
Chapter 14. Particle Systems
In this chapter, you’ll get back to work on the 3D game you’ve been building throughout most of the 3D section of this book. Specifically, you’ll be adding some particle effects to your game. Particle effects allow game developers to create exciting and realistic special effects such as smoke, fire, explosions, magic, and other effects that can make the gameplay experience more exciting and attractive.
To start with, let’s talk about particles. What is a particle? In game development terms, a particle typically represents a single component in a particle effect. A single spark in a firework, a single element in a smoke plume, and a single flickering light in a magical effect are all examples of particles. The combination of multiple particles flowing in a single special effect is what’s called a particle effect.
Particle engines are the driving mechanism behind particle effects. A particle engine manipulates multiple particles to create a particle effect by applying forces such as gravity and momentum to make the particles move and react in realistic ways.
Throughout this chapter, you’ll create a particle engine that creates explosion particle effects that you’ll plug into your game when a shot strikes an enemy ship.
Creating a Particle Engine
So let’s get to it. First, let’s examine what each individual particle will look like so we can get a better handle on what we’re trying to do. Each individual particle will be represented by four vertices, forming a square. You’ve done this before, so it shouldn’t be anything revolutionary. Also, you’ll be drawing a texture onto that square. The texture you’ll use is shown in Figure 14-1.

The actual texture file is simply a white shaded dot, as shown in Figure 14-1, but with a transparent background. The image in Figure 14-1 has a black background to give it some context in this book. If you haven’t already, download the source code for this chapter of the book. In the 3D Game3D GameContentTextures folder, you’ll find an image file called particle.png. Add it to your project by right-clicking the 3D GameContentTextures folder in Solution Explorer, selecting Add→Existing Item…, and then navigating to the particle.png file and selecting it.
Each of your particles will be a ball of light, shaded like the texture shown previously. But what fun is an explosion of white particles? You’ll want to add some random color to each particle. To do this, you’ll use another texture, which is shown in Figure 14-2.
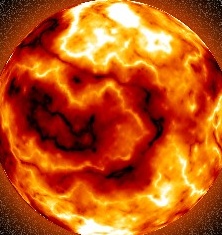
This texture will be used as a color map representing all the possible colors of your particles. Each time a particle is created, you’ll be pulling a random pixel from this texture, getting its color data, and assigning that to the new particle. Why use a picture of a red-hot sun? Simply because the reds, blacks, whites, and yellows in this texture represent a lot of colors you’d typically see in an explosion. In truth, you could swap this texture out for any texture you prefer and use those colors for your pixels. Go ahead and add this texture to your solution. In the 3D Game3D GameContentTextures folder, you’ll find an image file called ParticleColors.png. Add it to your project by right-clicking the 3D GameContentTextures folder in Solution Explorer, selecting Add→Existing Item…, and then navigating to the ParticleColors.png file and selecting it.
OK, now that we have an idea of how this will work, let’s get to
the code. You’ll be creating three new classes in this section: ParticleSettings, which will hold settings for
individual particles; ParticleExplosionSettings, which will hold
settings for individual explosions; and ParticleExplosion, which represents a single
explosion effect and will be responsible for moving, updating, and
drawing all the particles involved in an explosion effect.
Create a new class within your project called ParticleSettings, and replace the contents of
the ParticleSettings.cs file with the following
code:
namespace _3D_Game
{
    class ParticleSettings
    {
        // Size of particle
        public int maxSize = 2;
    }

    class ParticleExplosionSettings
    {
        // Life of particles
        public int minLife = 1000;
        public int maxLife = 2000;

        // Particles per round
        public int minParticlesPerRound = 100;
        public int maxParticlesPerRound = 600;

        // Round time
        public int minRoundTime = 16;
        public int maxRoundTime = 50;

        // Number of particles
        public int minParticles = 2000;
        public int maxParticles = 3000;
    }
}
As you can see, the only setting at the particle level is the
maximum size of each particle. When the ParticleExplosion class creates particles, it
will create them with a size greater than zero and less than this
maximum size.
In the ParticleExplosionSettings class, located in
the same code file, there are more settings. (In C#, it’s perfectly
legal to have multiple classes within the same file, and because these
two classes are so closely related, it makes sense to put them both in
your ParticleSettings.cs file.) The settings in
this class define different aspects of the particle effect, such as how
long the effect lasts, how many particles are used in the effect, etc.
All of this is explained in more detail in the following list.
Essentially, your ParticleExplosion class, when completed, will
function as follows:
Each particle in your explosion will be represented by four vertices, forming a square, with a colored texture drawn on the square.
When an instance of
ParticleExplosionis created, you’ll fill aVertexBufferwhich will contain the vertex data for your particles. The number of particles created by the explosion will be between theminParticlesandmaxParticlesvalues you defined. Therefore, the size of your vertex array will be the number of particles times four (four vertices for each particle).Your
ParticleExplosionclass will function in what we’ll call “rounds” of particles. A round is simply a time period indicating when new particles will be released from the explosion. Rounds will begin every X milliseconds, where X is between yourminRoundTimeandmaxRoundTimesettings. Every round, some number of particles betweenminParticlesPerRoundandmaxParticlesPerRoundwill be released from the explosion.Once the number of particles released by the
ParticleExplosionclass reaches the max number of particles, the explosion will not create any more particles.Every time the
Updatemethod is called in theModelManagerclass, theUpdatemethod of theParticleExplosionclass will be called. This method will cycle through all active particles and update their positions. Because we’re in outer space, there are no external forces such as gravity to deal with, so the particles will just move in a straight line designated by the direction stored in another array.A particle engine is also responsible for killing off particles once they expire. That is the purpose of the
minLifeandmaxLifesettings in your code. EachParticleExplosionwill be given a lifetime value greater thanminLifeand less thanmaxLife. Once the lifetime time limit has been reached for an explosion, it begins retiring particles in each round.Once all particles are retired, the explosion is over and will be deleted.
OK, now that you have an idea of how the ParticleExplosion class will work, let’s throw
it together. Create a new class within your project called ParticleExplosion. Make sure that you have the
following namespaces at the top of the file:
using System;
using Microsoft.Xna.Framework;
using Microsoft.Xna.Framework.Graphics;
Next, add the following class-level variables:
// Particle arrays and vertex buffer
VertexPositionTexture[] verts;
Vector3[] vertexDirectionArray;
Color[] vertexColorArray;
VertexBuffer particleVertexBuffer;

// Position
Vector3 position;

// Life
int lifeLeft;

// Rounds and particle counts
int numParticlesPerRound;
int maxParticles;
static Random rnd = new Random();
int roundTime;
int timeSinceLastRound = 0;

// Vertex and graphics info
GraphicsDevice graphicsDevice;

// Settings
ParticleSettings particleSettings;

// Effect
Effect particleEffect;

// Textures
Texture2D particleColorsTexture;

// Array indices
int endOfLiveParticlesIndex = 0;
int endOfDeadParticlesIndex = 0;
Here’s a rundown of what these variables will be used for:
vertsAn array of
VertexPositionTextureobjects that will store all vertices for all particles.vertexDirectionArrayAn array of
Vector3objects that will store the direction of each particle.vertexColorArrayAn array of
Colorobjects that will store the color of each particle.particleVertexBufferThe vertex buffer you’ll use to draw the particles.
positionThe position of the explosion, or the position from which new particles will emanate. This is also the position of the ship that was shot, triggering the explosion.
lifeLeftHow much life is left in the explosion before particles start being deleted.
numParticlesPerRoundHow many particles to create each round, and how many to remove each round once the explosion has no more life left.
maxParticlesThe total number of particles to be created by this explosion.
rndA random object from the
Game1class passed in via the constructor. This object is static because you want only one of these to exist for all explosion instances.roundTimeThe amount of time between particle rounds.
timeSinceLastRoundA counter to keep track of how much time is left until the next round begins.
graphicsDeviceThe graphics device passed in from the
Game1class.particleSettingsAn instance of the
ParticleSettingsclass, to apply those settings to particles being created.particleEffectThe HLSL effect that you’ll be using to draw your particles.
particleColorsTextureThis texture will contain a
Texture2Dobject that is actually a picture of an explosion. It will be used to determine random colors for each of your particles.endOfLiveParticlesIndexandendOfDeadParticlesIndexIndices into the array of
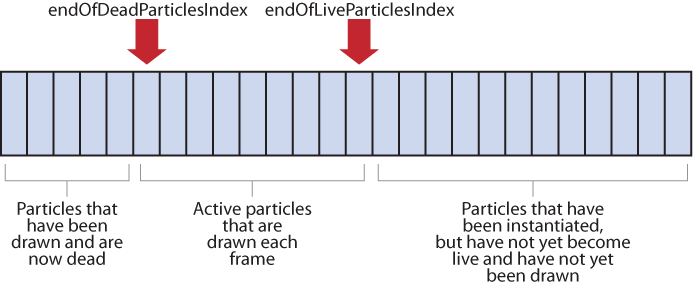
Particles. The entire array is instantiated when the explosion class is instantiated, but the only particles that are drawn are those that exist between theendOfDeadParticlesIndexand theendOfLiveParticlesIndex. As new particles are “created” each round, theendOfLiveParticlesIndexmoves down the array. As new particles are “deleted” each round, theendOfDeadParticlesIndexmoves down the list. Each time particles are drawn, the only ones being drawn are those that reside between the two indices.Figure 14-3 provides a graphical explanation of how the array of
Particles in theParticleExplosionclass functions. As theendOfDeadParticlesIndexandendOfLiveParticlesIndexmove from left to right, particles between the two indices are drawn. Particles to the left of both indices are dead, whereas particles to the right of both indices are not yet alive.
You’ll also need to provide a way for the ModelManager class to determine when an
explosion is finished. Add the following public property to the ParticleExplosion class:
public bool IsDead
{
    get { return endOfDeadParticlesIndex == maxParticles; }
}
Next, add a constructor to the ParticleExplosion class, as shown here:
public ParticleExplosion(GraphicsDevice graphicsDevice, Vector3 position,
    int lifeLeft, int roundTime, int numParticlesPerRound, int maxParticles,
    Texture2D particleColorsTexture, ParticleSettings particleSettings,
    Effect particleEffect)
{
    this.position = position;
    this.lifeLeft = lifeLeft;
    this.numParticlesPerRound = numParticlesPerRound;
    this.maxParticles = maxParticles;
    this.roundTime = roundTime;
    this.graphicsDevice = graphicsDevice;
    this.particleSettings = particleSettings;
    this.particleEffect = particleEffect;
    this.particleColorsTexture = particleColorsTexture;

    InitializeParticleVertices();

}
As you can see, there’s not a lot of magic happening here. Most of
the logic in the constructor is there just to copy the data from the
parameters to the class-level variables. At the end of the constructor,
there’s a call to InitializeParticles. This method will
instantiate the particle arrays and vertex buffer, setting positions,
random directions, random colors, and random sizes for each particle.
Add the InitializeParticles method
next, as follows:
private void InitializeParticleVertices()
{
    // Instantiate all particle arrays
    verts = new VertexPositionTexture[maxParticles * 4];
    vertexDirectionArray = new Vector3[maxParticles];
    vertexColorArray = new Color[maxParticles];

    // Get color data from colors texture
    Color[] colors = new Color[particleColorsTexture.Width *
        particleColorsTexture.Height];
    particleColorsTexture.GetData(colors);

    // Loop until max particles
    for (int i = 0; i < maxParticles; ++i)
    {
        float size = (float)rnd.NextDouble() * particleSettings.maxSize;

        // Set position, direction and size of particle
        verts[i * 4] = new VertexPositionTexture(position, new Vector2(0, 0));
        verts[(i * 4) + 1] = new VertexPositionTexture(new Vector3(position.X,
            position.Y + size, position.Z), new Vector2(0, 1));
        verts[(i * 4) + 2] = new VertexPositionTexture(new Vector3(position.X + size,
            position.Y, position.Z), new Vector2(1, 0));
        verts[(i * 4) + 3] = new VertexPositionTexture(new Vector3(position.X + size,
            position.Y + size, position.Z), new Vector2(1, 1));

        // Create a random velocity/direction
        Vector3 direction = new Vector3(
            (float)rnd.NextDouble() * 2 - 1,
            (float)rnd.NextDouble() * 2 - 1,
            (float)rnd.NextDouble() * 2 - 1);
        direction.Normalize();

        // Multiply by NextDouble to make sure that
        // all particles move at random speeds
        direction *= (float)rnd.NextDouble();

        // Set direction of particle
        vertexDirectionArray[i] = direction;

        // Set color of particle by getting a random color from the texture
        vertexColorArray[i] = colors[(
            rnd.Next(0, particleColorsTexture.Height) * particleColorsTexture.Width) +
            rnd.Next(0, particleColorsTexture.Width)];

    }

    // Instantiate vertex buffer
    particleVertexBuffer = new VertexBuffer(graphicsDevice,
        typeof(VertexPositionTexture), verts.Length, BufferUsage.None);

}
There’s a lot going on here, so let’s walk through it.
First, you’re instantiating the three arrays that will store the
data for your particles (verts,
vertexDirectionArray, and
vertexColorArray). Note that the direction and color
arrays are set to the size of maxParticles, whereas
the vertex array is set to maxParticles * 4. This is
because the vertex array will actually store four vertices for each
particle.
Next, you’re creating an array of Color objects
and using the GetData method from the
particleColorsTexture object to fill the array. The
GetData method of the Texture2D
object will copy the color data from the texture into an array of type
Color. You’ll be using this colors array later on to
assign random colors to particles.
Then, in the for loop, you build four vertices
for each particle, using a random size and setting the texture UV
coordinates accordingly. You also build a random direction for each
particle and assign it to the direction array.
You may have noticed the call to Normalize the direction vector, after the
random XYZ values are generated. Why would you need to do that? If you
didn’t, instead of your explosion particles exploding in a nice sphere,
they would explode in a cube formation. The reason? The range of random
values used to create the vector in the first place is from −1 to 1 in
X, Y, and Z. This will result in the longest vector horizontally being
(1, 0, 0) and the longest vector diagonally being (1, 1, 1), which, when
hundreds of particles are created using these random direction vectors,
will result in a cube formation. Remember that Normalize will make all vectors have a length
of 1, so normalizing the vectors will maintain the random directions,
but will change the magnitude of all the vectors to 1. That means you’ll
have a nice spherical shape—but it also means that all the particles
will have the same speed, which is not what you want. To fix that
problem, you multiply the vectors by a call to the NextDouble method from the Random object, which will vary the lengths of
the vectors.
Finally, at the end of the for loop you pull a
random color from the texture color array you built earlier in the
method and assign it to each particle via the
vertexColorArray.
At the end of the InitializeParticleVertices
method, you instantiate the vertex buffer you’ll use to draw the
particles.
Now you’ll need to code the Update method of the ParticleExplosion class. This method will be
responsible for moving the particles, as well as adding new particles
each round and removing old particles each round. Add the method as
follows:
public void Update(GameTime gameTime)
{
    // Decrement life left until it's gone
    if (lifeLeft > 0)
        lifeLeft -= gameTime.ElapsedGameTime.Milliseconds;

    // Time for new round?
    timeSinceLastRound += gameTime.ElapsedGameTime.Milliseconds;
    if (timeSinceLastRound > roundTime)
    {
        // New round - add and remove particles
        timeSinceLastRound -= roundTime;

        // Increment end of live particles index each
        // round until end of list is reached
        if (endOfLiveParticlesIndex < maxParticles)
        {
            endOfLiveParticlesIndex += numParticlesPerRound;
            if (endOfLiveParticlesIndex > maxParticles)
                endOfLiveParticlesIndex = maxParticles;
        }
        if (lifeLeft <= 0)
        {
            // Increment end of dead particles index each
            // round until end of list is reached
            if (endOfDeadParticlesIndex < maxParticles)
            {
                endOfDeadParticlesIndex += numParticlesPerRound;
                if (endOfDeadParticlesIndex > maxParticles)
                    endOfDeadParticlesIndex = maxParticles;
            }
        }
    }

    // Update positions of all live particles
    for (int i = endOfDeadParticlesIndex;
        i < endOfLiveParticlesIndex; ++i)
    {
        verts[i * 4].Position += vertexDirectionArray[i];
        verts[(i * 4) + 1].Position += vertexDirectionArray[i];
        verts[(i * 4) + 2].Position += vertexDirectionArray[i];
        verts[(i * 4) + 3].Position += vertexDirectionArray[i];

    }
}
Let’s take a closer look at the logic in this method. The method
first decrements the lifeLeft
variable by the amount of time that has passed since the last call to
Update. Remember that when the
lifeLeft variable hits zero, you’ll
start removing particles each round.
Next, the timeSinceLastRound
counter is incremented and checked to determine whether a new round
should begin. If it is time for a new round, new particles are added
to the list of drawn particles by
incrementing the value of the endOfLiveParticlesIndex variable. If the
index variable is already at the end of the array (designated by
maxParticles), no more particles are
added to the list of particles to draw.
Then, the lifeLeft variable is
checked to see whether its value is less than 1 (indicating that the
explosion’s life is over). If that is the case, the endOfDeadParticlesIndex variable is
incremented, which will cause particles to be removed from the list of
drawn particles. Once the endOfDeadParticlesIndex variable reaches the
end of the array, it will not move any further, and the IsDead property you added earlier will return
true (indicating to the ModelManager that the explosion has run its
course and is ready for deletion).
Finally, the method updates the positions of all particles that
are in the list to be drawn (i.e., all particles between the endOfDeadParticlesIndex and endOfLiveParticlesIndex variables).
Very nice. We’re getting close to the end! All you have to do now
is code up a Draw method for the
explosion. This code should be pretty straightforward, as it’s no
different than the code that you’ve written to draw with
previously:
public void Draw(Camera camera)
{
    graphicsDevice.SetVertexBuffer(particleVertexBuffer);

    // Only draw if there are live particles
    if (endOfLiveParticlesIndex - endOfDeadParticlesIndex > 0)
    {
        for (int i = endOfDeadParticlesIndex; i < endOfLiveParticlesIndex; ++i)
        {
            particleEffect.Parameters["WorldViewProjection"].SetValue(
                camera.view * camera.projection);
            particleEffect.Parameters["particleColor"].SetValue(
                vertexColorArray[i].ToVector4());

            // Draw particles
            foreach (EffectPass pass in particleEffect.CurrentTechnique.Passes)
            {
                pass.Apply();

                graphicsDevice.DrawUserPrimitives<VertexPositionTexture>(
                    PrimitiveType.TriangleStrip,
                    verts, i * 4, 2);

            }
        }
    }
}
The camera data is passed into the method as the only parameter. The first thing the method does is assign the vertex buffer to the graphics device.
Then, you’ll check to see whether there are any particles left to draw in this explosion. You’ll want to draw only if there are actually particles that need to be drawn (meaning that there are some particles in the array between the two index variables). If there are particles to draw, you begin looping through all live particles in the array.
For each live particle, you set the parameters of the Effect. There are two effect parameters: one
you should be familiar with by now, representing the world, view, and
projection matrices; and another representing the color for that
particle.
Next, you loop through each of the passes in the effect and begin
the pass by calling Apply. Notice the call to
DrawUserPrimitives and the fact that
it uses PrimitiveType.TriangleStrip for
drawing. Also, notice that the index of the particle (the variable
i from your for loop) provides the
key to find the spot where you should start pulling data from your
vertex array. There are four vertices per particle, so i *
4 will give you the starting point for each particle. The
final parameter is how many primitives (in this case, two) you want to
draw.
That’s all there is to it. You now have a custom vertex, some settings classes to help determine how things will function, and an explosion class to manipulate and draw your particles. Very impressive! Now it’s time to create the effect file you’ll use to draw your particles.
Adding a Particle Effect File
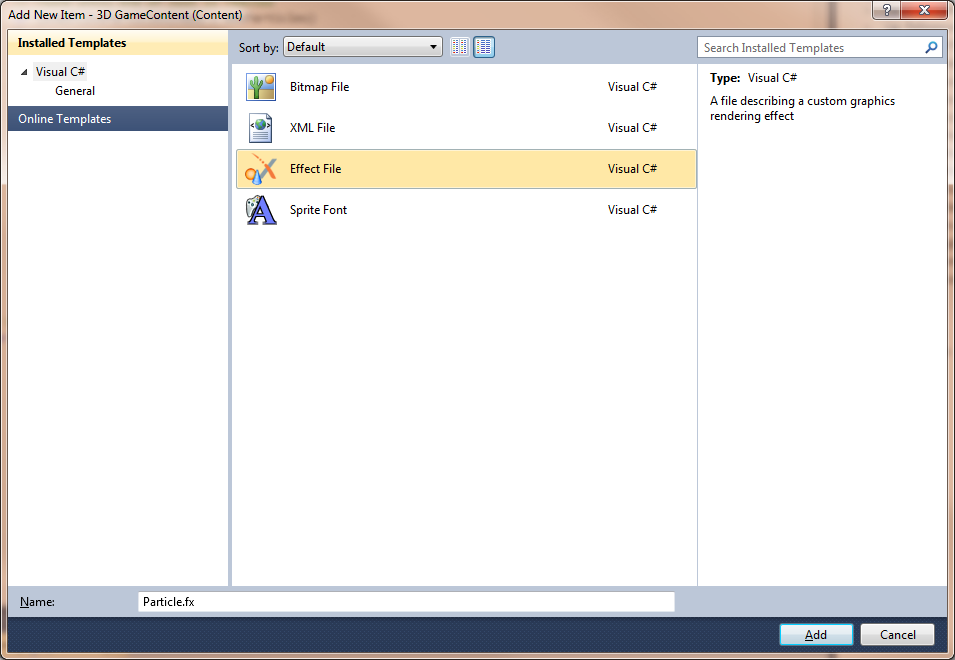
First, you’ll want to create a folder for your effects. Right-click the Content node in Solution Explorer and select Add→New Folder. Name the folder Effects. Then, right-click the new ContentEffects folder and select Add→New Item…. Select the Effect File template on the right side of the window and name the file Particle.fx, as shown in Figure 14-4.
Replace all of the code in your new Particle.fx file with the following effect code:
float4x4 WorldViewProjection;
Texture theTexture;
float4 particleColor;

sampler ColoredTextureSampler = sampler_state
{
	texture = <theTexture> ;
	magfilter = LINEAR;
	minfilter = LINEAR;
	mipfilter= POINT;
	AddressU = Clamp;
	AddressV = Clamp;
};

struct VertexShaderInput
{
	float4 Position : POSITION0;
	float2 textureCoordinates : TEXCOORD0;
};

struct VertexShaderOutput
{
	float4 Position : POSITION0;
	float2 textureCoordinates : TEXCOORD0;
};

struct PixelShaderInput
{
	float2 textureCoordinates : TEXCOORD0;
};

VertexShaderOutput VertexShaderFunction(VertexShaderInput input)
{
	VertexShaderOutput output;
	output.Position = mul(input.Position, WorldViewProjection);
	output.textureCoordinates = input.textureCoordinates;
	return output;
}

float4 PixelShaderFunction(PixelShaderInput input) : COLOR0
{
	float4 color = tex2D( ColoredTextureSampler, input.textureCoordinates);
	color.r = particleColor.r * color.a;
	color.g = particleColor.g * color.a;
	color.b = particleColor.b * color.a;
	return color;
}

technique Technique1
{
	pass Pass1
	{
		VertexShader = compile vs_2_0 VertexShaderFunction( );
		PixelShader = compile ps_2_0 PixelShaderFunction( );
	}
}
Most of this code should be somewhat familiar to you, as it’s very similar to some of the examples in the previous chapter. Notice that you have a texture and a texture sampler. The texture coordinates are sent into the vertex shader input, then sent out to the vertex shader output, and finally into the pixel shader input.
Also notice the particleColor variable at the
top of the file. This is the variable to which you assigned a random
color for each particle. In your pixel shader function you can see that
the method first pulls the color of the pixel from the texture for the
particle. Remember earlier in the chapter when we discussed the two
textures you’ll use for each particle? The texture we’re talking about
now is the particle.png
texture—the shaded white circle. Next, the pixel shader function
modifies the color pulled from the
particle.png texture by
assigning it the RBG values from the color you passed into the effect
(which was the random color you assigned it from the
particleColors.png texture) and
multiplying those values by the alpha value from the pixel. This allows
you to keep the nice, round, shaded circle for each particle but also
give the pixel the random color you wanted.
Why multiply the pixel color by the alpha value? Remember, your particles are square: you’re just putting a circle-shaped texture on them so they don’t look square. If you ignore the alpha (transparent) value for each pixel and simply slap a color on them, each pixel in the square will be drawn with that color, and you’d end up with lame-looking square particles. And come on, admit it, nobody wants square particles.
Adding Your Particle Engine to Your Game
Now that you have an effect and a particle engine, you need to modify your code to create explosions when ships are hit.
Open the ModelManager class,
and let’s get to work on adding some cool explosions to your game. Add
the following class-level variables:
List<ParticleExplosion> explosions = new List<ParticleExplosion>();
ParticleExplosionSettings particleExplosionSettings = new ParticleExplosionSettings();
ParticleSettings particleSettings = new ParticleSettings();
Texture2D explosionTexture;
Texture2D explosionColorsTexture;
Effect explosionEffect;
These variables are all pretty self-explanatory: you have a list
of ParticleExplosions so your class
can update and draw them; an instance of both settings classes for your
particles; and Effect and Texture2D objects for drawing your particles,
an explosion texture, an explosion colors texture, and an effect.
Next, you’ll need to load the resources for your particles, set
the current technique of your particle effect, and set the texture for
that effect as well. Modify the LoadContent method in your ModelManager class as follows:
protected override void LoadContent()
{
    // Load explosion textures and effect
    explosionTexture = Game.Content.Load<Texture2D>(@"TexturesParticle");
    explosionColorsTexture = Game.Content.Load<Texture2D>(@"TexturesParticleColors");
    explosionEffect = Game.Content.Load<Effect>(@"effectsparticle");

    // Set effect parameters that don't change per particle
    explosionEffect.CurrentTechnique = explosionEffect.Techniques["Technique1"];
    explosionEffect.Parameters["theTexture"].SetValue(explosionTexture);

    base.LoadContent();
}
In addition to loading your texture and effect, this code sets the current technique and the texture parameters of the effect, as those will not change throughout the course of the game.
Now, in the UpdateShots method
of the ModelManager, you’ll need to
find the place where you determine whether a shot hits a ship. It’s the
only place in the class where you’re calling the BasicModel CollidesWith method. The current
code should look something like this:
if (shots[i].CollidesWith(models[j].GetModel,
    models[j].GetWorld(  )))
{
    // Collision! remove the ship and the shot.
    models.RemoveAt(j);
    shots.RemoveAt(i);
    −−i;
    ((Game1)Game).PlayCue("Explosions");
    break;
}
Add the following lines of code at the top of the block, within
that if(... CollidesWith...)
statement (added lines are in bold):
if (shots[i].CollidesWith(models[j].GetModel,
    models[j].GetWorld(  )))
{
    // Collision! add an explosion.
    explosions.Add(new ParticleExplosion(GraphicsDevice,
        models[j].GetWorld().Translation,
        ((Game1)Game).rnd.Next(
            particleExplosionSettings.minLife,
            particleExplosionSettings.maxLife),
        ((Game1)Game).rnd.Next(
            particleExplosionSettings.minRoundTime,
            particleExplosionSettings.maxRoundTime),
        ((Game1)Game).rnd.Next(
            particleExplosionSettings.minParticlesPerRound,
            particleExplosionSettings.maxParticlesPerRound),
        ((Game1)Game).rnd.Next(
            particleExplosionSettings.minParticles,
            particleExplosionSettings.maxParticles),
        explosionColorsTexture, particleSettings,
        explosionEffect));

    // Remove the ship and the shot
    models.RemoveAt(j);
    shots.RemoveAt(i);
    −−i;
    ((Game1)Game).PlayCue("Explosions");
    break;
}
This might look like a lot of code, but really all it’s doing is
creating a new ParticleExplosion
using the location of the ship (via the ship’s world matrix Translation method) and using random values
for the settings, as defined in your settings classes.
Although this will create an explosion, your class still needs to
update the explosion and draw it in each frame. Add the following method
to the ModelManager class to update
explosions and remove them once they are finished:
protected void UpdateExplosions(GameTime gameTime)
{
    // Loop through and update explosions
    for (int i = 0; i < explosions.Count; ++i)
    {
        explosions[i].Update(gameTime);
        // If explosion is finished, remove it
        if (explosions[i].IsDead)
        {
            explosions.RemoveAt(i);
            --i;
        }
    }
}
Then, call the UpdateExplosions
method at the end of the Update
method, just before the call to base.Update:
// Update explosions
UpdateExplosions(gameTime);
This code will update each explosion in the list by calling the
explosion’s Update method. In
addition, if an explosion is finished (determined by the IsDead accessor), it is removed from the
list.
Finally, in the Draw method of
your ModelManager class, add the
following code to loop through all explosions and call their Draw methods immediately before the call to
base.Draw:
// Loop through and draw each particle explosion
foreach (ParticleExplosion pe in explosions)
{
pe.Draw(((Game1)Game).camera);
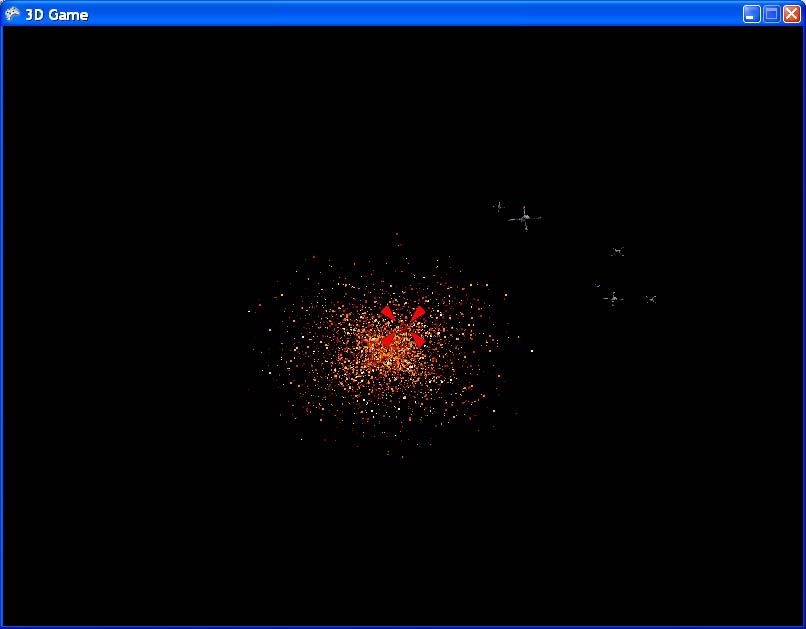
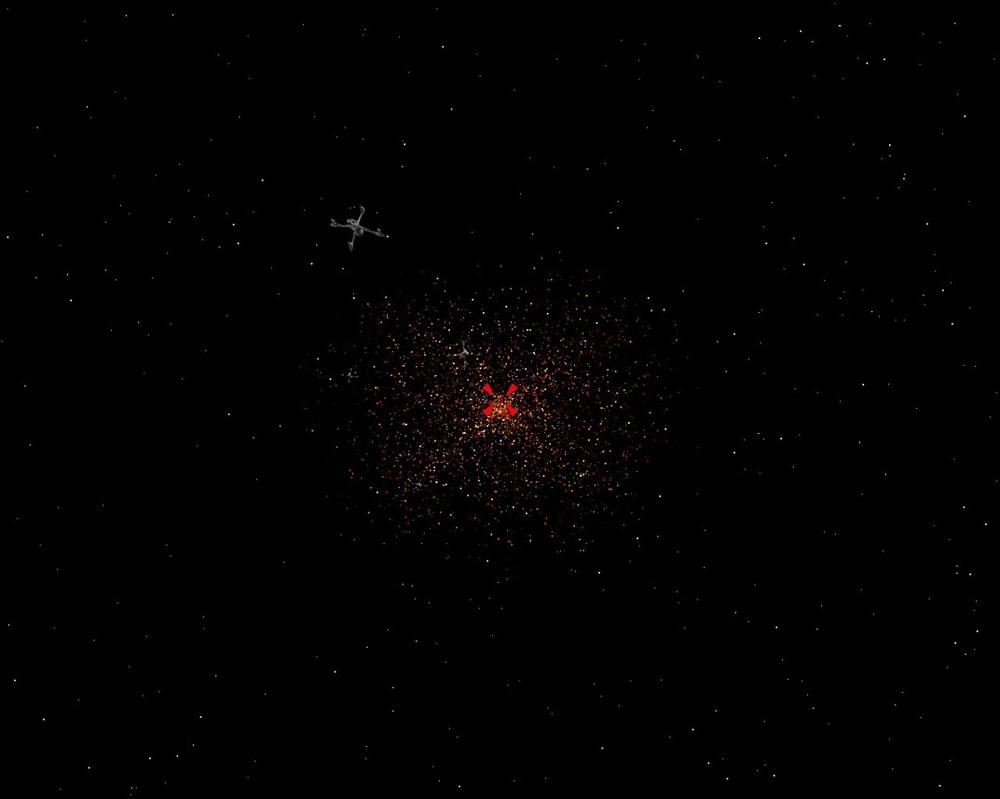
}Boom! You’re ready to go! Nice work. Compile and run the game and see what happens when you blow an enemy to oblivion. You should see a cool explosion effect like the one pictured in Figure 14-5.
Adding a Starfield
Given the way that you’ve created your particles and your
particle engine, you’re perfectly
set up for creating a field of stars in the background to make this look
more like outer space. To do this, you’ll
need to create a new version of your ParticleExplosion class that treats the particles
a little bit differently. For example, the particles you use for stars
in the background won’t move around the screen the way the ones in the
explosions do. You also won’t be deleting stars from the list of stars
to draw, nor will your star particle engine die out at some time: the
stars will be the same at the end of the game as they were at the
beginning.
Add a new class to your project by right-clicking the solution and selecting Add→Class…. Name the class ParticleStarSheet. Then, replace the code in the file that is generated with the following:
using System;
using Microsoft.Xna.Framework;
using Microsoft.Xna.Framework.Graphics;

namespace _3D_Game
{
    class ParticleStarSheet
    {
        // Particle arrays and vertex buffer
        VertexPositionTexture[] verts;
        Color[] vertexColorArray;
        VertexBuffer particleVertexBuffer;

        // Behavior variables
        Vector3 maxPosition;
        int maxParticles;
        static Random rnd = new Random();

        // Vertex and graphics info
        GraphicsDevice graphicsDevice;

        // Settings
        ParticleSettings particleSettings;

        // Effect
        Effect particleEffect;

        // Textures
        Texture2D particleColorsTexture;


        public ParticleStarSheet(GraphicsDevice graphicsDevice,
            Vector3 maxPosition, int maxParticles, Texture2D particleColorsTexture,
            ParticleSettings particleSettings, Effect particleEffect)
        {
            this.maxParticles = maxParticles;
            this.graphicsDevice = graphicsDevice;
            this.particleSettings = particleSettings;
            this.particleEffect = particleEffect;
            this.particleColorsTexture = particleColorsTexture;
            this.maxPosition = maxPosition;

            InitializeParticleVertices();

        }

        private void InitializeParticleVertices()
        {
            // Instantiate all particle arrays
            verts = new VertexPositionTexture[maxParticles * 4];
            vertexColorArray = new Color[maxParticles];            // Get color data from colors texture
            Color[] colors = new Color[particleColorsTexture.Width *
                particleColorsTexture.Height];
            particleColorsTexture.GetData(colors);

            // Loop until max particles
            for (int i = 0; i < maxParticles; ++i)
            {
                float size = (float)rnd.NextDouble() * particleSettings.maxSize;

                Vector3 position = new Vector3(
                    rnd.Next(-(int)maxPosition.X, (int)maxPosition.X),
                    rnd.Next(-(int)maxPosition.Y, (int)maxPosition.Y),
                    maxPosition.Z);

                // Set position and size of particle
                verts[i * 4] = new VertexPositionTexture(position, new Vector2(0, 0));
                verts[(i * 4) + 1] = new VertexPositionTexture(
                    new Vector3(position.X, position.Y + size, position.Z),
                    new Vector2(0, 1));
                verts[(i * 4) + 2] = new VertexPositionTexture(
                    new Vector3(position.X + size, position.Y, position.Z),
                    new Vector2(1, 0));
                verts[(i * 4) + 3] = new VertexPositionTexture(
                    new Vector3(position.X + size, position.Y + size, position.Z),
                    new Vector2(1, 1));

                // Set color of particle by getting a random color from the texture
                vertexColorArray[i] = colors[(rnd.Next(0,
                    particleColorsTexture.Height) *
                    particleColorsTexture.Width) +
                    rnd.Next(0, particleColorsTexture.Width)];

            }

            // Instantiate vertex buffer
            particleVertexBuffer = new VertexBuffer(graphicsDevice,
                typeof(VertexPositionTexture), verts.Length, BufferUsage.None);

        }


        public void Draw(Camera camera)
        {
            graphicsDevice.SetVertexBuffer(particleVertexBuffer);

            for (int i = 0; i < maxParticles; ++i)
            {
                particleEffect.Parameters["WorldViewProjection"].SetValue(
                    camera.view * camera.projection);
                particleEffect.Parameters["particleColor"].SetValue(
                    vertexColorArray[i].ToVector4());

                // Draw particles
                foreach (EffectPass pass in particleEffect.CurrentTechnique.Passes)
                {
                    pass.Apply();

                    graphicsDevice.DrawUserPrimitives<VertexPositionTexture>(
                        PrimitiveType.TriangleStrip,
                        verts, i * 4, 2);

                }
            }
        }
    }
}
I won’t go into a lot of detail about this class, because there’s
nothing here that you didn’t see in the previous class you created. One
key difference is that this class accepts a Vector3 parameter called maxPosition. Whereas the ParticleExplosion class used the position of
the exploding ship as an initial position for all its particles, this
class will instead use random X and Y values and a constant Z value for
the positions of all of its particles. This maxPosition variable is used in such a way
that all star particles will have positions between -maxPosition.X and +maxPosition.X, -maxPosition.Y and +maxPosition.Y, and maxPosition.Z.
The other key difference between this class and the ParticleExplosion class is that this class
draws all particles in the array and doesn’t move or delete them (notice
the Update method is missing altogether). All the
logic for rounds is gone as well.
To use this class, you’ll want to add a different texture for the stars. Stars will be more white and yellow than the particles in your explosions, which are often red and brown. In the 3D Game3D GameContentTextures folder included with the source code for this chapter, there is a file called Stars.png. Add it to your project by right-clicking the 3D GameContentTexturesfolder in Solution Explorer, selecting Add→Existing Item…, and navigating to the Stars.png file and selecting it.
Now, add the following class-level variables to your ModelManager class:
ParticleStarSheet stars;
Effect starEffect;
Texture2D starTexture;
Next, in the LoadContent method
of your ModelManager class, add the
following code just before the call to base.LoadContent:
// Load star texture and effect
starTexture = Game.Content.Load<Texture2D>(@"texturesstars");
starEffect = explosionEffect.Clone();
starEffect.CurrentTechnique = starEffect.Techniques["Technique1"];
starEffect.Parameters["theTexture"].SetValue(explosionTexture);

// Initialize particle star sheet
stars = new ParticleStarSheet(
    GraphicsDevice,
    new Vector3(2000, 2000, -1900),
    1500, starTexture,
    particleSettings,
    starEffect);
In this code, you first load the texture into the Texture2D object, and then you take the
explosion effect and make a copy of it using the Clone method. This will create a duplicate
(but separate) effect. You do this so you can set the theTexture variable within the HLSL file
differently for stars and explosions.
The other thing you’re doing here is creating an initial
starfield. This is done here because stars will exist throughout the
game, rather than only at certain times such as with the explosions.
Notice also that you’re assigning the
explosionTexture to the theTexture
parameter of the star effect. This is because you’ll still use that
texture to create the round shape of the stars. You’re using the new
starTexture only for the color of the stars, which is
why you pass it into the constructor of the ParticleStarSheet
object.
Your stars never need to be updated because they won’t ever move,
so all that’s left to do is to add a line of code that will draw the
stars. Add the following line to the Draw method of your ModelManager class just before the call to
base.Draw:
stars.Draw(((Game1)Game).camera);
Not bad at all. You’re now using your Particle struct for stars and explosions.
Compile and run the game and see how much better it looks with some
stars in the background. You should see something like the image shown
in Figure 14-6.
Well, you’re almost done. The game is looking nice, and things are really coming together. All that’s left now is to add some scoring and make your game levels work, and you’ll have finished your first awesome XNA 3D game!
What You Just Did
Before we get into all of that, let’s review what you did this chapter:
You learned about particles and particle systems.
You created a particle engine that moves, adds, and removes particles to create a sphere-shaped explosion.
You created an HLSL effect file that sets the shape of a particle based on one texture and the color based on a different texture.
You created a starfield background using a modified particle engine that draws particles but doesn’t remove them or move them around.
Summary
A particle is simply a way of representing a single element within a group of elements that form a particle effect, such as an explosion or some magical spell effect.
A particle engine is a mechanism that manipulates, adds, removes, and draws particles to make up a particle effect. Often, particle engines simulate gravity and other external forces to make particle effects look more realistic.
Particle engines can be used for more than just cool effects. You can build things such as star sheets with a very similar model.
Anyone who knows XNA and can create sweet particle effects will have more friends than they know what to do with.