
![]()
Working with D3
In the various sections of this chapter, and as you delve deeper into the aspects of the library in the next chapters, you’ll be able to appreciate that D3 has a unique and innovative structure. First of all, it does not use jQuery, but it reproduces all the features necessary for data visualization. Whereas in the jqPlot and Highcharts libraries, chart components are already created, requiring the users only to adjust their properties via the options object, D3 has virtually the opposite approach.
The D3 library allows you to build any representation, starting with the most basic graphical elements such as circles, lines, squares, and so on. Certainly, such an approach greatly complicates the implementation of a chart, but at the same time, it allows you to develop completely new graphical representations, free from having to follow the preset patterns that the other graphic libraries provide.
Thus, in the course of this chapter, you’ll become acquainted with the basic concepts that underlie this library. You’ll also find out how to manipulate the various Document Object Model (DOM) elements, especially the creation of Scalable Vector Graphics (SVG) elements, which are the essential building blocks of the graphical representations.
The chapter closes with a brief introduction to the transformations and transitions of SVG elements.
You’ll start with an introduction to this wonderful library.
FIREBUG: DEBUGGING D3 CODE
Before beginning with some practical examples, I would like to remind you to use FireBug for debugging. At the least, be sure to get a good debugging tool in JavaScript that allows you to view the DOM tree of the web page upon which you’ll be working (see the “FireBug and DevTool” section in Chapter 1).
Using a debugging tool with the D3 library is essential, given that unlike the other libraries you have seen, it is not structured with premodeled objects. With D3, it is necessary to start from scratch, implementing all the chart elements one by one. Therefore, those who are familiar with development will realize that choosing a good debugging tool is essential to solving any problems that arise.
With FireBug it is possible to edit, debug, and monitor CSS, SVG, and HTML. You can change their values in real time and see the effects. It also provides a console where you can read out the log, which is suitably placed within the JavaScript code to monitor the content of the variables used. This can be achieved by calling the log() function of the console object and passing the variable interested as argument:
console.log (variable);
It is possible to add some text for reference, as well:
console.log ("this is the value:");
You will see that, when working with D3, FireBug is crucial for inspecting the dynamic structures of SVG elements that JavaScript generates in the DOM.
Introducing D3
D3 is a JavaScript library that allows direct inspection and manipulation of the DOM, but is intended solely for data visualization. It really does its job excellently. In fact, the name D3 is derived from data-driven documents. D3 was developed by Mike Bostock, the creator of the Protovis library, which D3 is designed to replace.
This library is proving to be very versatile and powerful, thanks to the technologies upon which it is based: JavaScript, SVG, and CSS. D3 combines powerful visualization components with a data-driven approach to DOM manipulation. In so doing, D3 takes full advantage of the capabilities of the modern browser.
D3 allows you to bind arbitrary data to the DOM. Its strength is its capability to affect several transformations of the document. For example, a set of data could be converted into an interactive SVG graphical structure such as a chart.
If you are familiar with other JavaScript frameworks specialized in web chart representation (i.e. jqPlot), you know that their strength is that they provide structured solutions, which you manipulate through the settings of options. Instead, the strength of D3 is precisely the opposite. It provides the building blocks and tools to assemble structures based on SVG. The result of this approach is the continuous development of new structures, which are graphically rich and open to all sorts of interactions and animations. D3 is the perfect tool for those who want to develop new graphics solutions for aspects not covered by existing frameworks.
Differently from the other JavaScript graphic libraries, D3 does not use the jQuery library to handle the DOM elements, but it has many similar concepts in it, including the method-chaining paradigm and the selections. It provides a jQuery-like interface to the DOM, which means you don’t need to know all the features of SVG in much detail. In order to handle the D3 code, you need to be able to use objects and functions and to understand the basics of SVG and CSS, which are used extensively. The sacrifices that go into mastering all of this knowledge are rewarded with the amazing visualizations you can create.
SVG provides the building blocks for the artwork; it allows you to draw all the basic shape primitives such as lines, rectangles, and circles, as well as text. It allows you to build complex shapes with paths.
Starting with a Blank HTML Page
It’s time to practice the concepts just outlined. First, start with a blank page, shown in Listing 2-1. This will be the starting point for all of the D3 examples.
Listing 2-1. Ch2_01a.html
<!DOCTYPE html>
<html>
<head>
<meta charset="utf-8">
<script src="http://d3js.org/d3.v3.js"></script>
<style>

    // CSS Style here

</style>
</head>
<body>

    <!-- HTML elements here -->

<script type="text/javascript">

    // D3 code here

</script>
</body>
</html>
Although, at first glance, you see only a simple HTML blank page, there are some small measures you must take when you work with D3. The most simple and clear measure is to include the library D3:
<script src="../src/d3.v3.js"></script>
Or if you prefer to use a content delivery network (CDN) service:
<script src="http://d3js.org/d3.v3.js"></script>
When entering the URL of the remote D3 library, make sure that the website always includes the latest version. Another measure, which is less obvious, is to add the <head> of the page:
<meta charset="utf-8">
If you do not specify this row, you will soon find out that the D3 code you added does not run. Last, but not least, where you add the various parts of the code is very important. It is advisable to include all the JavaScript code of D3 at the end of the <body> section, after all the HTML elements.
Using Selections and Operators
To start working with D3, it is necessary to become familiar with the concept of selections. Having to deal with selections involves the use of three basic objects:
- Selections
- Selectors
- Operators
A selection is an array of node elements extracted from the current document. In order to extract a specific set of elements (selection), you need to use selectors. These are patterns that match elements in the tree structure of the document. Once you get a selection, you might wish to perform some operations on it and so you use operators. As a result of their operation, you get a new selection, and so it is possible to apply another operator, and so on.
Selectors and operators are defined by the W3C (World Wide Web Consortium) APIs and are supported by all modern browsers. Generally, you’ll operate on HTML documents, and so you’ll work on the selection of HTML elements.
To extract a selection from a document, D3 provides two methods:
- select
- selectAll
d3.select("selector") selects the first element that matches the selector, returning a selection with only one element.
d3.selectAll("selector") instead selects all elements that match the selector, returning a selection with all these elements.
There is no better way to understand these concepts than to do so gradually, with some simple examples. Starting from the HTML page just described, add two paragraphs containing some text and then make a selection with D3 (see Listing 2-2).
Listing 2-2. Ch2_01a.html
<body>
<p>First paragraph</p>
<p>Second paragraph</p>
<script type="text/javascript">
    var selection = d3.select("p");
    console.log(selection);
</script>
</body>
d3.select is the top-level operator; "p" is the selector; and the selection is the returned value of the operator you assign to a variable. With this D3 command, you want to select the first element <p> in the web page. Using the log function, you can see the selection with FireBug in Figure 2-1.

Figure 2-1. The FireBug console enables you to see the content of the selection
Since you used the select() method, you have a selection with only one element, although in the web page there are two. If you want to select both, you use selectAll(), as in Listing 2-3.
Listing 2-3. Ch2_01b.html
<script type="text/javascript">
    var selection = d3.selectAll("p");
    console.log(selection);
</script>
Figure 2-2 shows both elements.
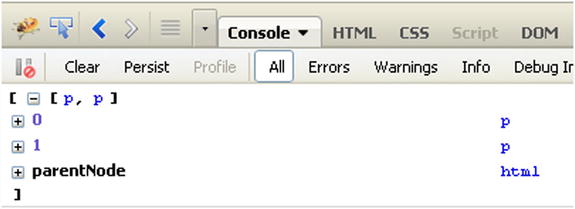
Figure 2-2. FireBug shows the selection of all the <p> elements in the web page
Now you have a selection with two elements. The great innovation that jQuery and D3 introduce with the concept of selection is that for loops are no long necessary. Instead of coding recursive functions to modify elements, you can operate on entire selections at once.
Once you have learned to make selections, it is time to apply operators to them.
An operator is a method that’s applied to a selection, or generally to a set of elements, and it specifically “operates” a manipulation. For example, it can get or set a property of the elements in the selection, or can act in some way on their content. For example, you may want to replace existing text with new text. For this purpose, you use the text() operator, shown in Listing 2-4.
Listing 2-4. Ch2_02.html
<body>
<p>First paragraph</p>
<p>Second paragraph</p>
<script type="text/javascript">
    var selection = d3.selectAll("p");
    selection.text("we add this new text");
</script>
</body>
The page now reports twice for the same text, where before there were two paragraphs (see Figure 2-3).
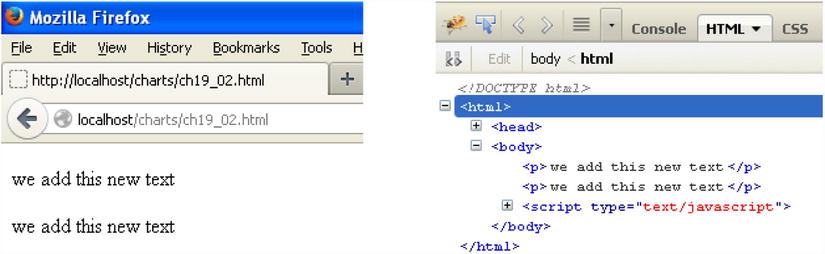
Figure 2-3. The text contained in the two <p> elements has been replaced in the browser on the left and is shown in FireBug on the right
You defined the variable selection and then applied the operator to this variable. But there is another way to write all this; you can use the methods of chain functionality, especially when you apply multiple operators to the same selection.
d3.selectAll("p").text("we add this new text");
You have seen that by passing a parameter to the text() operator, you are going to replace the existing text. So it is as if the function were setText("new text"). But you do not always want that. If you do not pass any arguments, the function will have a different behavior. It will return the value of the text already present. This can be very useful for further processing, or for assigning this string value to a variable or an array. Therefore, without parameters, it is as if it were getText().
var text = d3.select("p").text();
console.log(text);
The text variable contains the "First paragraph" string (see Figure 2-4).
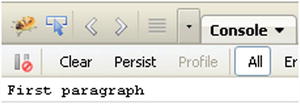
Figure 2-4. The FireBug console shows the text contained in the selection
There are operators for every kind of object upon which you’d want operate. These operators can set the content of:
- Attributes
- Styles
- Properties
- HTML
- Text
You just saw the text() operator in action. Next, you’ll see some of the other operators.
![]() Note If you want to learn more about operators, I suggest you visit the API reference for the D3 library at this link: https://github.com/mbostock/d3/wiki/API-Reference.
Note If you want to learn more about operators, I suggest you visit the API reference for the D3 library at this link: https://github.com/mbostock/d3/wiki/API-Reference.
For example, it is helpful to be able to change a CSS style and you can do so with the style() operator. Listing 2-5 replaces the existing text using text() and then modifies its style to be written in red, adding the style() operator to the methods chain.
Listing 2-5. Ch2_03.html
<body>
<p>Existing black text</p>
<script type="text/javascript">
    d3.selectAll("p").style('color','red').text("New red text");
</script>
</body>
Figure 2-5 shows the original text on the left and the newly styled text on the right.
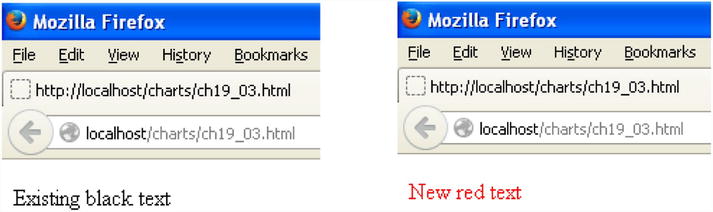
Figure 2-5. The original text is replaced by the new red text, applying the chain method upon the selection
Another operator, attr(), acts at the level of attributes of elements. This operator will be used when you create new SVG elements; in fact, it allows you to define the attributes while you are creating the tags, before inserting them in the web page. Here you can see how it can modify an existing attribute. In Listing 2-6, you’re changing the alignment of a title to be displayed in the middle of the page (see Figure 2-6).
Listing 2-6. ch2_04.html
<body>
<h1>Title</h1>
<script type="text/javascript">
    d3.select('h1').attr('align','center'),
</script>
</body>

Figure 2-6. With the D3 library it is possible to dynamically add a title to a web page
Creating New Elements
Now that you have seen how to act at the level of elements and how to modify both attributes and content, it is time to see how to create new items. To do this, D3 provides a number of operators (https://github.com/mbostock/d3/wiki/API-Reference), among which the most commonly used are:
This section shows how the html() method operates. You always start from a selection and then apply this operator to add an element inside. For example, you select a particular tag as a container, and then write a string that is passed as an argument. The string then becomes the content of the tag (see Listing 2-7).
Listing 2-7. Ch2_05.html
<body>
<p>A paragraph</p>
<script type="text/javascript">
    d3.select('p').html("<h1>New Paragraph</h1>");
</script>
</body>
Here, you first select the <p> tag with select() and then with html() you replace its contents with a new element, <h1>. Figure 2-7 shows the original text on the left and the newly formatted version on the right.
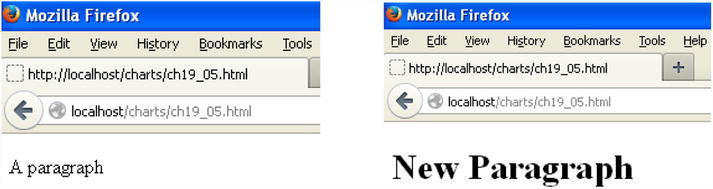
Figure 2-7. The text in a paragraph element <p> is replaced with a heading element <h>
You can see this change better, using FireBug (see Figure 2-8)
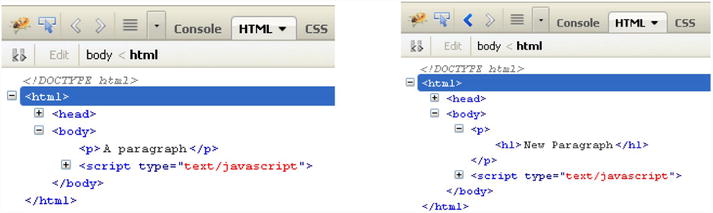
Figure 2-8. FireBug clearly shows the insertion of the head element (on the right) to replace the content of the paragraph element (on the left)
Practically, the html() function replaces the contents of the selection with the HTML code passed as an argument. Exactly as its name suggests, this function allows you to dynamically write HTML code within the elements of the selection.
Another popular method for adding elements is append().
Recall that when you’re using the html() operator, the content of the selected tag, if any, is replaced with the new one passed as an argument. The append() operator instead adds a new element, passed as its argument, to the end of all the existing elements contained in the selected tag. The content of the newly created element must be added to the chain of methods, using text() if it is only a string, or append(), html() or insert() if it is a further element.
In order to understand this last point, add an unordered list <ul> with some items containing fruit names to the page (see Figure 2-9).

Figure 2-9. An unordered list of three fruits
Say that you now want to add Oranges to this list. In order to do this, you must select the unordered list tag <ul> and then use append() to add a list item tag <li>. But append() creates only the tag, so in order to insert the string "Oranges" inside it, you need to add the text() operator to the chain of methods (see Listing 2-8).
Listing 2-8. Ch2_06.html
<body>
<ul>
    <li>Apples</li>
    <li>Pears</li>
    <li>Bananas</li>
</ul>
<script type="text/javascript">
    d3.select('ul').append('li').text("Oranges");
</script>
</body>
Figure 2-10 shows the list with the added element.
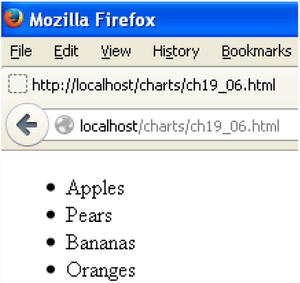
Figure 2-10. Using the append() operator, you have added the Oranges item to the end of the list
Figure 2-11 shows it in FireBug.
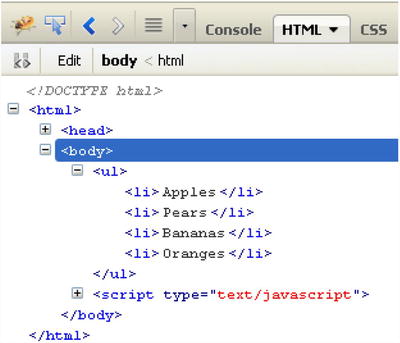
Figure 2-11. FireBug shows the HTML structure with the added <li> element
In this case, you have used simple text as the content for the new element added to the list, but the append() operator can do more. In fact, as previously noted, the content of an element may be yet another element. This allows you to create an entire tree of HTML elements, all by exploiting a chain method. In fact, the content of the new element created by the append() operator can in turn be created by another operator, such as another append() operator. Look at Listing 2-9. It is a simple example that will help you better understand this concept.
Listing 2-9. Ch2_06b.html
<body>
<ul>
    <li>Apples</li>
    <li>Pears</li>
    <li>Bananas</li>
</ul>
<script type="text/javascript">
    d3.select('ul').append('li').text("Citrus fruits");
    d3.select('ul').append('ul').append('li').text("Oranges");
    d3.select('ul').select('ul').append('li').text("Lemons");
    d3.select('ul').select('ul').append('li').text("Grapefruits");
</script>
</body>
This time, you want to create a sub-category of fruits, Citrus fruits, in which we shall assign the Oranges, Lemons, and Grapefruits items. In order to do this, you need to add a new list item <li> with the string "Citrus fruits" as its content. This works the same way as in the previous example, concatenating the text() operator just after the append() operator. Then you need to create a new list item. This time, its content is an unordered list. Thus, you need to concatenate two append() operators in order to create a list item <li> element nested in an unordered list <ul> element. You can then add two other new elements to the nested unordered list, again with the append() operator.
Figure 2-12 shows the new nested list of citrus fruits on the browser and the HTML structure that generates it on FireBug.
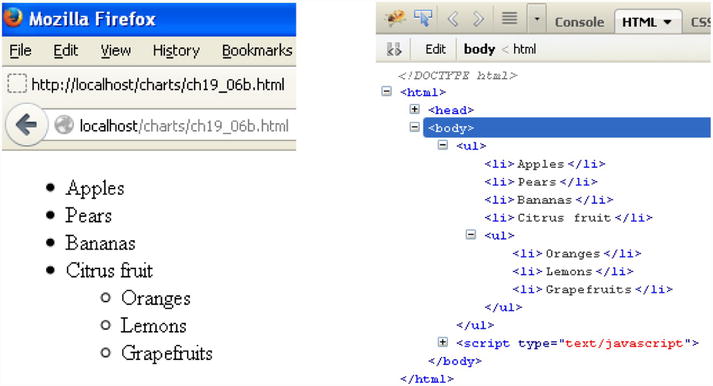
Figure 2-12. FireBug shows the HTML structure with a nested unordered list in the browser on the left and in FireBug on the right
The last operator, insert(), has a particular behavior. If you use it with only one argument, it behaves as if you were using append(). Normally, it is used with two arguments. The first indicates the tag to add, and the second is the matching tag where you want to insert it. In fact, replace append() with insert() in the preceding fruit list example, and you will obtain a different result, shown in Figure 2-13 (the original list is on the left and new one with Oranges added is on the right).
d3.select('ul').insert('li','li').text("Oranges");
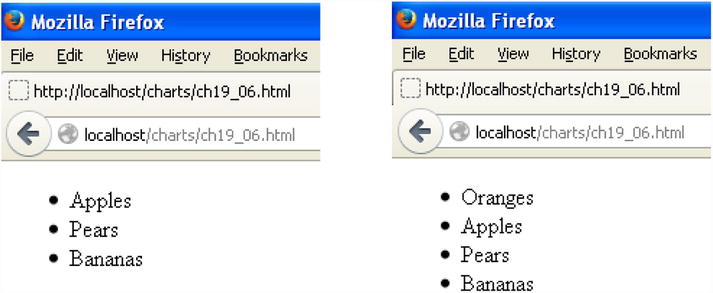
Figure 2-13. Using the insert() operator, you can insert the Oranges item at the top of the list
Now the new element is at the top of the unordered list. But if you wanted to insert a new item in a different location than the first? You can use the CSS selector nth-child(i) to do this, where i is the index of the element. Therefore, if you use the selector li:nth-child(i), you are going to select the i-th <li> element. Thus, if you want to insert an element between the second and the third element, you need to call the third <li> element in the insert() operator (remember that this operator puts the new element before the one called):
d3.select('ul').insert('li','li:nth-child(2)').text("Oranges");
This will insert the new Orange item between the second and the third items in the list, as shown in Figure 2-14 (in the browser on the left and in FireBug on the right).
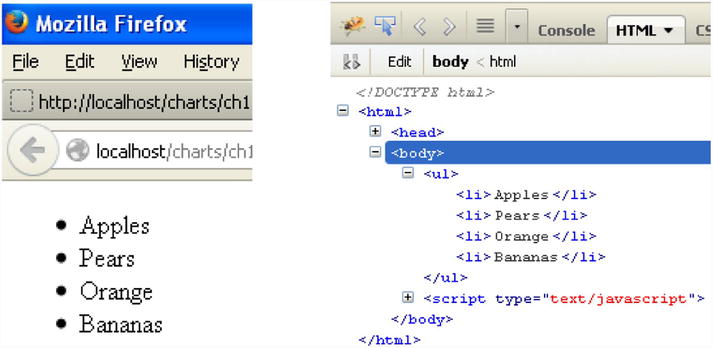
Figure 2-14. Using the CSS selector nth-child, you can add the Oranges item in any position in the list
HTML( ), APPEND( ), AND INSERT() OPERATORS: A BETTER UNDERSTANDING
Sometimes, understanding the functionality of these three operators isn’t easy. Consider this schematic HTML structure, containing a generic parent tag and some children tags inside:
<parent>
<child></child>
<child></child>
<child></child>
</parent>
The following simple diagrams show what each operator does exactly, in order to better understand the different behaviors. It is crucial that you fully understand the functionality of these three operators if you want to exploit the full potential of the D3 library.
When you need to create a new tag element at the end of a list of other tags at the same level of the HTML structure, use the append() operator. Figure 2-15 shows the behavior of this operator.
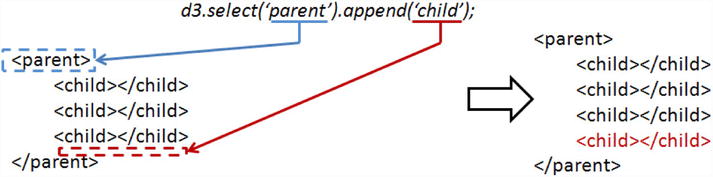
Figure 2-15. The append() operator adds a child tag to the end of the list
When you need to create a new tag element at the beginning of a list of other tags at the same level of the HTML structure, use the insert() operator. Figure 2-16 shows the behavior of this operator.

Figure 2-16. The insert() operator adds a child tag before the child tag is passed as a second argument
When you need to create a new tag element at a specific position in a list of other tags, always at the same level of the HTML structure, use the insert() operator. Figure 2-17 shows the behavior of this operator.
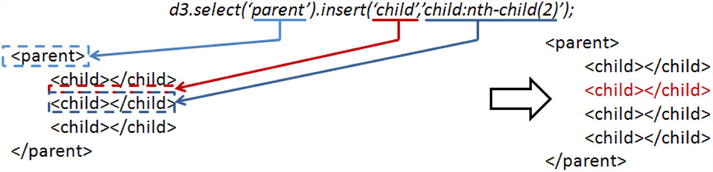
Figure 2-17. You can pass a child of the list as the argument using the CSS selector nth-child()
When you need to create a new tag element in place of another tag or in place of a list of other tags at the same level of the HTML structure, use the html() operator. Figure 2-18 illustrates the behavior of this operator.

Figure 2-18. The html() operator replaces the contents of the parent tag with the tag passed as the argument
You have just seen how to create new elements in your document. But how can you put the data inside? This is where the data() operator comes in, by passing an array of data as an argument.
For each element in the selection, a value will be assigned in the array following the same order of the sequence. This correspondence is indicated by a generic function in which d and i are passed as arguments.
function(d,i) {
    // code with d and i
    // return some elaboration of d;
}
This function will be executed as many times as there are elements in the list: i is the index of the sequence and d is the value in the data array corresponding to that index. Many times you are not interested in the value of i and use only d.
For those familiar with the for loop, it is as if you had written:
for(i=0; i < selection.length; i++){
    d = input_array[i];
    //  code with d and i
    //return output_array[i];
}
To understand the whole thing, there is no better way than to provide an example. Define an array containing the names of three fruits. You’ll create an unordered list with three empty items and create a selection of these items with selectAll(). You must have a corresponding number of items in the selection and values in the array; otherwise, the values in surplus will not be evaluated. You associate the array to the selection and then, applying function(d), write the values of each item within the list (see Listing 2-10).
Listing 2-10. Ch2_07.html
<body>
<ul>
    <li></li>
    <li></li>
    <li></li>
</ul>
<script type="text/javascript">
    var fruits = ['Apples', 'Pears', 'Bananas'];

    d3.selectAll('li').data(fruits).text( function(d){
       return d;
    });
</script>
</body>
Figure 2-19 shows the result in the browser on the left and in FireBug on the right. In FireBug, you can see the HTML structure used for each list item <li> content, which was not present when you wrote Listing 2-10. These added text items are the values of the fruits array.
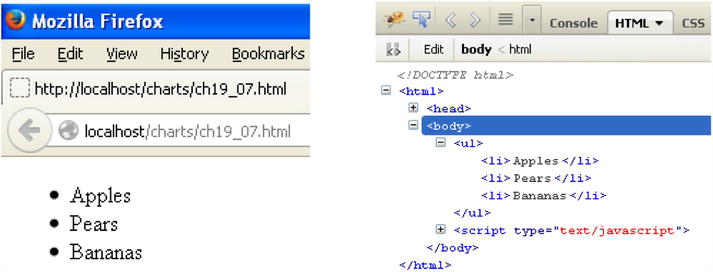
Figure 2-19. It is possible to fill the content of HTML elements with array values
The data() operator does not just bind data to elements, it computes a connection between the element of the selection and the data provided. All goes well as long as the length of the array is equal to the number of elements in the selection. But what if it is not so? If you have a selection with three elements and provide an array with five values, the two extra values will be stored in a special selection called “enter.” This selection is accessible via the enter() operator on the return value of a call to data. You can see this in the example in Listing 2-11.
Listing 2-11. Ch2_08.html
<body>
<ul>
    <li></li>
    <li></li>
    <li></li>
</ul>
<script type="text/javascript">
    var fruits = ['Apples', 'Pears', 'Bananas', 'Oranges', 'Strawberries'];
    var list = d3.select('ul'),
    var fruits = list.selectAll('li').data(fruits);
    fruits.enter().append('li').text( function(d){
       return d;
    });
    fruits.text( function(d){
       return d;
    });
</script>
</body>
First, you define the array with five different fruits. Then, you make a selection that contains the list and assign it to the variable list. From this selection, you make a further selection containing the three empty list items and assign the fruits array to it. From this association, the last two values of the array will advance (Oranges and Strawberries), and thus they will be stored in the enter selection. Now you must pay particular attention to this point: usually it is best to deal with the enter selection first. Therefore, you have to access the enter selection and use append() in order to create two new list items with the two fruits advanced. Then you write the values in the fruit selection within the three existing list items.
You get a list with all five fruits, in the order in which they were entered. Figure 2-20 shows the change in the browser on the top and in FireBug on the bottom.
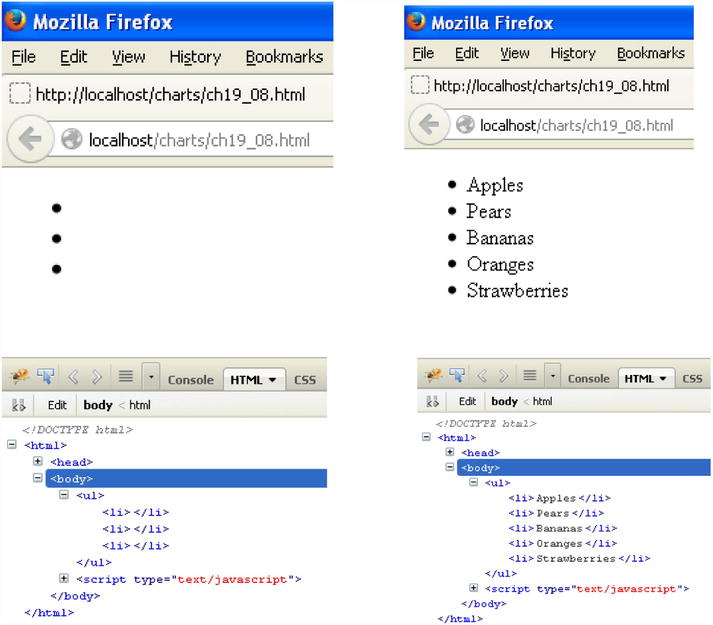
Figure 2-20. It is possible to fill the content of HTML elements with array values and to integrate them with other elements if they are not enough
You have seen how to define and modify styles, attributes, and other properties with the use of functions provided by the D3 framework. But so far, they have been treated as constants. It is time to take a leap forward. One of the advantages of the JavaScript language and especially of the D3 (and jQuery) library lies in its ability to make the content of a page dynamic. In fact, you have just seen how to delete, create, and manipulate the element tags in a web page. A similar approach is also applicable to other types of values such as CSS styles or the attributes of elements you created or manipulated through the selections mechanism. You could even create different options relating to events or controls.
D3 provides you with a set of specific functions for this purpose. Despite their apparent simplicity, these functions can be a powerful tool for those who know how to make full use of their mechanisms.
In the example in Listing 2-12, you use a generic function to assign a random color to the paragraphs. Every time the page is loaded, it shows a different set of colors.
Listing 2-12. Ch2_09.html
<body>
<p>the first paragraph</p>
<p>the second paragraph</p>
<p>the third paragraph</p>
<p>the last paragraph</p>
<script>
d3.selectAll("p").style("color", function() {

    r = Math.round((Math.random() * 255));
    g = Math.round((Math.random() * 255));
    b = Math.round((Math.random() * 255));
    return "rgb("+r+", "+g+", "+b+")";

});
</script>
</body>
Figure 2-21 on the left shows the results of one loaded page and another, on the right, with different colors applied to it. Every time you load the page, you get a different color combination.
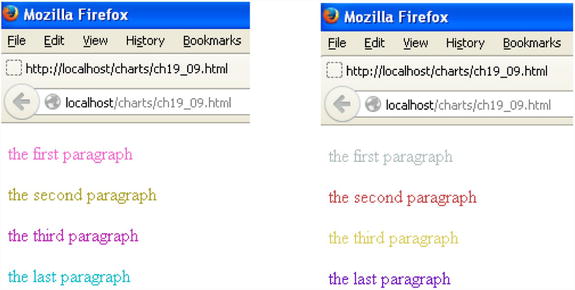
Figure 2-21. The colors change each time the page loads
Certainly, this is a very trivial example, but it shows the basic idea. Any value that you assign to an attribute, a text, or a style can be dynamically generated from a function.
You have finally arrived at the point where you can apply what you learned to create beautiful displays. In this section, you’ll begin to learn about the peculiarities of the D3 library, with the creation and manipulation of graphic elements such as lines, squares, circles, and more. All of this will be done primarily by using nested structures of two tags: <svg> for graphic elements and <g> for application groups.
First, you’ll learn how to create an SVG element and how to nest it in a group using the <g> tag. Later, you’ll discover what SVG transformations are and how to apply them to groups of elements. Finally, with a further example, you’ll see how to animate these elements with SVG transitions, in order to get nice animations.
Creating an SVG Element
You can start from a <div> tag, which will be used as a container for the visualization, similarly to what jQuery does with <canvas>. From this <div> tag, you create the root tag <svg> using the append() operator. Then you can set the size of the visualization by acting on the height and width attributes using the attr() operator (see Listing 2-13).
Listing 2-13. Ch2_10.html
<body>
<div id="circle"></div>
<script type="text/javascript">
    var svg = d3.select('#circle')
       .append('svg')
       .attr('width', 200)
       .attr('height', 200);
</script>
</body>
From FireBug, you can see the <body> structure with the new <svg> element and its attributes (see Figure 2-22).
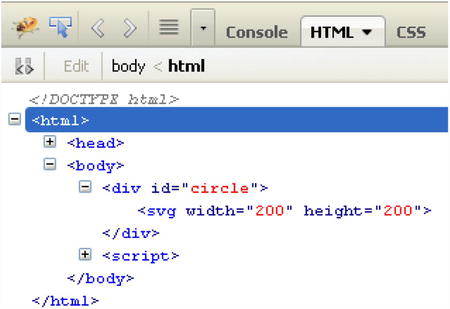
Figure 2-22. FireBug shows the <svg> tag you just created
You can also add a basic shape to the root tag <svg>. Let’s add a yellow circle (see Listing 2-14). Once you understand this principle, it is very simple to repeat it whenever you wish.
Listing 2-14. ch19_10.html
<script type="text/javascript">
    var svg = d3.select('#circle')
       .append('svg')
       .attr('width', 200)
       .attr('height', 200);

    svg.append('circle')
       .style('stroke', 'black')
       .style('fill', 'yellow')
       .attr('r', 40)
       .attr('cx', 50)
       .attr('cy', 50);
</script>
Figure 2-23 shows the perfect yellow circle.

Figure 2-23. A perfect yellow circle
In FireBug, you can see how the tree structure of the tags gradually takes shape from the root <svg>, specifying all the attributes (see Figure 2-24).
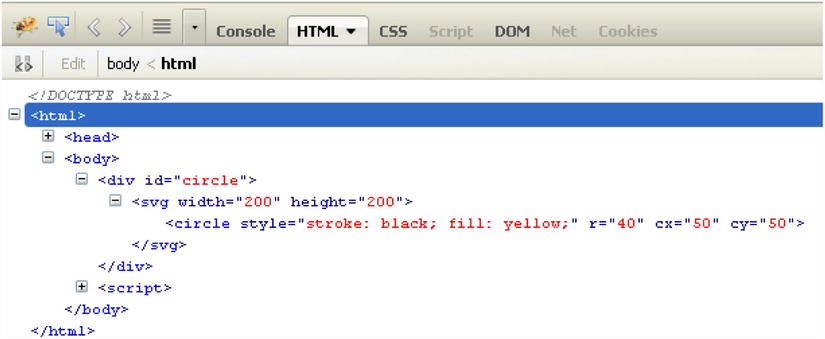
Figure 2-24. In FireBug, it is possible to follow the development of the tag structure
Now that you have seen how to create graphics using SVG tags, the next step is to apply transformations to them.
A key aspect of D3 is its transformation capability. This extends the concept of SVG transformations in JavaScript. Once an object is created in SVG, from a simple square to more complex structures, it can be subjected to various transformations. The most common transformations include:
- Scale
- Translate
- Rotate
![]() Note If you are interested in learning more about transformations, I suggest that you visit this page: https://developer.mozilla.org/en-US/docs/Web/SVG/Attribute/transform. It lists all the available transformations, with simple explanations.
Note If you are interested in learning more about transformations, I suggest that you visit this page: https://developer.mozilla.org/en-US/docs/Web/SVG/Attribute/transform. It lists all the available transformations, with simple explanations.
Typically, you use sequences of these basic transformations to obtain more complex transformations. As always, you’ll see a series of small examples to illustrate the concept of transformations. First, you’ll draw a small red square in the same way you drew the yellow circle (see Listing 2-15). For this purpose, you use the <rect> tag. The only difference from <circle> is that for rectangles, you need to specify the position of the rectangle’s top-left corner with x and y instead of the center of the circle. Then you have to specify the size of the rectangle, and since it is a square, the sides will be equal.
Listing 2-15. Ch2_11a.html
<div id="square"></div>
<script type="text/javascript">
    var svg = d3.select('#square')
       .append('svg')
       .attr('width', 200)
       .attr('height', 200);
    svg.append('rect')
       .style('stroke', 'black')
       .style('fill', 'red')
       .attr('x', 50)
       .attr('y', 50)
       .attr('width', 50)
       .attr('height', 50);
</script>
It’s a good time to introduce another concept that will be useful when in dealing with SVG elements: groups of elements. You’ll often need to apply a series of operations, including only the transformations at times, to a group of shapes or to a complex shape (consisting of multiple basic shapes). This is possible by grouping several items together in a group, which is reflected in SVG by putting all the elements in a tag <g>. So if you want to apply a transformation to the red square for example, you need to insert it within a group (see Listing 2-16).
Listing 2-16. Ch2_11a.html
var svg = d3.select('#square')
    .append('svg')
    .attr('width', 200)
    .attr('height', 200);

var g = svg.append("svg:g");

g.append('rect')
    .style('stroke', 'black')
    .style('fill', 'red')
    .attr('x', 50)
    .attr('y', 50)
    .attr('width', 50)
    .attr('height', 50);
Figure 2-25 shows how the SVG structure appears in FireBug.

Figure 2-25. FireBug shows the SVG structure corresponding to the red square
In the browser, you’ll a small red square like the one shown in Figure 2-26.
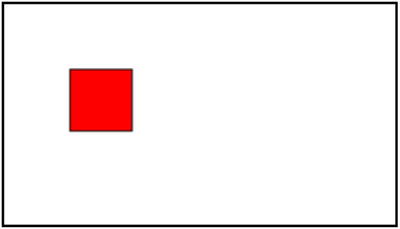
Figure 2-26. A red square is a good object upon which to apply transformations
Now you’ll apply all the transformations, one by one. Start with the translation, which in SVG is expressed by the translate(x, y) function, where x and y are the amount of pixels by which the square will be moved (see Listing 2-17).
Listing 2-17. Ch2_11b.html
var g = svg.append("svg:g")
    .attr("transform", "translate(" + 100 + ",0)");
Here I put the value 100 outside of the string passed as an attribute, to understand that at that point you can insert a previously defined variable. This will make the transformation more dynamic. With this line, you moved the square to the right 100 pixels (see Figure 2-27).
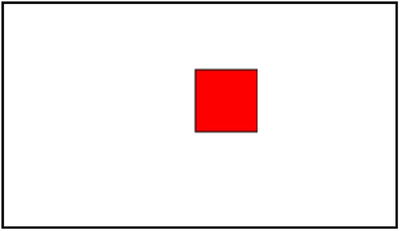
Figure 2-27. Now the red square appears right-shifted by 100 pixels
Another transformation that you can apply to the square is called scaling. In this SVG, it is expressed through the function scale(s) or scale(sx, sy). If you pass a single parameter in the function, the scaling will be uniform, but if you pass two parameters, you can apply the expansion of the square in a different way horizontally and vertically. Listing 2-18 increases the size of the red square by two times. Thus, you need to apply the scale() transformation and to pass the value 2 as a parameter. The number passed is the factor by which the size of the square will be multiplied. Since you’ve passed a single parameter, scaling is uniform.
Listing 2-18. Ch2_11c.html
var g = svg.append("svg:g")
    .attr("transform","scale(2)");
Figure 2-28 shows the square scaled by two times. The square has doubled in height and width.
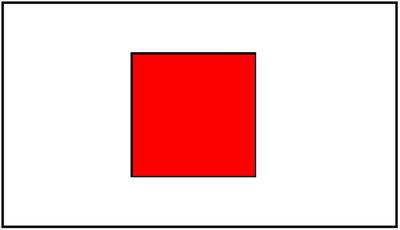
Figure 2-28. The red square has doubled its size
If you want non-uniform scaling, you can use something like Listing 2-19 to obtain a result similar to Figure 2-29. Non-uniform scaling can distort a figure to give another picture. In this case, you get a rectangle from a square.
Listing 2-19. Ch2_11d.html
var g = svg.append("svg:g")
    .attr("transform","scale(2, 1)");
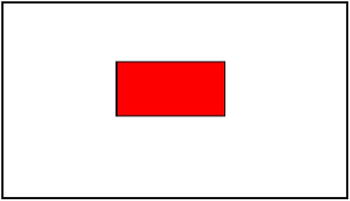
Figure 2-29. A rectangle obtained by applying non-uniform scaling to a square
The last kind of transformation is rotation. It is expressed in SVG with the function rotate(degree,x,y), where the first argument is the angle of rotation (clockwise) in degrees, and x and y are the coordinates of the center of rotation.
Say you want the center of rotation to correspond with the center of the square, which is located at x = 75 and y = 75. If you wish to draw a rhombus, you need to perform a rotation of 45 degrees on the square (see Listing 2-20).
Listing 2-20. Ch2_11e.html
var g = svg.append("svg:g")
    .attr("transform","rotate(45, 75, 75)");
You get the rhombus (see Figure 2-30).
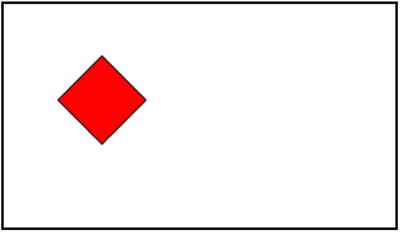
Figure 2-30. A rhombus is the result you obtain when you rotate a square
But the most interesting effect involves applying the transformations in a sequence, thereby creating a chain (see Listing 2-21).
Listing 2-21. Ch2_11f.html
var g = svg.append("svg:g")
    .attr("transform", "translate(-30, 0),scale(2, 1),rotate(45, 75, 75)");
From this listing, you obtain the shape in Figure 2-31.
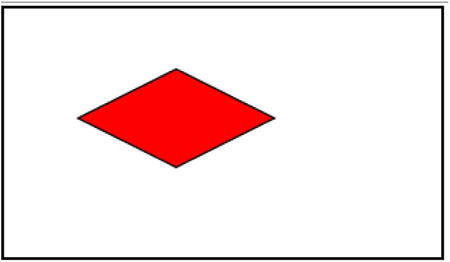
Figure 2-31. A rhombus obtained by applying a chain of transformations to a square
Transitions
You have seen that values of attributes, styles, and so forth, can be dynamic, according to the definition set with the help of certain functions. But D3 offers more—you can even animate your shapes. D3 provides three functions to this purpose:
- transition()
- delay()
- duration()
Naturally, you’ll apply these functions to the SVG elements, thanks to D3, which can recognize any kind of values and interpolate them.
You define a transition when an SVG shape passes from one state to another. Both the starting state and the final state are characterized by several parameters that define the color, the shape, the size, and the position of an object. You take as the initial state the one defined in the yellow circle example (refer to Listing 2-14). In Listing 2-22, you subject the circle to a transition consisting of three different mutations: the circle changes its color to black (setting fill to black), it reduces its area (changing r from 40 to 10), and it moves slightly to the right (changing cx from 50 to 150).
Listing 2-22. Ch2_12.html
<div id="circle"></div>
<script>
var svg = d3.select('#circle')
    .append('svg')
    .attr('width', 200)
    .attr('height', 200);

svg.append('circle')
    .style('stroke', 'black')
    .style('fill', 'yellow')
    .attr('r', 40)
    .attr('cx', 50)
    .attr('cy', 50)
    .transition()
    .delay(100)
    .duration(4000)
    .attr("r", 10)
    .attr("cx", 150)
    .style("fill", "black");
</script>
So, in this example, you add the transition() method to the methods chain. This separates the initial state from the final one and warns D3 of a transition. Immediately after the transition(), there are two other functions: delay() and duration().
The delay() function takes one argument: the time that must elapse before the transition begins. The duration() function, in contrast, is defined as the time taken by the transition. The greater the value of the parameter passed, the slower the transition will be.
Following these three functions, you add all the attributes characterizing the final state of the figure to the method chain. D3 interpolates the intermediate values depending on the time you have established, and will generate all the intermediate figures with those values. What appears before your eyes is an animation in which the yellow circle turns black, moving to the left and decreasing in size. All of this takes four seconds.
Figure 2-32 shows the transition sequence whereby you can see the changes to the circle.

Figure 2-32. Different instances of the animation of a circle subjected to transitions
The simple examples you have seen so far were applied to one graphic element at a time. The next step is to apply what you have learned to groups of elements, so as to create more complex graphics. Subsequent chapters provide good examples in which this basic concept of the D3 library will be put into practice.
Summary
This chapter covered the highlights of the D3 library. The D3 library can manage selections, selectors and operators without making use of jQuery JavaScript library. Through a series of examples, you have seen how to manipulate DOM elements by changing their attributes, and by creating new ones when needed. In the second part of the chapter, you learned what the main object of manipulations with the D3 library is: SVG elements. These are the graphic building blocks with which you build your charts. Finally, you took a quick look at how to apply SVG transformations to these graphic elements and then at how to exploit SVG transitions to generate nice animations.
The next chapter puts what you have learned so far about the D3 library into practice, by implementing line charts. Taking one SVG element after another, you’ll see how to achieve attractive graphical representations.