
A user’s interaction with an application is called a session. A session can encompass several page requests. For example, in an ecommerce application, a session can involve browsing the products for sale, adding some of them to a shopping cart, entering payment and shipping information, and finalizing the transaction.
During a session, the user assigns values to page items, encompassing perhaps several pages, and sends these values to the server for processing. The item values for a given session comprise what is called its session state . In this chapter, you will examine the various ways that an application can modify and access the session state and look at some common page design techniques that make use of this state.
Session IDs
Building session capability into a web application is problematic because browser requests are anonymous. There is no built-in way for a server to know whether two browser requests are part of the same session. APEX solves this problem by assigning an identifier to each session. A browser request indicates its session by adding the session’s ID to the request.
Recall that an APEX URL consists of the f?p= string followed by a colon-delimited string of values. The first two values are the application ID and page ID; the third value is the session ID. To see session IDs in action, log in to APEX and browse its screens. Look at the URL associated with each screen you visit. You should discover that every URL has the same session ID value. Now log out of APEX. When you log back in, APEX will assign a new session ID to the interaction. The URL of each screen you visit will now have this new session ID.
When the page loads, the URL will contain a new session ID.
Submit vs. Redirect
Suppose that you modify the value of an item on a web page, perhaps by selecting a radio button or typing into a text field. Your browser knows how to display this change directly, without having to ask the server to re-render the page. Consequently, the server will know nothing about the change you made to the item and thus cannot use the new value.
If you want your application to know about the values of the items on a page, you must first upload those values to the server. This action is called submit . The server holds a variable for each item of your application. When you submit a page, the value of each item on that page is saved in its corresponding variable. In effect, the submit action synchronizes the session state with the current page.
Recall that the action of a button is either submit or redirect. Both actions cause the APEX server to render a target page and send it to the browser. For redirect, you specify the target page as part of the redirect action. For submit, you specify the target page via a separate branch component—if no branches are specified, the current page is reloaded. Branches are discussed in Chapter 9, so for now you can assume that a submit operation always reloads the current page.
The primary difference between submit and redirect is that submit uploads the page’s item values to the server, whereas redirect does not. If a user changes the value of some items on a page and then does a redirect, those changes will be lost—even if the redirect is to the same page.
To see an example of this difference, consider the Item Sampler demo page from Chapter 5, as shown in Figure 5-2. Recall from Chapter 5 that the initial value of an item is determined by its Source properties. The default is to use the session state value if it is not null. This means that if you assign a non-null value to an item and submit, then that value will become the item’s initial value when the page is reloaded. You can verify this fact by changing some of the values on the page and clicking the Cancel button. Because that button does a redirect, your changes are lost. Now modify those values again and click the Submit button. The item values remain as chosen because the submit operation wrote those changes to the session state and then retrieved them when the page was reloaded. If you navigate to a different page and come back, the values will still be there.
Recall that when you run a page from within APEX, the developer toolbar appears on the bottom of the screen. The toolbar button labeled Session shows you the current session state. Clicking it opens a window that displays all items and their current session values. This window is very useful when debugging pages. In the example, open the session window and look at the session state. Then change some items and submit. Open the session window again, and verify that the item values have changed.
It is important to understand that specifying an initial value of an item will affect the value of the item in the browser, but will never, ever change its value in the session state. You can run some experiments on the Item Sampler page to verify this fact. Go to the property editor, set the source of the item P8_JOB to be the static expression CLERK, and have it be used Always, replacing any existing value in session state. Run the page, change the item’s value to ANALYST, and click the Submit button, checking the session state at each step. The session state value stays blank until the page is submitted, at which point it becomes ANALYST. The browser, however, will show CLERK when the page is rendered. Now go back to the property editor and change the Source Used property of the item to be Only when current value in session state is null and repeat the experiment. (Start by setting the value of the item to blank and clicking the Submit button to clear the session state.) You should observe that the session state values behave the same as before. The browser, however, will display CLERK until you submit a new value, after which it will display that value.
Using an Item to Submit a Page
The primary way to submit a page is to use a button. However, certain item types can also perform a submit. The Settings section of a text field or password field has the property Submit when Enter pressed. Turning on this property causes the item to submit the page when the user presses the Enter key.
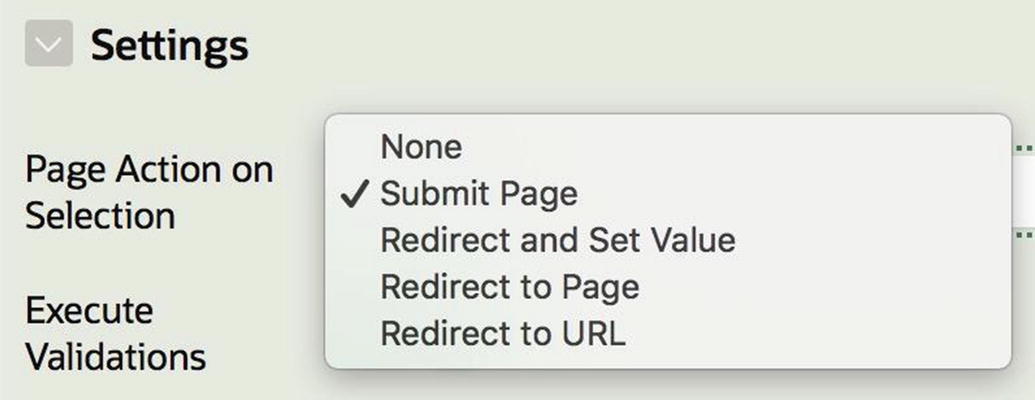
Possible actions for a select list
The figure also shows three other values for this property. These values correspond to different forms of redirect. The Redirect and Set Value option saves the value of that item in the session state and then redirects to the same page. That is, it behaves like submit, but for just one item instead of all items on the page.
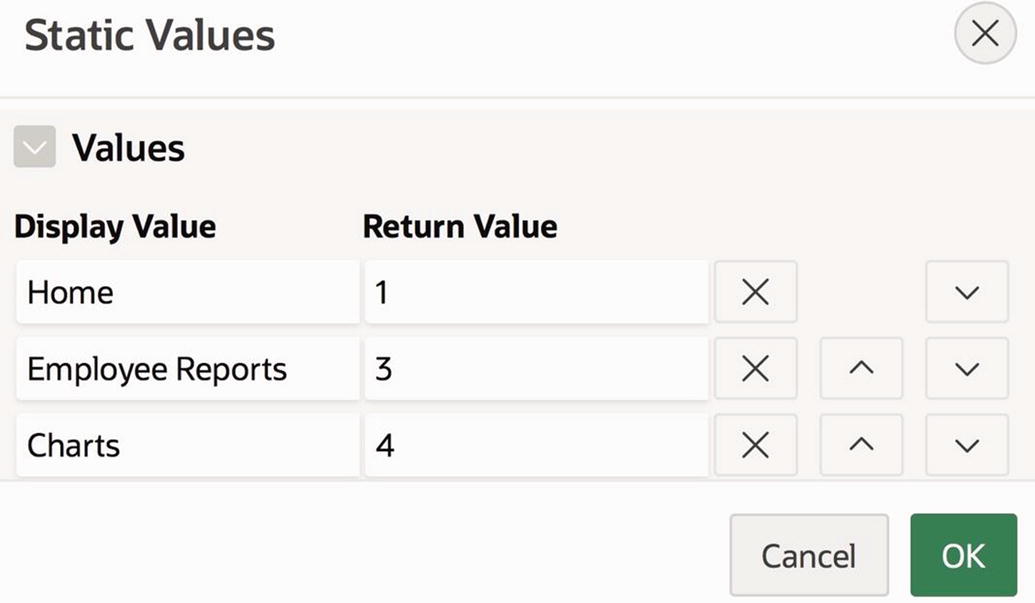
Static values for a Redirect to Page action
The Redirect to URL option is similar, except that the item values are assumed to be URLs. Neither of these two options changes the session state.
Redirect Can Set Session State
Consider the redirect action of a button. Even though that action does not submit the page, it nevertheless can modify the session state.
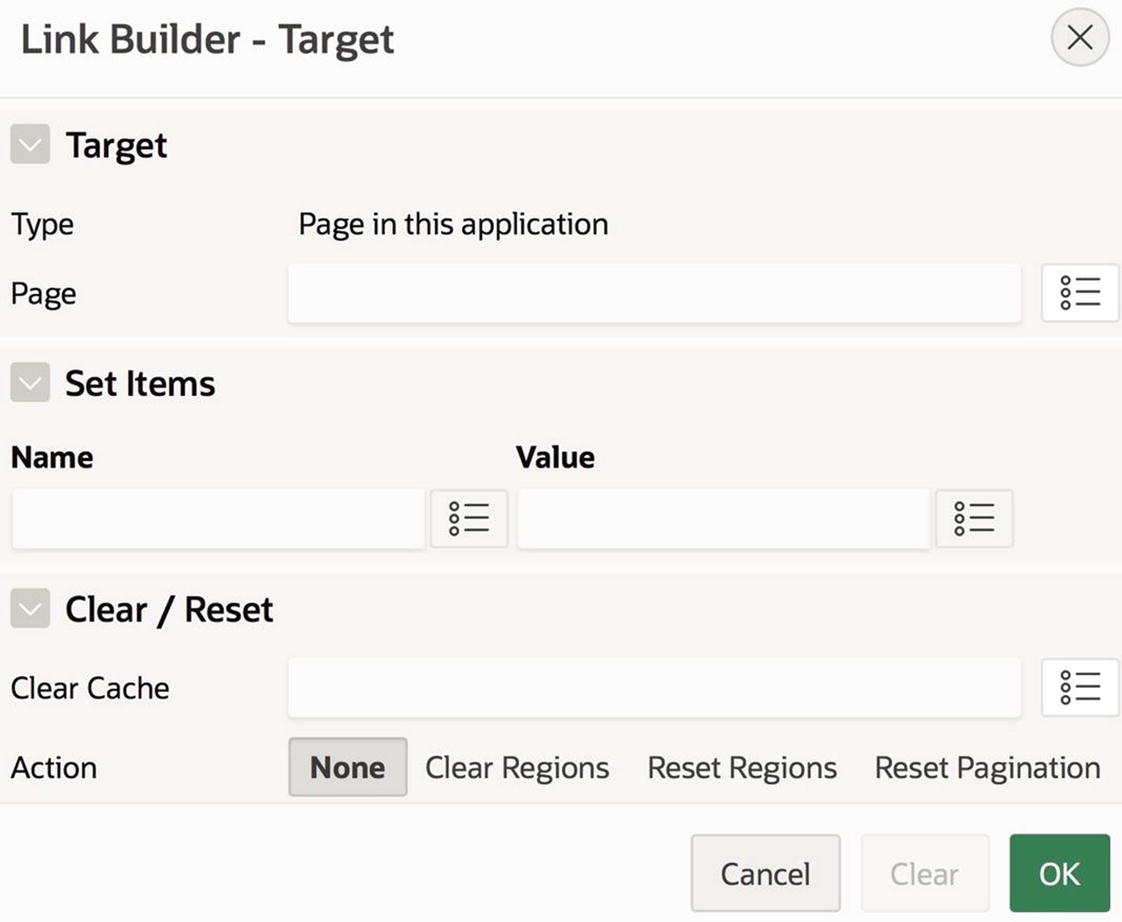
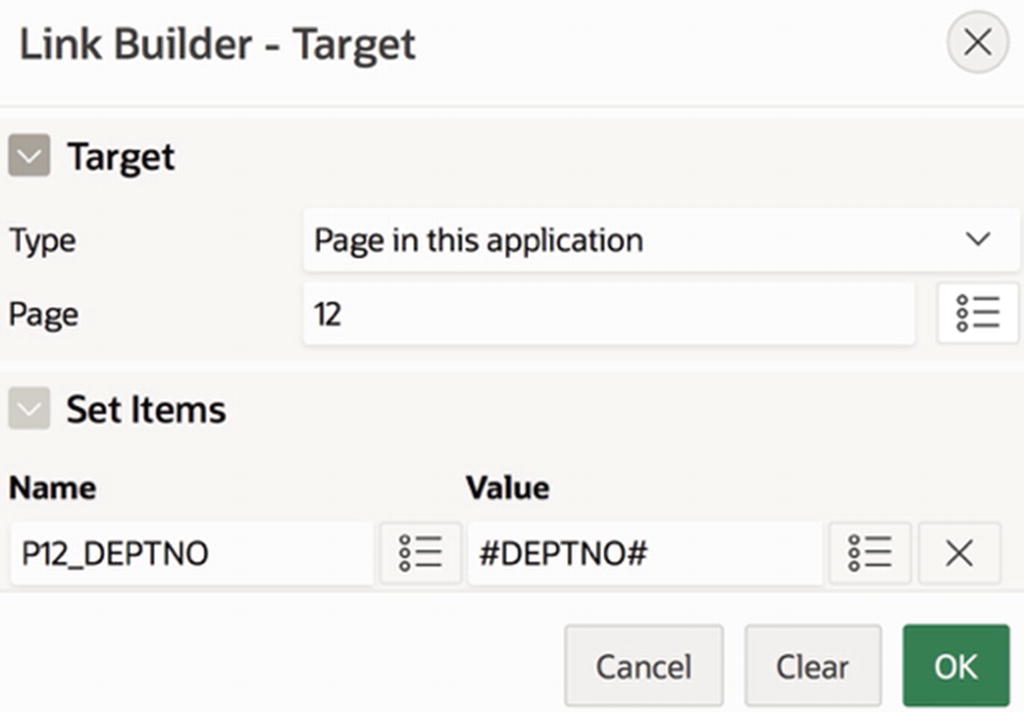
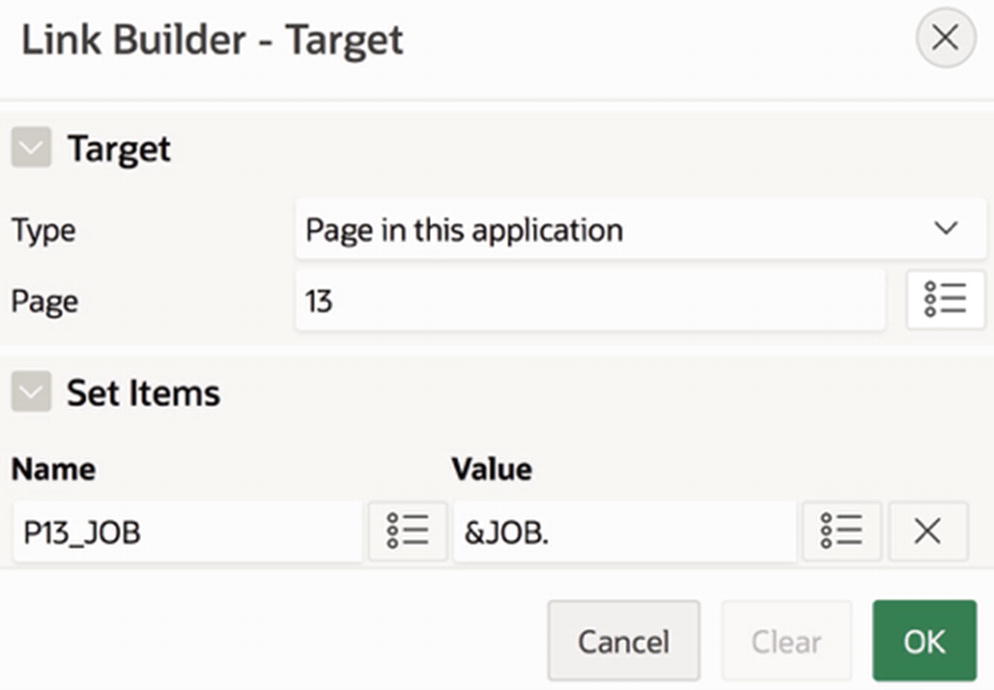
Link Builder wizard page
In addition to setting the Page property to the desired target, you can use the Set Items section to set the value of as many items as you want. Enter the item name in the Name box and its desired session state value in the Value box. Each time you fill up a row, another row appears, thus allowing you to enter arbitrarily many name/value pairs.
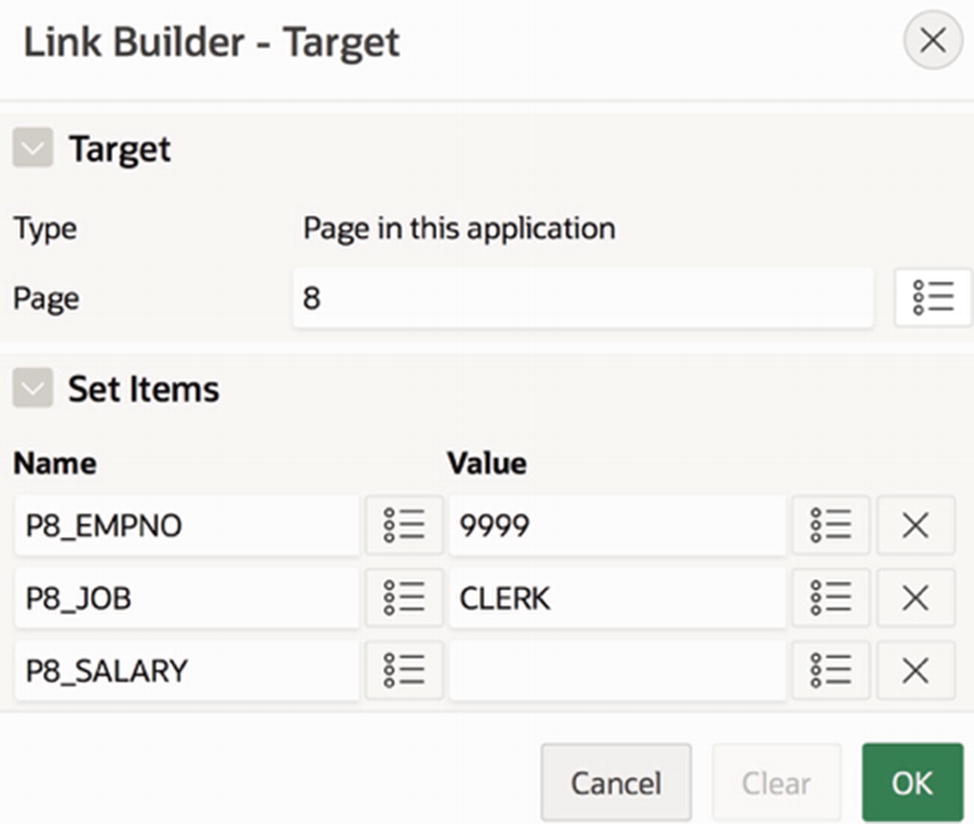
Specifying item values upon redirect
Suppose that you want the Cancel button to clear the session state of all items in the page. APEX calls this clearing the cache and provides the Clear Cache property in the link builder to do so. For example, in Figure 6-3, typing 3,4,8 into the Clear Cache input box will clear the session state for all items on pages 3, 4, and 8. If you have also specified items in the Set Items section, APEX will assign values to those items after clearing the cache.
Note that this way of modifying the session state is totally unlike the submit action, because it does not (and cannot) use values displayed in the browser. That is, a redirect from a button can set the session state value of an item to a constant or computed value, but it cannot set it to a browser value entered by the user.
Referring to Session State Variables
Now that you know how to set the value of a session state variable, you need to know how to get a page to access that value. There are two primary techniques. If you want to reference the variable from within SQL code, prepend a colon in front of the item name. Such a reference is called a bind variable . If you want to reference an item from within an HTML expression, prepend an ampersand in front of the item name and append a period at its end. This latter reference, which is called a substitution string , was introduced in Chapter 3.
For example, consider the item P8_EMPNO on the Item Sampler page. To refer to it as a substitution string, write “&P8_EMPNO.”. To refer to it as a bind variable, write “:P8_EMPNO”.
In this book, you have seen several uses for SQL queries, such as the source of a report or chart, the initial value of an item, and the definition of the values of a list-based item. You have also seen several uses for HTML expressions, such as the title of a page or region and the label of an item. The remaining sections of this chapter give examples of how you can greatly increase the functionality of your pages by using item references within these SQL queries and HTML expressions.
Before building any of the pages in this chapter, you might want to go to the List Details page for the DeskTop Navigation Menu (as shown in Figure 4-21), and add a root entry named Session State. Then, each time you create a page, you can assign the parent of its navigation menu entry to be Session State.
Customized Reports
A customized report is a report whose contents are affected by the values of one or more items. A user enters values for some items on the page and clicks a Submit button . The page then displays a report based on those input values. In this section, you will build three customized report pages to illustrate this technique.
Filter by Job and Department Page

Filter by Job and Department page
The action of the button is Submit and its position is Edit.
I would like to point out that there was no particular need to use two regions on this page. In fact, it is easy to modify this page to use a single region. First, go to the Layout section for the item P9_JOB and change its Region property to Matching Employees. Then do the same thing for P9_DEPTNO and the Submit button. Finally, go to the Appearance section of Matching Employees and set its Item Display Position property to Above Content, so that the two items appear above the report. (You can also delete the Select Values region if you like.) Now run the page. You should discover that its behavior has not changed. That is, the decision to use one or two (or even three!) regions is based purely on aesthetics.
Filter by Possible Department Page
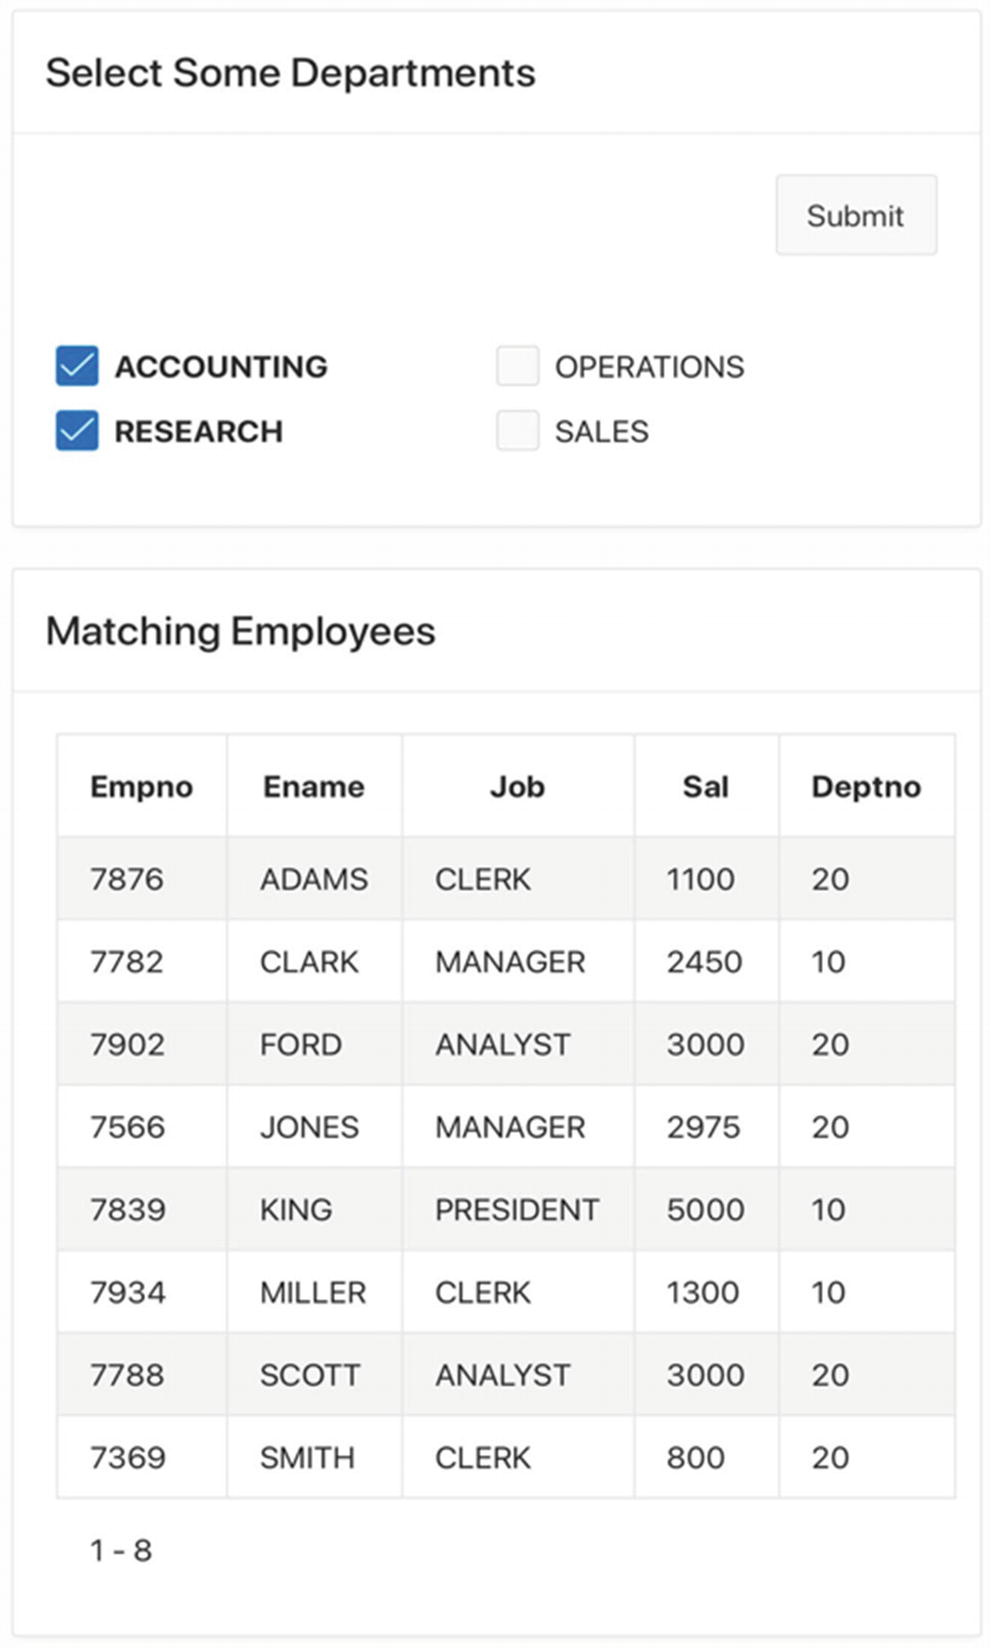
Filter by Possible Department page
Recall that the value of a multi-value item is a string containing the selected checkbox values separated by colons. For example, the value of P10_DEPTNO in Figure 6-5 is 10:30. If all four departments were checked, the value would be 10:40:20:30. (The order of the selected values in the string is based on the sort order of the item’s list-of-values query, which in this case is by department name.)
The InStr function tests whether the second argument is a substring of the first one. If so, it returns the character position of the match; otherwise, it returns 0. Thus, the query returns those EMP records whose DeptNo value appears somewhere in the item. This query is almost what you want, but not quite. For example, suppose that the value of the item is 10:30. The EMP records having a DeptNo value of 10 and 30 will match, and those having a value of 20 and 40 will not match. This is correct, but look at what happens if a new department is created with the department number 3. The employees in this department will match, which is incorrect.
Many people (including me) have difficulty coming to terms with this query; if you feel the same, try working out an example. In particular, note the two different uses of the colon: the colon outside of quotes denotes a bind variable, whereas a colon inside the quotes is a delimiter character.
Filter by Salary Range Page
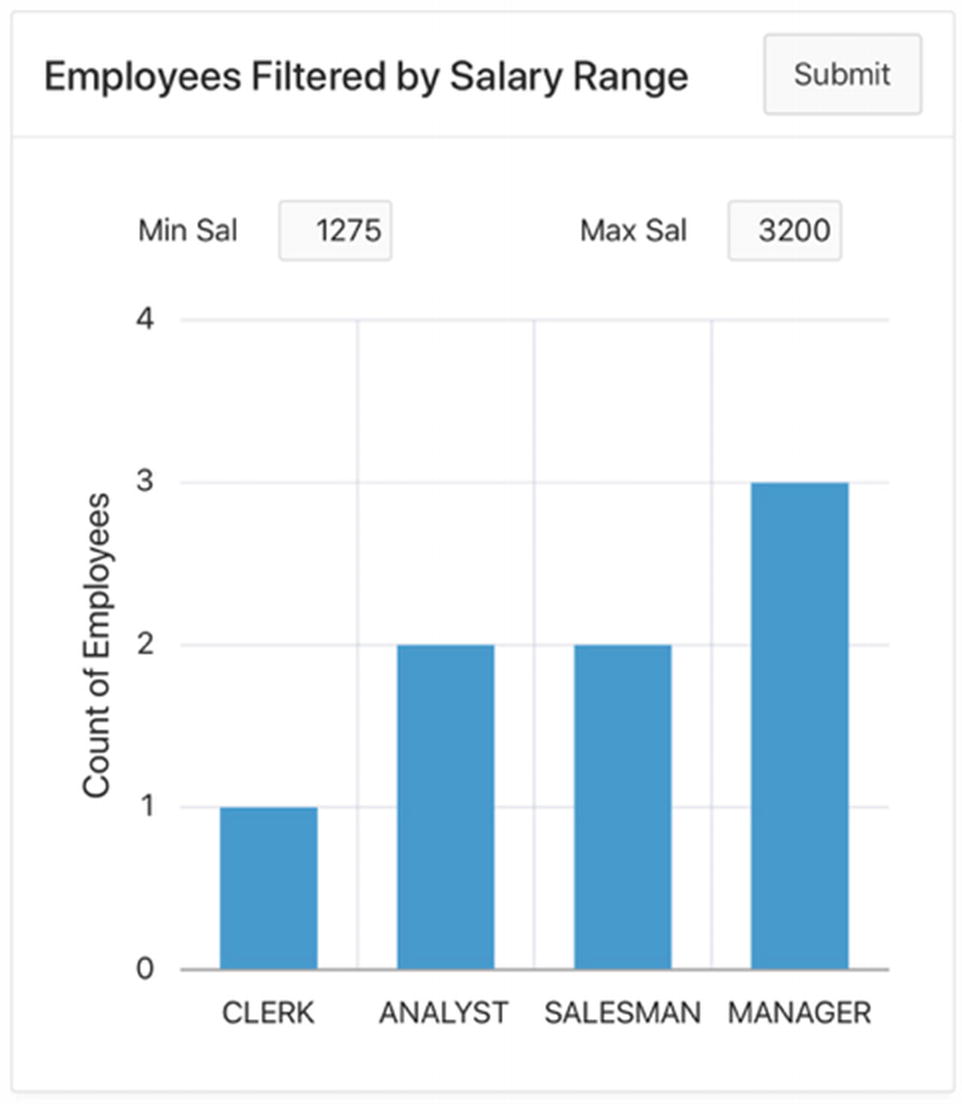
Filter by Salary Range page
This page contains a single region, which is of type chart. The region’s Item Display Position property (in its Appearance section) has the value Above Contents, which is why the two items and Submit button are located above the chart. The two items, named P11_MINSAL and P11_MAXSAL, are number fields having a Width value of 5. The button’s position is Edit.
As with the Filter by Job and Department page , this query ensures that a null item value will not contribute to the filter.
It should also be clear to you that the chart’s source query would be the same if you decided to move the two items and button to a separate region. If not, try it and see.
Master-Detail Reports
A master-detail report is a set of two reports. These reports are linked, in the sense that each row of the detail report has an associated row in the master report. A user interacts with the reports by choosing one of the master rows; the detail report responds by displaying just the detail rows associated with the chosen master record.

Employees by Department page
Consider how to implement this page. The main issue is that the master report needs to let the detail report know which row was selected. The standard technique is to use a hidden item, whose value is the key of the selected row. Let’s name this item P12_DEPTNO. The master report will assign to P12_DEPTNO the DeptNo value of the selected row. The detail report will then use this value to customize itself.
The hard part is implementing the master report. You have three questions to answer: What is the source query of the report? How do you get its fourth column to display a link? And how do you assign the appropriate value to P12_DEPTNO?
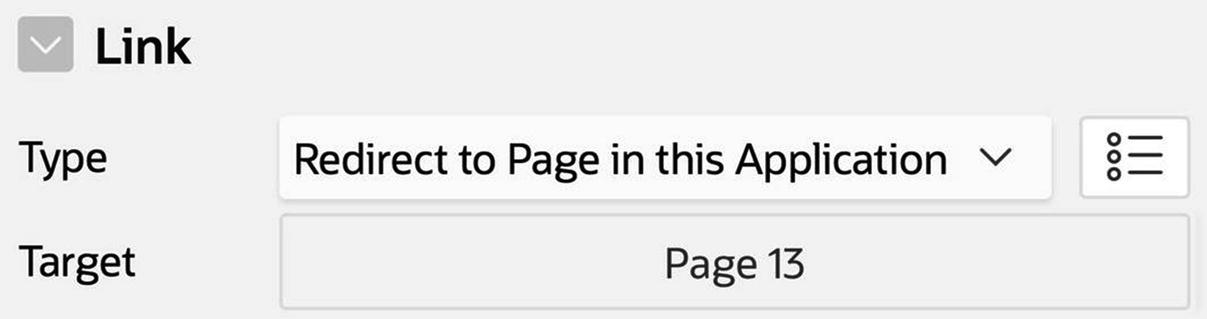
Chapter 3 described how to specify a link for a report column. To review, go to the page designer and click the DEPTNO column in the rendering tree. Set the type of the column to Link. Find the Link section in the property editor (refer to Figure 3-35 in Chapter 3) and set the link text to Click for details. Clicking the Target box will take you to the Link Builder page, in which you can set the target to page 12 (the current page).
Configuring the master report’s column link
Finally, you have to actually create the item P12_DEPTNO. You know that it should be a hidden type, but where should it be placed? Because the item is hidden, it doesn’t really matter which region on the page it goes in. I chose to place it in the master region because that is where its value is assigned.
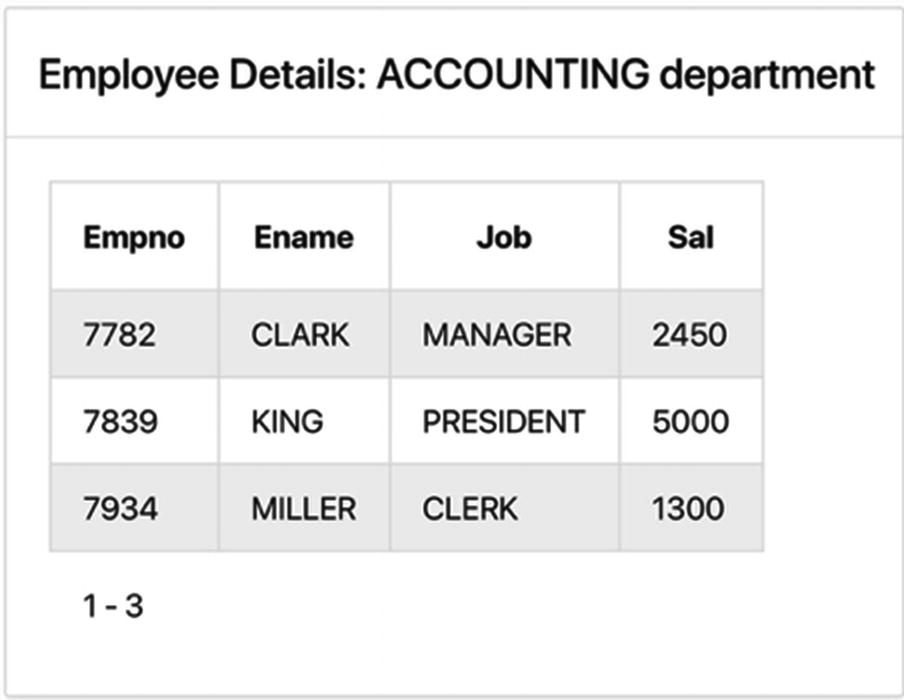
Chart Drill Down
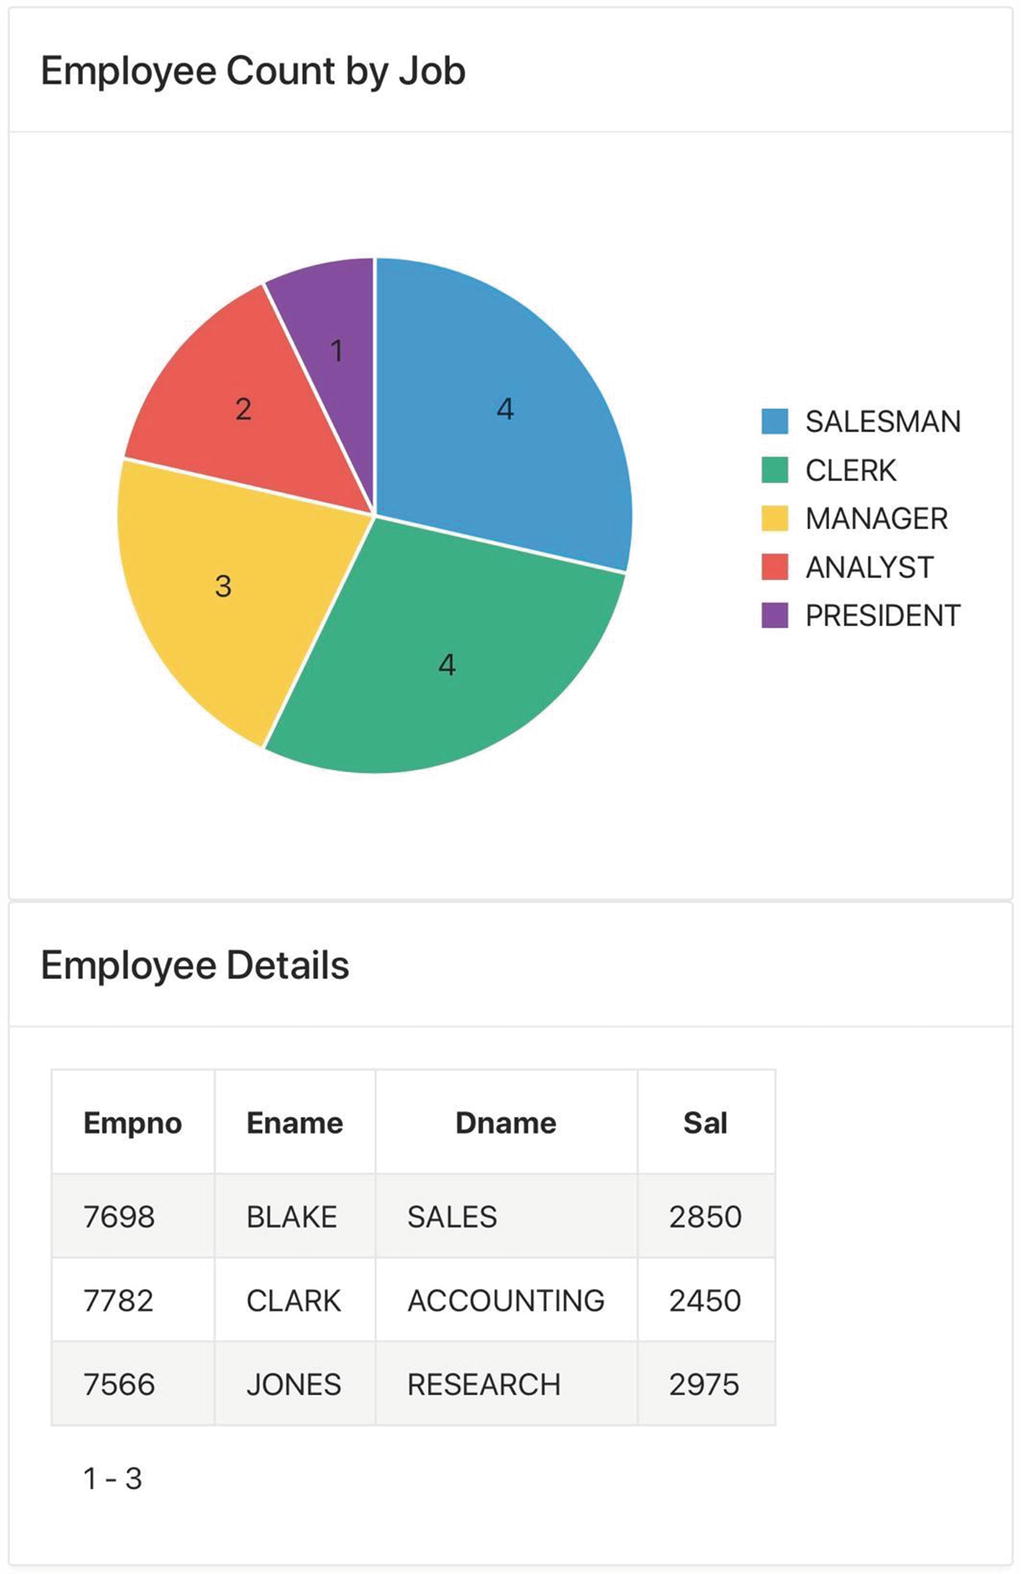
Employees by Job page
This technique of clicking a chart to see more detail is called chart drill down. Here, clicking the chart selects a category value, which is then used to customize the report.
- 1.
Create a hidden item, here called P13_JOB.
- 2.
Create the detail report customized by that item.
- 3.
Create the chart, configuring it to assign the selected job to the hidden item when clicked.
Link properties for a chart series
Configuring a chart for drill down
Customized Titles and Labels
In Chapter 3, you saw how to use HTML tags to format a region title. In fact, you can use HTML tags to format any property whose value is displayed on the page, such as page and region titles, item labels, and button text. Moreover, these properties can also be customized by item values.
Employee detail report with a customized title bar
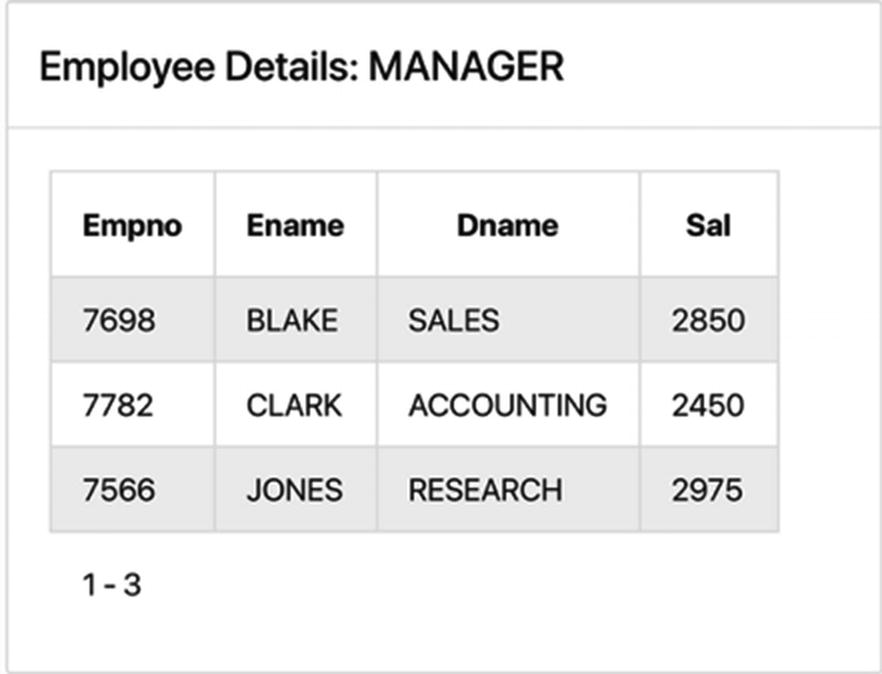
Another customized title bar
That's it! You're done. Note that you use the substitution string notation because the title is an HTML expression.
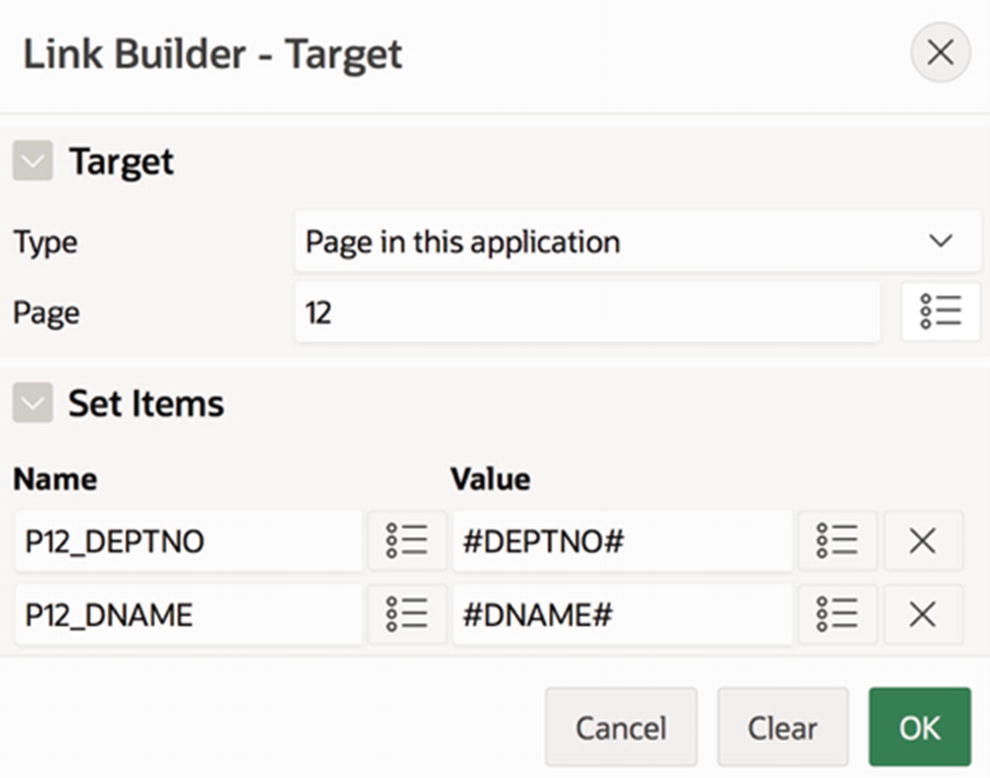
Setting two hidden item values in the link builder
Cascading Lists
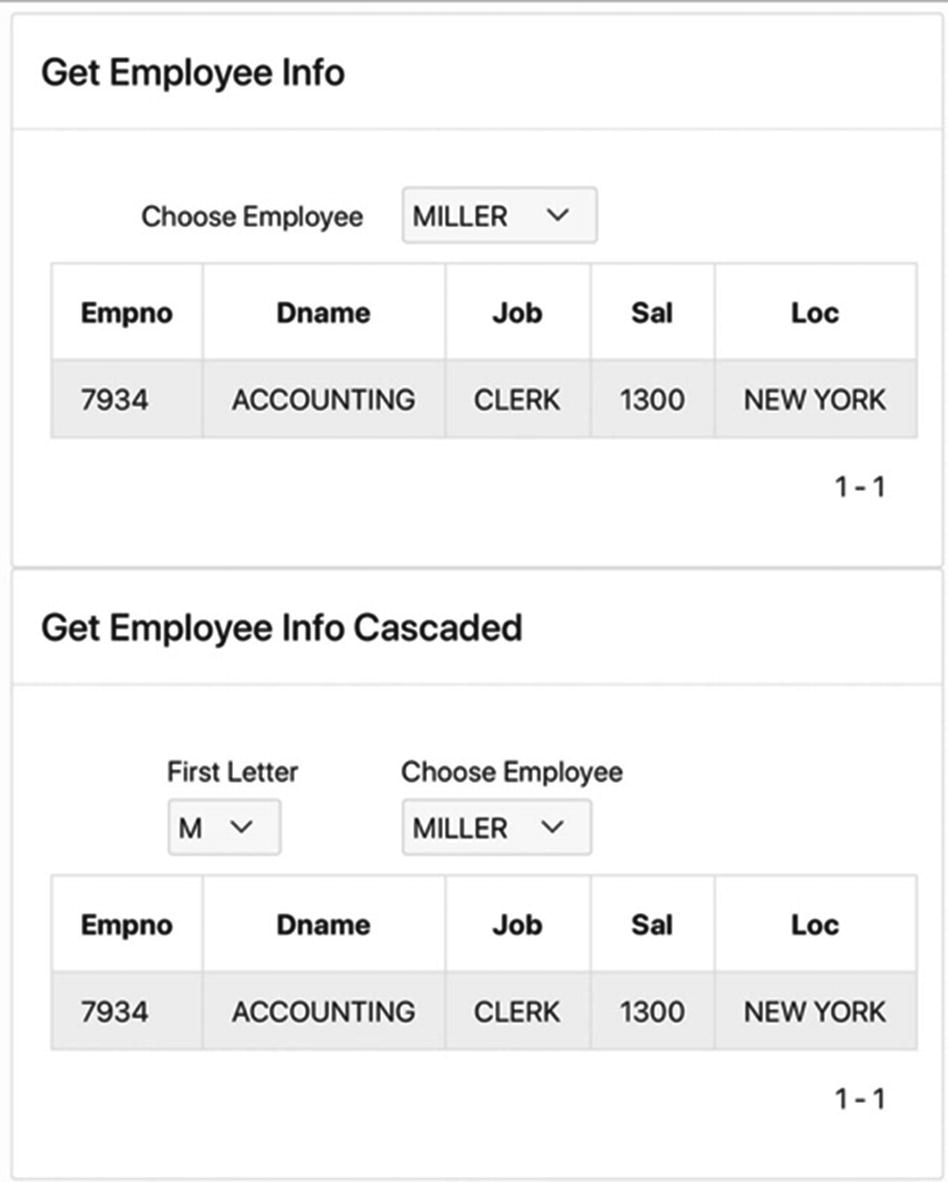
Cascading lists
The top region has no button. Instead, the select list has the action Redirect and Set Value, which means that choosing an employee name from the select list causes the item’s value to be changed in the session state.
If you try out this region, you should discover that it is easy to scan through the list of names, due to the small number of employees. Suppose, however, that the EMP table were large, with thousands of employees to pick from. Scrolling through the select list would be awkward and time-consuming, even if the names were sorted. A common solution to this problem is to let the user choose the name in steps, via a series of select lists.
The bottom region of Figure 6-16 uses two select lists to choose an employee. The first select list displays the first letter of each employee name, and the second one displays the names of employees whose names begin with that letter.
This technique is called a cascading list, in which the display values of the second select list change according to the value selected for the first one. This technique can be extended to multiple select lists—the values of each select list except the first change according to the values chosen for the select lists previous to it. The advantage of this approach is that a user can scroll through several small select lists instead of one large one.
The two select lists in the bottom region are named P14_FIRST_LETTER and P14_EMPNO_CASCADE. They are defined as follows.
The source of the bottom report is exactly the same as the top report, except that P14_EMPNO is replaced by P14_EMPNO_CASCADE.
If you set the action of both these select lists to Redirect and Set Value, then choosing a first letter causes the list of names to be updated, and choosing a name causes the report to be updated.

Specifying the cascading parent item
This figure specifies that P14_EMPNO_CASCADE depends on the value of P14_FIRST_LETTER; that is, it monitors the behavior of P14_FIRST_LETTER and refreshes itself when the value of P14_FIRST_LETTER changes. Consequently, the action of P14_FIRST_LETTER should now be None. The action of P14_EMPNO_CASCADE should be Redirect and Set Value, as before. The Cascading List of Values property enables APEX to use JavaScript and Ajax to refresh the select list without having the re-render the entire page. It is the most efficient way to implement cascading.
Conditional Rendering
Throughout your use of the app builder, you have come across numerous situations in which choosing a particular value in the property editor caused the editor to suddenly display other properties. The Link Builder page shown in Figure 6-15 is such an example—if you choose the target type URL, then the Set Items properties suddenly disappear, and if you change its value back to Page in this application, then those items reappear. What’s going on here?
Although it looks like the items are getting created and deleted on the spot, they are not; instead, those items always exist. When you are in the link builder and select the value Page in this application, APEX displays the additional items; when you select the value URL, APEX hides them. This ability to dynamically show or hide an item is called conditional rendering.
Conditional rendering can be defined for items, buttons, and regions. Each one has a Server-side Condition section in its property editor, which lets you choose a condition type from a select list. Although there are many condition types, the focus here is on the type SQL expression. The value of this type is an SQL expression that returns true/false. The value of the expression determines whether the item, button, or region is rendered.
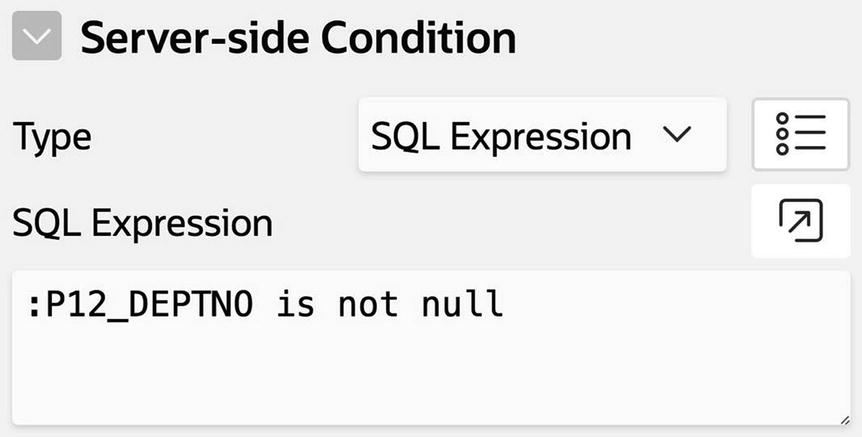
Conditionally displaying the Employee Details region
Conditional region rendering

The static values for P15_CHOICE
And the Department Info region has the following source:
select * from DEPTBoth of these regions are displayed conditionally, depending on the value of P15_CHOICE. The condition for Employee Info is the following SQL expression:
InStr(:P15_CHOICE, 'Employee') > 0And the condition for Department Info is the following SQL expression:
InStr(:P15_CHOICE, 'Department') > 0When the button is clicked, APEX creates a colon-delimited string containing the values of the checked boxes and saves it in the session state. When the page is then re-rendered, APEX uses the session state value to initialize P15_CHOICE and evaluates each conditional expression to determine which regions to display. Consequently, it is important that the Source properties of P15_CHOICE be specified as in Figure 6-21.

Source properties of P15_CHOICE
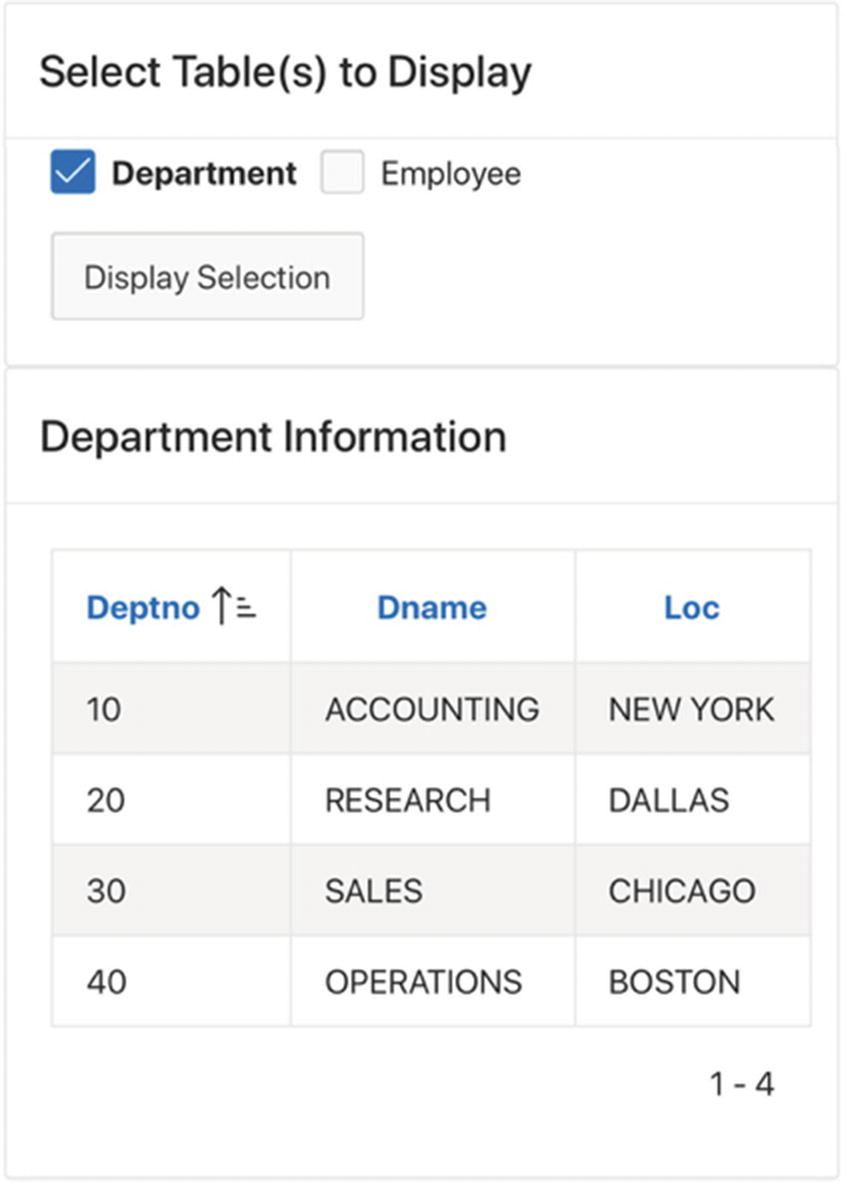
Region Display Selectors

Part of the Application Properties screen
Note in particular the tab bar under the title, with tabs labeled Show All, Name, Properties, and so on. This bar is a region display selector. If you click the Show All tab, the page displays all its regions; if you click any of the other tabs, the page displays only the chosen region.
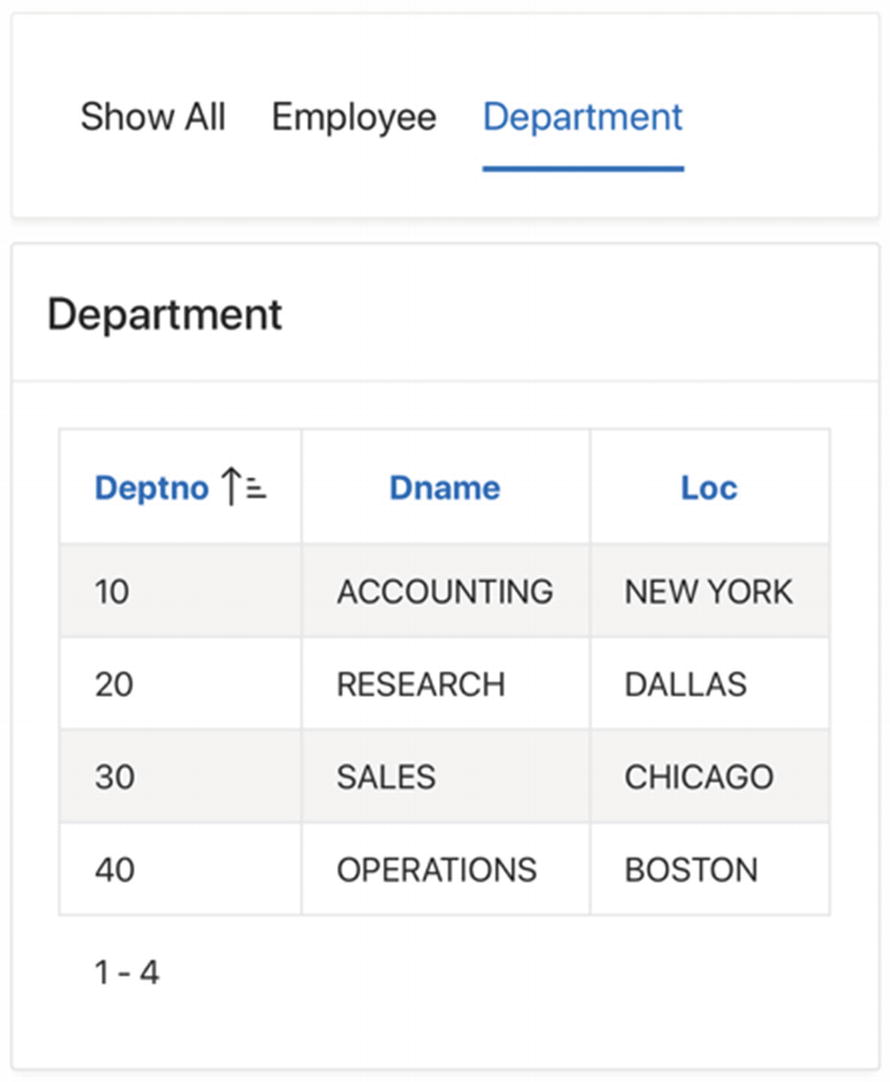
Using a region display selector region
This page consists of two classic report regions, one for each of the EMP and DEPT tables. Above it is a Region Display Selector region . To create the display selector region, create a region in the page designer and then change its type to Region Display Selector. Unlike every other region you have encountered, this region has no source; its sole purpose is to display a tab bar for the regions of the page.
The region display selector in Figure 6-23 is placed in the Content Body position with a small sequence number so that it appears first. Its template is Buttons Container, which formats the region without a title.
By default, the region display selector displays a tab for every region on the page (provided that there is more than one region to display). If you want to exclude a region, use its property Region Display Selector, which is a switch in the Advanced section. Turning the property off excludes that region from having a tab in the display selector.
Summary
The APEX server maintains data about each user session; this data is called the session state. In this chapter, you saw how the session state gets modified and examined ways that an application developer can make use of it.
The session state has a variable for each item in the application. These variable values can get modified as the result of a submit or redirect action. When a page is submitted, the values of all items on the page will be updated in the session state. When a page redirects to a target page, the redirect operation can assign values to specific items. In particular, when you configure a button, report link, or chart to redirect, the property editor will display the Link Builder wizard, which has a section for specifying session state values.
One common use of session state is to enable users to customize reports. The idea is that a user specifies some values, and those values affect which of the report records are displayed. You saw examples of several ways that a user could specify those values:
The user can enter the values directly into items on the page.
The user can select a row from a master report.
The user can select a value by doing chart drill down.
This chapter also considered additional uses of session state, such as cascading lists, in which the value chosen for one select list determines the values displayed by another, and conditional rendering , in which the value of an item determines whether a region should be visible or hidden.
Session state is an immensely important aspect of APEX. Most of the examples in the rest of the book will make use of the techniques mentioned in this chapter.