Many of the processes from Chapter 7 involve certain basic tasks, such as retrieving the values of a record given its key, finding the previous and next records of a given record, updating records in a table, and modifying the session state.
APEX has a region type, called Form , which makes it possible to perform these tasks without any PL/SQL programming whatsoever. A form region contains two generic processes—one that executes during rendering and one that executes during processing—which you can configure to meet many of your needs.
This chapter examines the use of form regions, their processes, and some related processes built into APEX. It also evaluates some of the APEX wizards for creating form-based pages. Knowing how and when to use the APEX form regions and wizards can relieve you of the need to write PL/SQL code for the more common page development tasks.
Form Regions
A form region is similar to a report region, in that both have a source query. Their difference is in how they display their output records. A report displays several output records at a time tabularly, whereas a form displays one record at a time, with each value in an item. Reports are read-only, but forms can modify the database.
Looking back at Chapter 7, the Emp Info region of the Single Row View page (refer to Figure 7-17) is used as a form, as are the Insert Employee and Update/Delete Employee regions of the Single Row Update page (refer to Figure 7-24). Those regions had the type static content and used PL/SQL code to implement their functionality. This section introduces the Form region type and shows how the same functionality can be obtained without any PL/SQL coding.
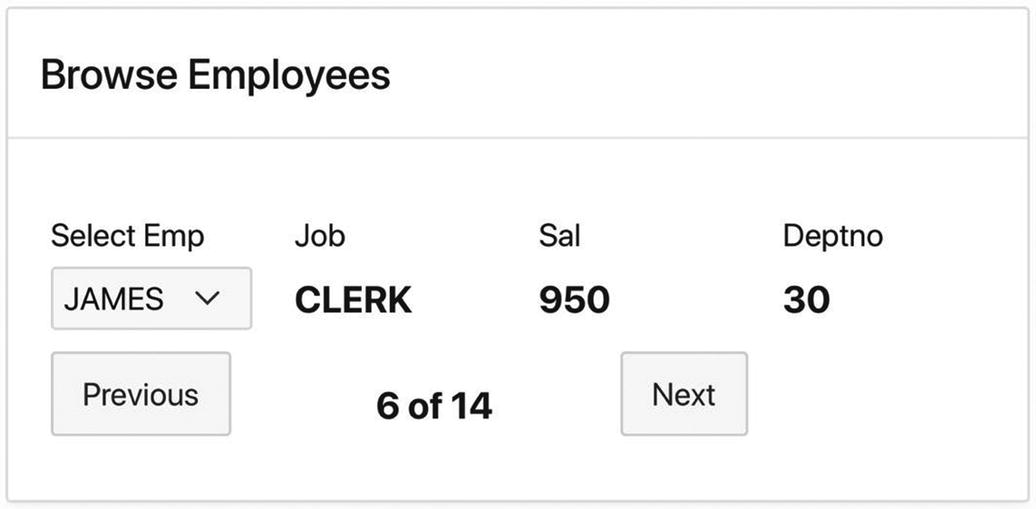
The Form View page

Source of the Browse Employees region

The rendering tree for a form region
The name and type of each item are taken from the corresponding column definitions. For example, the item corresponding to the column EmpNo is named P29_EMPNO, and its type is Number Field. The item type for a character field is Text Field, the type for a date field is Date Picker, and so on.

Source properties of a form item
These items and their property values were created for you when you specified the source of the form region. However, there is one property value that you must specify yourself, and that is the Primary Key property shown in Figure 10-4. The rendering process that comes with the form needs to know which item corresponds to the primary key. So you should turn on the Primary Key property for P29_EMPNO. If you forget to specify a primary key item, APEX will display an error message to remind you.

The default form region

Identification properties for the initialization process
I then set the action of the select list to Redirect and Set Value. Consequently, when an employee name is chosen from the list, the corresponding employee number will be assigned to the item P29_EMPNO. You should verify this in your page. Select an employee name from the list and watch the corresponding employee values appear in the items.
Create two hidden items to hold the previous and next employee numbers. I called these items P29_PREV and P29_NEXT.
Create a text field item to hold the string that displays the position of the current record. I called this item P29_COUNT.
Go to the Settings section for the initialization process, and set its Next Primary Key Item, Previous Primary Key Item, and Current Row/Total Item properties as shown in Figure 10-7.
Create two buttons, called Previous and Next. The Previous button should redirect, setting the value of P29_EMPNO to &P29_PREV., as shown in Figure 10-8. Configure the Next button similarly.
Optionally, go to the Server-side Condition section for the Previous button, and set its condition to the SQL expression :P29_PREV is not null. Configure the Next button similarly. This causes the buttons to be rendered only when appropriate.

Configuring the form’s initialization process

Configuring the action of the Previous button
Change P29_ENAME to be a hidden item, because its value duplicates the display value of the select list.
Change the visible items to be display-only, with the exception of P29_EMPNO, which should remain a select list.
Set the label of P29_EMPNO to Select Emp.
Set the label template of the visible items to Optional-Above. The exception is P29_COUNT, whose label template is Hidden.
Set the position of the Previous and Next buttons to be Region Body, so that they are displayed with the items.
Set the sequence numbers of the items and buttons so that the three highest are Next, P29_COUNT, and Previous in that order.
Position the items into a layout having two rows. The Previous button should begin the second row. The remaining visible items begin new columns.
If the automatic positioning of an item is not sufficient, then change its Column property (in its Layout section). For example, I set the Column value for P29_COUNT to 3, meaning that it begins at the third grid point.
Form Update

The Form Update page
Updating Records
The Update Employees region works as follows: a user chooses an employee from the select list. The EMP record for that employee will then be fetched and its values used to initialize the region’s items. The user can then modify the item values, as desired. Clicking the Update button will modify that record to have those values. Clicking the Delete button will delete the record.
Look at the resulting rendering tree. APEX has created an item for each of the fields in the query, as well as an initialization process. This is the same situation that you encountered in the Form View page. Before you forget, go to the Source properties for P30_EMPNO (as in Figure 10-4) and turn on its Primary Key property.
You should also create two buttons, named Delete and Update. Their position is Edit, and their action is Submit.
Your form should now be able to successfully retrieve the information for a selected employee. Your remaining task is to get the buttons to perform their intended database modifications. This turns out to be surprisingly easy.
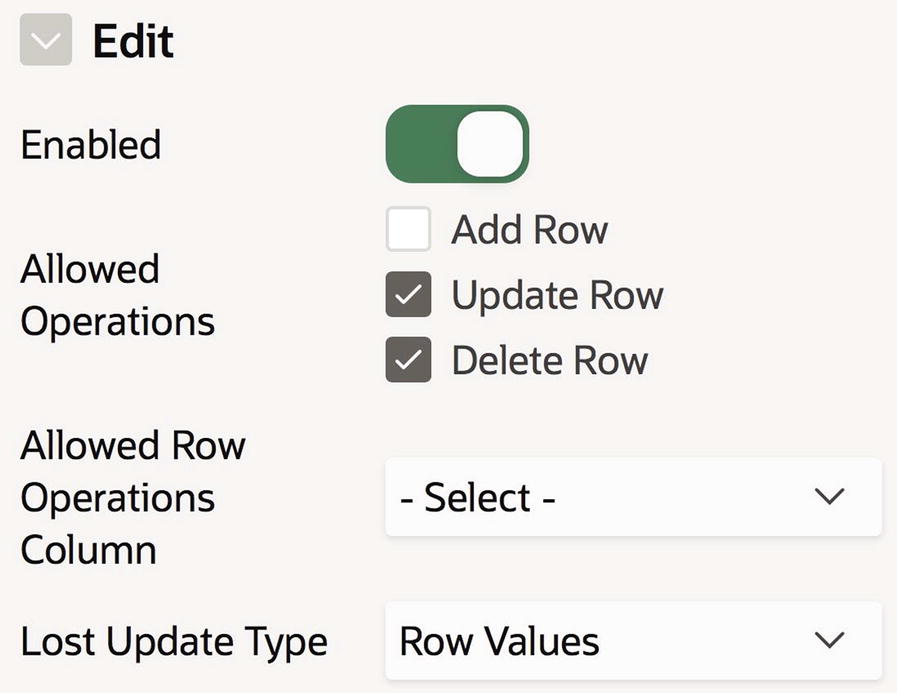
A form region’s edit properties
As an aside, note the Lost Update Type property at the bottom of Figure 10-10. This property lets you specify how the process should implement lost update detection. Its default value is Row Values, which corresponds to the lost update detection algorithm of Listing 7-10.

ARP process properties
An ARP process can execute an insert, delete, or update operation in response to a submit action. But given a particular submit request, how does it know which operation to execute?
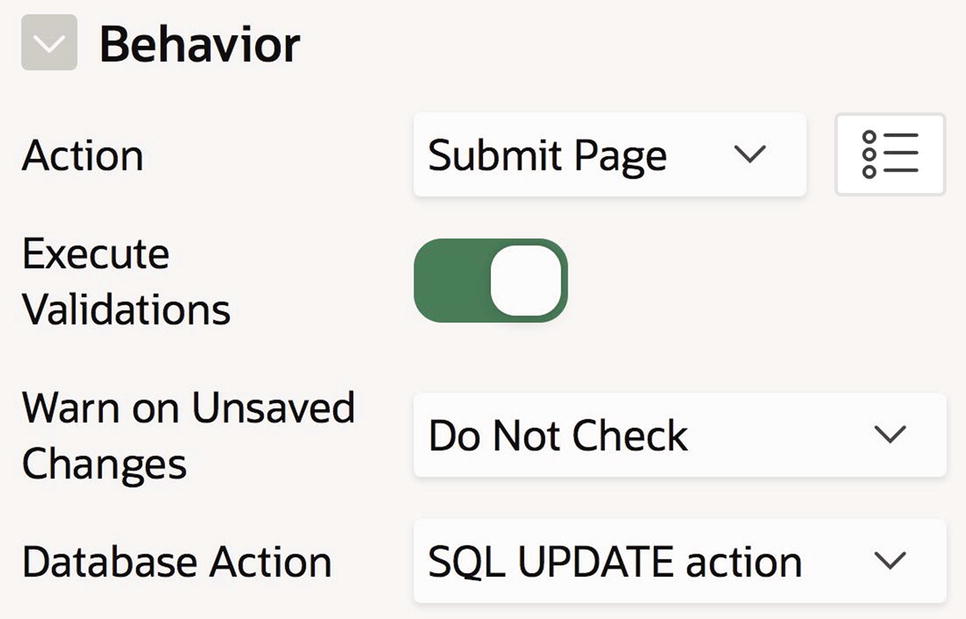
Configuring the behavior of the Update button

Specifying the condition for a process
Clearing Session State
Take some time to run your Form Update page . Choose a record, modify its values, and click the Update button. Everything should work. However, you will discover a problem with the Delete button. When you click it, APEX will display an error message.
The problem is that after the deletion, the item P30_EMPNO still contains the deleted employee number. So during page rendering, the initialization process will attempt to fetch values from this nonexistent record, thereby generating the error. The solution is to set P30_EMPNO to null after the deletion occurs. In fact, this is exactly what you did in the PL/SQL code for the DeleteEmp process shown in Listing 7-21.
But how to get the Delete button on page 30 to set the value of an item? Since you cannot touch the built-in ARP process, your only option is to create another process that will execute after the deletion occurs. Let’s call this process ClearEmpNo.
Those of us familiar with PL/SQL coding realize that this is a straightforward, simple solution. But APEX has another solution for those unfamiliar with PL/SQL, namely, the Clear Session State process type. Here is how to use it.
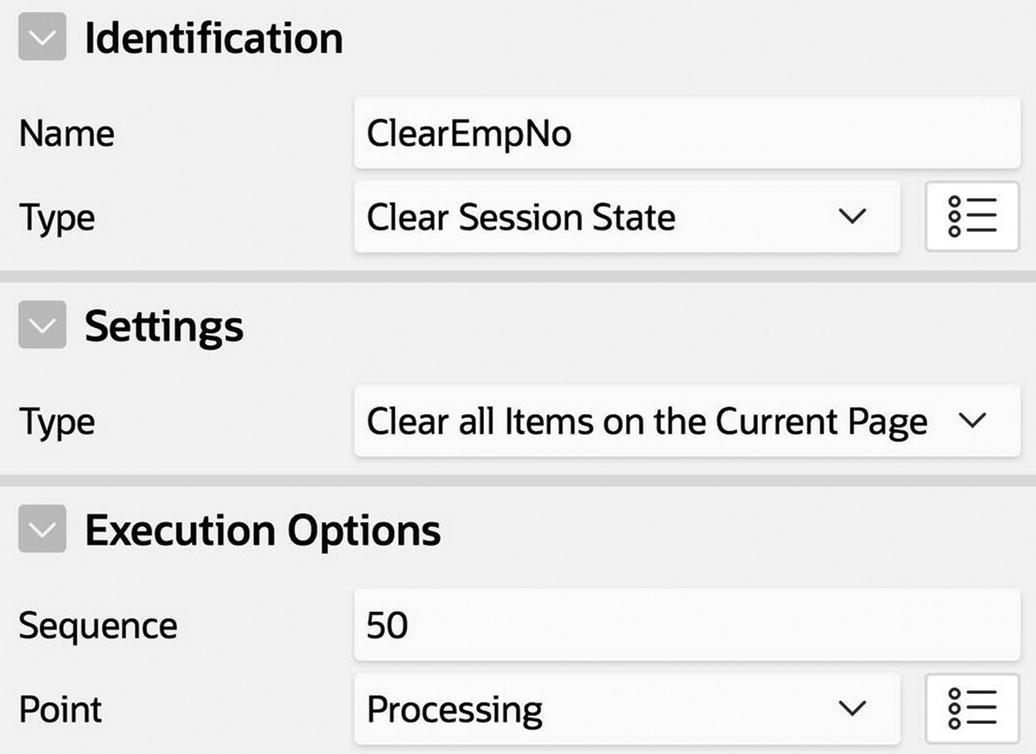
Properties of a Clear Session State process

Configuring a process to clear P30_EMPNO
You must set the value of its When Button Pressed property to Delete.
You must set its sequence value (shown in Figure 10-14) to be larger than that of the ARP process.
Inserting Records
The second region of the Form Update page of Figure 10-9 is called Insert Employees. It works as follows: A user enters values into the five items of the region and clicks the Insert button. APEX will then insert a record into the EMP table, using default values for the unmentioned fields.
An ARP process can only insert values appearing in page items. Thus, it is important that the Insert Employees region have an item for each field of EMP. In other words, the source of the form should be the query select * from EMP. You can then hide the items that are to receive default values.
When you create a form region having the preceding source, APEX will immediately inform you of a problem. The issue is that several of its generated items have duplicate names. The name of a generated item is based entirely on the name of its corresponding field, so a field name that appears in multiple forms on the page will have multiple items with the same name.

Renaming duplicate items
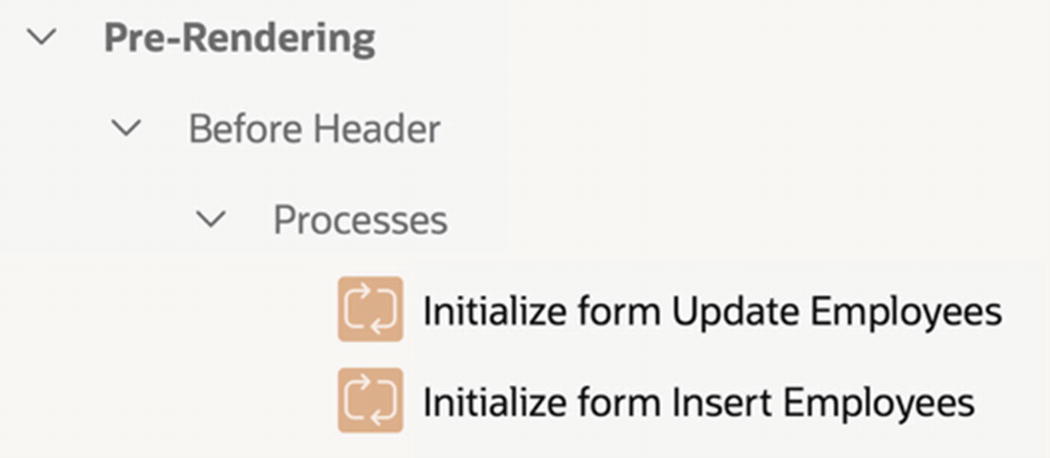
Renaming duplicate initialization processes
Turn on the Primary Key property for P30_INSERT_EMPNO in its Source section.
Turn on the Enabled property in the Edit section of the Insert Employee Attributes. Then ensure that only the Add Row operation is checked.
Create a button named Insert. Configure its Action property to be Submit Page and its Database Action property to be SQL INSERT action.
Go to the property editor for the ARP process named Process form Insert Employees, and give its When Button Pressed property the value Insert.
Format the type and layout of the items according to your taste.
If you try out your new region, you will discover one further problem, namely, that the form expects you to always have values for P30_EMPNO and P30_INSERT_EMPNO. This requirement was appropriate when Update Employees was the only region, because the Delete and Update operations make no sense without an employee number. But P30_EMPNO can (and should) be null when the Insert button is pressed. Similarly, P30_INSERT_EMPNO should be null when the Delete and Update buttons are pressed. Thus, you need to disable the Value Required property in the Validation section of both items.
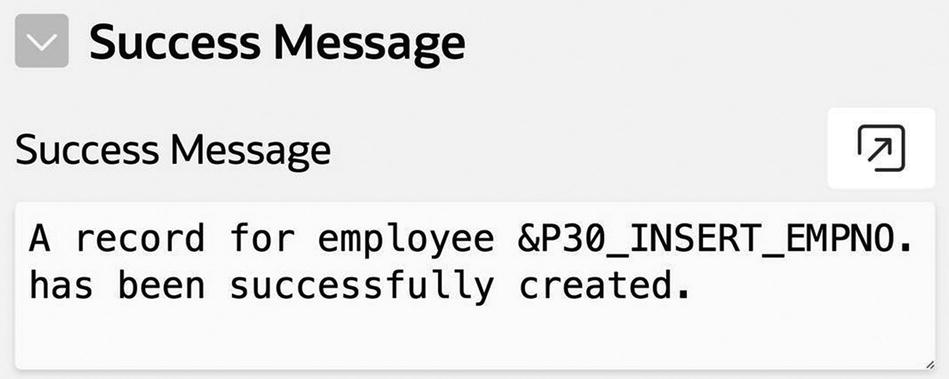
Improving the Insert button’s success message
Computations
The Insert Employees region shown in Figure 10-9 only displays items for the columns EName, Job, Salary, and DeptNo; the items for HireDate, Comm, and Offsite are hidden. The idea is these hidden items will contain default values—in particular, P30_INSERT_HIREDATE will contain the current day, P30_INSERT_COMM will be 0, and P30_INSERT_OFFSITE will be 'N'. The ARP process will use the values of these items when it performs its insertion operation.
The question, then, is how to get default values into the hidden items. The answer is to use an APEX computation. A computation is a page component that assigns a value to one item. The idea is to create a computation for each item that needs a default value and to arrange for these computations to be executed before the ARP process executes. In that way, the computed values will wind up as part of the session state, and the ARP process will use them when it creates a new record.

Adding three computations to the Form Update page

Properties for the HireDate computation
The other two computations are created similarly. The simplest way to specify a constant is to use the type Static Value, but you can also specify it using an SQL expression.
PL/SQL Code Equivalent to Three Computations
I intentionally hid the items P30_INSERT_HIREDATE, P30_INSERT_COMM, and P30_INSERT_OFFSITE in Figure 10-9 to keep users from changing their default values. Another design option is to display these items with their default values already filled in. The user can then treat these values as suggestions and modify them if desired.
This option implies that the computed values should be assigned to the items during page rendering, instead of after submission. Implementing this option is straightforward. All you need to do is unhide the items and change the execution point of the three computations (or their equivalent PL/SQL process) to After Header.
Sending Email
Recall from Chapter 7 that the Revised Employee Data Entry page has a process SendSuspiciousEmail, whose job is to send email messages when suspicious database deletions and updates occur. The code for this process appeared in Listing 7-14. It is written in PL/SQL and makes use of the apex_mail.send library function.
APEX has the process type Send E-Mail, which gives you the ability to send email without having to write PL/SQL code. This section will show how to use this process to achieve the same functionality as in Listing 7-14.

Properties for a Send E-Mail process
The body text makes use of the APP_USER variable and the item P30_EMPNO to identify the user and the affected employee number. This behavior is the same as in Listing 7-14, except for one feature—the body of the email does not indicate whether the operation was a delete or an update. Listing 7-14 implemented this feature by an if-statement inside the PL/SQL code. How can you do the same thing when you use a process of type Send E-Mail?
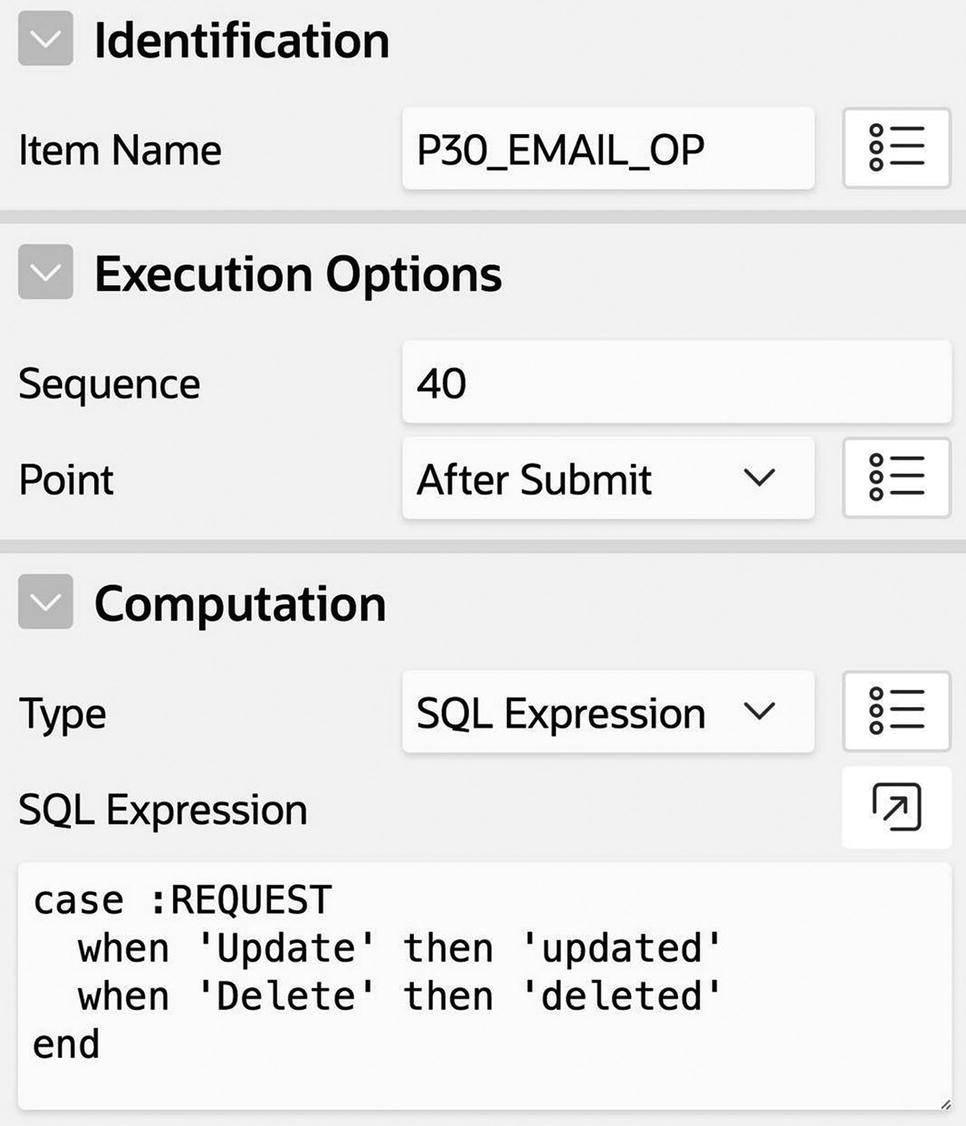
A computation to identify the request
Finally, you need to specify when the SendSuspiciousEmail process executes. Its server-side condition should specify what is meant by a “suspicious” change to the database. I chose to use the same condition shown in Figure 7-16. In addition, the sequence number of the process must be chosen such that it executes after the database operation but before the ClearEmpNo process clears the deleted employee number from P30_EMPNO.
Report with Form Pages
An APEX Form region automatically generates items for you and provides two powerful built-in processes, which save you time over having to write comparable items and PL/SQL processes. However, you still need to create and configure additional buttons and items. To simplify your work further, APEX provides wizards for creating prebuilt form pages. You enter your information into the wizard and it creates the necessary regions, items, buttons, and processes. Such wizards can be effective shortcuts if you want what they produce.

APEX wizards to create form pages
A Report with Form page is actually two pages—a report page and a form page. It works similarly to the Single Row Update page in Figure 7-24, but the report and form are on two separate pages instead of being on separate regions of the same page.

Creating report with form pages
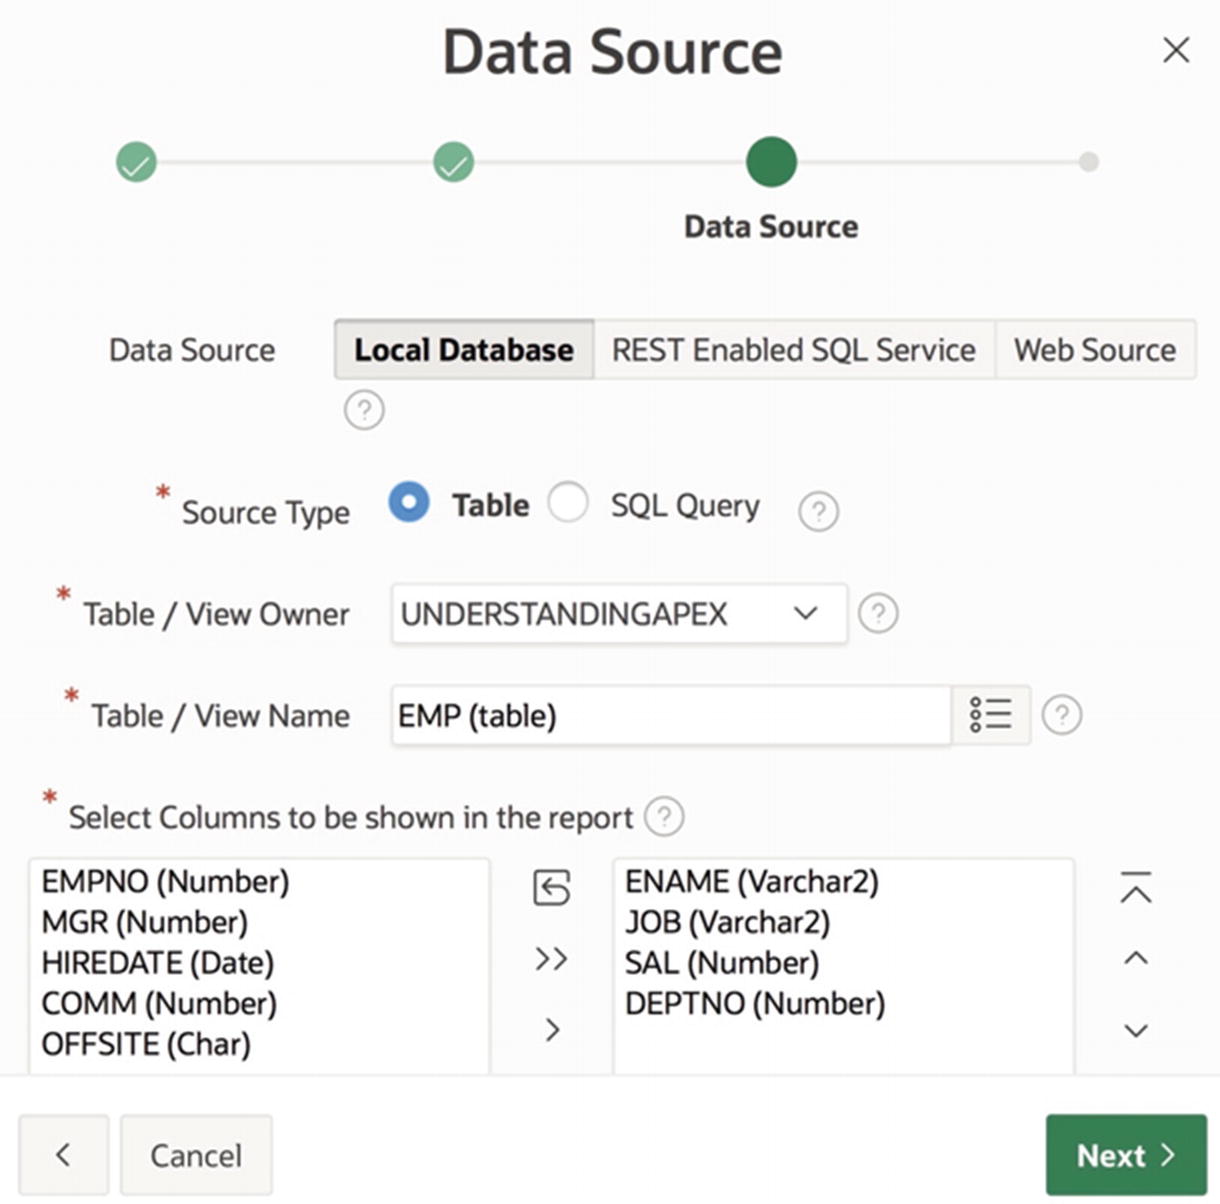
Entering the source query for the report and form
The third screen (not shown) is where you specify the navigation menu entry for the report page. Note that the form page does not get a menu entry because it should only be accessed via its report page.

Specifying the primary key column
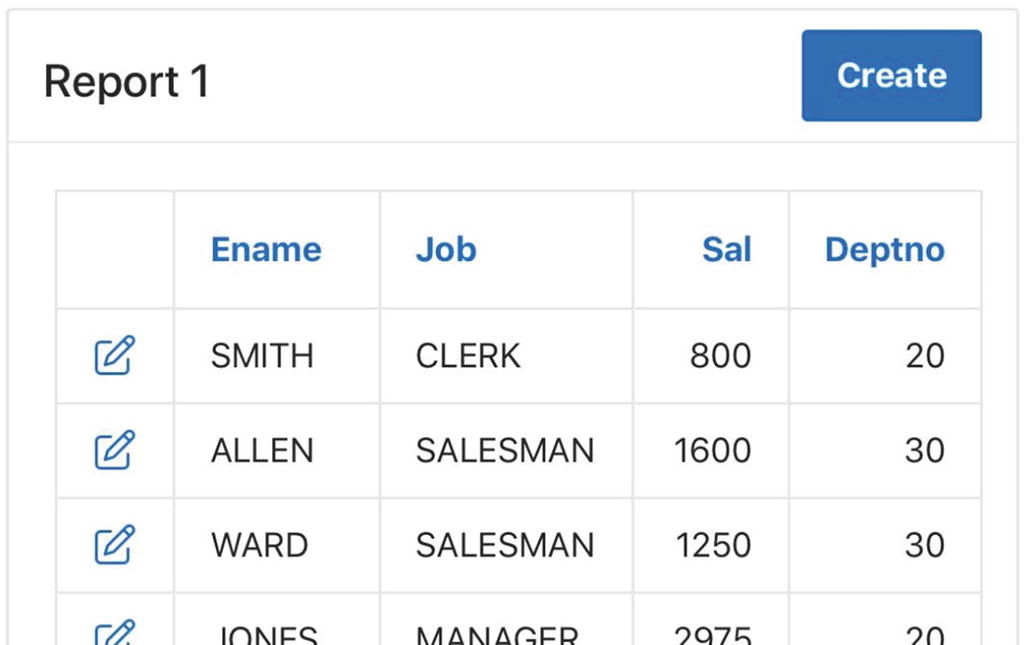
The Report with Form report page
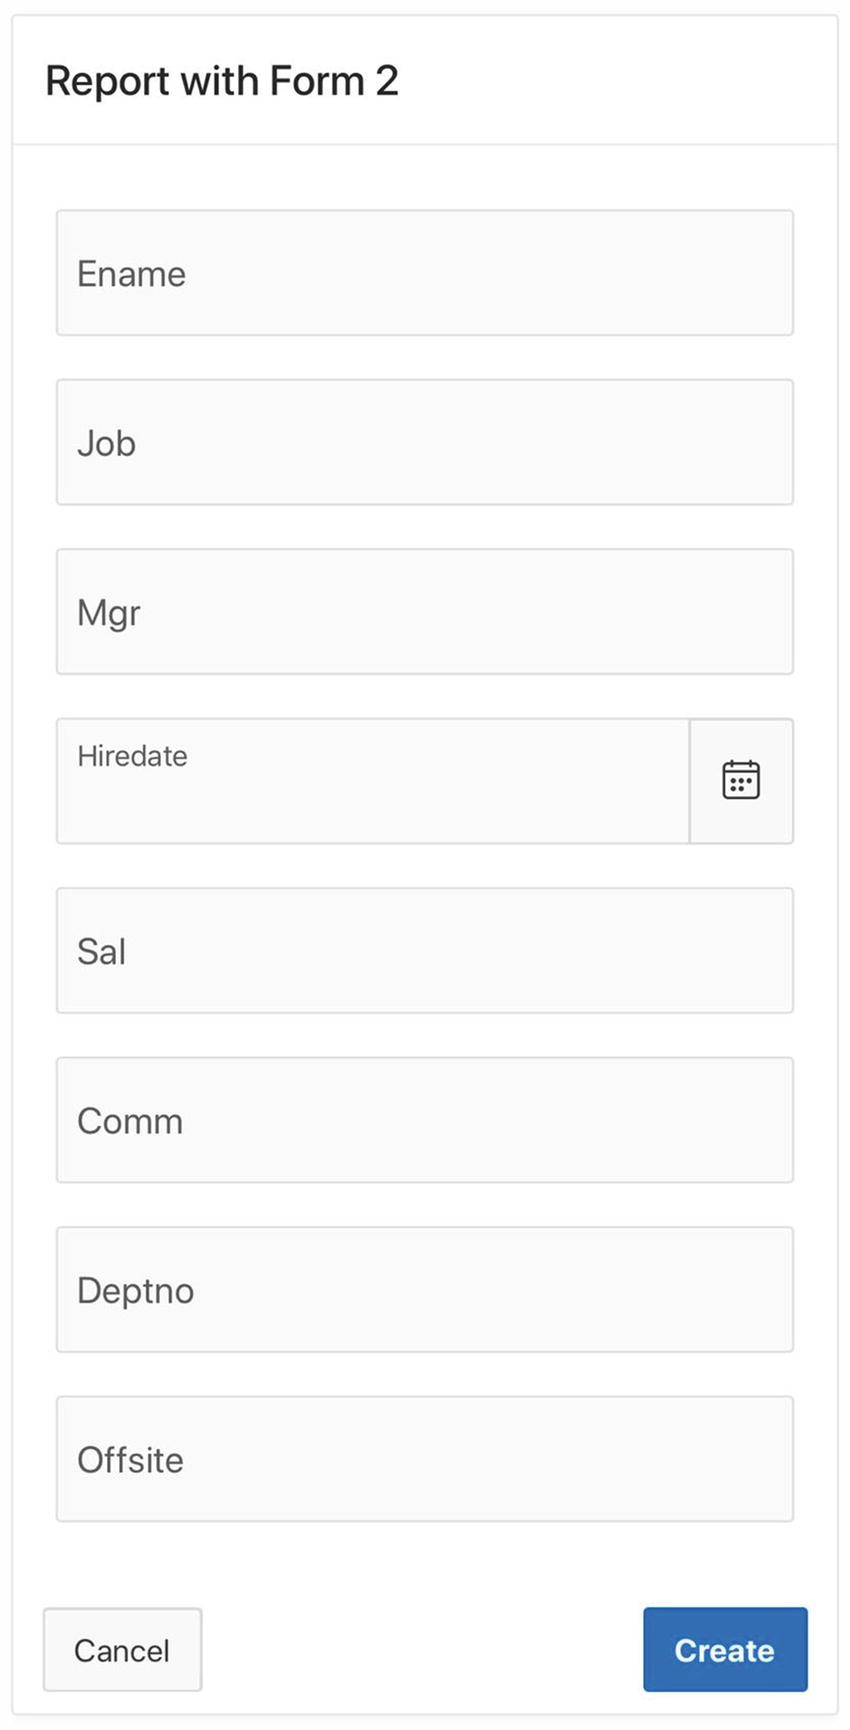
The form page in insert mode

The form page in update/delete mode
Note that the buttons on the form page differ according to its mode. In insert mode, the page displays a Create button, which inserts a new record into the EMP table. In update/delete mode, the Delete button deletes the selected record and the Apply Changes button updates it. All three buttons return to the report page after changing the table. The Cancel button is common to both modes; it simply returns to the report page without changing the table.
The following subsections investigate how the wizard implemented these pages.
The Report Page

The Link Builder screen for the EMPNO column
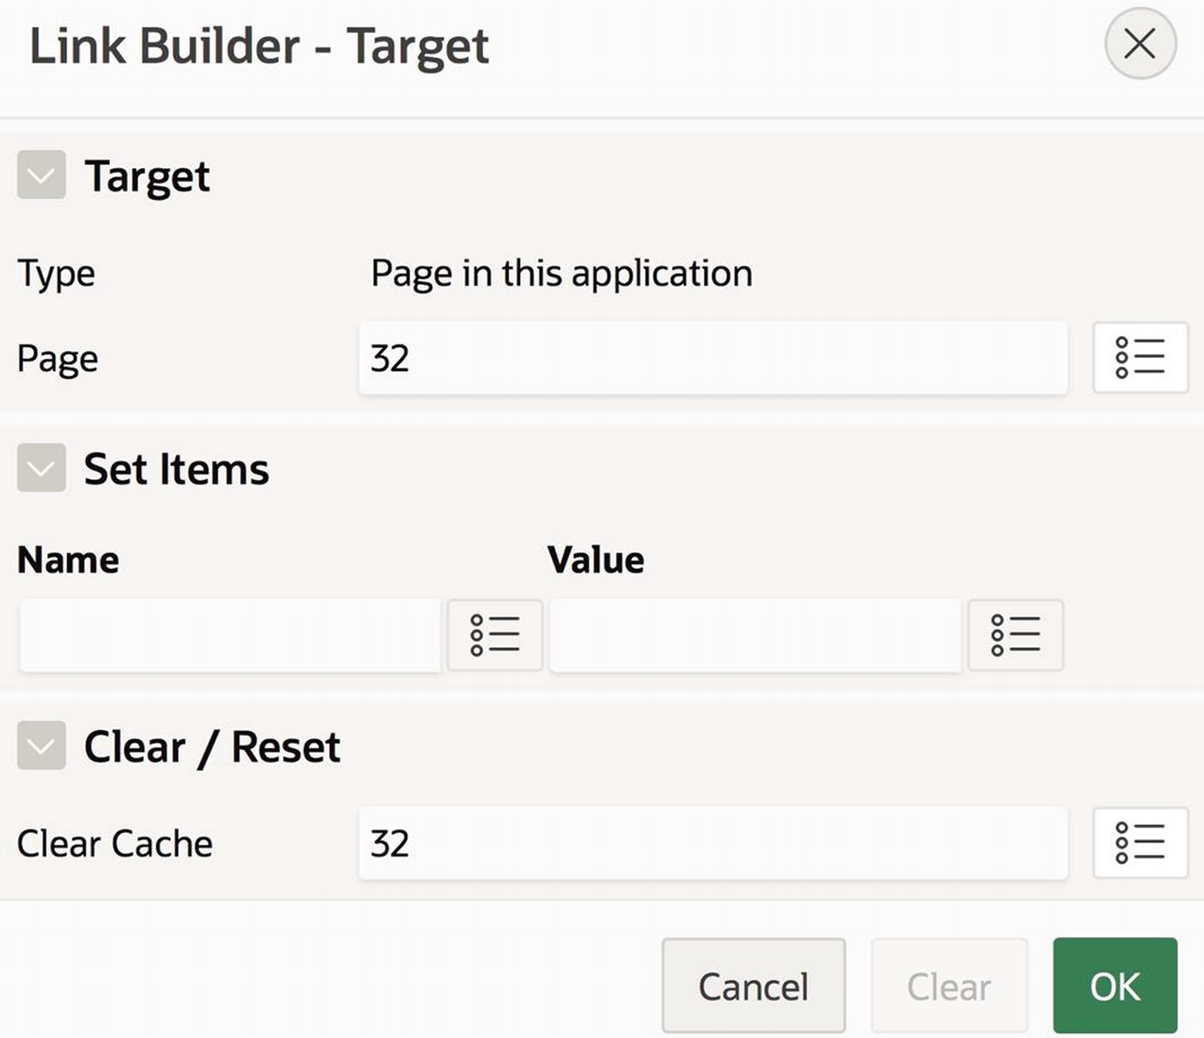
The Link Builder screen for the Create button.
The value of P32_EMPNO therefore determines whether the form page is in insert mode or update/delete mode. In insert mode, the values of the page items will all be null because the Create button cleared them. In delete mode, the values of the page items will all have a value, due to the action of the initialization process.
The Create button is rendered in blue to indicate that it is a “hot” button. The relevant property is named Hot and is in the button’s Appearance section, as shown in Figure 5-29.
The Form Page

The rendering tree for the form page
Recall that the DELETE and SAVE buttons are rendered only when the page is in update/delete mode and the CREATE button is rendered only in insert mode. The form uses the value of P32_EMPNO to determine the conditional rendering. If it is null, then CREATE is rendered; otherwise, DELETE and SAVE are rendered. The form page also contains a branch that redirects to the report page after the submit processing has finished.

Link Builder screen for the DELETE button
The Processing tab of the form page contains two components: the ARP process common to all form regions and a branch. The process fires when the CREATE, SAVE, or DELETE button is clicked. Since these buttons are the only components on the page that perform a submit action, the process does not need to be conditional. The branch unconditionally redirects to the report page following the submit processing, which explains why every button click from the form page causes a return to the report page.
Customizing the Report and Form
Although the Report with Form wizard produces fully functional pages, they are raw and unpolished. It is unlikely that you would want to use them as is in any real application. Instead, you ought to think of them as the foundation of a more expansive, customized application. These customizations fall into three basic categories: aesthetic, functional, and organizational.
The aesthetic customizations improve the look and feel of the application. For example, you can use the techniques of Chapter 3 to improve the format of the report and its columns and the techniques of Chapter 5 to improve the appearance and layout of the buttons and items. You can change the default region titles, button text, and item labels.
Another aesthetic issue concerns the visibility of form items. Recall from Figure 10-25 that the Report with Form wizard asked you to specify the items that should appear in the form page. The problem is that the form page gets used for both insert and update, and these two operations have different requirements. For example, the insert operation needs to have items for all columns, but you might want to hide the items for columns that receive default values. Moreover, the update operation should only show items for updatable columns. Therefore, it would be a good idea to provide a Server-side Condition expression for each item, specifying when that item should be visible.
Alternatively, you could choose to disable an item instead of hiding it. Each item has a property section Read Only, which lets you specify a condition, much like the Server-side Condition section does. Whereas Server-side Condition hides an item, Read Only makes it unmodifiable. So, for example, in update mode, it might be a good idea to display the entire record, but format the unmodifiable ones (such as EName) as read-only.
Functional customizations add features to the pages generated by the wizard. For example, you could add Previous and Next buttons to the form page. You could also modify the insert and update operations so that they remain on the form page after changing the database, as in the Single Row Update page of Figure 7-24.
Organization-related customizations involve adding or deleting pages and regions and moving existing page components among them. For example, the report and form regions could be moved to the same page. Or you could split the form region into two regions—one for insertion and one for update/delete—as in the Single Row Update page. Or you could even have three form regions, as in the Employee Data Entry page of Figure 7-5.
Form Pages
The two pages created by the Report with Form wizard are very loosely connected. Their only interaction is when a link on the report page or its Create button is clicked, both of which set the value of the item P32_EMPNO on the form page. Consequently, the form page can be used in conjunction with other kinds of page, the only requirement being that the other page provides the form page with an employee number.
In this section, instead of connecting a report with a form, I want to connect a tree with a form. A tree depicts a table’s records hierarchically, which is possible when the table has a field that can be the basis of the hierarchy. For example, the Mgr field of EMP determines a hierarchy, known in business as the management hierarchy. The president, who has no manager, is the root of the hierarchy. Every other employee is the child of its manager.
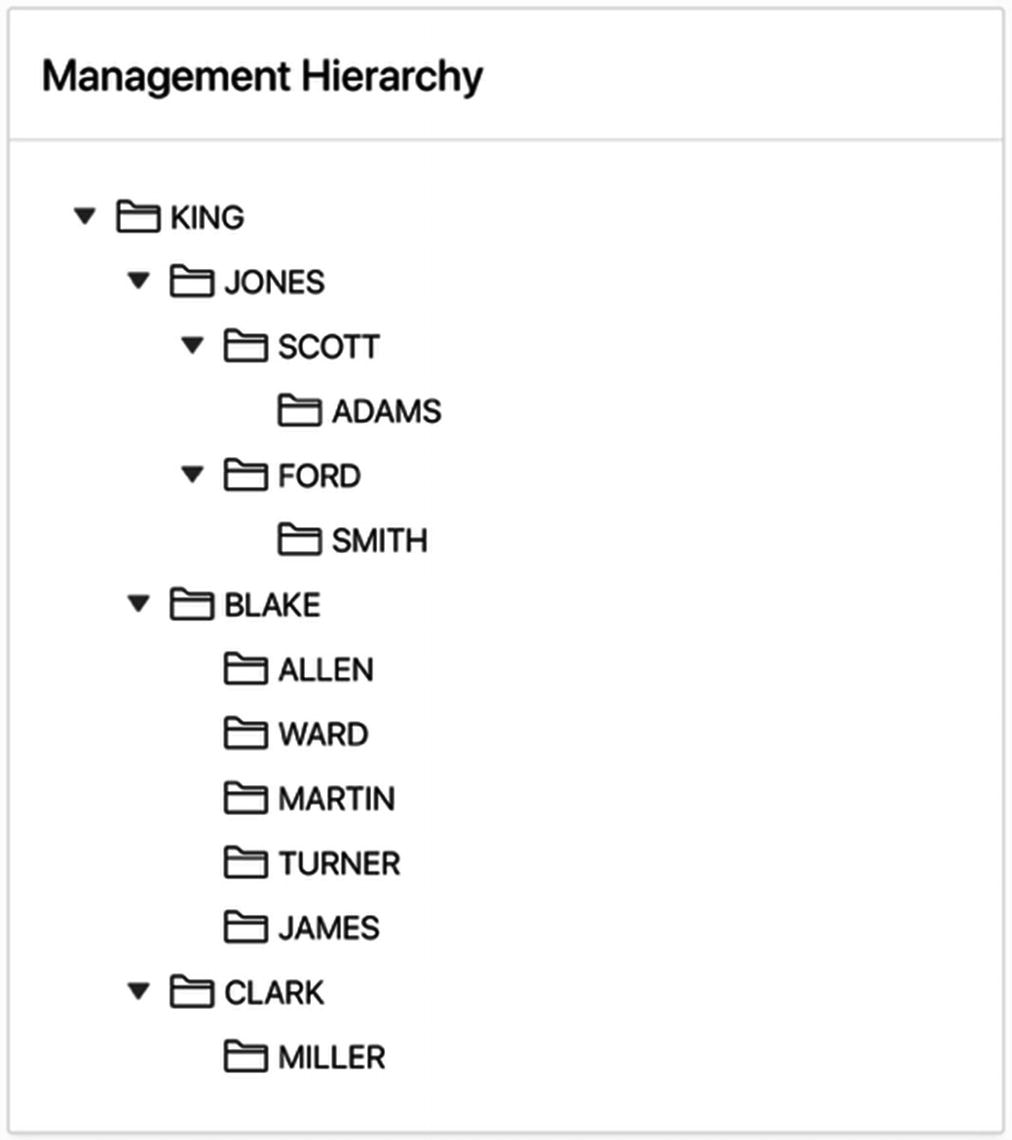
The Management Hierarchy tree page

The Management Hierarchy form page
Implementing the Tree Page
Although APEX has a page wizard to create trees, it is more instructive (and simpler!) to create the page yourself. So create page 33 as a blank page named Management Hierarchy Tree, and create a region of type Tree. Its source should be the EMP table.

Tree region settings
Node Label Column is the field whose values are the labels of the tree nodes.
Node Id Column is the primary key field.
Parent Key Column is the field that defines the hierarchy. A record’s value for this field specifies the primary key of its parent.
Start Tree With specifies the root of the hierarchy. The setting Value is NULL asserts that the root of the hierarchy is the record whose parent key column value is null.
Run your page at this point, and explore the tree. If a node has children, there will be an arrow to its left. Clicking on these arrows will expand or contract their list of children.

Specifying the link to the form page
Implementing the Form Page
Page 34 of the Employee Demo application is the form page shown in Figure 10-35. It is easy enough to implement it by creating a blank page and adding a Form region to it. However, it is even easier to use a wizard to create the form page itself.

The first screen of the Create Form wizard
After asking for the page number and name, the wizard requests two things: the page that the form should branch to after a submit (i.e., the Delete and Apply Changes buttons) and after a redirect (i.e., the Cancel button). The remaining screens are similar to what you’ve seen before—a screen asking about the navigation menu, a screen requesting the source, and a final screen requesting the primary key.
The form page generated by the wizard should work seamlessly with the tree page, without any additional configuration on your part—the tree redirects to the form when a tree node is clicked, and the form redirects to the tree when a button is clicked. My form page in Figure 10-35 is the result of simply changing the type and layout of the items generated by the wizard.
I want to stress that the form page generated by the Form wizard is exactly the same as the form page generated by the Report with Form wizard—the only difference between the two wizards is that Report with Form also generates a page containing a Create button and a report. Moreover, the page generated by the Form wizard is exactly the same as a blank page with a Form region, plus a few buttons and property settings. The other form-based wizards in Figure 10-23 are similar to Report with Form. Knowing this can help you decide, for any given task, whether to use one of the wizards or to write the pages yourself.
Master-Detail Forms
Chapter 6 discussed the creation of master-detail reports. In a master-detail report, two reports are linked such that selecting a row of the master report causes the detail report to display only those rows associated with the selected master row. For example, the Employees by Department page in Figure 6-8 shows an EMP report linked to the master DEPT report; clicking a DEPT record causes the EMP report to show only those employees in the selected department.
In this section, I want to consider how to expand a master-detail report to include updates. A straightforward approach is to create two sets of Report with Form pages, one for DEPT and one for EMP, and then link the DEPT and EMP reports as in Chapter 6. Let’s see how much effort this requires.
Begin by using the Report with Form wizard to create report and form pages for DEPT. The report page is named Master Report and is page 35; the form page is named Master Form and is page 36. The page source is select * from DEPT.
Then use the wizard to create report and form pages for EMP. The pages are numbered 37 and 38; the report page is named Detail Report and the form page is named Detail Form. Their source is select * from EMP.
The master report needs a link column that takes you to the detail report.
The detail report needs to display only the records associated with the selected detail row.
The detail report needs a button that returns you to the master report.

The master report

The detail report
Right-click the Columns node of the rendering tree, and select the Create Virtual Column menu item. APEX will add a column named DERIVED$01 to the report.
Set the type of this column to Link.
Go to the Settings section, and click the box for the Target property. This brings up the link builder.
Configure the link builder as shown in Figure 10-41.
Set the Link Text property for the column to be View Emps.

Link builder for the View Emps link
Create hidden items P37_DEPTNO and P37_DNAME.
Change the source of the region to
Change the title of the region to
Create a button that has the label All Depts and redirects to page 35.
That’s it! The advantage of using the page wizard is that you can quickly construct fully functional web pages. You will probably want to configure the look and feel of the regions, but that shouldn’t be too onerous.
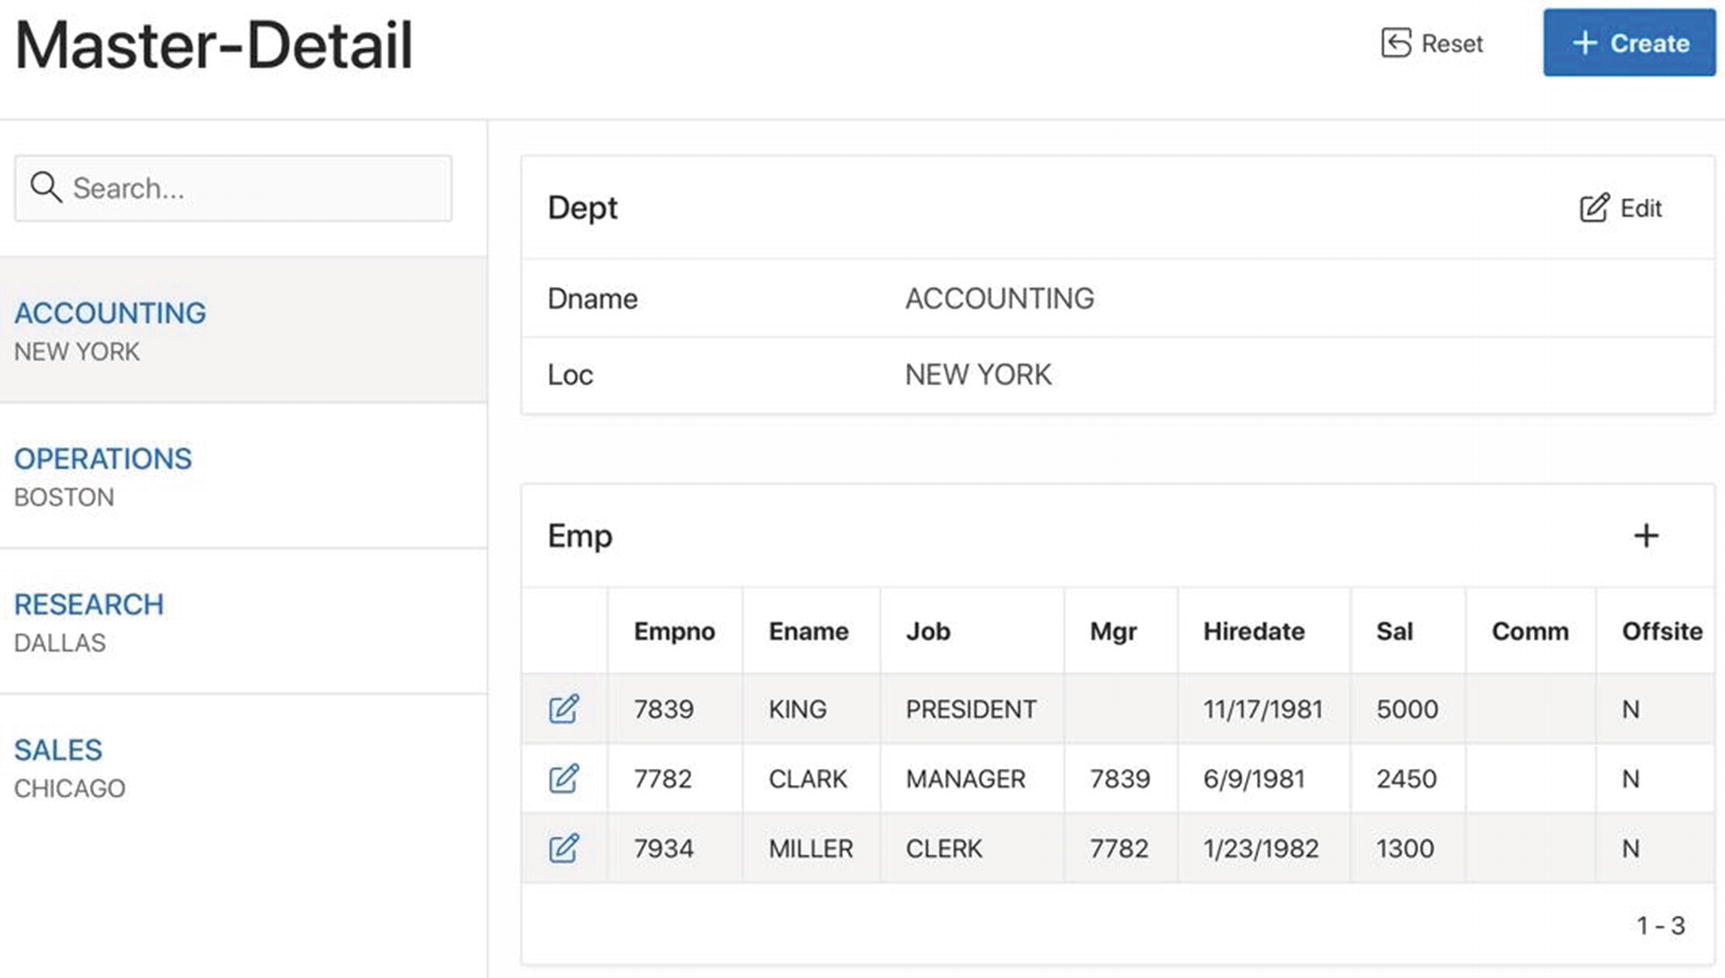
A combined master-detail page
The page has five regions: a region across the very top, named Master-Detail and having two buttons; a region in the left column containing the search bar; a report region down the left column listing the master rows; a report region (named Dept) at the top, listing the selected master row; and a report region (named Emp) at the bottom, listing the associated detail rows.
The rows of the master region in the left column are links. When you click a row, it becomes the selected row and the two regions to its right adjust themselves accordingly.
The Create button in the Master-Detail region inserts a new row into the master table.
The Edit button in the Dept region edits the current master row.
The “+” button in the Emp region inserts a new row into the detail table.
The edit links in the detail report edit the selected detail row.
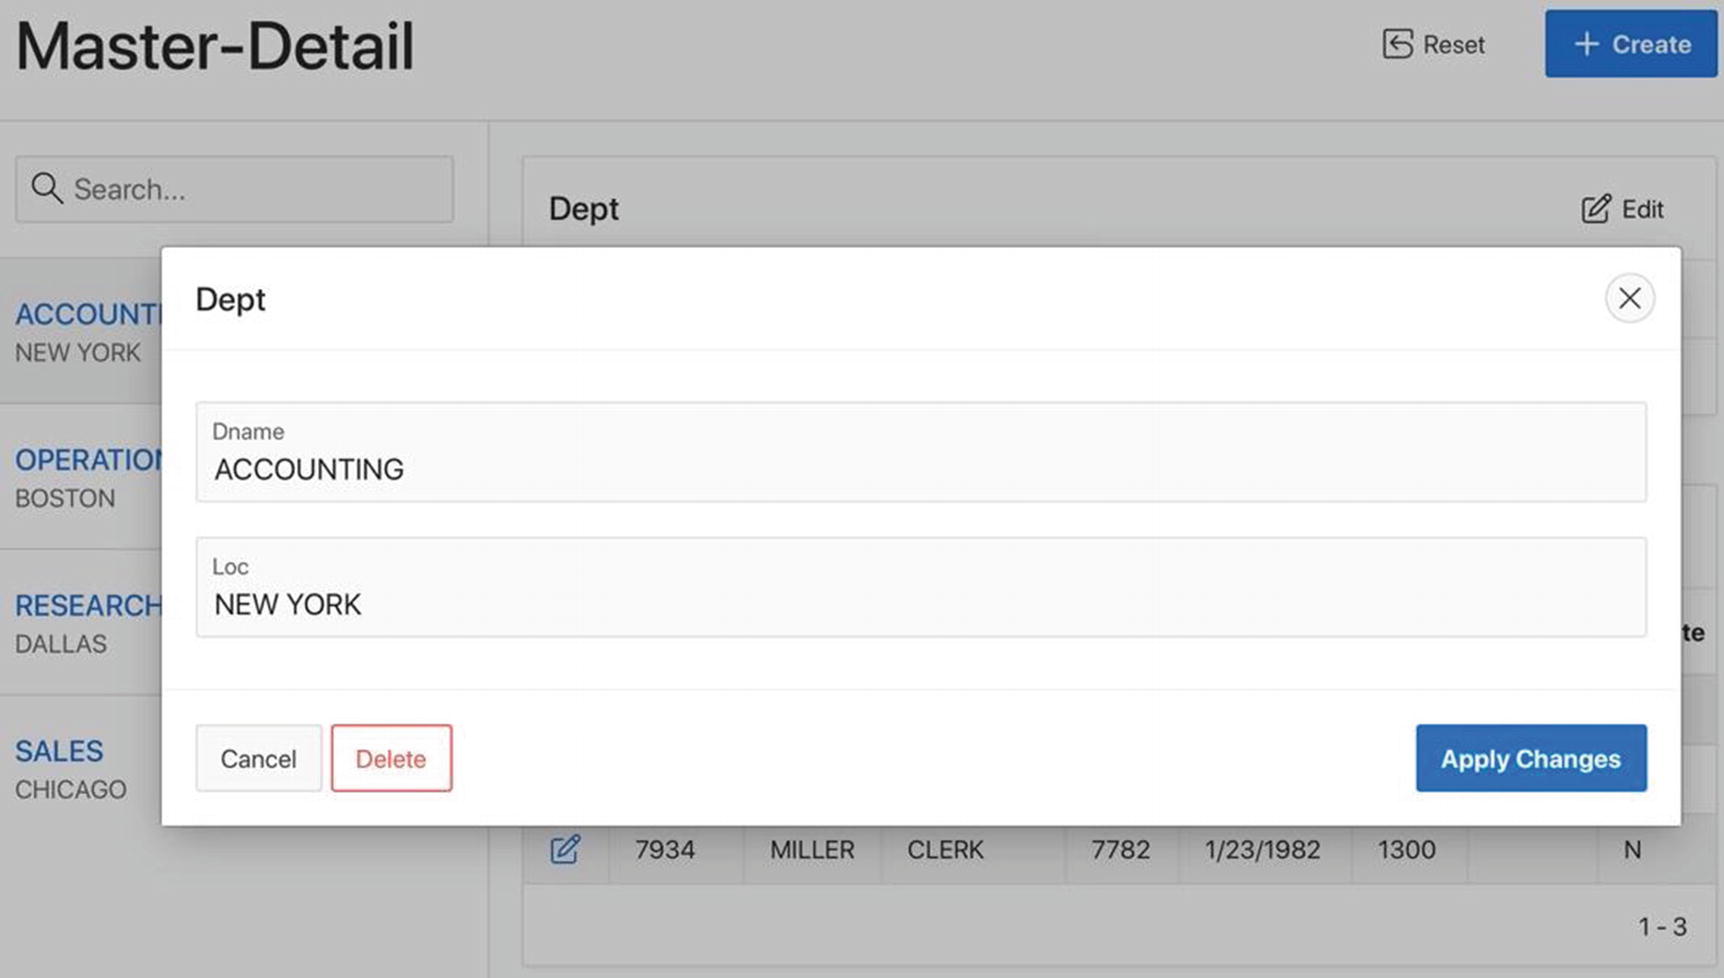
Editing the current master record
From a design point of view, it is worth comparing this master-detail page with the previous solution. This page displays the master and detail reports on the same page, similar to the Employees by Department page of Figure 6-8. This page is primary, and the user never loses contact with it. When an edit is required, the appropriate form is displayed modally and then disappears when the edit is complete. In comparison, the previous solution consisted of four pages. The user switches from one page to the other according to the task at hand (“view the master report,” “edit a master row,” “view the detail report,” or “edit a detail row”), and no page is more important than any other page.
The point is not that one approach is better than the other, but that there are many ways to approach a problem. You need to be facile enough with APEX to produce the pages you envision, instead of being forced into a design based on the pages that the wizards produce.
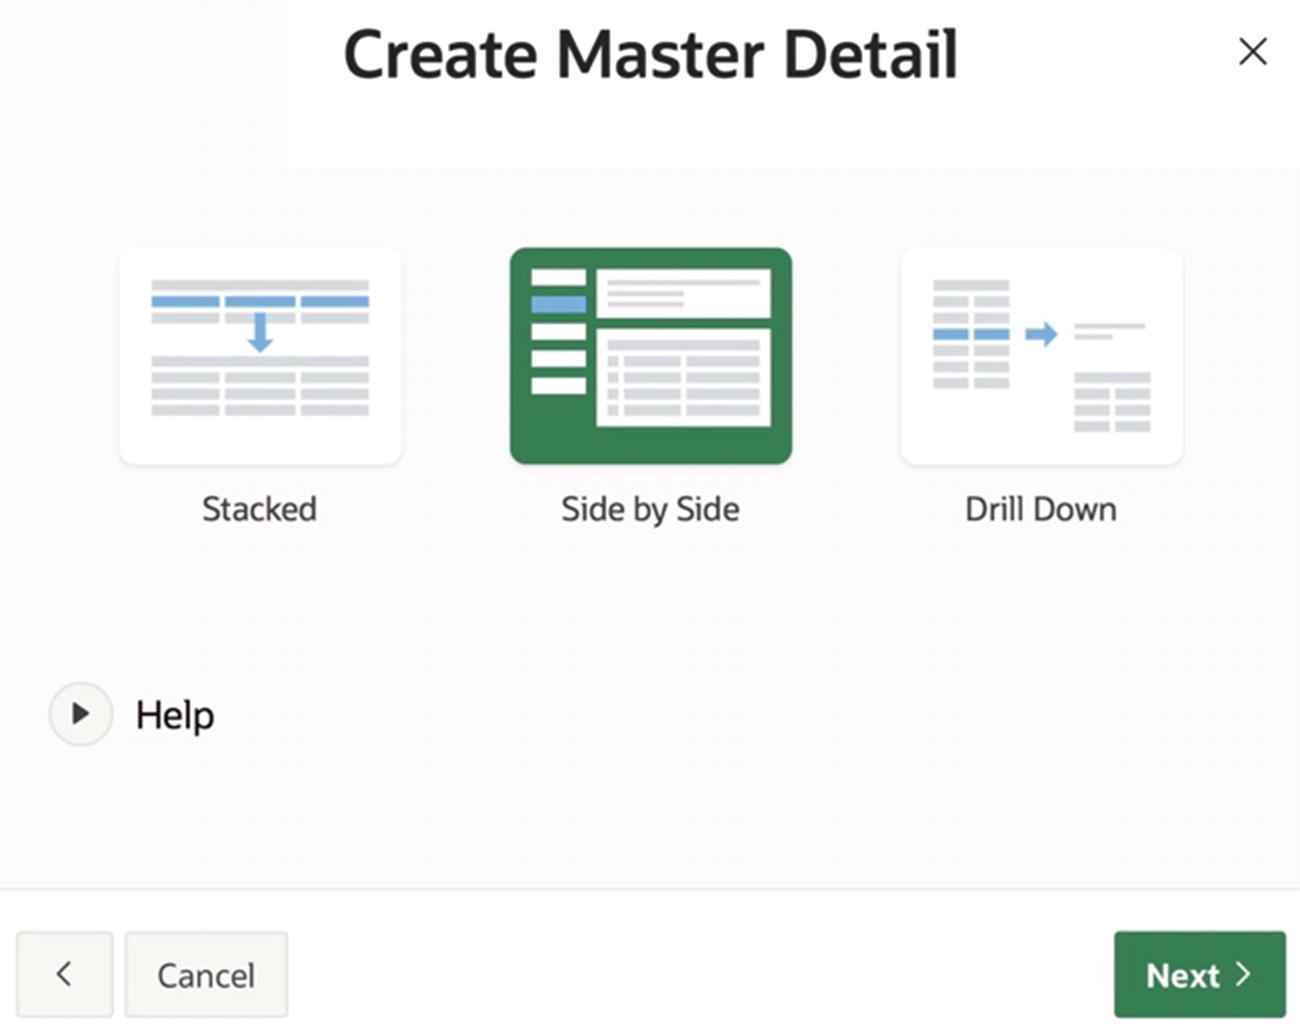
Selecting the desired master-detail wizard
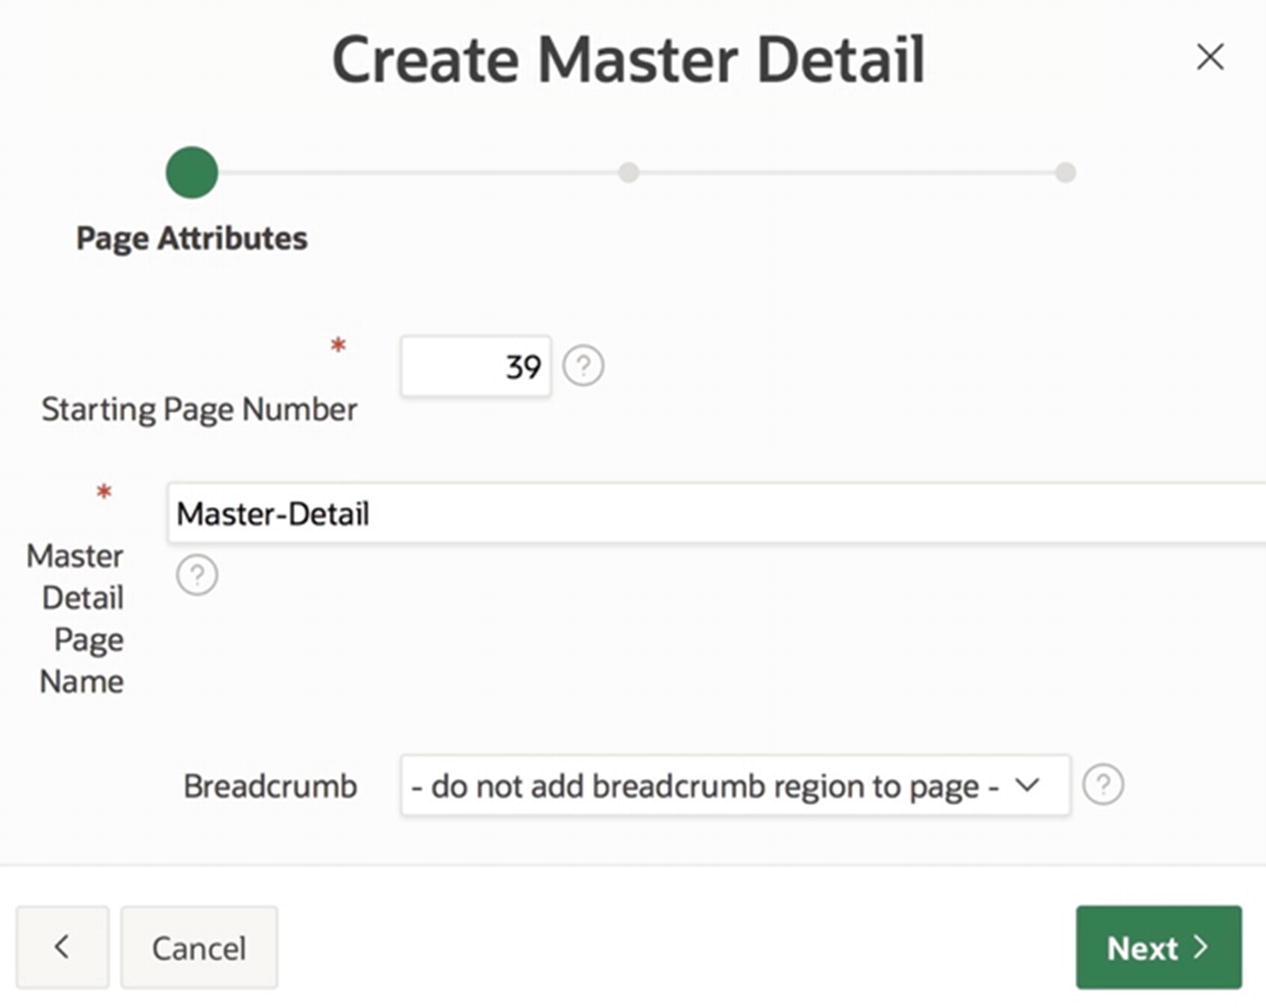
The first master-detail screen
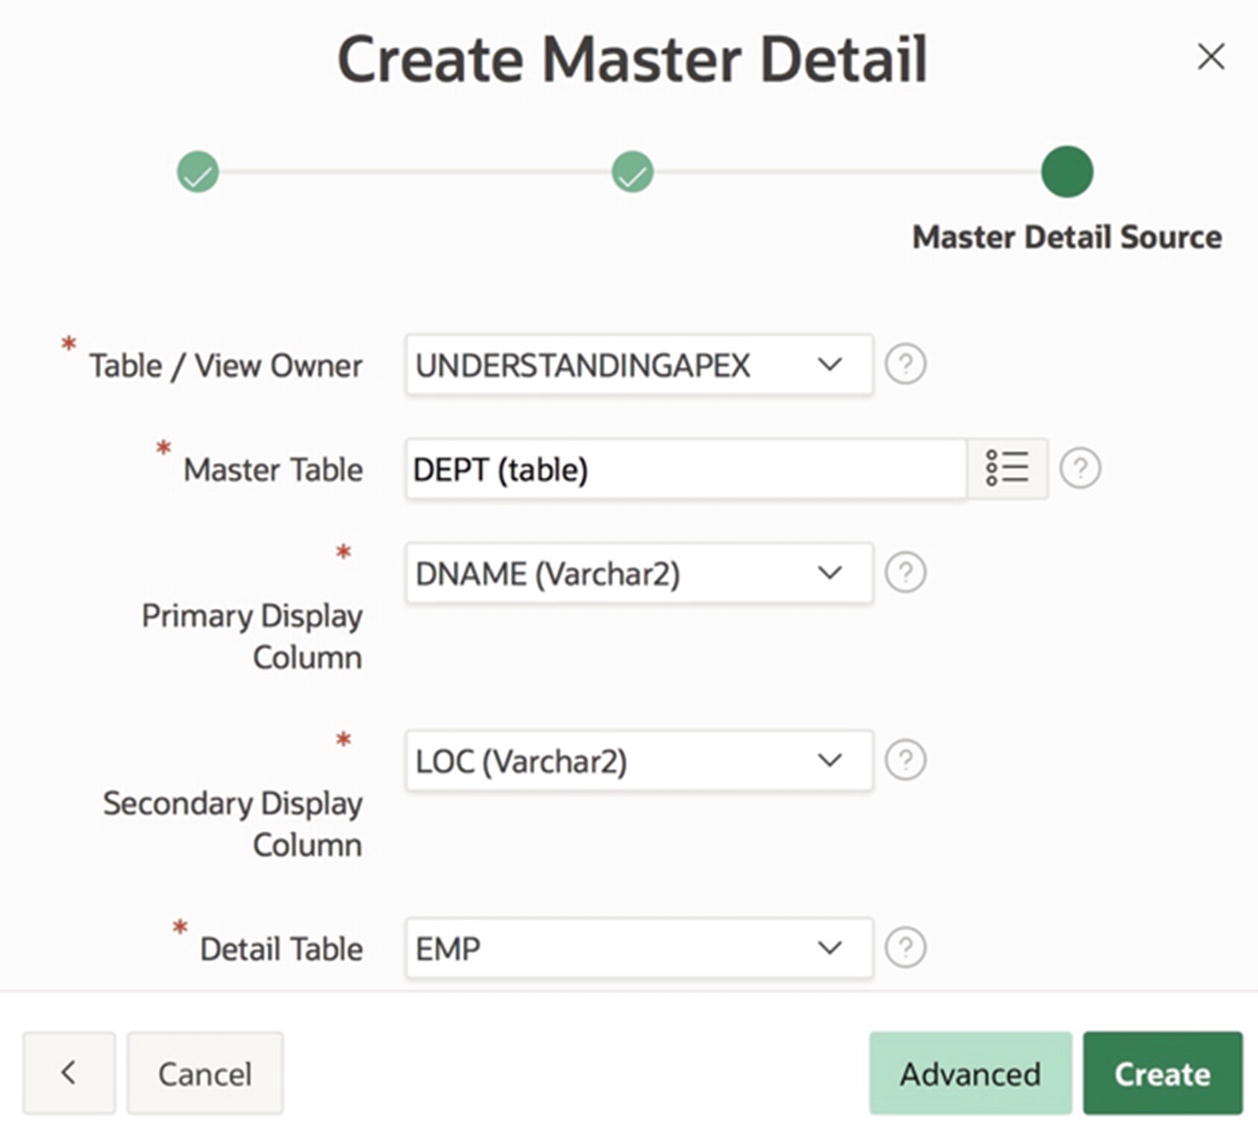
The third master-detail screen
Pages 40 and 41 are form pages and are the same as what you would get by calling the Create Form wizard. So the main issue is how the report page is implemented.
The function apex_page.get_url returns a URL to an APEX page. By default, the URL redirects to the current page. The parameters p_items and p_values specify how the session state should be changed.
The region titled Dept in Figure 10-42 has the template Value Attribute Pairs – Column. This template displays each value on its own line, prepended by the column name. In the figure, the region’s source has one row with two columns, so its report displays two rows.
The region titled Emp has the Standard template, so its report is displayed in the standard way.
Apart from their different appearances, the Dept and Emp reports interact with their form pages in the usual way, by having their buttons and links redirect to the appropriate form page.
The bottom line is that even a sophisticated wizard like Master-Detail is just creating a page containing three report regions, two of which are linked to form pages. If you wish, you can then customize those regions to fit your needs.
Summary
The first part of this chapter examined APEX form regions. A form region contains two processes—an initialization process and an ARP process—that allow your pages to access the database without having to write PL/SQL code. APEX also provides built-in processes for some common tasks, which work smoothly with the two form processes. Several examples demonstrated both the advantages and limitations that these processes have over corresponding PL/SQL processes.
The second part of the chapter examined some APEX page-creation wizards that create forms. These varied from the single-page Form wizard, which creates a page that is intended to be used in conjunction with other pages, to the Report with Form wizard, which pairs the Form page with a simple report page, to the sophisticated Master-Detail wizard, which matches two Form pages with a page containing three report regions. In each case, the focus was to uncover the mystery of these wizards, so that you feel empowered to create the pages you need, with or without them.