When you created your Employee Demo application, you chose to restrict access to those who have an account on your workspace. This restriction is one of several APEX facilities for limiting access. These facilities can be divided into authentication, which identifies the legal users, and authorization, which specifies what information each legal user is allowed to see. This chapter will examine these facilities, as well as the related issue of how to protect the data from malicious users.
Authentication
Authentication is the ability to identify the current user of an application. APEX users identify themselves by providing a username and password. APEX supports several possible authentication schemes, which maintain the user/password list in different ways and at different organizational levels.
LDAP Directory scheme: The user/password list is maintained within an organization’s LDAP directory. This scheme allows an organization to assign a single account to each person to be used for all systems that it maintains. The resulting ease of administration often makes LDAP the authentication scheme of choice for many organizations.
Database Accounts scheme: The user/password list is maintained within the Oracle database system. This scheme allows a user to have a single account for multiple Oracle-based systems (including APEX applications). The downside of this scheme is that users will also have direct access to the Oracle database, which might not be desirable.
Application Express Accounts scheme: This is the current authorization scheme for the Employee Demo application . The user/password list is maintained within the application’s workspace. The APEX administrator for a workspace manages the list for that workspace. If a person needs to access applications from different workspaces, the person needs an account for each workspace.
Custom scheme: The owner of the application maintains the user/password list. A person will need a separate account for each such application. Custom schemes are often used by applications that allow people to create and manage their own accounts.
In addition, there is the scheme in which the application does not perform any authentication. APEX considers this to be a No Authentication authentication scheme.
Managing Authentication Schemes
An APEX application can contain multiple authentication schemes, but only one scheme can be current at a time. To create a scheme, go to the home page for the application, click the Shared Components button, look for the Security section, and select Authentication Schemes.
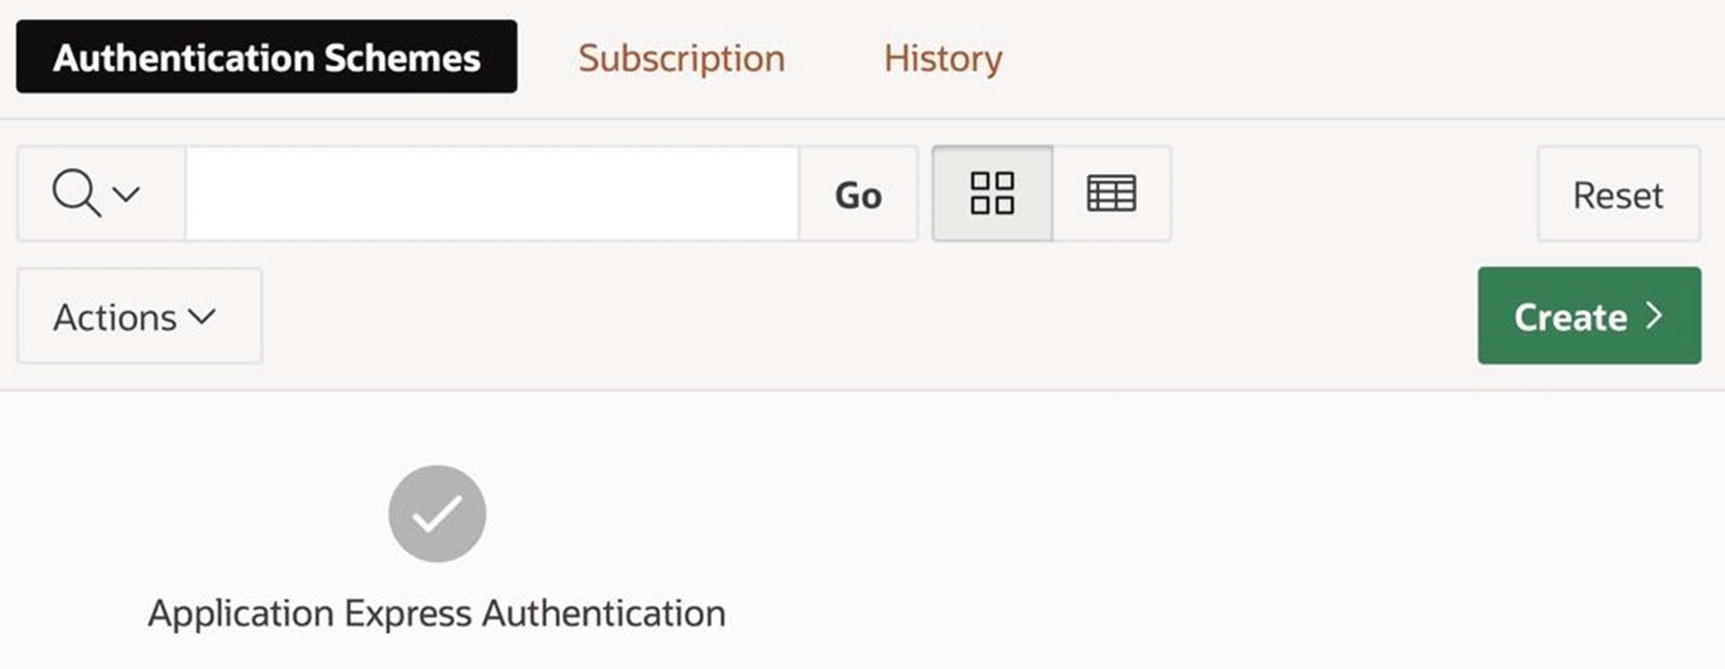
Authentication Schemes screen
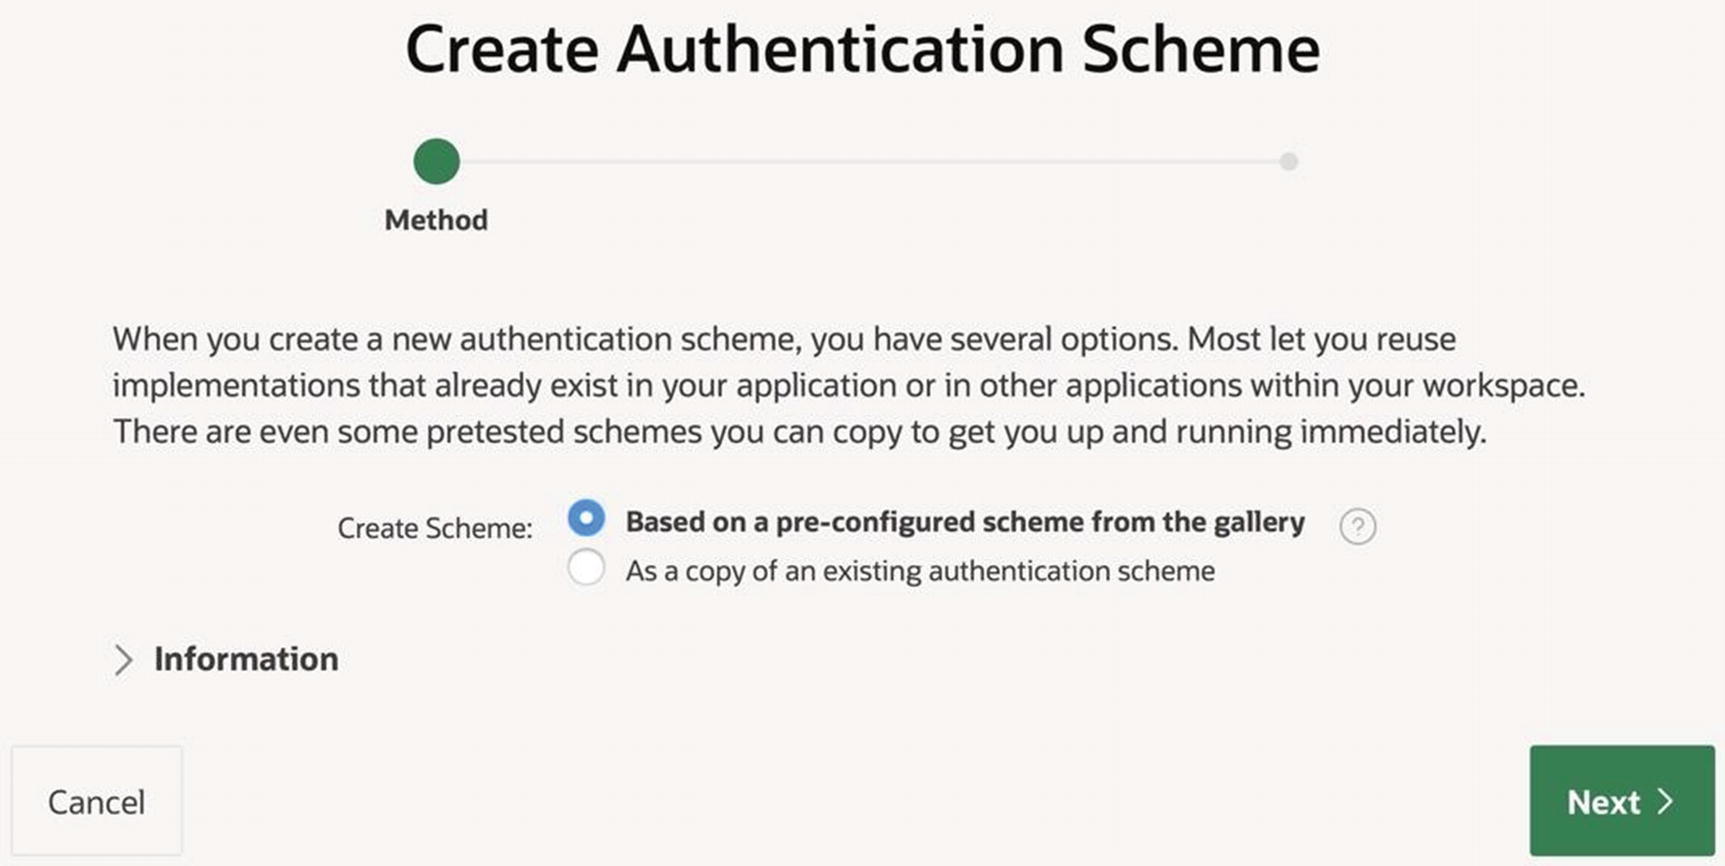
The first Create Authentication wizard screen

The second Create Authentication wizard screen
Each time you create a new authentication scheme, APEX makes it the current scheme. If you want to switch to a different scheme, go back to the list of schemes, click the icon corresponding to the scheme, and then click the Make Current Scheme button. If you want to delete a scheme, make sure that it is not current, click its icon, and then click the Delete button.
For fun, create a No Authentication scheme and make it current. When you run your application, you will be taken to the first page immediately, without having to go through a Login page.
If you have an Oracle database account, create a Database Accounts scheme, make it current, and log in that way.
If you have access to an LDAP server, you can try creating an LDAP Directory scheme. You will need to enter the necessary configuration information into the creation screen, such as the hostname of the LDAP server and the distinguished name string. Note, however, that LDAP servers are often inside firewalls. If the APEX server runs in a different domain from the LDAP server, you might encounter firewall issues that make this scheme unworkable.

Properties for a Custom authentication scheme
The Settings section allows you to specify four functions, but only the Authentication Function Name property is typically used. The authentication function is called each time a login is attempted. Its return value will be true or false, indicating whether the login should succeed or not. The Settings section asks only for the name of the function; APEX expects that the function will be defined elsewhere. Typically, the function will be defined as a stored procedure in the database, but if not, the Source section provides a place for you to enter the desired code. The authentication function must have parameters named p_username and p_password . When a user submits the Login page, APEX calls the authentication function, assigning the specified username and password to those parameters.
The authentication function given in Figure 13-4 is the simplest possible authentication function—it ignores the username and password and always returns true.
Try this for yourself. Create a custom authentication scheme that has the alwaysTrue authentication function, and make it the current authentication scheme. When you run the application, the Login page will ask you for a username and password, but will accept anything you enter.
Writing an Authentication Function
Now that you understand how custom authentication works, it is time to implement a more useful authentication function. The following sections address three important issues: how to store the username and password information, how to manage user accounts, and how to authenticate a user.
Storing Username/Password Information
SQL Statements for the USERS Table
The treatment of passwords requires some explanation. For security, passwords should always be stored in an encoded form, not in plaintext. Listing 13-1 uses the function apex_util.get_hash to perform the encoding. This function was introduced in Chapter 7 and used for lost update detection. Recall that the function takes a collection of values as input and produces a string as output. The constructor function apex_t_varchar2 creates the collection of values from its arguments. For example, the encoded password for ADMIN is the output of calling the hash function with the collection ['ADMIN','1234'] as input.
The reason to use a hash function for password encoding is that it obfuscates its input value—given the output of the function, there is no practical way for someone to determine its input. So you can feel safe knowing that even if the database system were compromised (e.g., if the hard drive were stolen), the intruder could not easily make use of the encoded password information.
The hashed passwords in Listing 13-1 include the username as part of the hash value. This technique increases safety somewhat by thwarting the following attack: An intruder creates an account and then creates a sequence of passwords for it, noting the hash value of each one. The intruder can then compare these hashed passwords with the passwords stolen from the USERS table. Suppose that a match is detected. If the username is not part of the hash value, the intruder has most likely discovered a user’s password. However, if the username is part of the hash value, detecting a match tells the intruder nothing.
The apex_util.get_hash function has two arguments: the first is the collection of values to be hashed, and the second argument is a Boolean value. The second argument in Listing 13-1 is null, which is treated as false. In Chapter 7, the function was called with only one argument, which implied a second argument value of true.
The second argument indicates whether the function should add the session ID to the input values. The hash value will be more secure if it includes the session ID, but it then will be of use only within the scope of that session. Because lost update detection occurs within a single session, it was reasonable to use a second argument of true, which is what occurred in Chapter 7. However, password encoding spans sessions, and so a second argument of false (or null) is mandatory.
Adding User Accounts

Manage Users page of the demo application
I put the encoded passwords in the report for demonstration purposes only. In a real application, encoded passwords should not be displayed—the values serve no useful administrative purpose, and displaying them increases the probability of their being cracked.
P46_NAME has the type Plain Text.
P46_ADMIN has the type Switch.
P46_PASSWORD and P46_CONFIRM have the type Password.
Figure 13-5 shows the contents of this page just prior to adding a non-administrator user named JOE having the password “joe”. Although this username was entered in lowercase, it will get saved in the table in uppercase to ensure that usernames are case insensitive. And, of course, the password will be saved as an encoded string using the hash function.
The second line of the validation accounts for the possibility that the password can be null.
Code to Create a New User
Authenticating Users
Custom Authentication Function
This authentication function converts the provided username to uppercase to ensure that usernames are case insensitive. It then executes a query that sees whether there is a record in the USERS table having that username and encoded password. If so, it returns true.
After you have created this authentication scheme, make it current. Then run your application. Practice logging in as ADMIN, GUEST, and JOE. Go to the Manage Users page and create another user, and then log out and log back in as that user.
Public Pages
Consider an application whose authentication scheme is something other than No Authentication. When an unauthenticated user attempts to access any page of the application, that user will be directed to the Login page and will not be allowed to proceed until authenticated.
However, web applications often contain public pages that require no authentication, as well as the private pages that do. The APEX property Authentication lets you specify the pages that should be public.

Specifying a public page
Change the value to Page is Public and save the page. To test the change, log out of the application. You will find that APEX enables you to visit the application’s home page, but if you try to access any other page, you will be requested to log in.
Authorization
An authentication scheme specifies which users are allowed to access the non-public pages of an application. It is a good start, but often is not sufficient. A web application can have several types of users, with certain pages (or parts of pages) appropriate only for certain types. So you need a way to specify which users can access what information. This aspect of security is called authorization .
APEX implements authorization by allowing each page or page component to have an associated authorization scheme, which specifies a set of allowed users. If a page (or component) has an authorization scheme, it will be visible only to the users specified by that scheme.
Creating an Authorization Scheme
Recall that the built-in variable APP_USER holds the username of the current user. An APEX authorization scheme is defined by a Boolean expression, typically involving the value of APP_USER; a user is authorized when the expression returns true.
Authorization expressions are similar to validation expressions, and their types are similar. For example, the Exists SQL Query type returns true if the query output contains at least one record. The type PL/SQL function returning Boolean is PL/SQL code that explicitly returns true or false.
As an example, let’s create three authorization schemes for the Employee Demo application: Administrators, which returns true if the current user has administrative privileges; Guests, which returns true if the current username is GUEST; and Built-in Users, which returns true if the current username is GUEST or ADMIN.
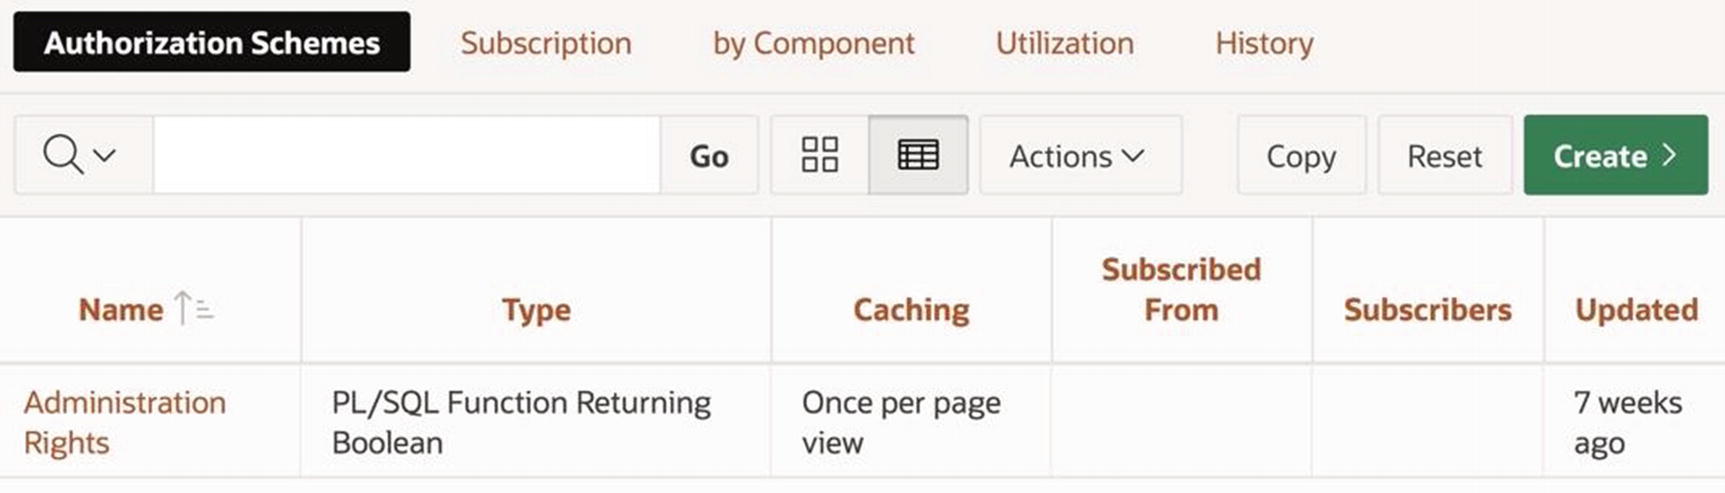
The initial Authorization Schemes screen

First screen of the Create Authorization wizard
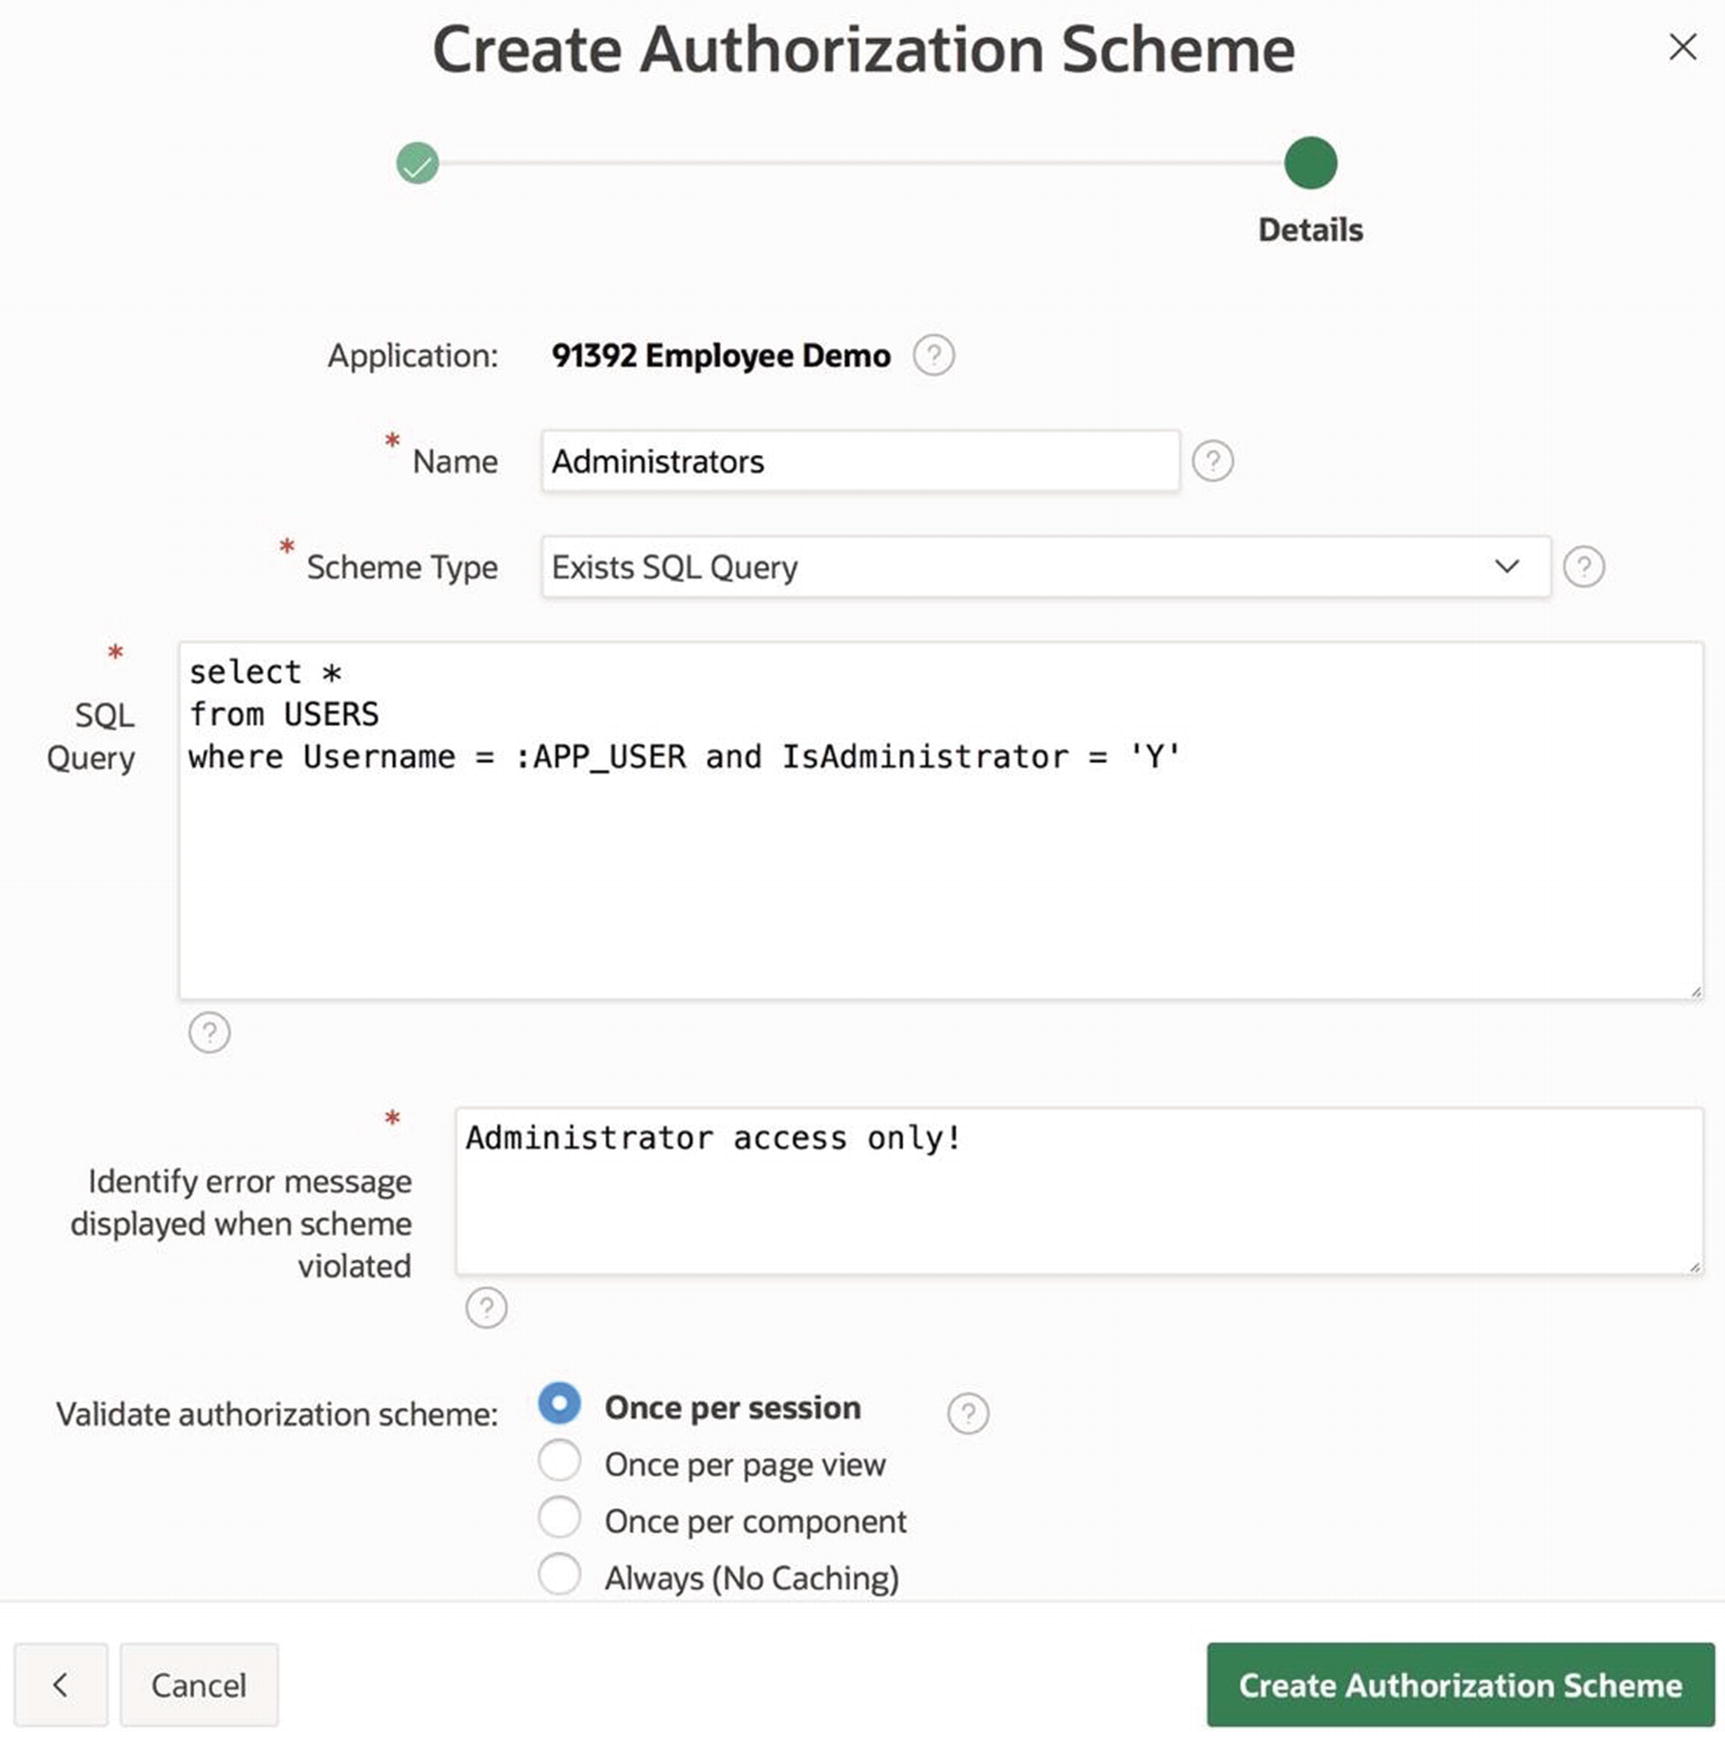
Second screen of the Create Authorization wizard
The second wizard screen also asks you to provide an error message (such as Administrator access only) and to specify how often the authorization scheme should be validated. Two common choices are Once per session and Once per page view. Evaluating the scheme once per session is far more efficient and is the default. You would choose to evaluate once per page view only if the authorization condition is likely to change within the session.
This scheme returns true only for the ADMIN user and only between the hours of 9 a.m. and 5 p.m. If the purpose of the authorization scheme is to restrict access to those times, its evaluation point needs to be Once per page view.
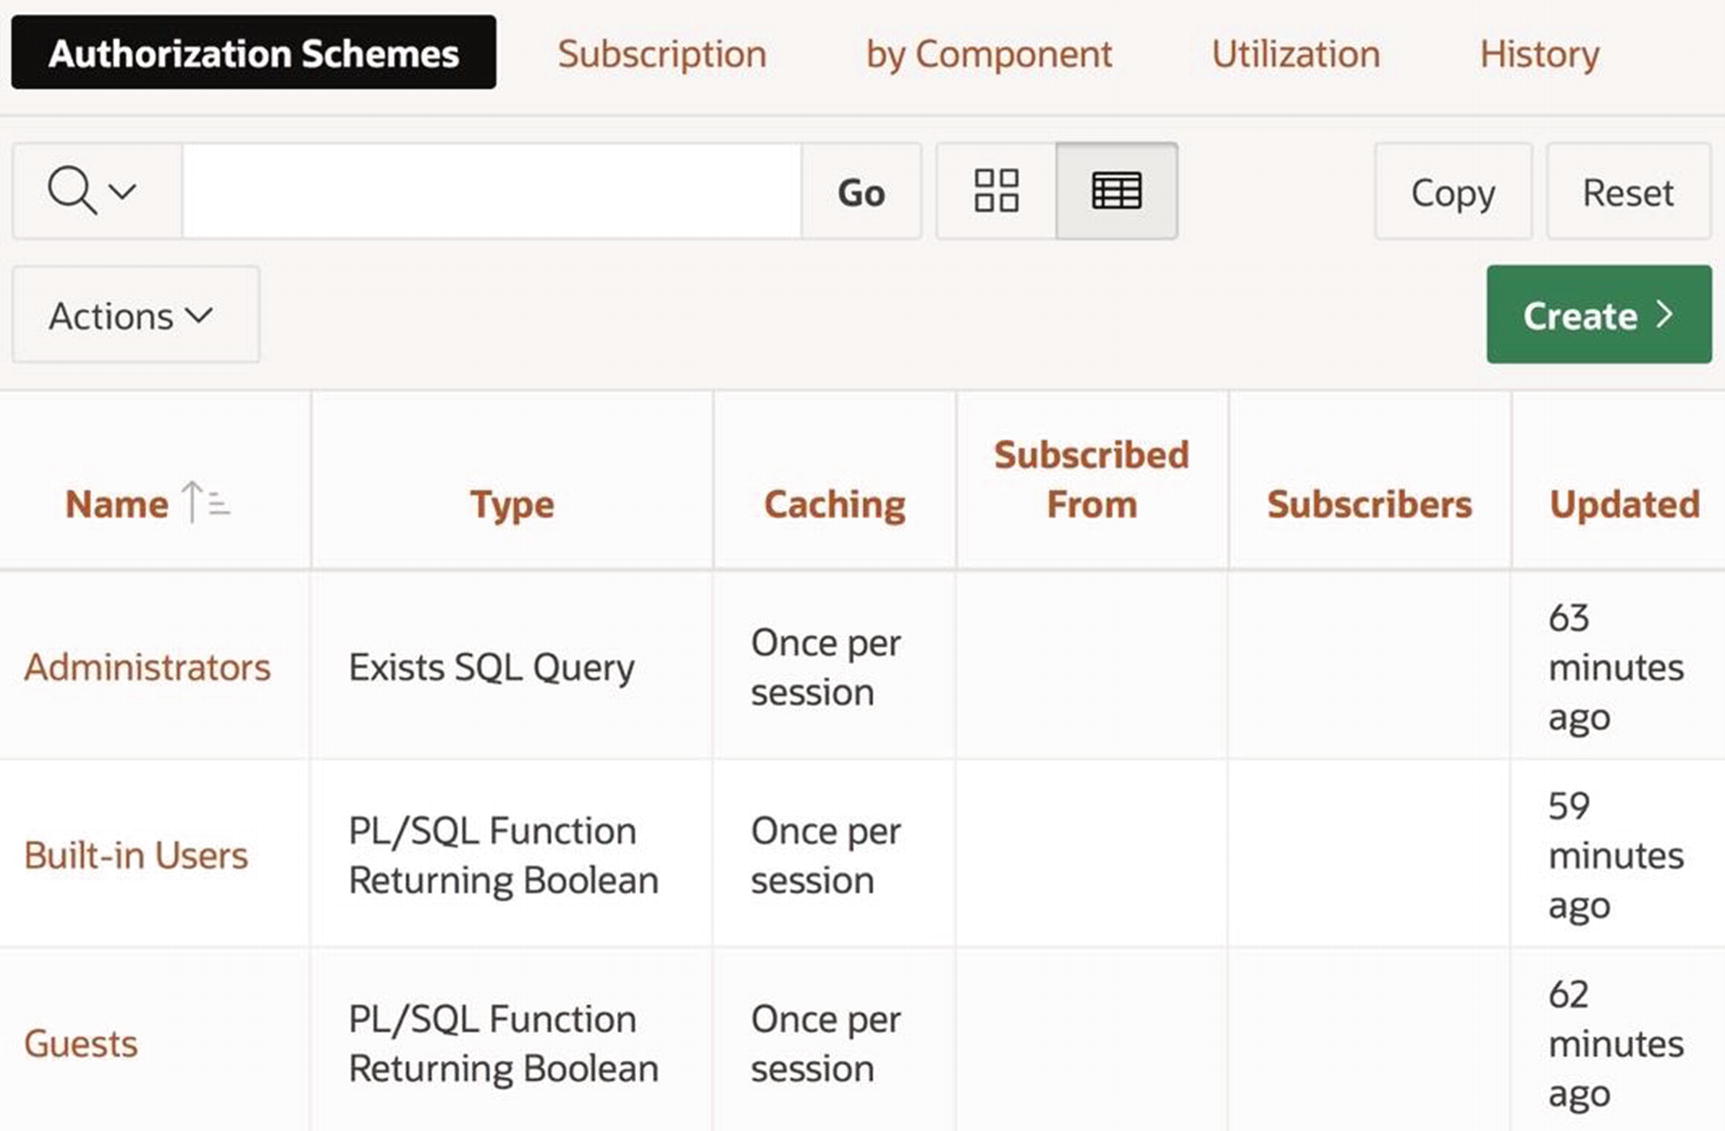
The current Authorization Schemes screen
Component Authorization

Assigning an authorization scheme to a component
The first option is –Select–, which denotes that no authorization is required. The next three options are the three authorization schemes I created. The last three options are the negations of these, which are automatically generated by APEX. The Must Not Be Public User scheme is built in to APEX and will be discussed later.
For an example, consider the Employee Data Entry page from Figure 7-5. Recall that this page has four regions: a region to display a report of the EMP table, plus regions to delete, insert, and update table rows. Assume that anyone can view the employee report, but guests are not allowed to modify it. In this case, you would assign the authorization scheme Not Guests to the delete, insert, and update regions and assign –Select– to the report region. The result is that users authenticated as GUEST will see only the report region; the other three regions will be hidden from them.
For a second example, consider again the Manage Users page of Figure 13-5. If you want the two regions on the page to be accessible only to administrators, assign the authorization scheme Administrators to each of them. As a result, administrators will see the page as shown in the figure; non-administrators will see a page having a navigation bar and menu, but no content.
Because displaying an essentially blank page to a user is awkward, the page ought to display something to the non-administrators. One solution is to create a region that displays the message This page is for administrators only and assign the authorization scheme Not Administrators to it. Another solution is to assign an authorization scheme to the entire page, as discussed later.
Assigning an authorization scheme to a component causes that component to be displayed or hidden, depending on the current user. This behavior is very similar to the conditional rendering that you examined in Chapter 6. So the question is this: why use component authorization at all—why not do everything using conditional rendering?
A single authorization scheme can be used for several components, ensuring consistency.
Each authorization scheme has a name, which makes it easier for the application developer to understand the effect of the authorization condition.
Authorization and conditional rendering have entirely different purposes in an application, and it is clearer if they are kept separate.
Page Authorization
Instead of assigning an authorization scheme to the components of a page, you can assign it to the page itself. Each page has the property Authorization Scheme in its Security section, with the same options as in Figure 13-11.
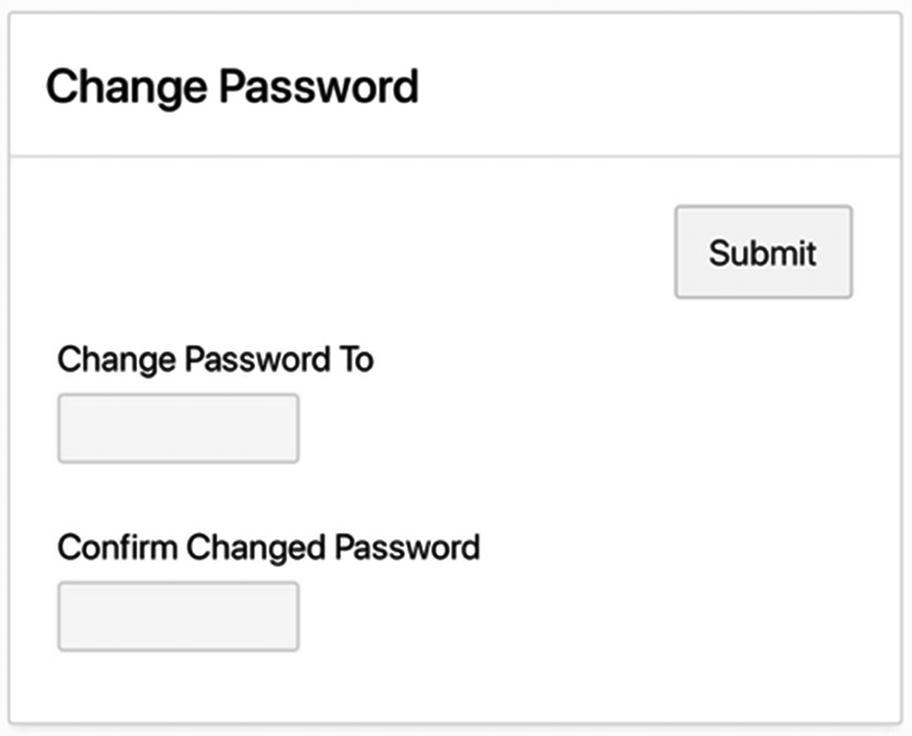
Change Password page
How should this page be authorized? Assume that everyone should be allowed to change their own password except for the built-in users GUEST and ADMIN. Thus, the authorization scheme for the page should be Not Built-In Users.
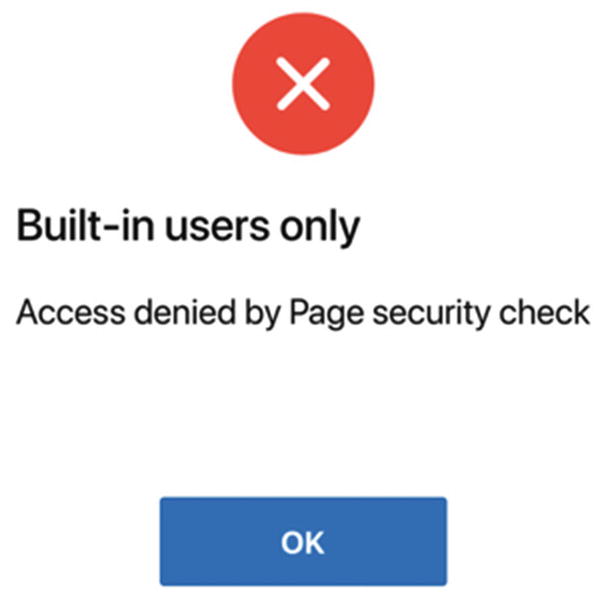
Result of unauthorized page access
This error message does the job, but not very well. The error message is somewhat harsh. (In fact, the message is backward—APEX uses the error message defined for the Built-in Users scheme because the negated scheme, being automatically generated, has no error message.) A much more user-friendly approach is to simply hide the page from an unauthorized user. In the case of the Change Password page, this amounts to not displaying its navigation menu entry to an unauthorized user. This is easily done by changing the Authorization Scheme property of the list entry.
To find the property, start at the application’s Shared Components screen and navigate to the Desktop Navigation Menu list, as shown in Figure 4-2. Scroll down to its Change Password entry; clicking that entry will bring up its List Entry screen as shown in Figure 4-3. The property you want is in the Authorization section; choose the Not Built-in Users authorization scheme and click the Apply Changes button. Then run your application. Note that if you are logged in as ADMIN or GUEST, the entry for the Change Password page will be missing from the navigation menu.
A good rule of thumb is this: if a page has an authorization scheme, its associated navigation menu entry should have the same authorization scheme.
Not Public User Scheme
The authorization scheme Not Public User is built into APEX. It returns true for any logged in user and false if the user has not logged in. Its primary use is to selectively hide components on public pages.
For example, suppose that your application’s home page is a public page. However, suppose that not all of the page should be public; in particular, the Quick Link region should be visible only to logged in users. This situation can be handled by setting the authorization for that region to Not Public User.
Avoiding Malicious Use
A web application’s authentication and authorization schemes form a detailed specification of who is allowed to access what components of which pages. Each authenticated user has a well-defined, limited interface to the data—provided, of course, that the user accesses the pages in the intended manner.
The problem is that there are various ways for users to subvert the intended functionality of a web application. This section focuses on three such techniques: SQL injection, cross-site scripting, and URL modification. With SQL injection, a user submits an SQL code fragment that masquerades as input data and alters the query that is processing this pretend “data.” With cross-site scripting, a user saves a malicious JavaScript code fragment as part of a table’s data value; when another user subsequently displays that value, the JavaScript code also executes. With URL modification, a user sends a URL to the server in a form that the server expects; however, the action requested by that URL is something that the user is not supposed to do.
APEX has several properties to help you guard against malicious use. In fact, it is relatively straightforward to use these properties to build a tamper-proof application. To take advantage of them, however, you need to understand what the threats are and how APEX can guard against them.
SQL Injection
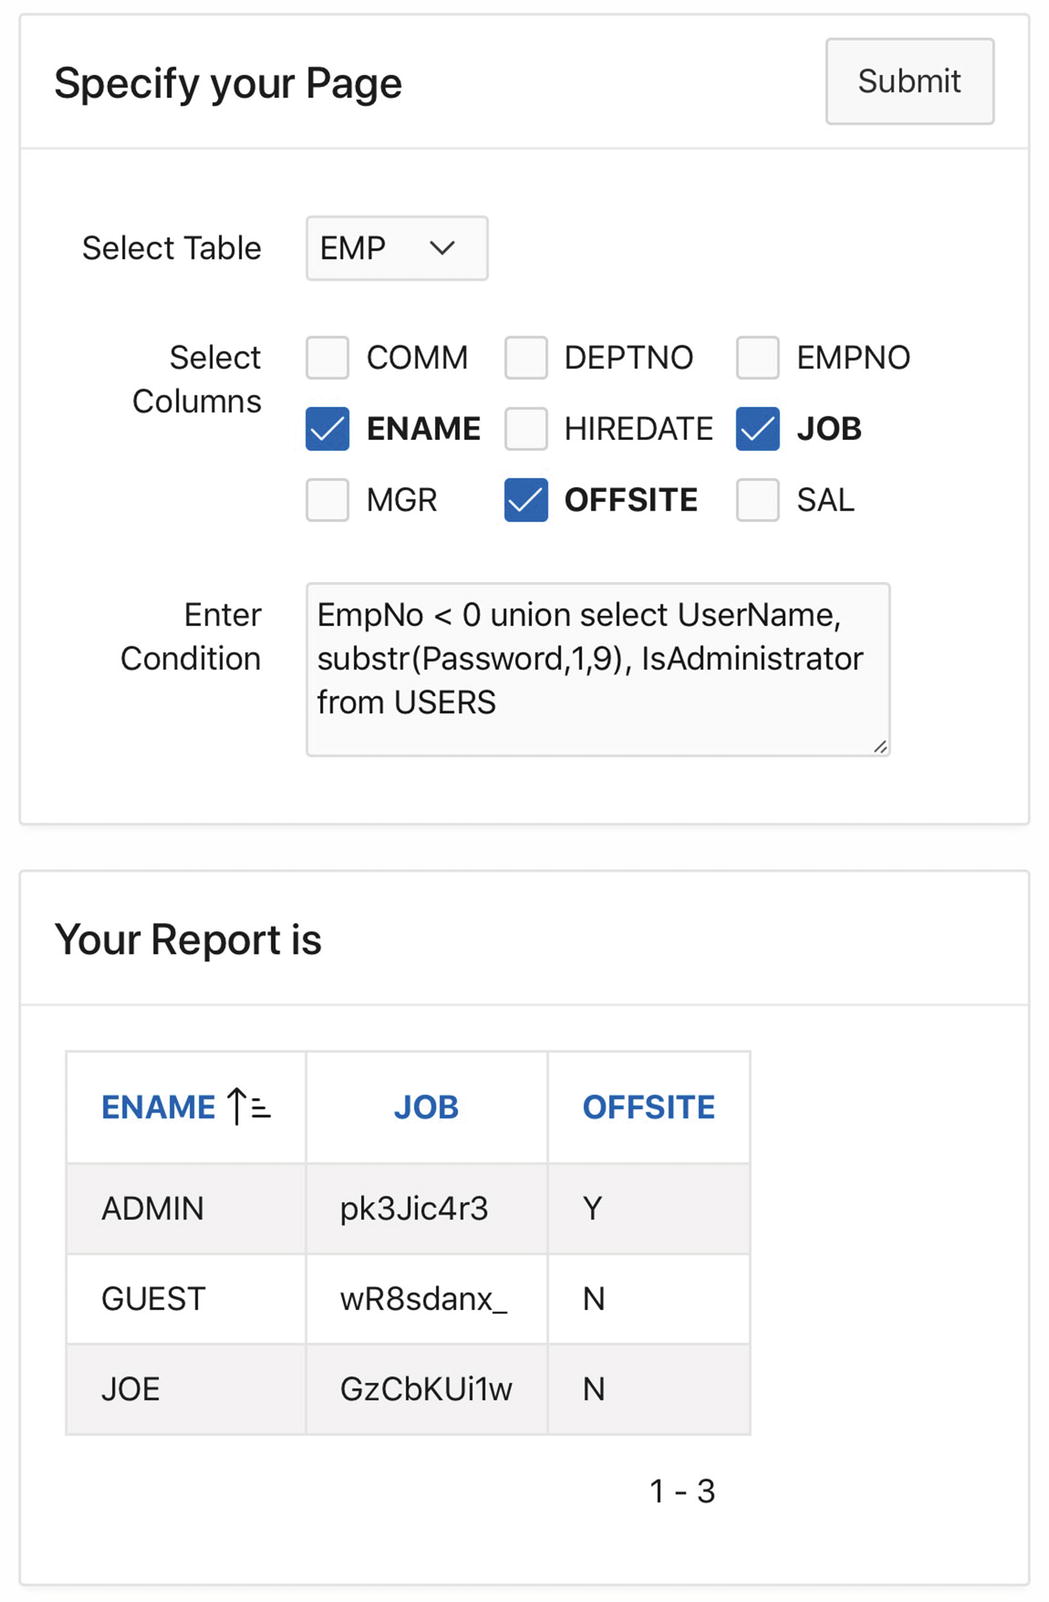
Unintended use of the Report Builder page
Note that the user has taken advantage of the union keyword to broaden the scope of the query. The intended query on the EMP table is now just a subquery of the overall query. Moreover, the condition EmpNo<0 causes that subquery to return no output records, which means that the output of the overall query comes entirely from the second subquery.
This second subquery can be arbitrary, subject only to the restriction that it must have the same number of columns as the first subquery, and each output value must match the type of the corresponding column of the first subquery. This restriction explains why the second subquery extracts only the first nine characters of the password—the Job column is defined as varchar2(9), so attempting to select additional characters would generate an SQL error.
A malicious user might use this exploit to obtain the encoded passwords of users, in order to subsequently crack them and gain unauthorized access to the application. Of course, having only the first nine characters of the encoded passwords is not sufficient. The malicious user could, however, discover the remaining characters by running the exploit several more times, each time grabbing the next nine characters of the password.
This technique is called SQL injection. SQL injection occurs when a malicious user enters SQL into a text-based item to change a query from its intended purpose. The preceding example shows that SQL injection can have serious consequences. Thus, application developers must be aware of the possibility of SQL injection and avoid it at all costs.
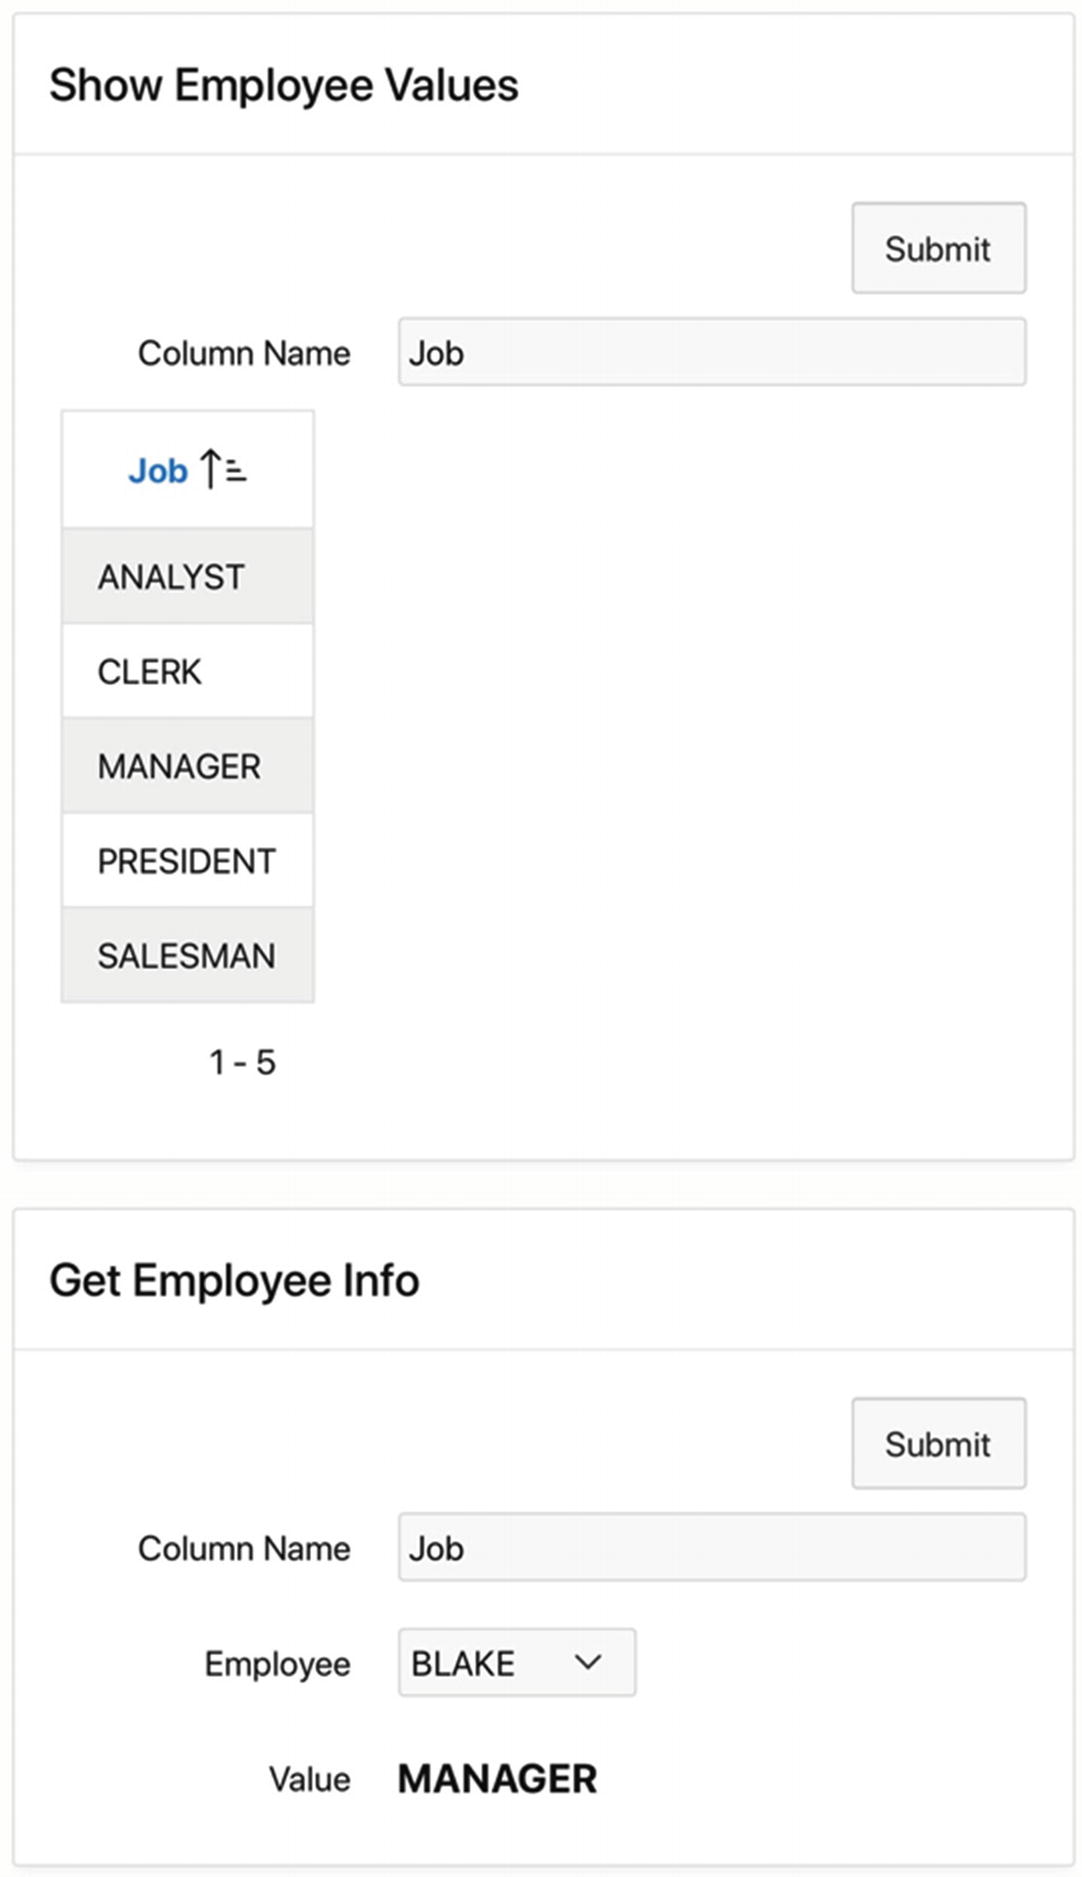
Intended use of the SQL Injection page
The page contains two regions. The input to the Show Employee Values region is a column name from the EMP table; clicking the Submit button then displays a report of the distinct values for that column. In Figure 13-15, the report displays the five jobs appearing in the EMP table.
The Get Employee Info region is similar. Its input is a column name and employee number; clicking the submit button displays the value of that column for the selected employee. In Figure 13-15, the region tells you that Blake is a manager.
PL/SQL Code for the Show Employee Values Report
Enable generic column names.
Specify a column count of 1.
Set the column heading type to PL/SQL Function Body, having the expression return :P48_COLUMN1;.
Now let’s consider how to implement the Get Employee Info region. It is a static content region having three items: P48_COLUMN2 is a text field, P48_EMPNO2 is a select list that displays employee names and returns employee numbers, and P48_VALUE2 is a display-only item.
Process Code for the Get Employee Info Region

Malicious use of the SQL Injection page
Recall that the character “--” denotes a comment in PL/SQL. Thus, the from EMP part of the SQL code is totally ignored. In other words, the SQL injection transformed a query on the EMP table into a query on the USERS table.
Again, everything after the comment characters is ignored, so the injection winds up creating a query on the USERS table instead of the EMP table.
Note that the malicious user must carefully craft the injected code so that the resulting SQL string is legal. Consider the Get Employee Info example. The execute immediate statement passes an employee number to the SQL query; although the malicious query will not use this value, it still needs to have a formal parameter to receive it. The expression :1<0 achieves this goal. The specified employee number is assigned to the parameter :1. Because employee numbers are always positive, this expression always evaluates to false, so it does not affect the output of the query.
Avoid text-based input. Note that the SQL injection technique of Figure 13-16 would not work if the user were forced to choose a column from a list (although the URL modification technique could circumvent this strategy, as you will see later).
Write an APEX validation for the input that detects possible code fragments. For example, in Figure 13-16, you might refuse to accept column names that contain spaces or comment characters.
Translate the input into a “cleansed” form. That is, write a function to transform a user value into an acceptable one. In Figure 13-16, the function might remove all spaces from the input or it might convert each space into the escaped HTML character  .
Let’s see how these strategies can be used to improve the Report Builder page shown in Figure 13-14. The issue, of course, is that the text-based item Enter Condition requires the user to enter SQL code. The first strategy suggests that you try a non-text-based way to specify the condition. The Version 2 region of the Count and Delete demo page (shown in Figure 12-4) showed how this could be done, at least for simple conditions. The APEX query builder provides a more complex solution.
If you have never used the query builder, you should try it. Starting from the APEX SQL Workshop, click Utilities and then Query Builder. Click a table name to include it in the query, and explore.
The second strategy suggests you write a validation that rejects condition strings that contain suspicious keywords such as union or select. This strategy seems reasonable here.
Revising Listing 13-4 to Avoid SQL Injection
Similarly, you can improve the Get Employee Info region by removing all spaces from P48_COLUMN2 in the code for the submit process.
Cross-Site Scripting
In the cross-site scripting technique, a malicious user saves JavaScript code as part of a database value. The code acts like a booby trap: when another user displays a page containing that value, the user’s browser executes the JavaScript code without the user’s knowledge. The JavaScript code might do things like emailing the user’s session information to the attacker (thereby letting the attacker pretend to be the user) or having the APEX server execute a specified function.
What makes cross-site scripting so evil is that the JavaScript code gets executed with the victim's level of authorization. So if an administrator falls prey to a cross-site scripting attack, the attacker would obtain administrator-level access to the database.
A successful cross-site scripting attack has three requirements: first, some table must have a column of type varchar2(N), where N is large enough to hold the JavaScript code; second, some page of the application must have a text-based item used for data entry into this field; and third, some page of the application must be configured to display the tainted value in “raw” unescaped form.

Cross-Site Scripting page
Turn on the form’s Edit Enabled property, and select Update Row as the only allowed operation.
Create a button whose action is Submit and whose database action is SQL UPDATE action.
- Specify that the item P49_DEPTNO is the primary key. Also, change its type to be Select List, having the list-of-values query.select DName, DeptNofrom DEPT
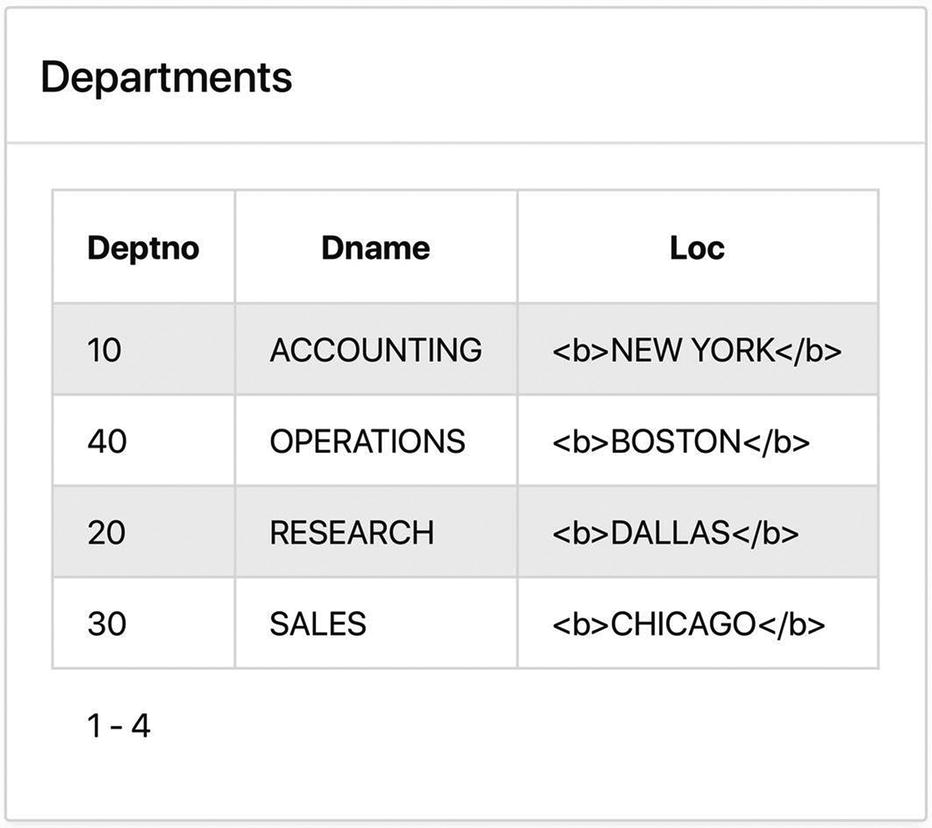
Report displays the HTML tags
Although the <b> and </b> tags were entered into the table as data, the browser will wind up treating them as HTML. In order for APEX to display the tags in the report, it must do extra work. In particular, it transforms the < and > characters into different characters that happen to display the same. This transformation is called escaping the special characters. In particular, the character < is replaced by < and the character > is replaced by >.
Each report column has the property Escape special characters in its Security section. By default it is turned on, which causes APEX to escape the special characters and display the HTML tags as in Figure 13-18. Now go to the Loc column and turn off the property. The tags in the Loc values will not be escaped, and will thus be treated as HTML. The report will now look like Figure 13-17.
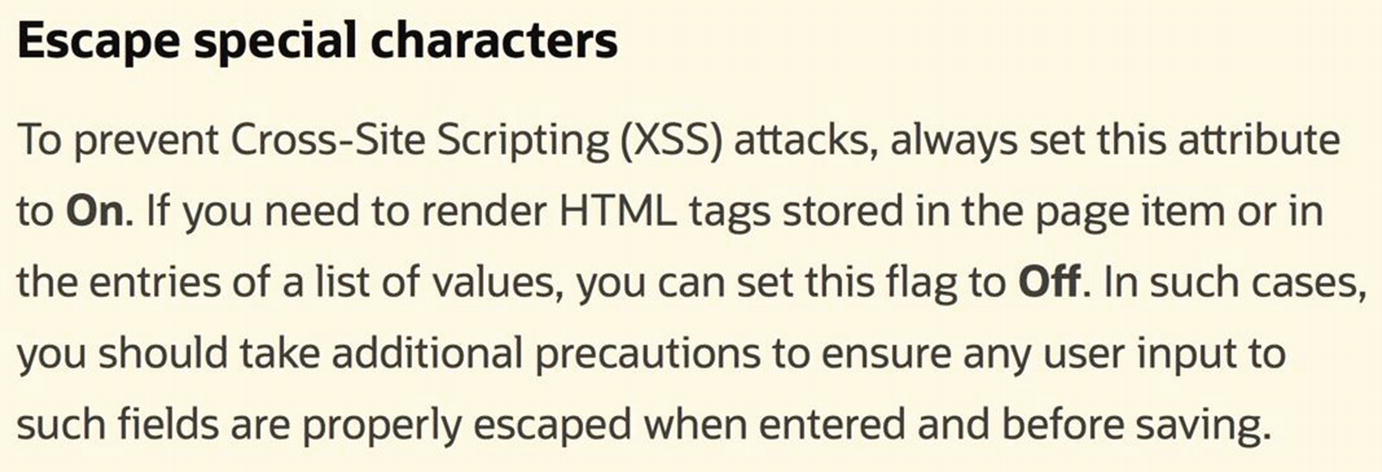
Help text for the Escape Special Characters property
This new value is a string consisting of the location, followed by a script that calls the JavaScript function alert. When a browser renders this string, it will display “BOSTON” and then call the script. In other words, the update will have no visible effect on the report. However, the script will run each time someone renders the page.

Cross-site scripting attack succeeded
The preceding JavaScript code is not malicious. The alert function just displays an alert window in the user’s browser. A malicious JavaScript string will almost certainly not throw an alert and will do something far more sophisticated and nasty. In all likelihood, you will not discover the problem until it is too late. It is therefore up to you to ensure that this cannot happen.
Reject inappropriate data
Escape the data before saving it in the database
Escape the data before it is displayed
Reject Inappropriate Data
In any data entry page, it is good practice to keep inappropriate data from being entered into the database. This is what database constraints and APEX validations are all about. The act of checking input data for unexpected HTML follows the same principle. There are two approaches you can take.
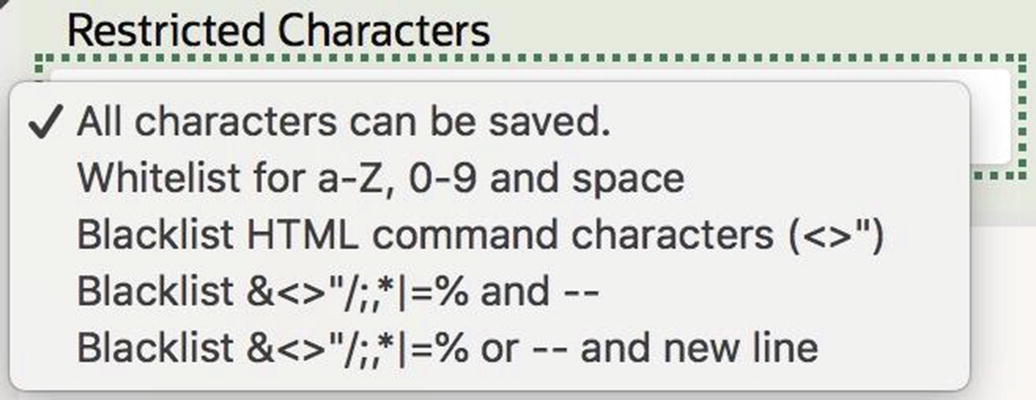
Choices for the Restricted Characters property
In the current example, suppose that department locations are alphanumeric; in that case, it would make sense to set the Restricted Characters property for P49_LOC to be Whitelist for a–Z, 0–9, and space. If not, then you should at least set it to Blacklist HTML command characters.
Validation to Guard Against Unwanted HTML Input
Escape Data Before Saving It
Escaping Unwanted HTML Input
Escape Data Before Displaying It
An application might not be able to guarantee that the database does not contain any HTML code, because users might have other ways to enter data. So to ensure against cross-site scripting, it is a good idea to always escape data before displaying it on a page. That is what the Escape Special Characters property is all about (refer back to Figure 13-19). If every column in your report has this property turned on, your report is immune to cross-site scripting attacks.
Original Source Query
Revised Source Query
URL Modification
The third type of malicious attack takes advantage of the way that web pages are accessed. In a typical, non-malicious scenario, a user types the URL for an application’s home page into a browser. From there, URLs are largely irrelevant; the user clicks tabs, links, and buttons to navigate to the other pages.
This scenario corresponds to the intended use of the application. The navigational links on a page are designed to help the user decide what pages to examine next. In fact, one criterion for measuring the quality of an application is the extent to which navigational aids contribute to a coherent user experience.
Of course, a user need not follow this scenario. A user who knows the URL structure of an application can access an arbitrary page by simply constructing a valid URL to it. This possibility presents several difficulties for APEX developers. The following subsections examine these difficulties and their solutions.
APEX URL Structure
Although I will continue to use legacy URLs in this chapter, most of these concepts also apply to friendly URLs. (And even if you prefer friendly URLs, you still need to be aware of how a malicious user can abuse legacy URLs.)
A legacy URL supports nine colon-separated arguments; if the value of an argument is missing, a default value is used. You already know the first three arguments: the application id, the page id, and the session id. The other two relevant arguments are the seventh and eighth, which are used for setting the session state.
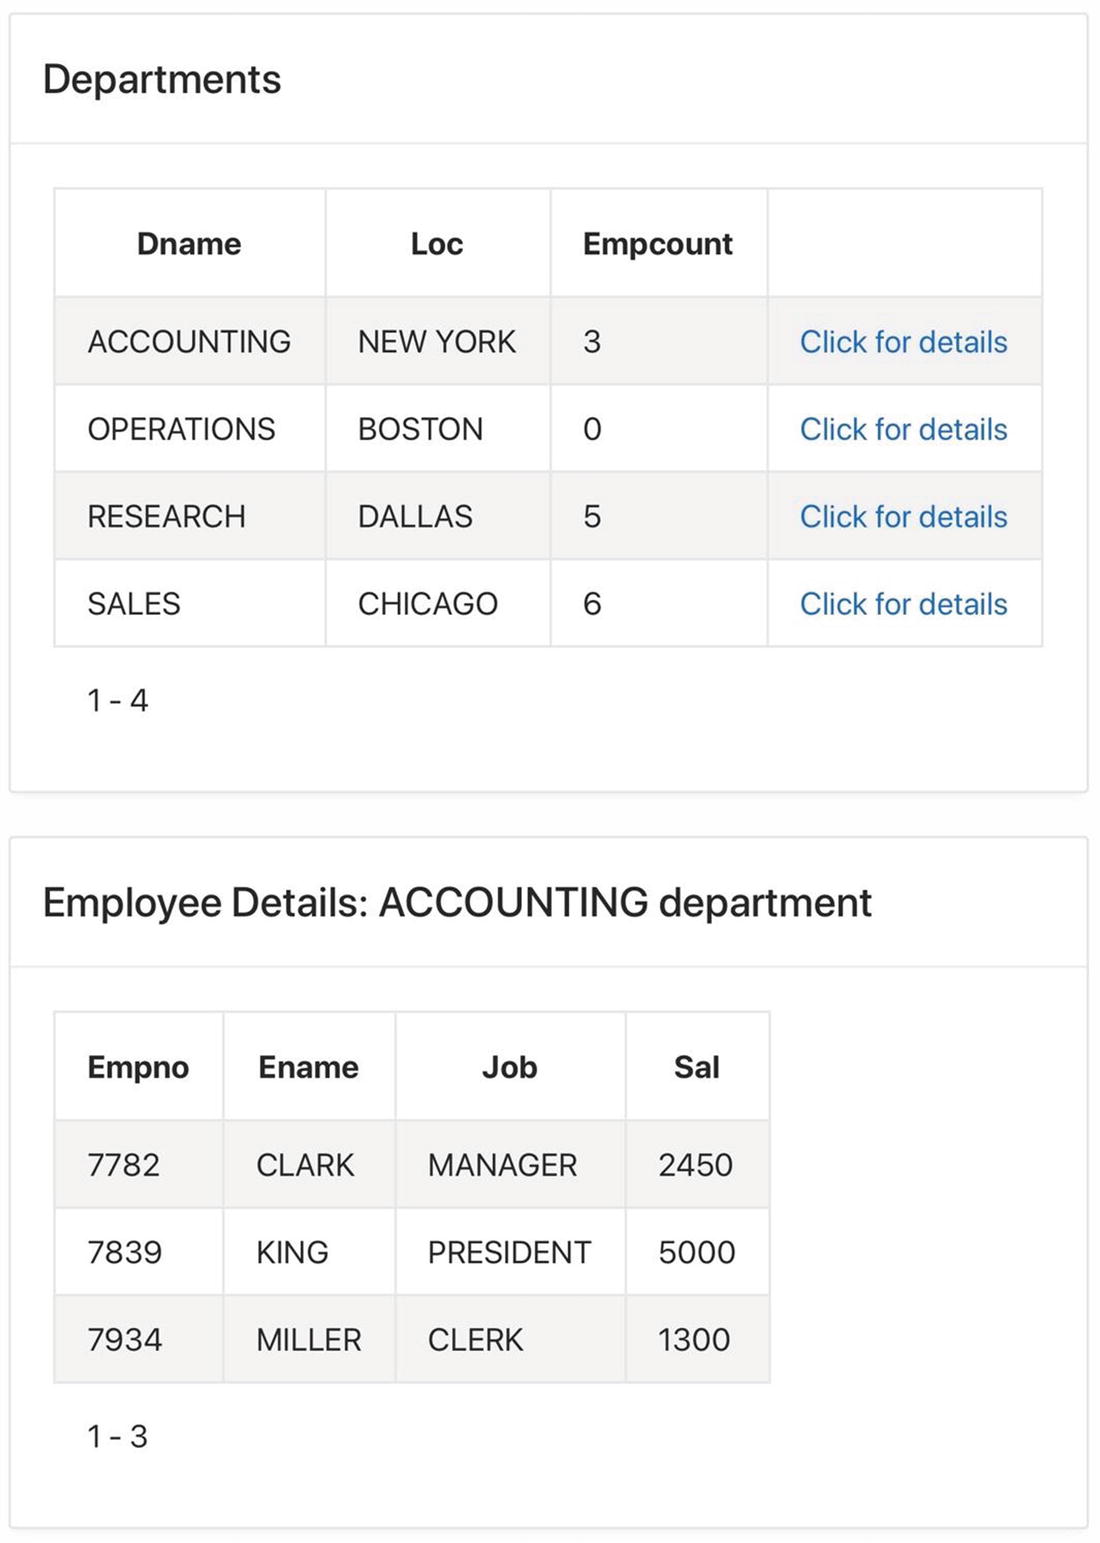
Employees by Department page
URL for Employees by Department Page
This listing illustrates the purpose of the seventh and eighth arguments of a URL. The seventh argument is a comma-separated list of the items whose values are to be set (P12_DEPTNO and P12_DNAME), and the eighth is a list of the values they will be set to (10 and ACCOUNTING).
GET vs. POST
Requests that a browser makes to a web server can be of different types. The two most common types are GET and POST, which differ in how they pass information to the server. A POST request places the information in a specific area within the request packet. A GET request, on the other hand, passes information to the server via its URL.
In APEX, POST requests are made by submit operations. To process a submit, the browser extracts the values of the page items, packages them into the POST request, and sends it to the server. The server then uses these values to change the session state. If you want to verify this, go to any page with a submit button (such as Filter by Job and Department). Click the submit button and observe that the URL does not change. This demonstrates that the input to the computation is not part of the submitted URL, which is also the reason why you cannot bookmark the result of a submit operation.
On the other hand, redirect operations in APEX make GET requests. Redirections are performed by several kinds of APEX components, such as buttons, list-based items, column links, and branches. As part of the redirection, APEX lets you assign values to specified items in the session state. For example, in the Employees by Department page of Figure 13-22, the Click for Details column link sets P12_DEPTNO and P12_DNAME to the department number and name of the current record, respectively. The browser sends this information to the server by encoding it within the URL, as was shown in Listing 13-11.
Because the structure of an APEX URL is well-known, it is possible for an authenticated user to construct a URL that accesses the application in a way the application developer did not intend. The following sections consider two techniques.
Page Scanning
Because there is no good way to eliminate page scanning, a developer’s only recourse is to use authorization to limit accessibility. In other words, the fact that page scanning is possible means that it is absolutely essential to define an authorization scheme for each page, regardless of its visibility from the navigation menu.
Item Modification
The second technique, item modification , can be used to attack pages that set item values via a URL. A user takes an existing legitimate URL for that page, modifies the assigned values, and submits the modified URL.

The Update Employees region
This URL redirects to page 30, setting the session state value for the select list to 7698, the employee number for BLAKE. Once I understand this, I can modify this URL to retrieve the information for any employee. For example, if I enter the same URL into my browser, changing the last four characters to 7782, I will see the information for employee CLARK.
At first glance, this modification seems like no big deal. After all, why should I go out of my way to type a value into the URL when I can use the select list to do it for me instead? The real point of this technique is that it works regardless of how the item is implemented on the page.
In Figure 13-23, P30_EMPNO is a select list that displays all employees. But suppose instead that it displays only the employees in the sales department, because the application developer wants users to be able to modify the records of only those employees. It doesn’t matter, because I can bypass the select list by entering any employee number directly into the URL. It makes absolutely no difference what the type of P30_EMPNO is or even if it is visible.

Filter by Job and Department page
APEX executes the request as follows. It first performs the submit by copying the item values from the browser to the session state; it then copies the specified values from the URL to the two specified items and renders the page. Thus, the values of P9_JOB and P9_DEPTNO that were chosen on the page will be overwritten by the values from the URL. That is, the resulting report will list the manager of the accounting department, regardless of the values displayed in the select lists!
The possibility of item modification means that you cannot depend on list-based items to enforce any kind of restriction on input data. This has ramifications for SQL injection and cross-site scripting. Recall that the discussion of those techniques noted that an attacker needs a sufficiently long text-based item for data entry, so the use of list-based items was preferred. However, an attacker can use item modification to enter the attack code directly into the URL. Thus, the use of list-based items cannot provide security (and, in fact, gives a false sense of security) unless there is a way to prohibit item modification.
Guarding Against Item Modification
APEX has functionality called page access protection , whose sole purpose is to prevent item modification attacks. There are several levels of protection. This section will discuss only the most general-purpose one: Arguments Must Have Checksum. It works as follows.
Suppose that a page is protected at this level. If a URL for that page assigns item values, that URL must also contain a checksum for those values. When the APEX server receives a request, it extracts the argument values, computes their checksum, and compares it with the checksum within the URL; the request is rejected if they differ.
The idea is that the checksum function is known only to APEX. When APEX generates the URL for a redirect operation, it calculates the checksum and adds it to the URL. If the user modifies the item values in any way, the existing checksum will no longer be correct; moreover, the user will have no way of knowing how to compute the correct value. Similarly, a user cannot create an item-saving URL from scratch because there is no way to determine its checksum. Thus, item modification is impossible.
There are two steps to enabling page access protection for a page. The first step is to enable the application’s Session State Protection property . Starting from the application’s home screen, click the Edit Application Properties button and then click the Security tab. The property is in the Session State Protection section. Most likely, the property is already enabled; if not, select Enabled. The second step is to go to the page properties for the page. The Page Access Protection property is in the Security section; select the option Arguments Must Have Checksum.

Detecting an attempted item modification
This request sets the session state value for P12_DEPTNO and P12_DNAME before loading the home page. The user can then navigate normally from the home page to the Employees by Department page . If those items get their source from the current session state value (as is typical), the page will be rendered with the user-specified values. In other words, the user will have successfully performed item modification despite your good intentions.
Summary
This chapter focused on the question of how to ensure the security of an application. It discussed how to configure the application so that each user can do only what that user should be able to do—no more and no less. There are three aspects to the security issue: authentication, authorization, and establishing safeguards.
Authentication ensures that an application knows the identity of its users. Users identify themselves by supplying a username and password; the application’s authentication scheme is responsible for matching the username/password against a master list. APEX supports several authentication schemes, which differ according to the part of the organization that manages the user/password list. You saw how to build a custom authentication scheme in which the application itself is responsible for the list.
Authorization specifies what each authenticated user can do. The fundamental authorization mechanism is the authorization scheme. Each authorization scheme specifies a set of users. By associating an authorization scheme with a page (or page component), you restrict access to that page (or component) to the users specified by its authorization scheme.
Safeguards are necessary to keep users from doing things they are not authorized to do. This chapter covered three well-known techniques: SQL injection, cross-site scripting, and URL modification. In SQL injection, a user submits an SQL code fragment as “data” in a way that causes the underlying process to execute the wrong query. In cross-site scripting, a user saves a malicious JavaScript code fragment as “data”; the malicious code then executes when another user attempts to display that data. With URL modification, a user sends a URL to the APEX server in a form that the server expects; however, the action requested by that URL is something that the user is not authorized to ask for. You examined ways to guard against each of these techniques. The bottom line is that if you are aware of the risks, it is relatively straightforward to ensure the complete security of your application.