When the APEX server receives a submit request from a browser, it performs the validations and processes associated with that request. Its final task is to choose a target page to send to the browser. By default, APEX chooses the page that was submitted, but it is possible to specify another page by creating a branch.
You have been able to get this far through the book without needing to use branches because of the ease in which multiple regions can be created on a page and the way that these regions can be conditionally rendered to give the effect of multiple pages. But there are many situations in which an application will use multiple pages to implement a user activity. This chapter investigates the use of branches to support these situations.
Separating Input from Output
A common application design technique is to use separate pages for input and output. A user enters input on a page and clicks a button; the application then branches to another page that displays the output.
As an example of this technique, consider the two pages shown in Figures 9-1 and 9-2. The pages have a single region each and work similar to the two-region Filter by Job and Department page of Chapter 6. In particular, a user begins on the Filter and Branch page shown in Figure 9-1, choosing a job and department from the select lists and then clicking a button. The system then branches to the Filtered Employees page of Figure 9-2, which displays a report of employees who have that job and are in that department.
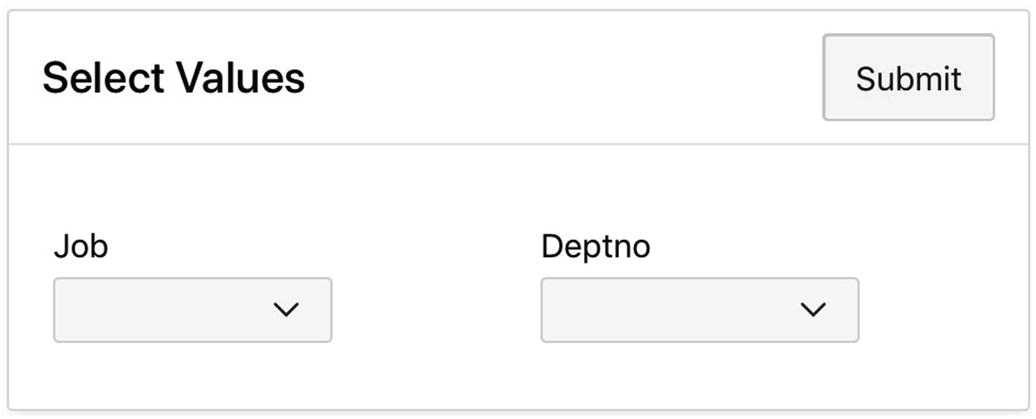
Figure 9-1
Filter and Branch page
Figure 9-2
Filtered Employees page
Let’s examine how to implement these pages. The Filter and Branch page will be page 22 of the Employee Demo application. Its region is titled Select Values and has the type Static Content. It has two select lists named P22_JOB and P22_DEPTNO. The list of values for these select lists are specified by the same SQL queries as in Chapter 6. In particular, the query for P22_JOB is
select distinct Job as DisplayVal, Job as ResultVal
from EMP
order by DisplayVal
And the query for P22_DEPTNO is
select DName, DeptNo
from DEPT
order by DName
The Filtered Employees page is page 23 of the demo and its region is a classic report. Its source query, which is also similar to what you saw in Chapter 6, is the following:
select EmpNo, EName, Job, Sal, DeptNo
from EMP
where (:P22_JOB is null or Job = :P22_JOB)
and (:P22_DEPTNO is null or DeptNo = :P22_DEPTNO)
order by EName
Each page has a button. The Submit button on the Filter and Branch page will perform a submit action to save its two item values in the session state. The Back button on the Filtered Employees page can simply redirect back to page 22 because it has no need to submit.
The Filter and Branch page will have an entry in the navigation menu. The Filtered Employees page will not, however, because the only way to access the page should be through the Filter and Branch page. This situation is true in general—when an interaction is broken up among several pages, usually only the first page of the interaction is accessible from the navigation menu.
There are two implementation issues that have not been discussed: how do you customize the region title of the Filtered Employee page, and how do you get page 22 to redirect to page 23 upon submit? Each issue will be discussed in turn.
Consider first the Filtered Employees region. One downside of using a separate page for output is that the input is no longer visible. The design strategy in Figure 9-2 is to recapitulate the input within the region’s title bar. Let’s examine how to implement this feature.
Recall that a region’s Title property is HTML code. Although HTML code cannot perform computation, it can reference the value of an item. Thus, the technique is to write a process to compute the title of the region and save it in a hidden item. Listing 9-1 gives the code for this process. This code considers the four cases in which the two items are empty or not, computes the region title appropriately, and saves it in the hidden item P23_REGION_TITLE.
declare
v_title varchar(100);
begin
if :P22_JOB is not null and :P22_DEPTNO is not null
Customizing the Title of the Filtered Employees Region
This process belongs to page 22 and is conditional on the Submit button. The HTML expression for the Filtered Employees region title then becomes a reference to that hidden item. In particular, the region title is the HTML expression “&P23_REGION_TITLE.”. Note that the expression uses substitution string syntax to refer to the item.
Creating a Branch
To get page 22 to redirect to page 23, you need to create a branch object. A branch object is similar to a process, in the sense that it performs an action in response to a submit. The difference is that a process executes code, whereas a branch redirects to a page. A branch typically executes last, after all processes have finished.
Creating a branch is similar to creating a process. Begin by going to the Processing tab of the page designer. Right-click the node labeled After Processing and choose Create Branch. APEX will create an unnamed branch that has the properties shown in Figure 9-3.
Figure 9-3
Properties of a newly created branch
You should give the branch a name. But what else must you do? Two important properties shown in Figure 9-3 are Point and Type; their default values specify that the branch will execute after all processes and will redirect to a specified page or URL. These default values are almost always what you want, and you should leave them as is.
The one property that requires your attention is Target. This property shows an error, indicating that you need to specify the target of the branch. Clicking the property’s Target property brings up the Link Builder wizard. Figure 9-4 shows the builder, configured to redirect to page 23.
Figure 9-4
Using the link builder to specify a branch target
A branch also has a Server-side Condition section for specifying when the branch should execute. As with processes, each branch typically has an associated button, and you specify that button in the When Button Pressed property. The branch in the Filter and Branch demo page should be associated with the Submit button and have no other condition.
Conditional Branching
In Chapter 7, you created the pages Employee Data Entry (shown in Figure 7-5) and Single Row Update (shown in Figure 7-24). These pages have similar functionality—they both allow a user to insert, delete, and update the EMP table—but they use very different interfaces to do so. In particular, the Employee Data Entry page is very expansive; it displays all the report and update regions at the same time. On the other hand, the Single Row Update page is compact, always displaying a single region at a time.
Let’s build a page that helps a user decide which page to use. This page, called Preference Chooser, is page 24 of the demo application and appears in Figure 9-5. The page has a single region that asks the user two questions. A user answers these questions and clicks the button; the button will then branch to page 17 (the Employee Data Entry page) if the first answer is No or the second answer is Yes or to page 21 (the Single Row Update page) otherwise.
Figure 9-5
Page with conditional branching
You can implement this page as follows: the two radio groups are named P24_COMPACT and P24_SEE_TABLE, having the static list of values {No, Yes}.
The button performs a submit action. Intuitively, you might imagine that the button makes the decision about which page to branch to. But that is not how branching works; instead, you need to create two branch objects, each of which is conditional on the button. Each branch will also have an extra condition. The branch object that redirects to page 17 has this condition:
:P24_COMPACT = 'No' or :P24_SEE_TABLE = 'Yes'
The branch object that redirects to page 21 has this condition:
:P24_COMPACT = 'Yes' and :P24_SEE_TABLE = 'No'
When the button performs the submit, only one of these conditions will be satisfied. The branch having the satisfied condition will perform its redirection.
Wizard-Like Interfaces
The final example of branching is also related to the problem of data entry. In each of the data entry pages of Chapter 7, a user creates a new record by entering the desired values into some items and then clicking an insert button. Such a design presupposes that the user has these values at hand. An alternative design is to create a series of pages that leads the user through the data entry process, much as a wizard does in APEX. The design will have four pages.
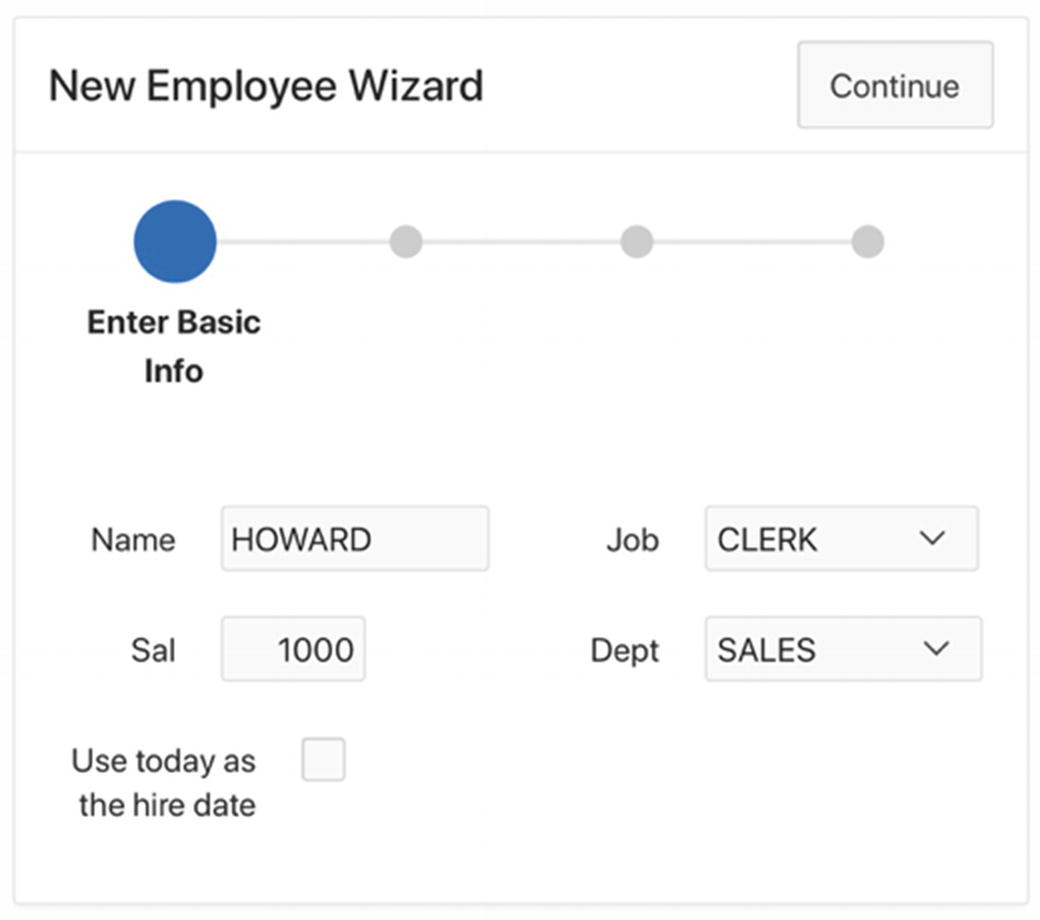
A user will begin on the Basic Info page (see Figure 9-6) by entering the name, job, department, and salary of the new employee. The most common situation is for the employee to have been hired that day, so there is a checkbox for that case. The user then clicks the Continue button to submit the page.
Figure 9-6
Entering the basic info
The next step is to determine the employee’s manager. Assume that the company assigns managers to employees as follows: the president has no manager, employees with the job MANAGER report to the president, and other employees (except clerks) report to the manager of their department. The exceptions are clerks. The manager of a clerk can be any employee (except another clerk) in the same department as the clerk, so the user will need to specify the manager of a new clerk explicitly.
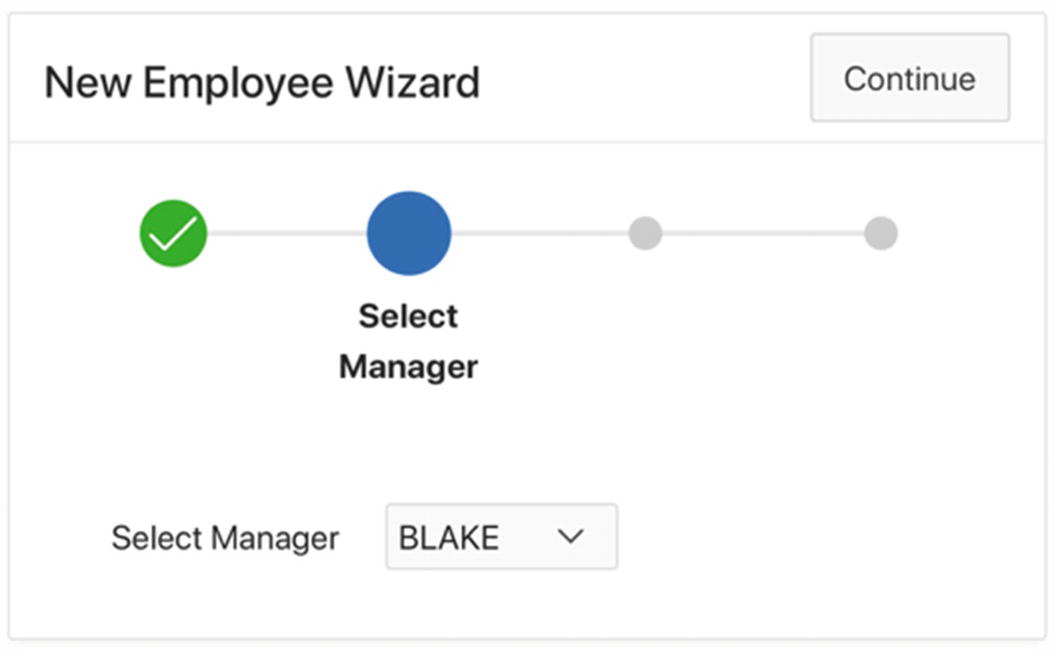
If the new employee is a clerk, clicking the Continue button will branch to the Manager Info page (see Figure 9-7), in which the user chooses the employee’s manager from a select list.
Figure 9-7
Selecting the manager
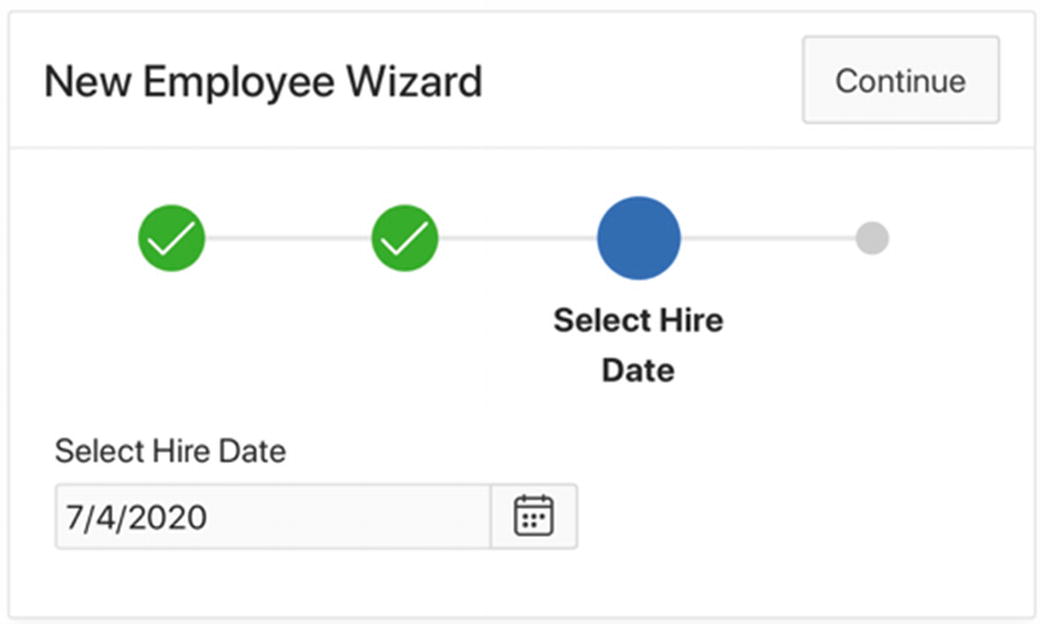
If the hiredate checkbox on the Basic Info page is unselected, the application will branch to the Hiredate Info page (see Figure 9-8), to let the user select a date. This branch will happen either from the Manager Info page or the Basic Info page, depending on whether the employee is a clerk. After selecting a date, the user clicks the Continue button.
Figure 9-8
Choosing the employee’s hire date
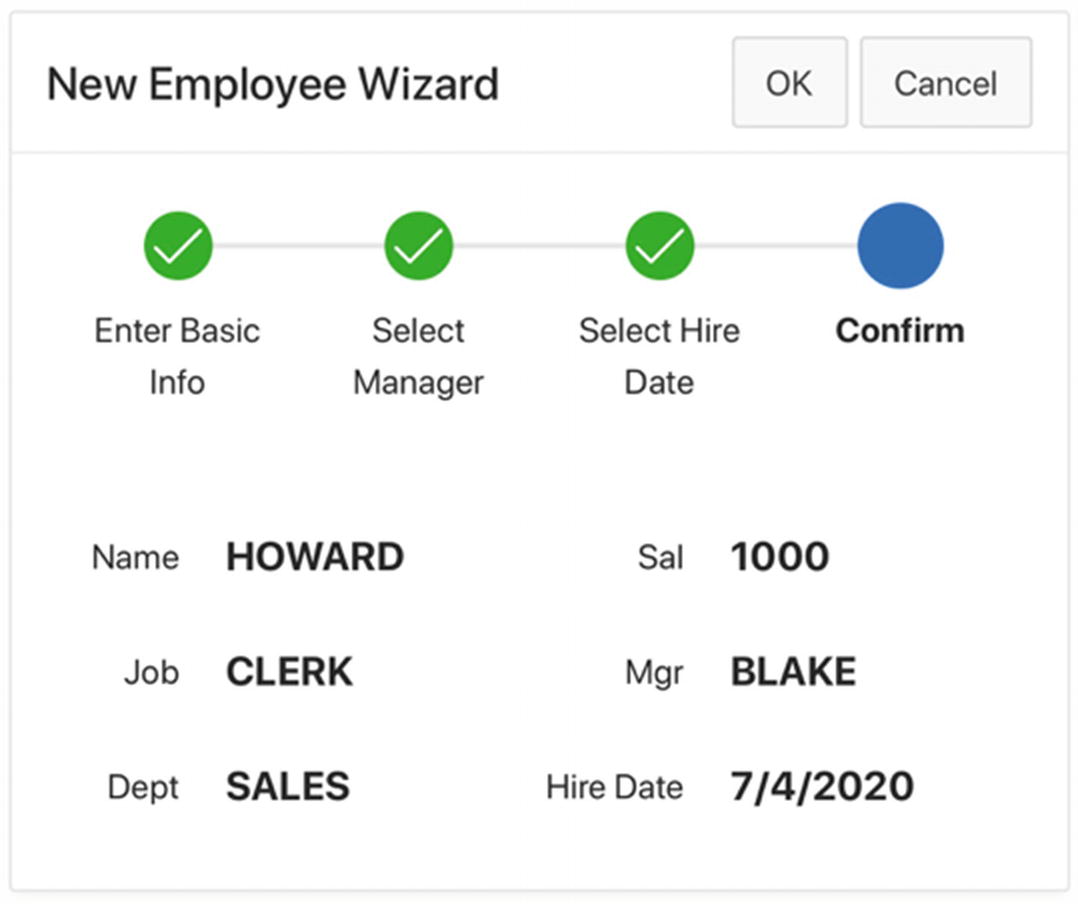
The final page of the wizard is the Confirm Employee Info page (see Figure 9-9), which displays the selected values for the new employee. The wizard branches to this page when all the necessary values are known. This branch can occur from any of the three earlier wizard pages. The Basic Info page can branch directly to the confirmation page when the new employee is not a clerk and the hiredate checkbox is selected, the Manager Info page can branch directly to the confirmation page when the checkbox was selected, and the Hiredate Info page always branches to the confirmation page.
Figure 9-9
Confirming the employee's information
The Confirm Employee Info page has buttons labeled OK and Cancel. Clicking the Cancel button redirects to the Basic Info page and clears the session state of each wizard page. Clicking the OK button inserts the new record into the EMP table, clears the session state of each page, and branches to the Basic Info page.
Now that you understand the flow of control through the wizard, let’s examine how to implement its pages. The following subsections address the issues.
Implementing the Progress Bar
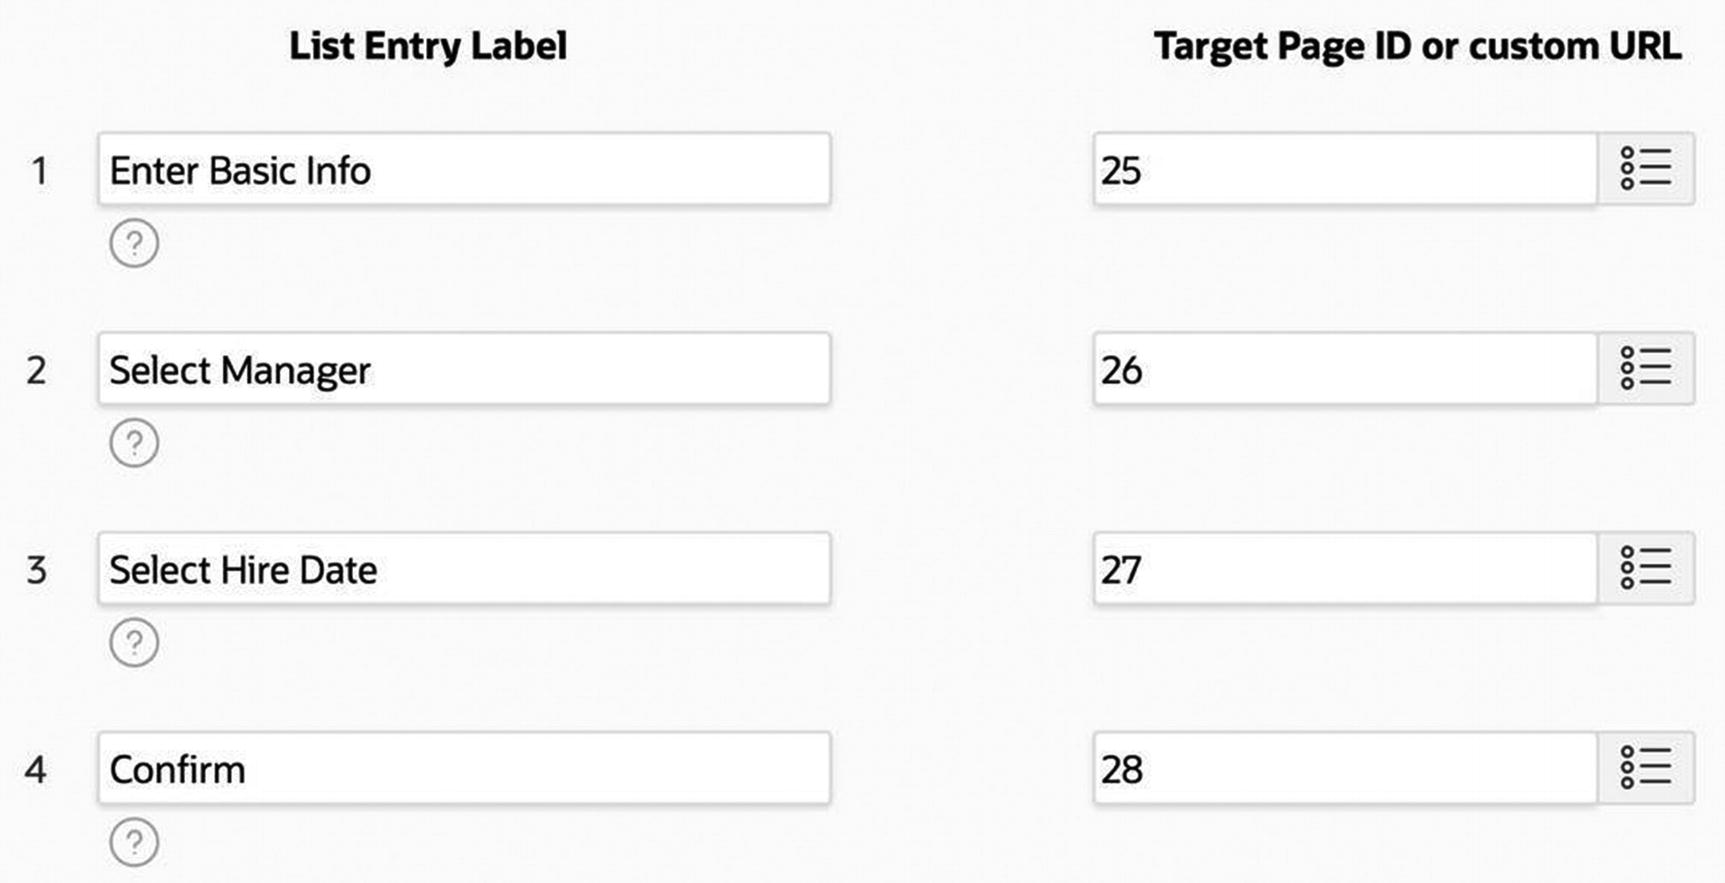
The region containing the colored circles along the top of the wizard pages is called a progress bar. A progress bar region is simply a fancy way to display a list of page numbers. The progress bar in each of these wizard pages displays the same list, namely, a list containing the page numbers [25, 26, 27, 28]. The step names in the progress bar are the labels associated with these page numbers.
To create the progress bars in the New Employee Wizard pages, you first need to create their common list. Then you can create a progress bar region on each page. Call the list New Employee Wizard; to create it, use the techniques you learned in Chapter 4. The list will have an entry for each of the four (not yet created) wizard pages, as shown in Figure 9-10.
Figure 9-10
Entries for the New Employee Wizard list
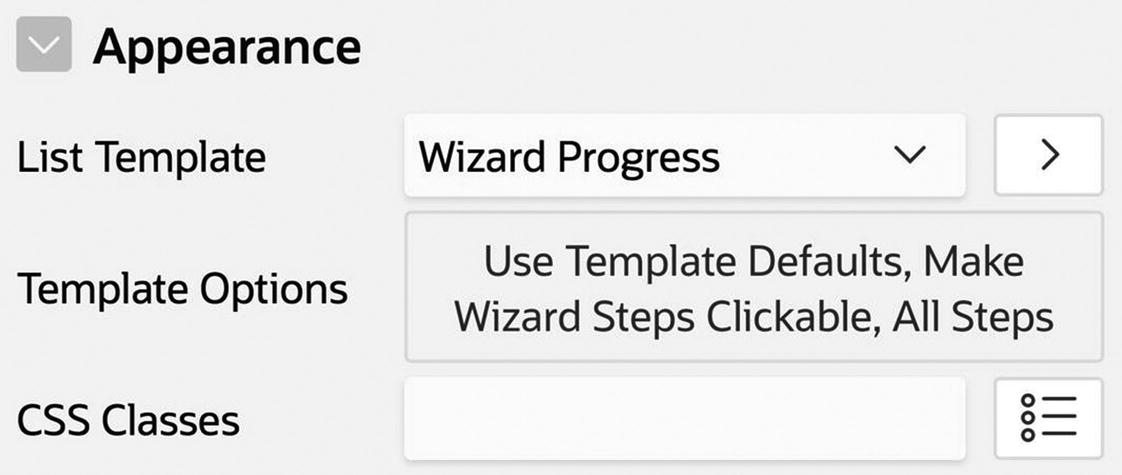
Then create the wizard pages. Start by creating four blank pages, numbered 25–28. Then create a region for each page, of type List, whose source is the list New Employee Wizard. Figure 9-11 shows the Attribute properties for the region. In particular, to display a list region as a progress bar, you only need to set its List Template property to be Wizard Progress.
Figure 9-11
List region properties
When you have added the list region to all four pages, run each page individually from the page editor. You should observe that the pages display the progress bar differently, based on the location of the page in the list.
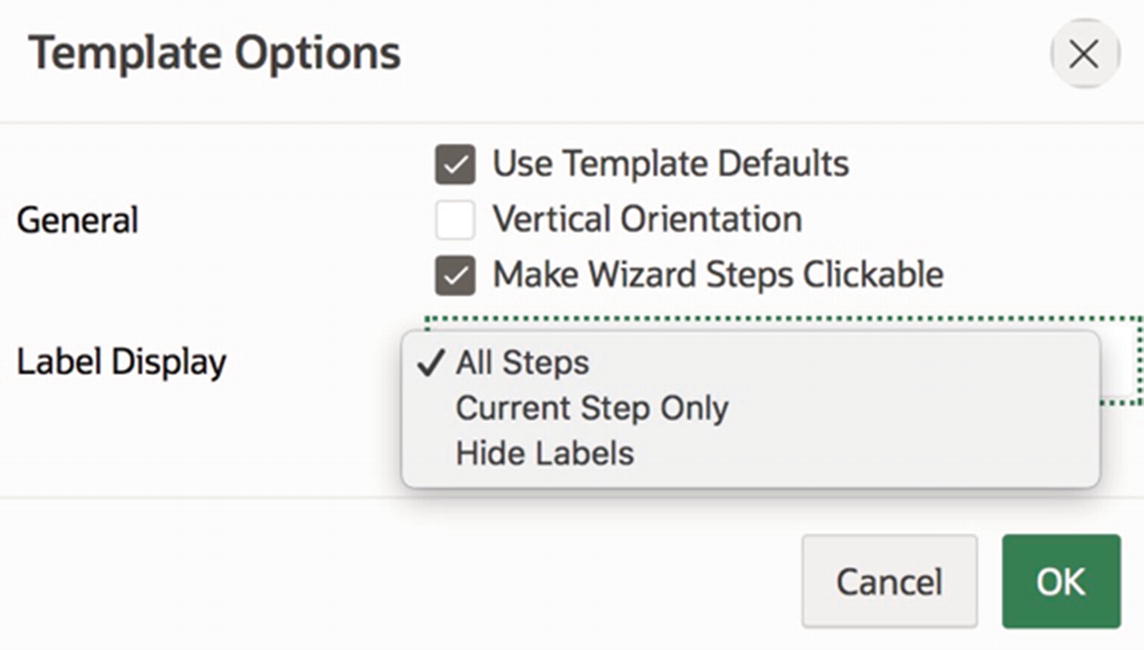
You can customize the look and feel of the wizard progress bar by clicking the Template Options property in Figure 9-11. Figure 9-12 shows the resulting dialog box. The Make Wizard Steps Clickable checkbox configures the progress bar so that each of its circles is a link—clicking a circle branches to the page corresponding to its step. Another option is Label Display, which lets you specify whether the progress bar should display labels for all steps or just the current one (or no labels). For example, the progress bar in Figures 9-6 through 9-8 show only the current step, whereas Figure 9-9 shows all steps. By default, the progress bar displays all steps, as shown in Figure 9-12.
Figure 9-12
Template options for a progress list
Basic Info Page
The Basic Info page has five items: P25_NAME is a text field, P25_SAL is a number field, P25_JOB and P25_DEPTNO are select lists. The list-of-values queries for these select lists are the same as in earlier pages: the list for P25_JOB is
select distinct Job as DisplayVal, Job as ResultVal
from EMP
order by DisplayVal
And the list for P25_DEPTNO is
select DName, DeptNo
from DEPT
order by DName
The item P25_HIRED_TODAY is a checkbox group having the single static value [ ,Yes]. That is, the display value is a space and the return value is Yes. Recall that a checkbox group is a multi-value item, so its value will be Yes if checked and null otherwise.
The Continue button performs a submit operation. During this submit, several things need to happen:
If the new employee is not a clerk, the page needs to calculate the employee’s manager.
If the hiredate box is checked, the page needs to set the employee’s hire date to be today.
The page needs to determine which of the other three wizard pages it should branch to.
The first bullet point requires that you write a process to calculate the manager of a non-clerk. Call this process ComputeManager. Its PL/SQL code appears in Listing 9-2.
begin
case :P25_JOB
when 'PRESIDENT' then -- the president has no manager
:P26_MGR := null;
when 'MANAGER' then -- a manager's manager is the president
select EmpNo into :P26_MGR
from EMP
where Job = 'PRESIDENT';
else -- the employee's manager is the manager of the dept
select EmpNo into :P26_MGR
from EMP
where DeptNo = :P25_DEPTNO and Job = 'MANAGER';
end case;
end;
Listing 9-2
PL/SQL Code for the ComputeManager Process
The ComputeManager process calculates its value in one of three ways, depending on the value of P25_JOB. In each case, it assigns the computed value to P26_MGR, which will be an item on the Manager Info page. In other words, this process assigns a value to the item on the Manager Info page so that the user doesn’t have to. (It is ok to write code that references a not-yet-existing item; you will just not be able to run it until the item exists.)
The ComputeManager process is associated with the Continue button and should execute only when the new employee is not a clerk. That is, the process is conditional on the following SQL expression:
:P25_JOB <> 'CLERK'
The second bullet point also requires you to write a process; call it ComputeHiredate. This process needs to calculate the current date and assign it to the item P27_HIREDATE, which will be on the Hiredate Info page. Its PL/SQL code uses Oracle’s built-in function sysdate and appears in Listing 9-3.
begin
:P27_HIREDATE := sysdate;
end;
Listing 9-3
PL/SQL Code for the ComputeHiredate Process
The ComputeHiredate process is also associated with the Continue button. It should execute only when the P25_HIRED_TODAY box has been checked. That is, it is conditional on this SQL expression:
:P25_HIRED_TODAY = 'Yes'
The third bullet point requires you to create three branch objects, one for each possible target. Call these branches GoToPage26, GoToPage27, and GoToPage28. The target specification for each branch is straightforward: the targets are pages 26, 27, and 28, respectively. Each branch is also associated with the Continue button. The only difficult issue is to specify their respective conditions.
The GoToPage26 branch should fire when the user has to choose a manager, so its condition is this SQL expression:
:P25_JOB = 'CLERK'
The GoToPage27 branch should fire when the user does not need to choose a manager, but does need to choose the hire date; thus, its condition is this SQL expression:
:P25_JOB <> 'CLERK' and :P25_HIRED_TODAY is null
Finally, the GoToPage28 branch should fire when neither the manager nor the hire date need to be chosen; thus, its condition is this SQL expression:
:P25_JOB <> 'CLERK' and :P25_HIRED_TODAY = 'Yes'
Manager Info Page
Now consider the Manager Info page, which has the single item P26_MGR. This item is a select list with values that denote all employees who are allowed to manage clerks. Assuming that a clerk’s manager must be in the same department and cannot be another clerk, the item’s list of values would be defined by the following query:
select EName, EmpNo
from EMP
where DeptNo = :P25_DEPTNO and Job <> 'CLERK'
The page also has a Continue button whose action is submit. The page does not need to compute any values, so no processes are needed. But it does need to decide whether to branch to the Hiredate Info page or the confirmation page. Thus, you need two branch objects, called GoToPage27 and GoToPage28. These branches are both associated with the Continue button.
The GoToPage27 branch should fire when P25_HIREDATE is not checked; thus, its condition is this SQL expression:
:P25_HIRED_TODAY is null
Conversely, the GoToPage28 branch should fire when P25_HIREDATE is checked; thus, its condition is this SQL expression:
:P25_HIRED_TODAY = 'Yes'
Hiredate Info Page
Now consider the Hiredate Info page. It has a single Date-Picker item named P27_HIREDATE to hold the hire date, a Continue button whose action is submit, and a branch to the Confirm Employee Info page that is conditional on the button. Submitting the page causes APEX to save the selected date in the session state and execute the branch.
Confirm Employee Info Page
Finally, consider the Confirm Employee Info page. Its six items are all of type Display Only, and their values are simply copied from the items on the other pages. For example, consider the employee’s name, which is in the item P28_NAME. Its source type is PL/SQL Expression and has the following value:
:P25_NAME
The source expressions for the items P28_SAL and P28_JOB are similar. The source expression for P28_HIREDATE is
:P27_HIREDATE
Specifying the source expressions for P28_MGR and P28_DEPTNO requires a little more work. Consider P28_MGR. If its source were simply the value of P26_MGR, the page would display the manager’s employee number. Looking back at Figure 9-9, however, you can see that the page displays the name of the manager, which is easier for a user to understand. Similarly, P28_DEPTNO displays the name of the department, even though the value of P25_DEPTNO is the department number.
To get P28_MGR to display the manager’s name, set its source to be SQL query (return single value), having the following query:
select EName
from EMP
where EmpNo = :P26_MGR
Similarly, the source of P28_DEPTNO is this SQL query:
select DName
from DEPT
where DeptNo = :P25_DEPTNO
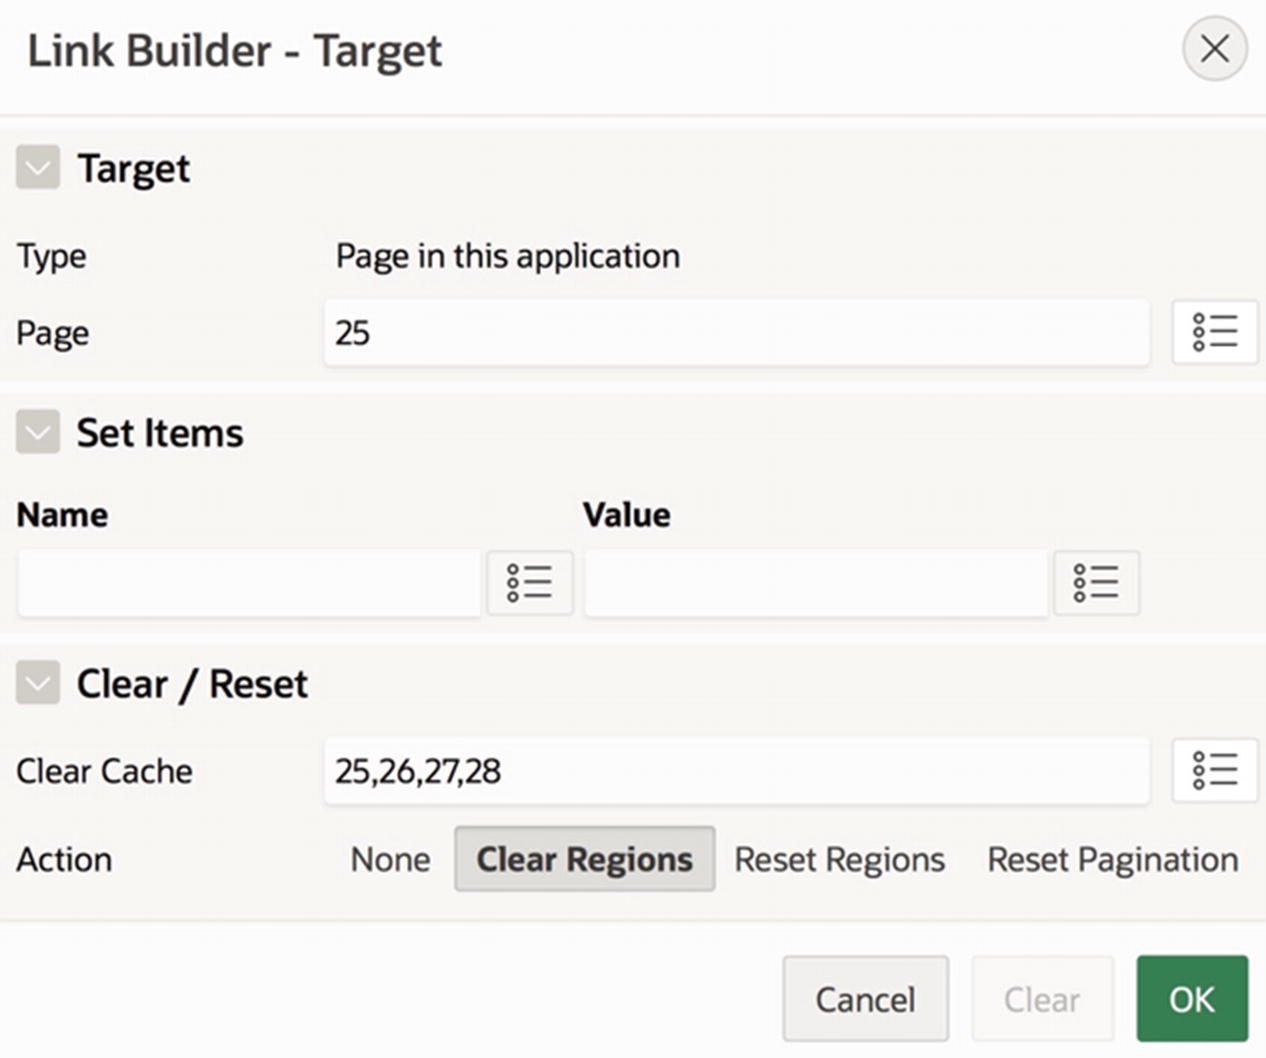
The Confirm Employee Info page has two buttons. The Cancel button redirects to the Basic Info page and clears the cache of the four wizard pages. Clicking the button’s Target property brings up the link builder, where you can specify the details of the redirection. Figure 9-13 shows the link builder values for my Cancel button. The Clear Cache property contains the page numbers of those pages whose item values should be cleared.
Figure 9-13
Link builder values for the Cancel button
The Continue button performs a submit action. The button has an associated process, called InsertRecord, which will insert the new employee record into the EMP table. The code for this process is similar to the code from Chapter 7 and appears in Listing 9-4.
Recall that after the insertion occurs, the page should clear the four wizard pages and redirect to the first one. To do so, create a branch object, named GoToPage25, which is conditional on the OK button. Use the link builder to specify the action of the branch, which will look exactly as in Figure 9-13.
Summary
This chapter looked at branch objects and gave some examples of their use. Branches execute during a submit operation, after the validations and processes. A branch has two important components: its target and its condition.
The branch’s target specifies the page (or URL) to redirect to. You specify the target using the link builder, just as you did when configuring a redirection for a button or link. Consequently, a branch can also assign values to items in the session state or clear item values on a page.
The branch’s condition specifies when the branch is relevant. A page might have several target pages, depending on its session state. You address this situation by creating a branch for each target page and assigning a condition to each branch. The branch conditions should be non-overlapping so that at most one branch will be able to fire during any submit operation.