
The user clicks the link of the desired row, which redirects to the Report with Form 2 page (Figure 10-29) and places the selected employee number into an item on that page.
The initialization process for the form then retrieves that employee’s information from the database and stores it in the appropriate items.
The user then modifies the content of those items and clicks the Apply Changes button to perform the update.
The peculiar thing about these steps is that the second step doesn’t make use of the employee report. Instead, the initialization process re-retrieves the desired employee record from the database, even though its values are right there in the report.
The concept of an interactive grid addresses this situation by allowing users to update report values directly. An interactive grid is essentially an “updatable report,” combining the features of a report and a form in a single region. This chapter examines the techniques needed to build and customize interactive grids.
Read-Only Interactive Grids
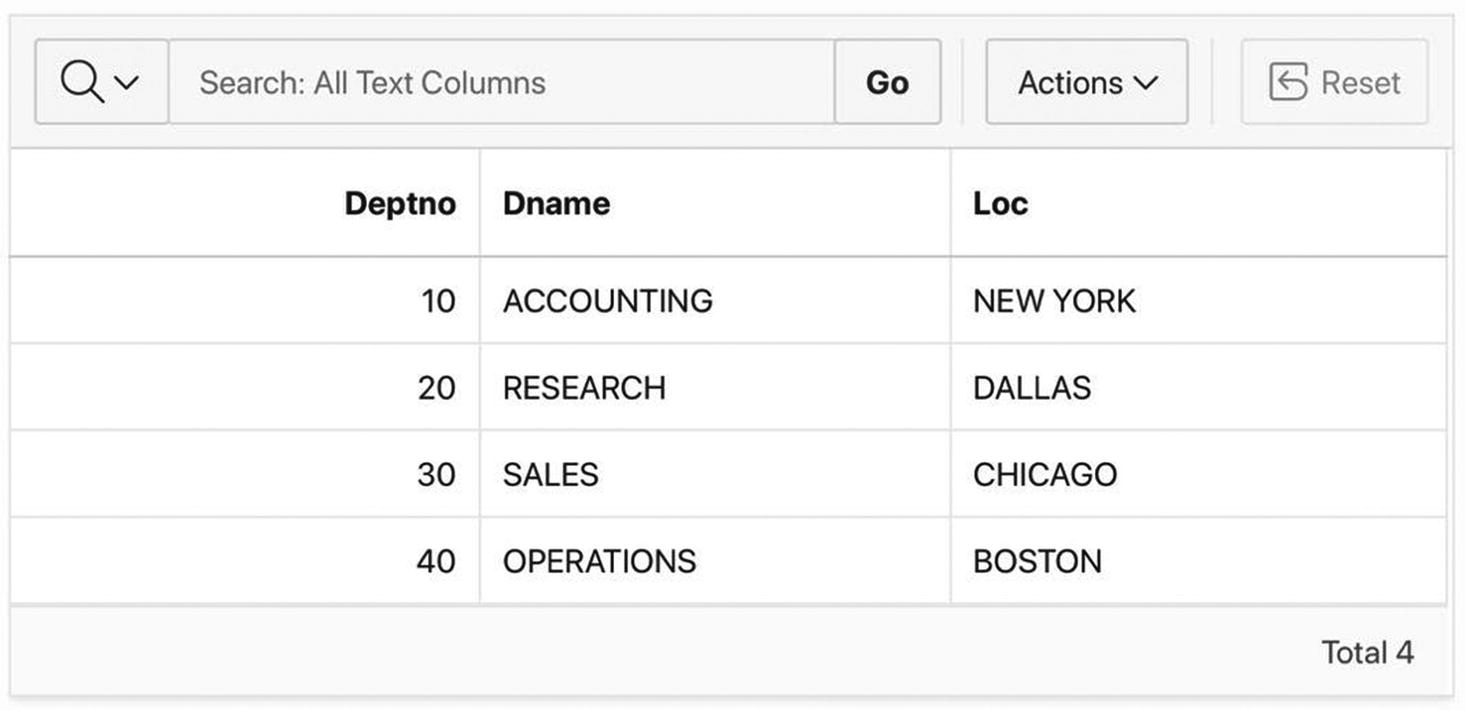
An APEX interactive grid is essentially an interactive report that can be edited like a form. This section examines the report-like features of interactive grids; the remainder of the chapter will cover the form-related issues. Page 42 of the Employee Demo application is called Interactive Grids and will be used as a running example throughout the chapter.
Creating an interactive grid region
An interactive grid region
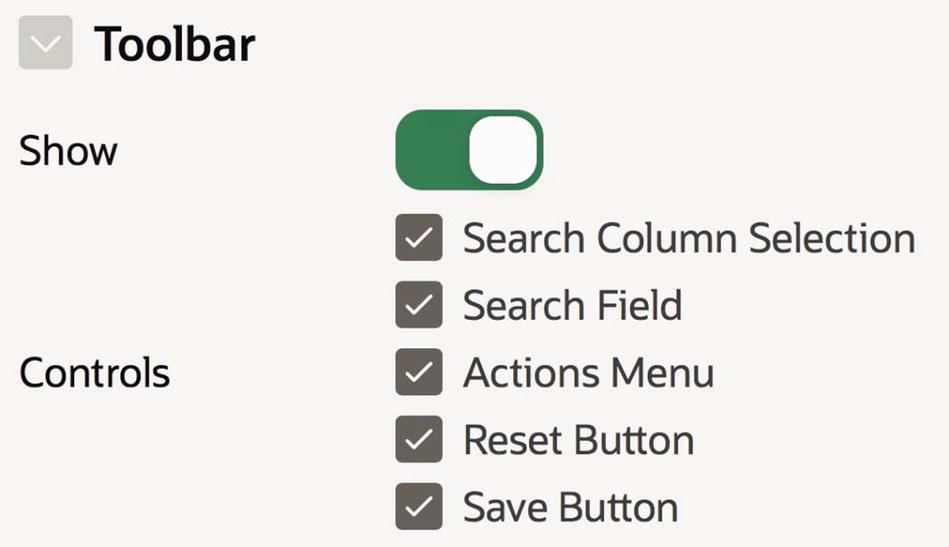
Properties to customize the toolbar
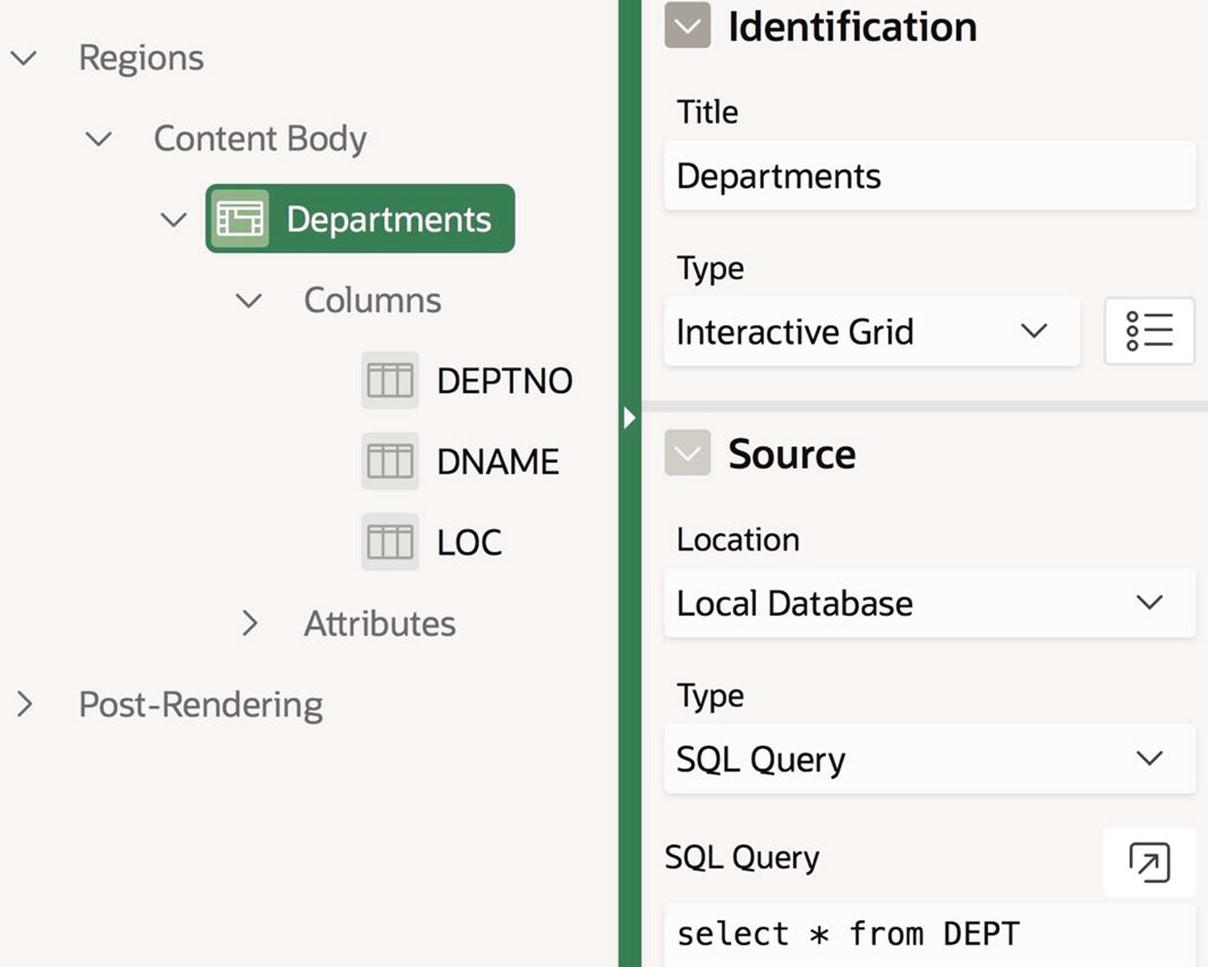
Create a new interactive grid region named Employees, having the source select * from EMP.
In the Departments region, click the DEPTNO node in the rendering tree and find its Source section in the property editor (as shown in Figure 10-4). Turn on the Primary Key property.
In your new Employees region, go to the Master Detail property section of the DEPTNO column, and set its Master Column property to DEPTNO, as shown in Figure 11-4.

The Master Detail property section
These last two steps establish the key-foreign key relationship between the two grids. The column DEPTNO in the Departments grid is the key, and the column DEPTNO in the Employees grid is the foreign key. APEX will ensure that whenever a user selects a row from the Departments grid, the Employees grid will show only the rows having corresponding DEPTNO values.

Master-detail interactive grids
Editing Interactive Grids
In addition to behaving like a report, an interactive grid can also behave like a form. You enable editing in an interactive grid the same as you do in a form. In particular, go to the rendering tree for the interactive grid region, click its Attributes node, and look at the Enabled property in the Edit section. By default, this property is turned off. When you turn it on, additional properties will be displayed, as was shown in Figure 10-10. The checkboxes allow you to specify which editing operations the region should allow.
As with a form, you will not be able to edit an interactive grid until you specify its primary key column. In the Sample Interactive Grids page, you already specified the primary key column for the Departments grid (to support the master-detail linkage); now you should specify that EMPNO is the primary key column for the Employees grid. You should also turn off the Value Required property for these key columns; otherwise, APEX will not be able to generate the key value for a newly inserted record.

An edit-enabled interactive grid
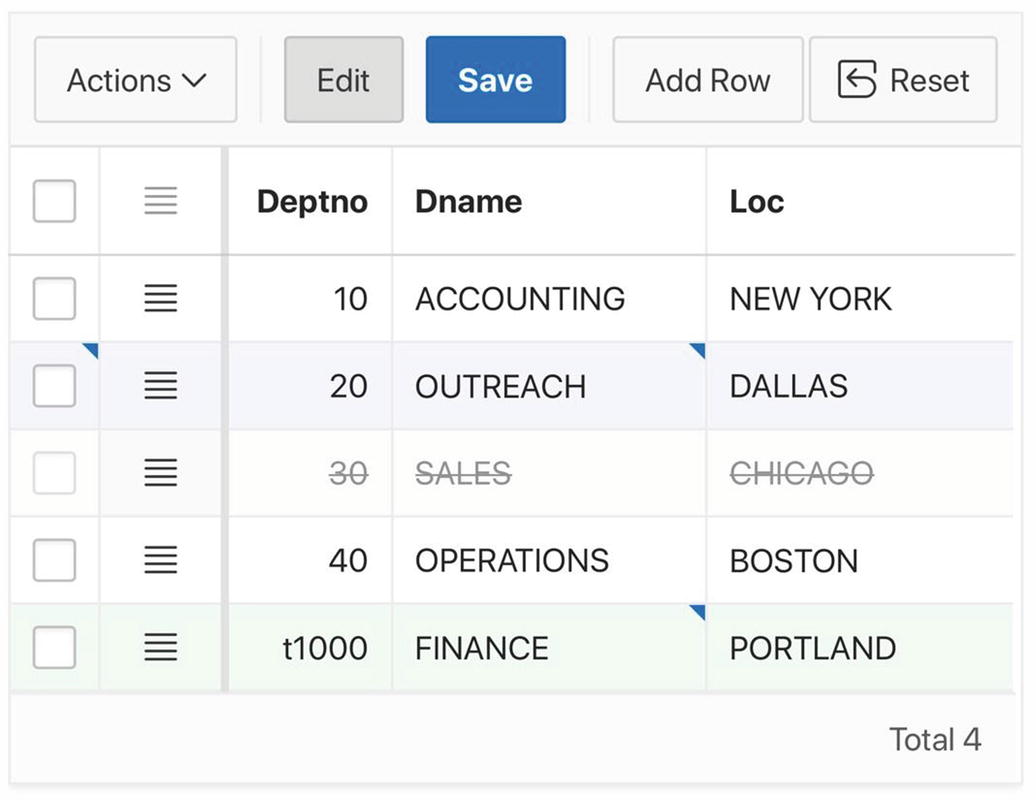
You edit an interactive grid as follows: the Edit button toggles between view mode and edit mode. Initially the button is white, as shown in Figure 11-6, denoting view mode. Clicking it turns the button gray, which denotes edit mode. When in edit mode, you can modify the value of cells. APEX denotes a modified cell by placing a small blue triangle in its top right corner.
Clicking the Add Row button adds a new row to the grid. The initial value of its primary key is a placeholder. You can either replace it with a desired value, or leave it as is. If you leave it, then APEX will overwrite it with a generated value.
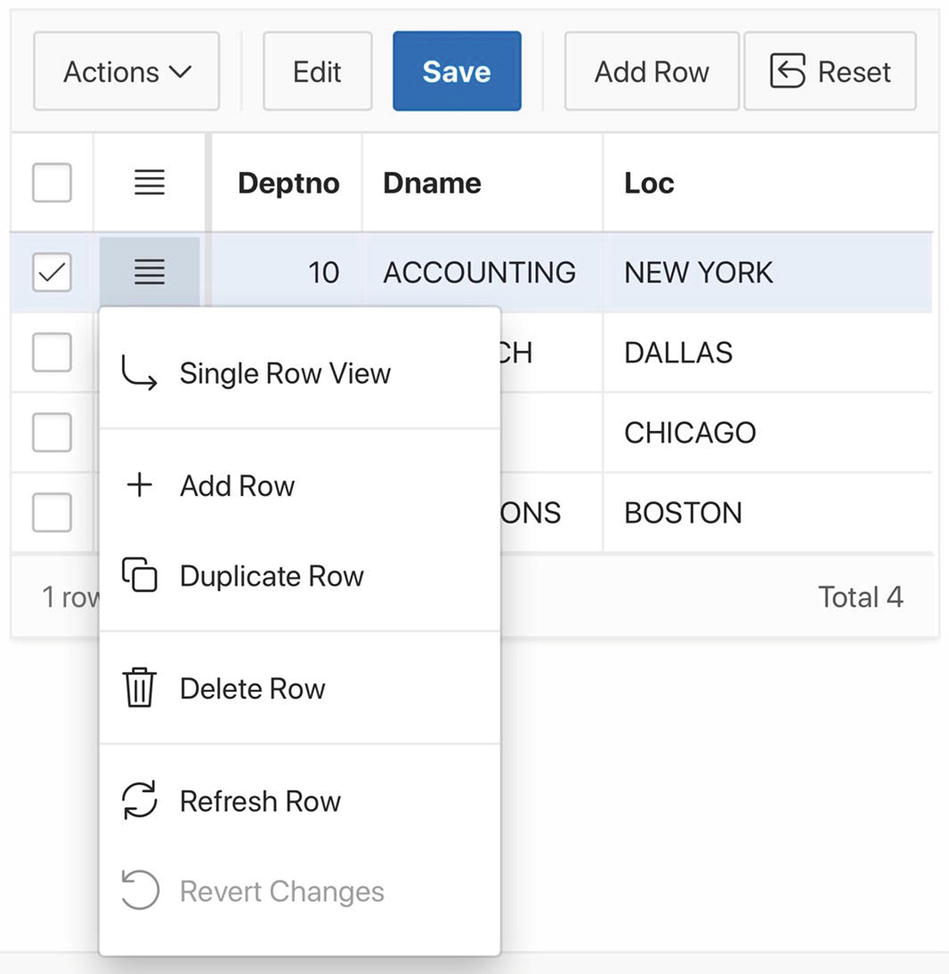
The APEX row-action menu
Changes to the interactive grid
None of these actions are permanent until you click the Save button. Until then, you can undo the change to a row by selecting the Revert Changes item from its row-action menu (as shown in Figure 11-7).
The row-selection column of the grid is the leftmost column, containing checkboxes. This column is not used for basic editing operations. For example, clicking the Save button in Figure 11-8 will save the three changed rows even though their row-selection boxes were not checked.
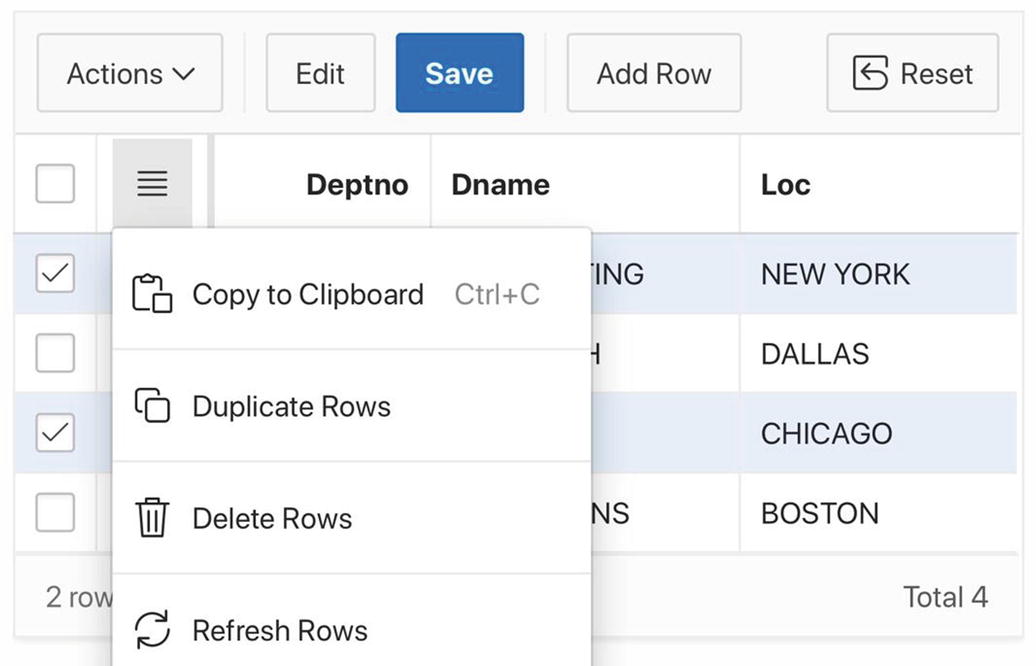
Bulk deletion of records
An alternative way to perform bulk operations is to use the Actions button in the toolbar above the grid. It has a submenu named Selection, whose menu items are identical to the header’s row-action menu.
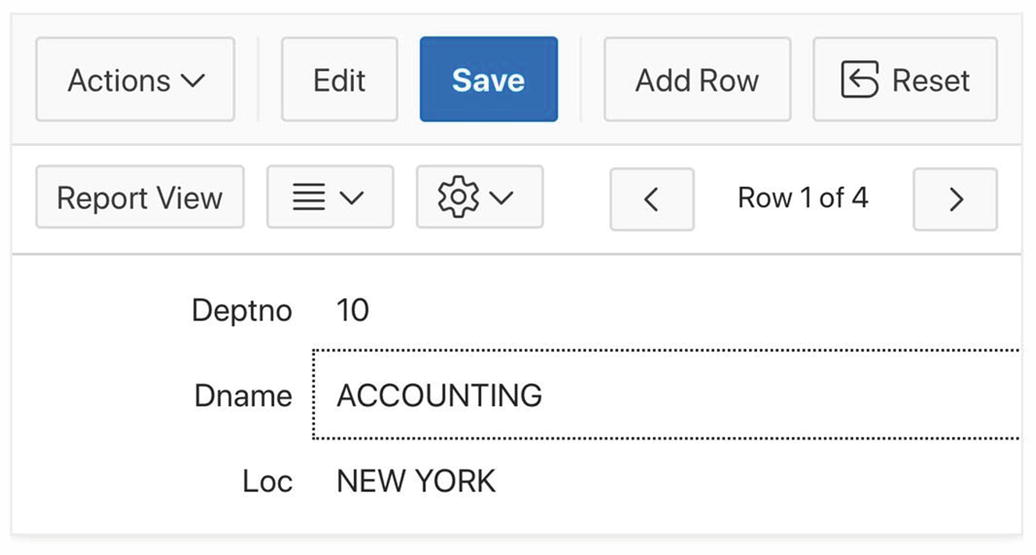
Single row view
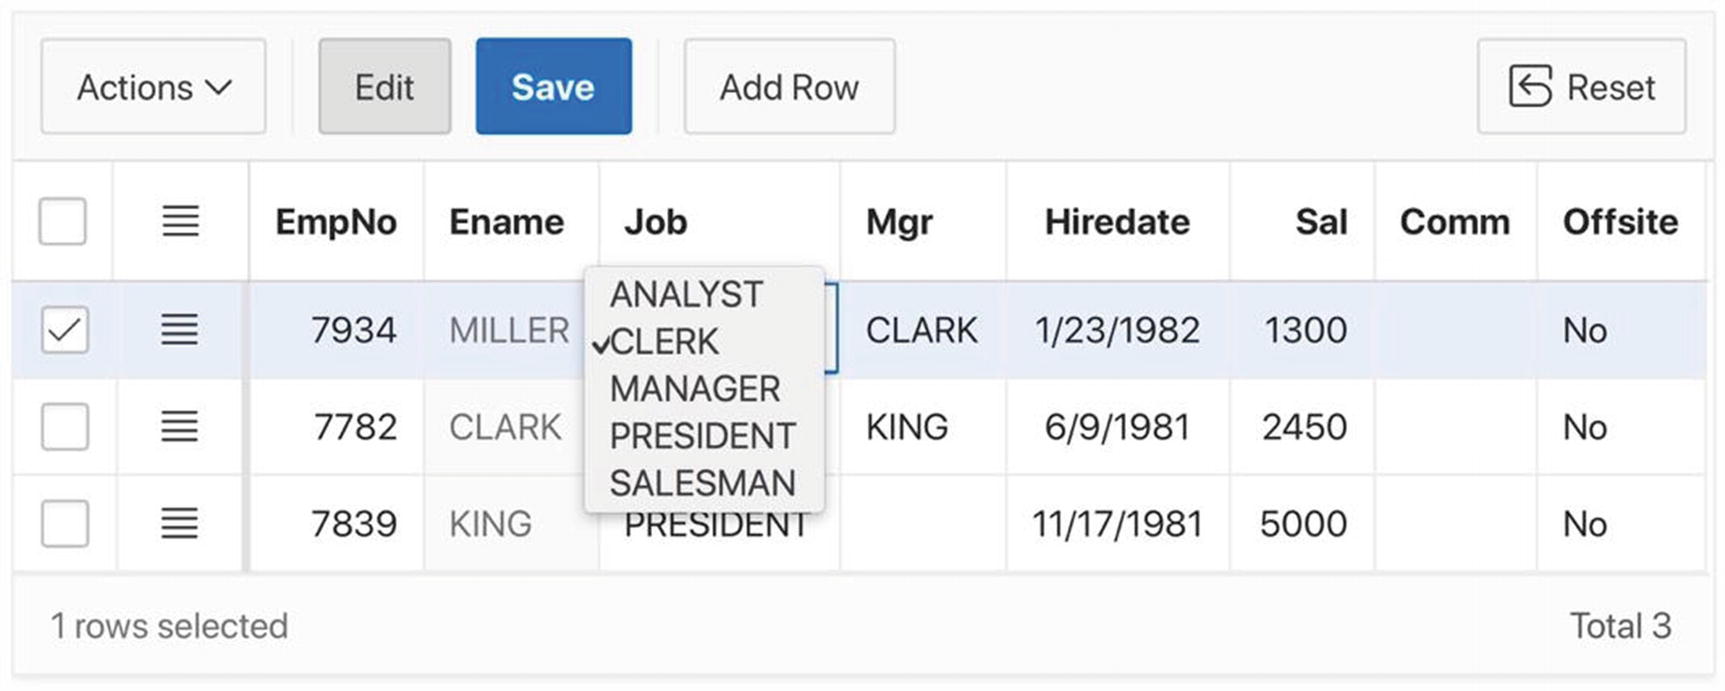
JOB formatted as a select list
Note that nonselected cells look like text fields, regardless of their type. For example, you cannot tell from the figure that each Mgr cell is a select list and each Offsite cell is a radio group. However, you can see that the Mgr cells show the display value of the column (the manager’s name) and not the return value (the manager’s employee number). Similarly, the Offsite cells show the display values of the column (‘No’) and not the return value (‘N’). The best way to learn about the different cell types is to experiment with them.

Specifying the default value of a column
I would like to show you how to make one final improvement to the look and feel of the page. Currently, the page contains two grid regions, each with its own buttons. The Edit and Add Row buttons affect only their own grids. However, the Save buttons are redundant—each one saves the changes from both grids. This behavior is somewhat unexpected and could confuse users.
The solution is to realize that the Save buttons do not have special functionality—their action is equivalent to a page-wide Submit operation. Therefore, it is possible to create your own Save button and display it anywhere you want on the page. My choice was to create a new static content region, titled Employees by Department, to be the parent of the two interactive grid regions. I then created a button in the new region labeled Save, set its position to Edit, turned on its Hot property (so that it is displayed in blue), and gave it the action Submit Page. You should do the same.
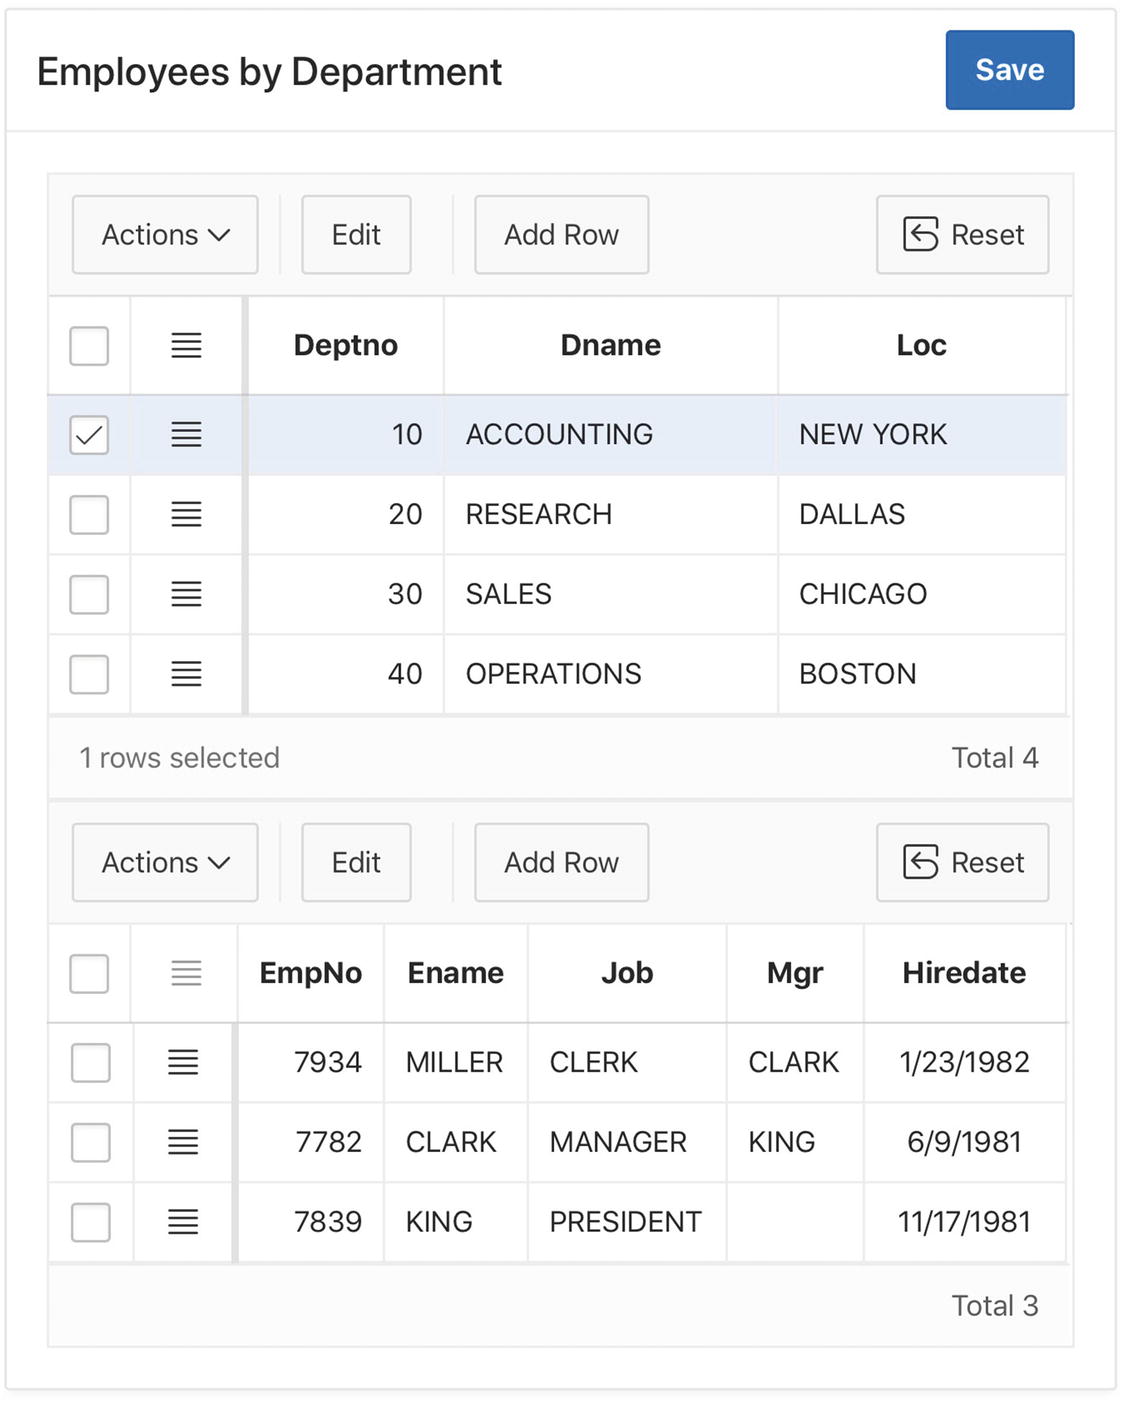
The completed Interactive Grids page
Ensuring Consistency
Chapter 8 discussed ways that a page can preserve data consistency. One way was to use validations to check for inappropriate item values; another was to restrict the values that can get entered. The following subsections show how these solutions can be applied to interactive grids.
Grid Validations
A validation in an interactive grid is an assertion that must be true for each row of the grid. You define an interactive grid validation the same as an item-based validation; the only difference is that it will apply to every row in the grid instead of just one.
Set the name of the validation to Mgr in Same Dept.
Set the editable region to Employees.
Set the validation type to Rows returned, having the query
select * from EMPwhere EmpNo = :MGRand (DeptNo = :DEPTNO or Job = 'PRESIDENT')Give an appropriate error message.

Properties of a grid validation
The critical property here is Editable Region. By providing a value for this property, you are specifying that this is an interactive grid validation and not an item-based validation. So when a submit action occurs (such as by clicking the Save button), APEX will apply the validation to each changed row of the grid.
Given an employee row, the validation query returns the employee’s manager, provided that the manager is either the president or in the same department as the employee. In other words, if an output record exists, then the row has a proper manager and thus satisfies the Rows returned validation type. Note that the query references the values of the modified row using bound variable syntax; that is, it treats the cells of the modified row as if they were items.
Restricting Interactive Grid Input
One problem with using an interactive grid for update is that you might want a cell to be updatable for some operations but not others. For example, consider the EName column in the Employees grid. Suppose that a user should be able to enter an employee name during insertion, but should not be able to edit it subsequently. How to enforce this restriction?
The idea is to make use of the column’s Read Only properties. In particular, you want to specify that the column’s cells should be read-only for all rows except update rows. To express this specification, you will need to know the update status of each row.
If the row has been edited, then the status is ‘U’.
If the row is an insert row, then the status is ‘C’ (for “created”).
If the row is flagged for deletion, then the status is ‘D’.
If the row has not been changed, then the status is null.
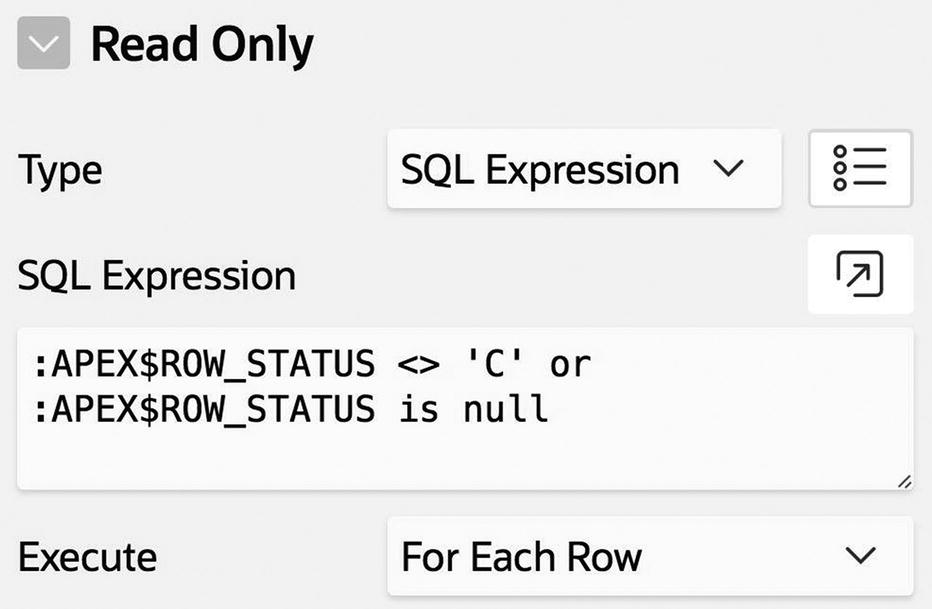
Specifying when EName values can be entered

Enabling row-specific updates and deletes
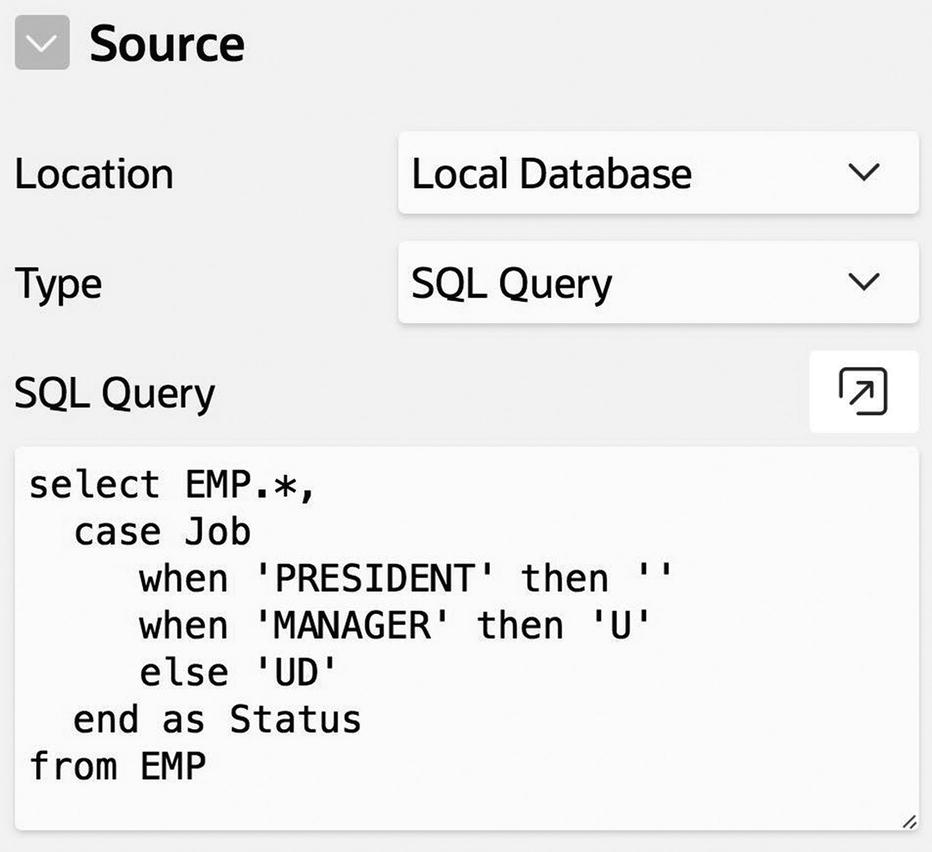
Adding a row operations column to the grid’s source
By default, this new source column will be displayed in the grid as a text field. This column can be a useful debugging aid. But eventually, you will want to set its type to Hidden.

Row protection in action
Grid Processes
Each grid region comes with its own ARP process, which implements the database modification operations for that region. If you want your grid to have additional functionality, then you need to create additional processes for it.
The processes discussed in Chapters 7 and 10 execute once per submit request. Processes for an interactive grid, however, need to execute once per modified row of the grid. For an example, consider the LogChanges process from Listing 7-13. That process was used in the Revised Employee Data Entry page—whenever a user clicked the Delete, Insert, or Update button, the process inserted into the EMPLOG table a record denoting the request, the user, and the date.
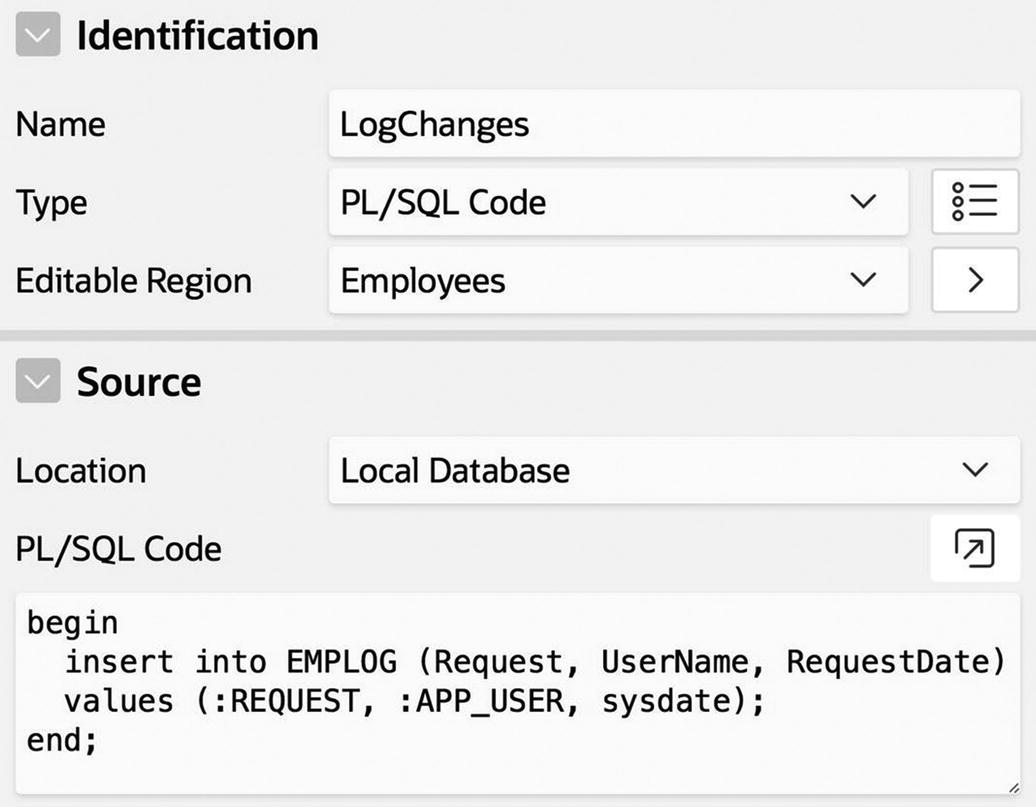
The LogChanges process
Test your process by making some changes to the Employees grid and then looking at the EMPLOG table from the SQL Workshop. The table should have a record for each modification you made. Unfortunately, all the records look the same—the Request values are either APEX_AJAX_DISPATCH (if you used the built-in SAVE button on the toolbar) or SAVE (if you used the SAVE button that you wrote for Figure 11-13). That is not good enough; the value of the Request field ought to be more informative.
PL/SQL Code for the Revised LogChange Process
Another situation you may encounter is that the grid’s built-in database modification code does not do what you want. In this case, APEX lets you write your own PL/SQL code to replace it.
For a simple example, consider the problem of inserting a new row into a grid that does not contain all the fields of the table. The built-in insertion process will assign null values to the missing fields. But what if this isn’t good enough? What if the new record needs non-null default values?
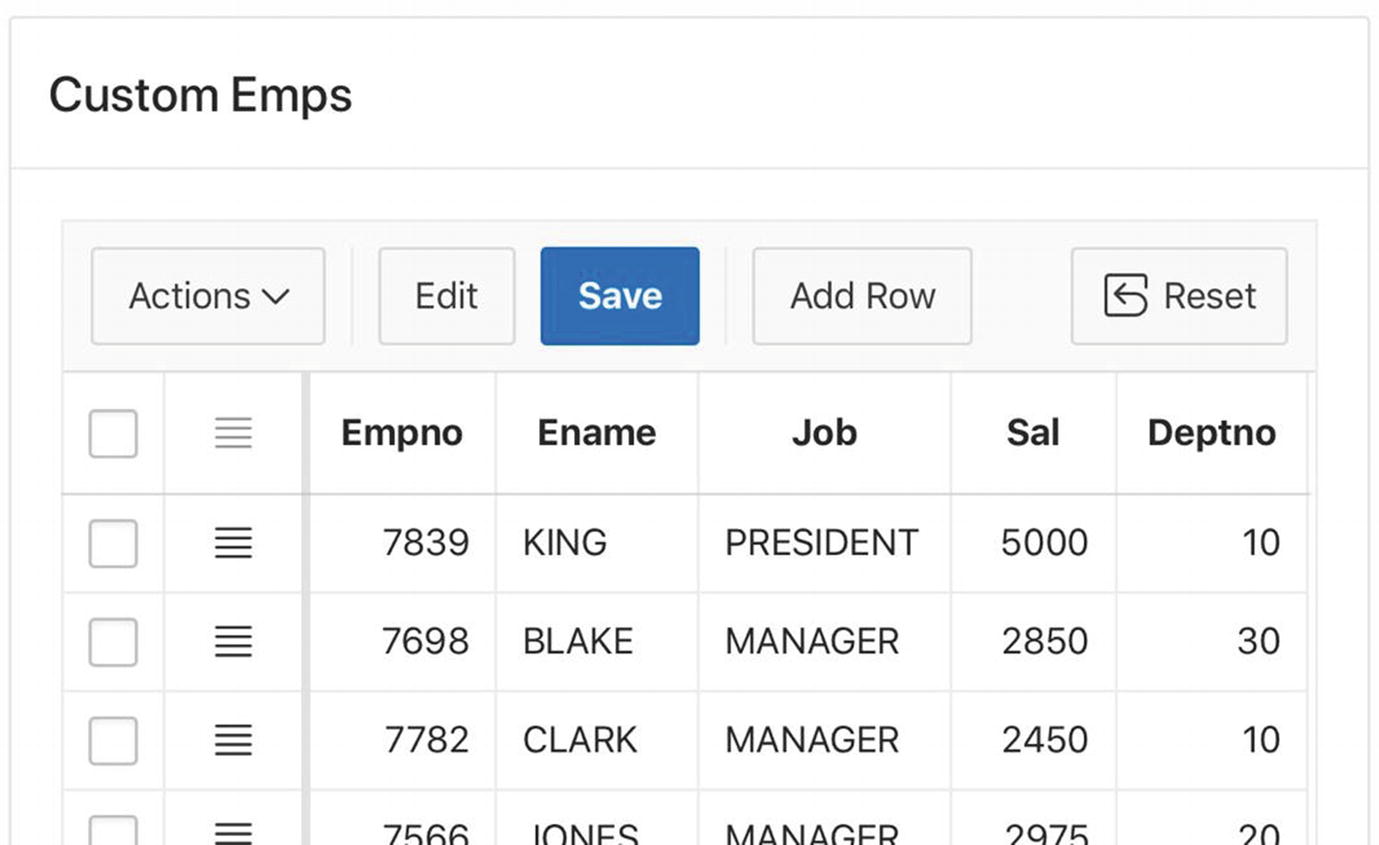
The Custom Emps grid region
The task at hand is to change the region’s insertion code so that it places default values into the missing fields. Here is how to do it.
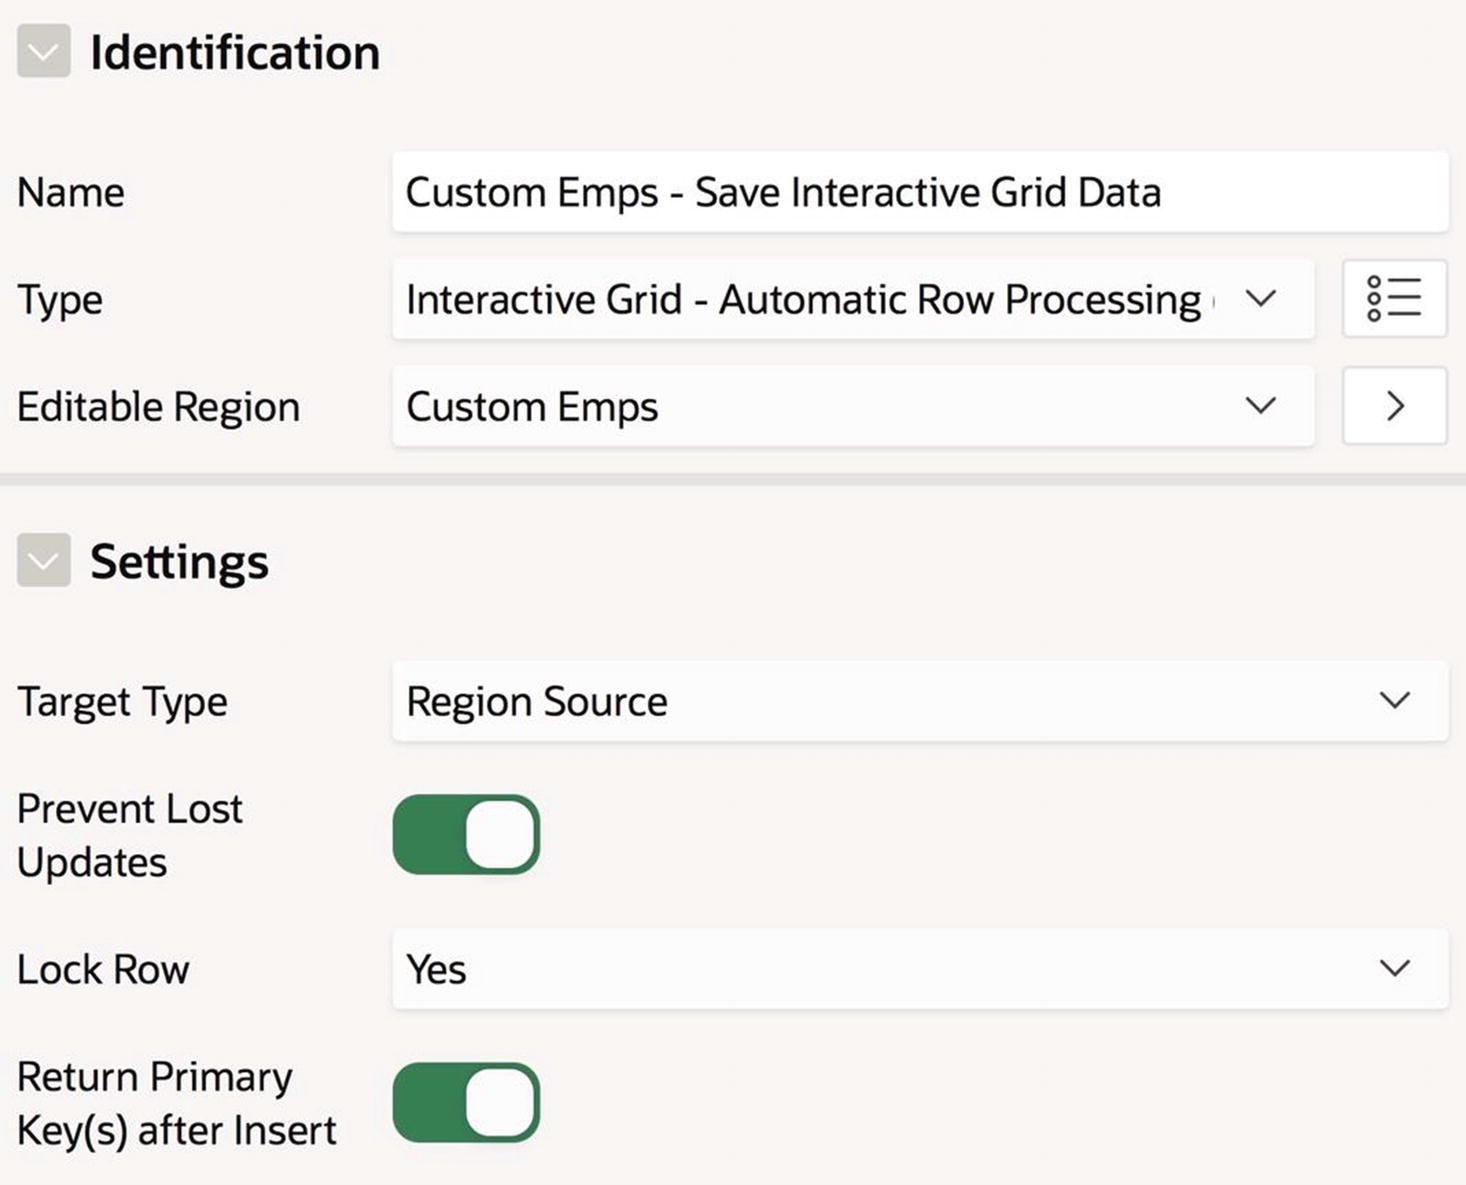
Property settings for the grid ARP process
Your custom PL/SQL code must handle all three modification operations, even though you are only changing insertion. Listing 11-2 shows my code. It uses a case statement to determine the operation that needs to be performed. The code for deletion and update are straightforward SQL commands, no different than what the ARP process would do. The code for insertion determines the default values for the four missing columns: the manager of a new employee is the president, the hire date is today, initial commission is 0, and the employee does not work offsite. The returning clause at the end of the insert statement causes the newly generated employee number to be saved in the grid’s session state.
Custom Interactive Grid Modification Code
Summary
This chapter focused on interactive grids—what they are, what they can do, and how to build them. It began by examining their report-like characteristics. In this aspect, they look and behave a lot like interactive reports. Interactive grids also have some additional features, most importantly the ability to link two grid regions in a master-detail relationship.
The chapter then considered the issue of how to use an interactive grid to update the database. Interactive grids have a sophisticated, easy-to-use interface, in which you can tentatively edit values in place, add rows and initialize their values, and delete existing rows, and then undo or save these changes when desired.
Ineractive grids have validations to ensure appropriate user input. You specify these validations the same as in Chapter 8. The difference is that APEX applies the validation code to each modified row of the grid. You can also use the Read Only properties of a grid to restrict users from changing the value of specified rows or columns.
Each interactive grid has a built-in process that handles the database insert, delete, and update operations. If you need additional functionality, you can write your own processes. As with validations, the code of the process refers to just one row of the grid; APEX applies the process to each modified row of the grid. In fact, you can even swap out the default database processing code and replace it with your own.