In this book, you have seen many ways to use session state values to customize a page. For example, the SQL source query of a report is a good candidate for customization, as is an SQL statement in a process that accesses the database. Much of this customization involves bound variable references in SQL statements.
However, there are limits to what can be customized. A reference to a session state variable can replace a constant in the SQL query, but it is not allowed to replace a table name or a column name. This chapter examines a technique called dynamic SQL, which overcomes this limitation by using PL/SQL code to construct and execute an SQL statement at runtime. You will see how to use dynamic SQL as the source of a report or the contents of a process and look at three examples that require dynamic SQL.
Dynamic Reports
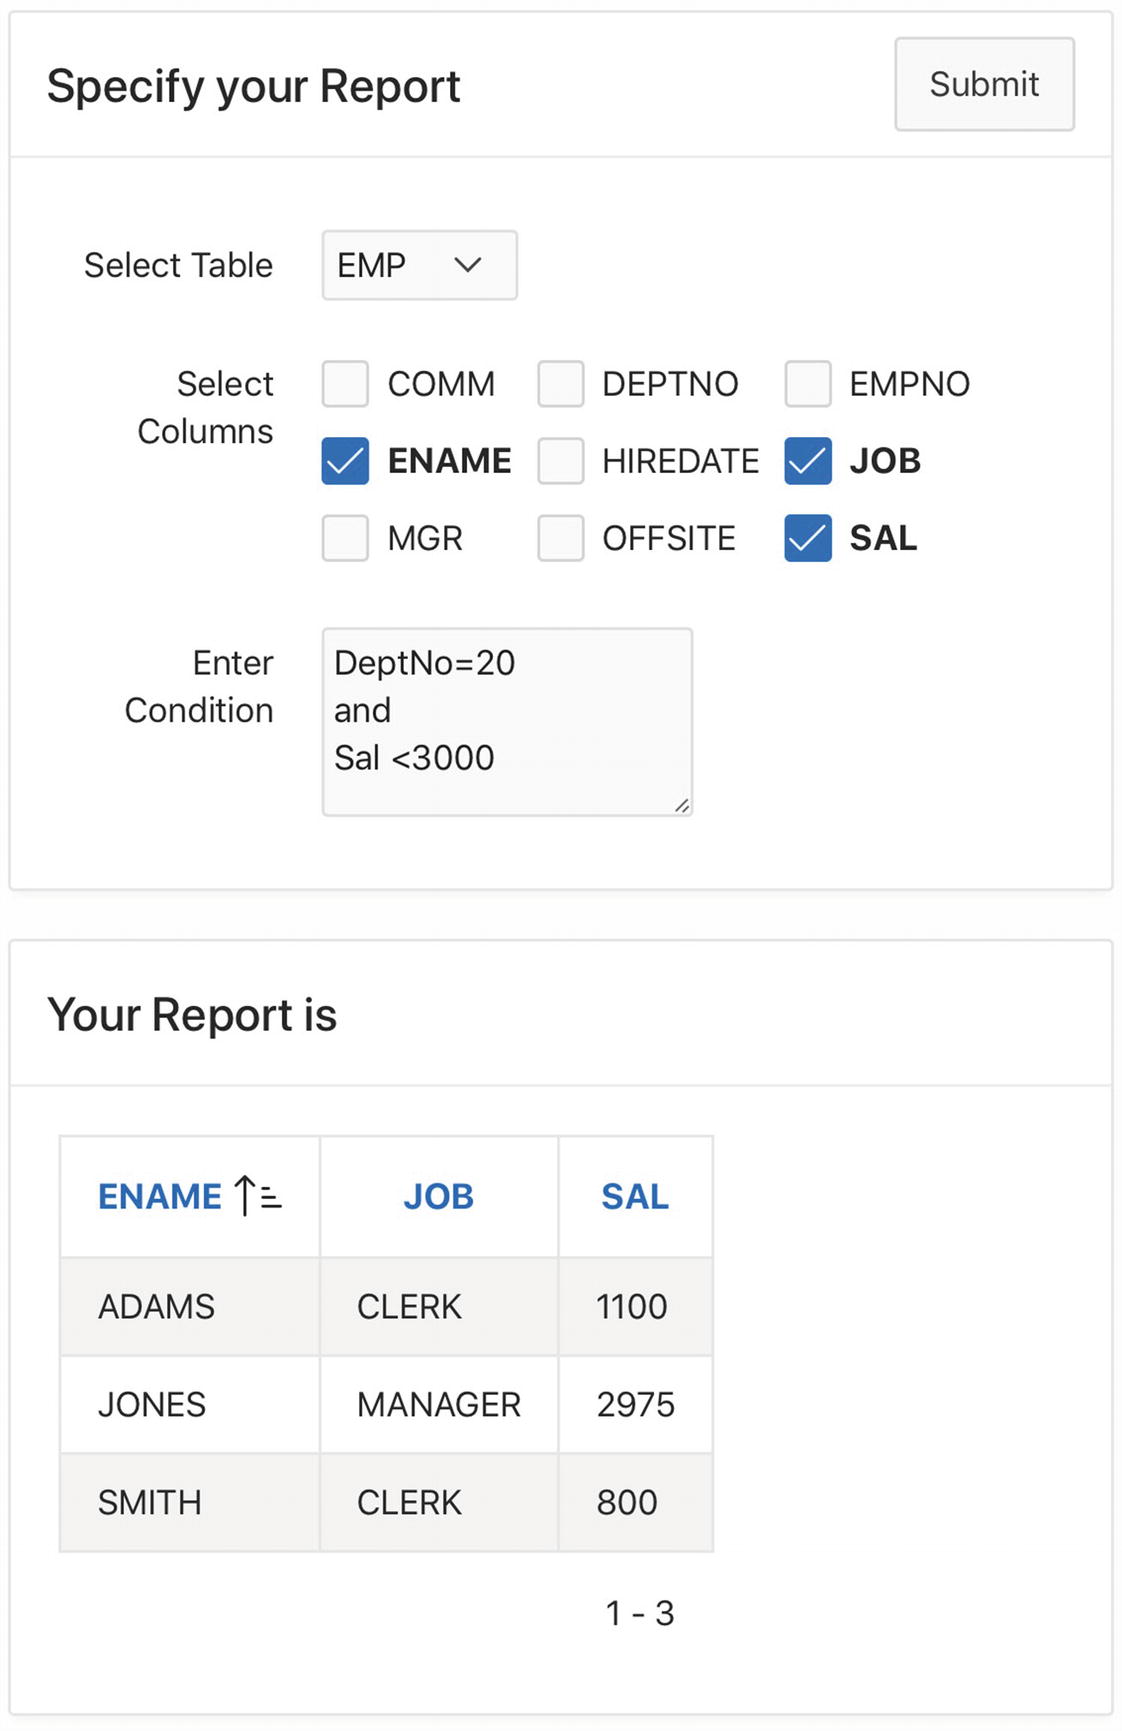
Consider the Report Builder page shown in Figure 12-1, which is page 43 of the Employee Demo application. The items in the top region enable a user to specify a report. A user chooses the desired table, selects the columns to display, and then enters the text of the filtering condition. Clicking the submit button displays the report in the bottom region.
Figure 12-1
Report Builder page
What does it take to implement these two regions? The Specify Your Report region is relatively straightforward. The region has three items and a button. The Select Table item is named P43_TABLE. It is a select list that displays the names of relevant tables and has no action when selected. When I built the page, I specified the list of table names as the static values [EMP, DEPT]. Another possibility is to specify the list via the following query, which makes use of Oracle’s User_Tables table:
select Table_Name as DisplayVal, Table_Name as ResultVal
from User_Tables
order by DisplayVal
The Select Columns item is named P43_COLS. It is a checkbox group that displays a checkbox for each column of the selected table. Its values are defined by the following query, which makes use of Oracle’s User_Tab_Cols table:
select Column_Name as DisplayVal, Column_Name as ResultVal
from User_Tab_Cols
where Table_Name = :P43_TABLE
order by DisplayVal
This query references P43_TABLE, which means that its list of displayed columns will vary according to what table is selected. To get this list to update when P43_TABLE changes, use the cascading lists technique of Chapter 6. That is, go to the Cascading List of Values section for P43_COLS and set its Parent Item(s) property to P43_TABLE.
The item P43_WHERE is a text area in which the user enters the filtering condition. This condition will be used as the where clause of the report’s source query.
Finally, the button in the Specify your Report region executes a submit action when pressed. This action causes the values of the three items to be saved in the session state.
The Your Report Is region displays a report customized by the values of these items. This region is not so straightforward to implement. Suppose that you tried to create the region as a classic report; its source query would look something like this:
select :P43_COLS
from :P43_TABLE
where :P43_WHERE
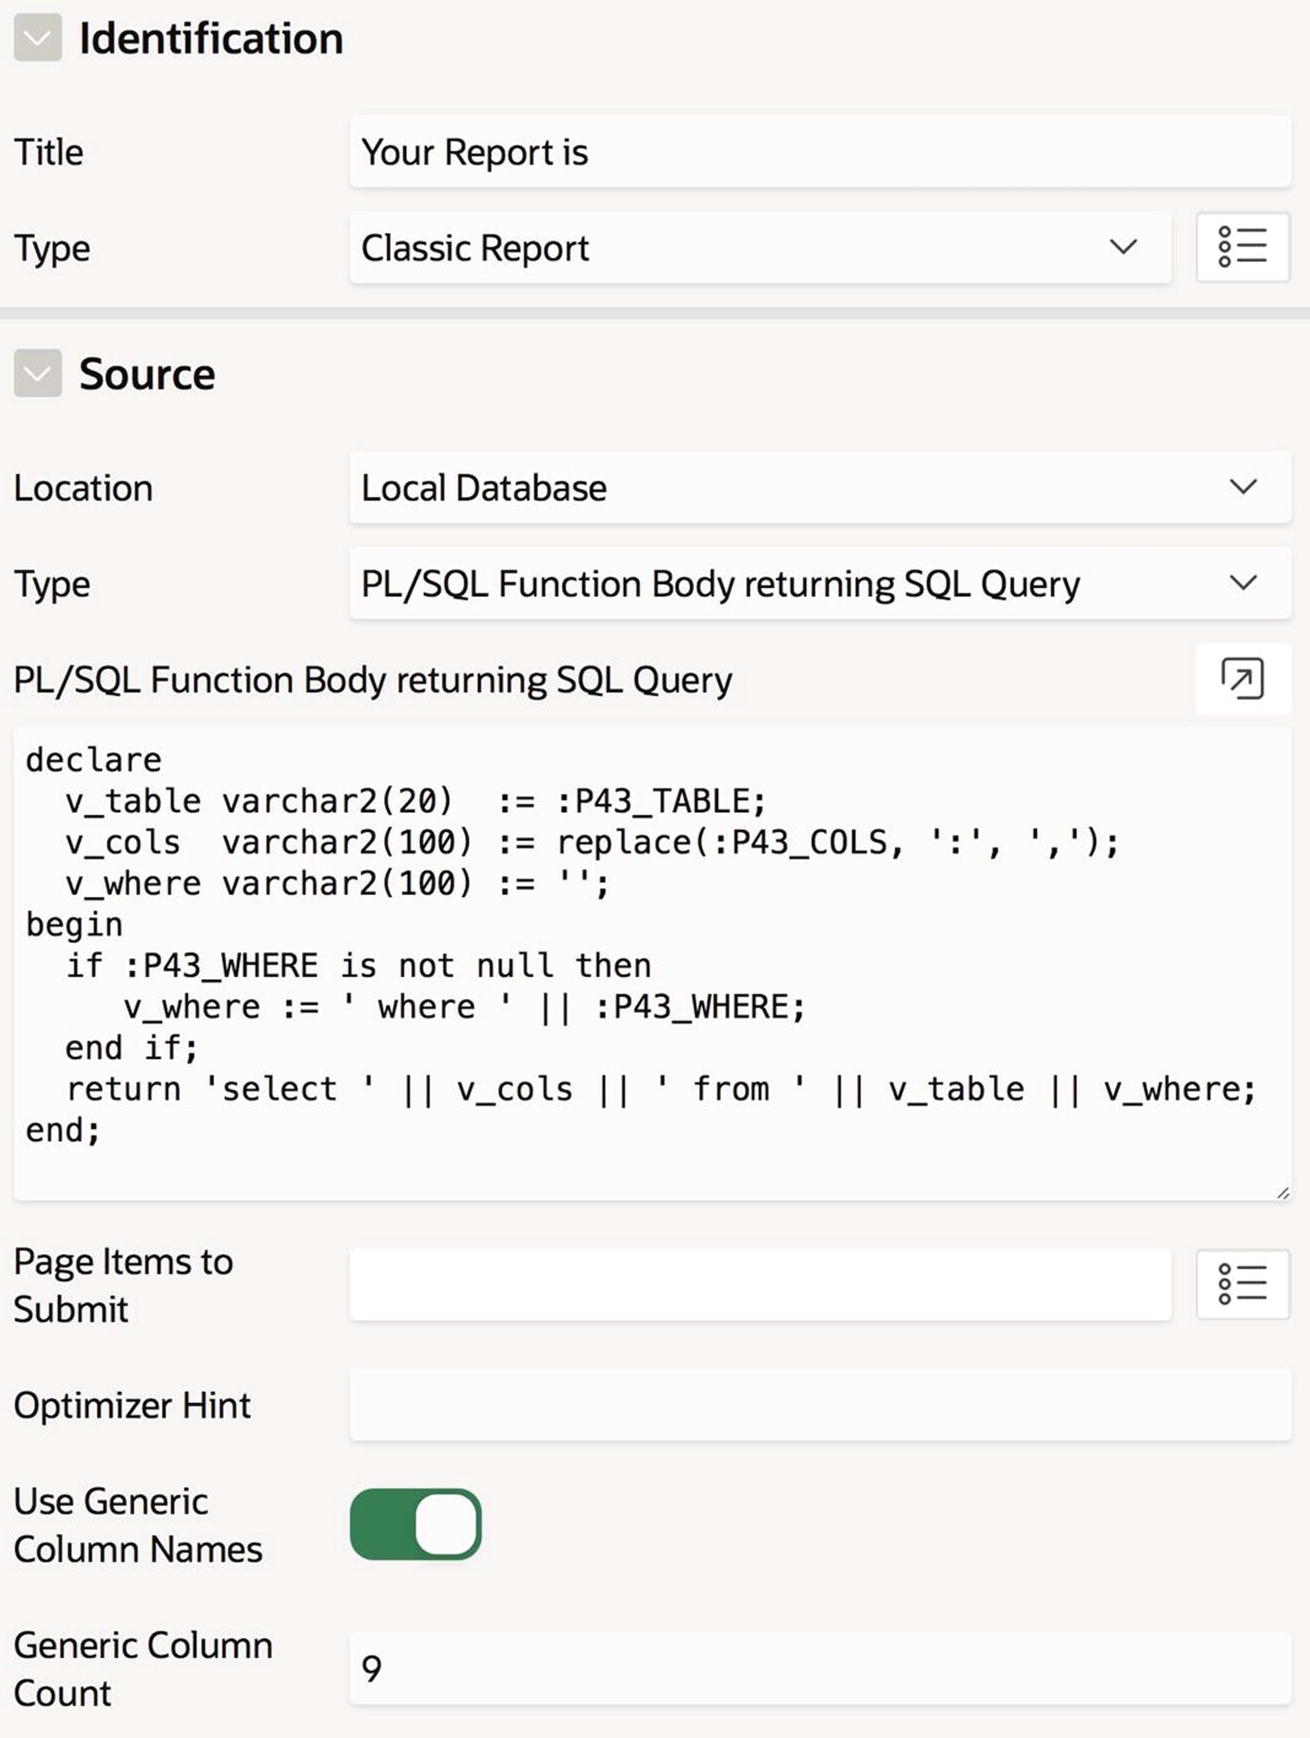
The problem is that such a query is not syntactically legal. The rule is that a bind variable can be used only to reference a constant, and this query is trying to reference columns, tables, and SQL code. To solve this problem, set the source type of the report to be PL/SQL Function Body returning SQL Query. The source of such a report is a PL/SQL function that computes the desired SQL query and returns it as a string. Listing 12-1 shows the code for the Your Report is report.
This code constructs the desired SQL query string piece by piece. The construction of the column list is perhaps the only nonobvious part. Recall that P43_COLS is a multi-value list item, which means that its value will be a string containing the selected column names separated by colons. In the query, however, the column names need to be separated by commas. So all you need to do is use the replace function to replace each colon by a comma and then assign that string to the variable v_cols.
The technique of using code to construct the source query is called dynamic SQL because the query is computed dynamically at runtime. Dynamic SQL is appropriate whenever the source query can vary in ways that go beyond simple customization by constants. Figure 12-2 depicts the Identification and Source properties for the Your Report Is region.
Figure 12-2
Implementing the Report Builder report region
One of the consequences of using dynamic SQL is that the columns of the report may not be known until runtime. In this case, you must tell APEX to define generic column names for the report. You do so via the property Use Generic Column Names, which can be seen at the bottom of Figure 12-2. When that property is turned on, the property Generic Column Count appears for you to specify how many generic columns to create.
Figure 12-2 specifies a column count of 9, which means that APEX will generate 9 columns for the report. The names of these columns will be COL01, COL02, and up to COL09. This specified count is a maximum; if the report happens to use fewer columns (as shown in Figure 12-1), the others will be ignored.
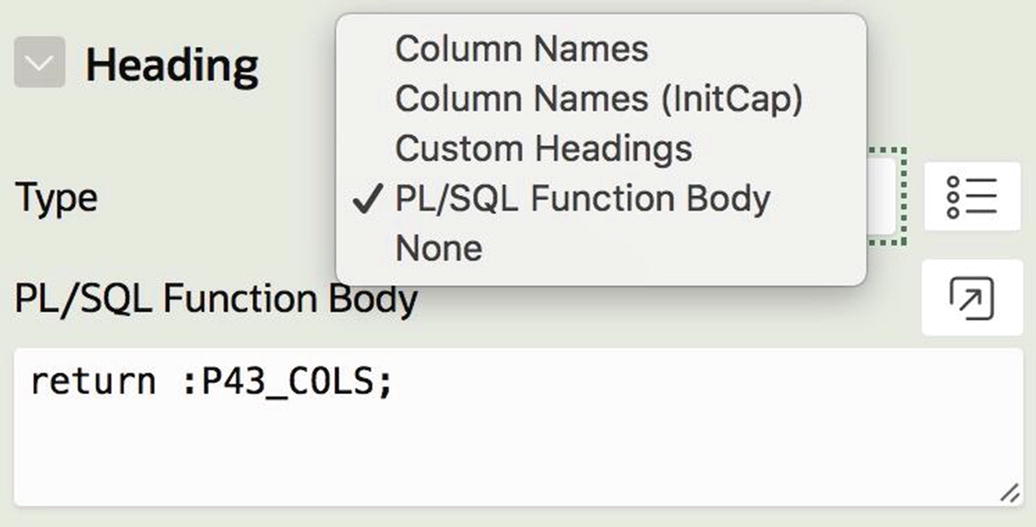
Recall that a column’s default heading is its name. Therefore, you should give each generic column a more appropriate heading. Typically you would specify a column’s heading directly in its Heading section. But since you won’t know the meaning of each column until runtime, you need to use a different approach. This is the purpose of the report’s Heading section. This section can be found in the Attributes node of the report’s rendering tree. Figure 12-3 shows the five possible heading types. The first three types create headings based on the column names, which is not appropriate here, and the last type specifies no headings. Thus, the best choice for handling generic columns is to use the heading type PL/SQL Function Body.
Figure 12-3
Specifying headings for generic columns
When you select that heading type, APEX will display a text area for entering PL/SQL code; that code should return a string containing a colon-separated list of the column headings. In this example, the checkbox group P43_COLS contains exactly what you need, so your code can simply return its value, as shown at the bottom of Figure 12-3. In more complex situations, you can write a PL/SQL block to compute the desired string.
When you run your page, the report will display the following error message until you choose at least one column:
failed to parse SQL query: ORA-00936: missing expression
The reason is that when P43_COLS is empty, the SQL string generated in Figure 12-2 begins "select from ...", which is not legal SQL. A good way to avoid this unpleasantness is to render the report region conditionally. In particular, set its Condition Type property to
P43_COLS is not null
Dynamic Processes
Chapter 7 demonstrated how easy it is to execute an SQL statement from a PL/SQL block: you simply place the statement directly within the block and parameterize it using bind variables. However, that syntax is not sufficient for dynamic SQL. This section explores the issues and their solution.
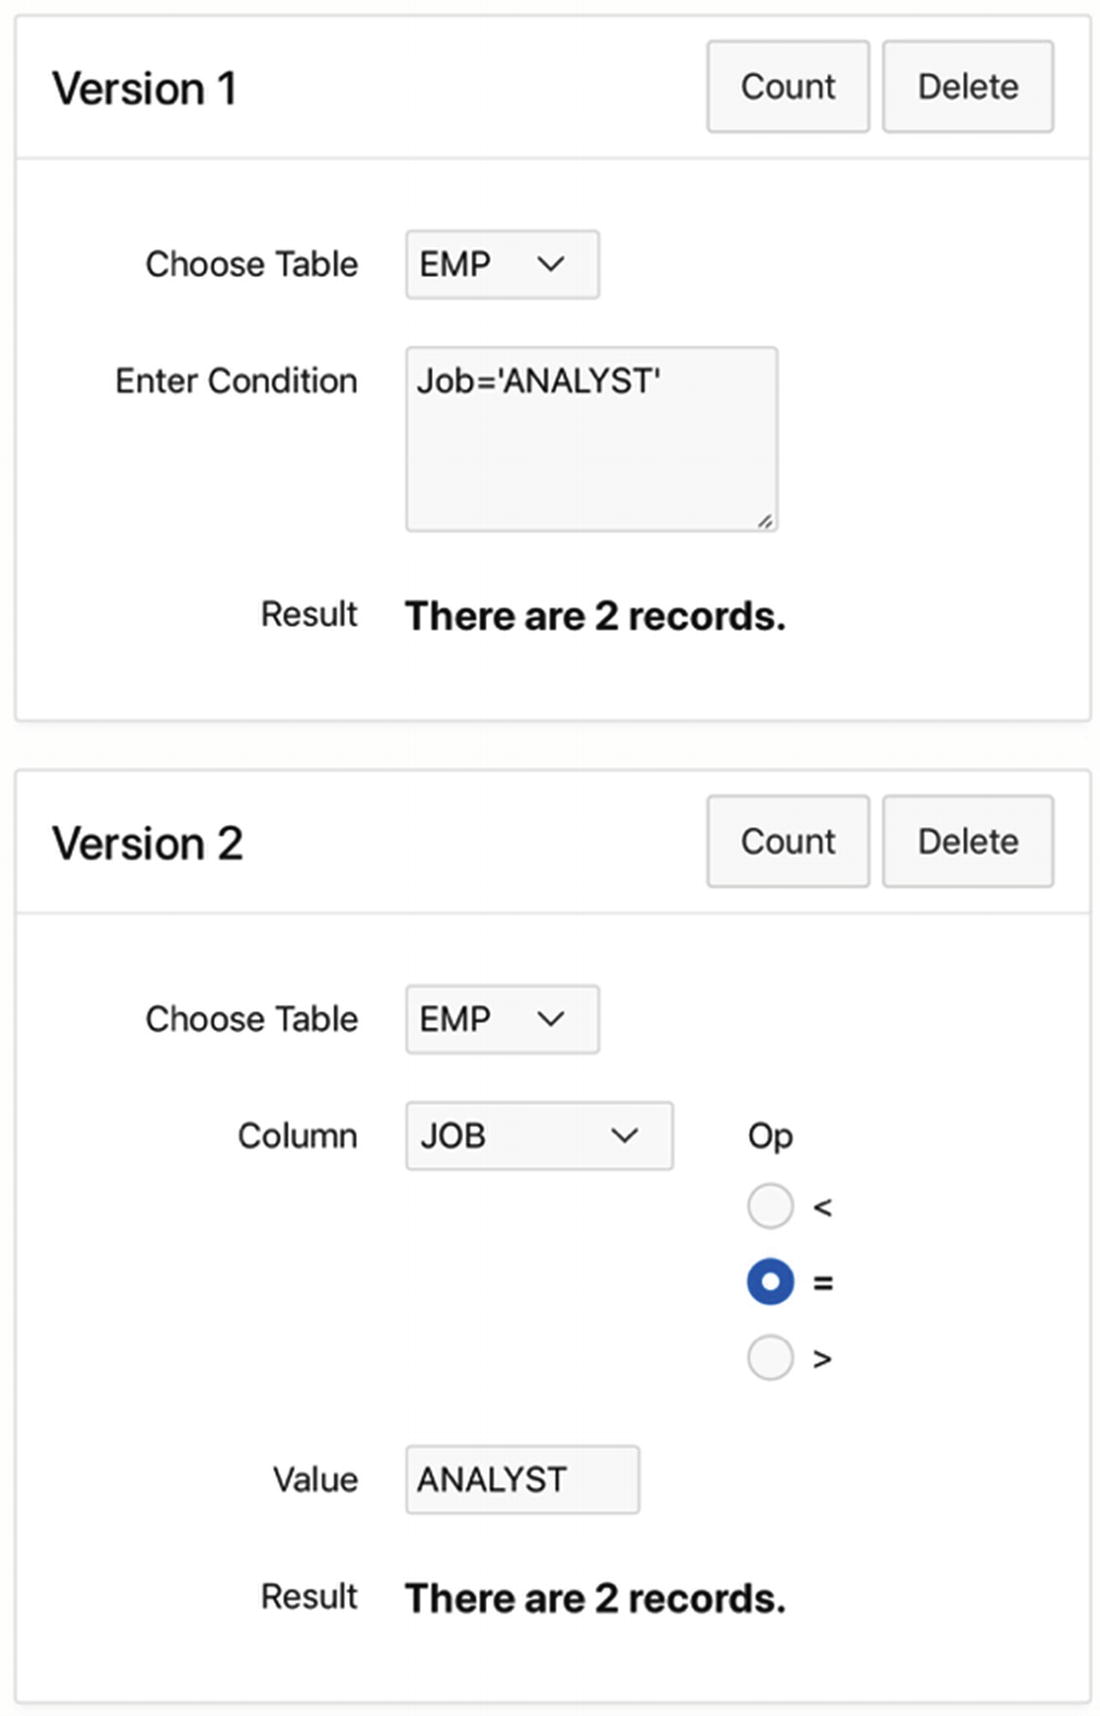
For an example, consider the Count and Delete page shown in Figure 12-4, which is page 44 of the Employee Demo application. This page contains two regions that have essentially the same functionality. In each case, a user chooses a table and specifies a filtering condition on it. Each region has the same two buttons: the Count button displays a message giving the number of records satisfying the condition, and the Delete button deletes those records from the table. Figure 12-4 shows the result of clicking the Count button in both regions.
Figure 12-4
Count and Delete page
Both regions in Figure 12-4 display the same filtering condition: employees who are analysts. These two regions differ only in how the user specifies the condition. In the Version 1 region, the user can enter an arbitrary condition, similar to the Report Builder page. In the Version 2 region, the user composes the condition by choosing a specific column, operator, and value. This second way of specifying the condition doesn’t require knowledge of SQL syntax and is perhaps more user-friendly, but it limits the kinds of conditions that can be expressed.
The creation of the items and buttons on this page is straightforward. The Version 1 region has three items: item P44_TABLE1 is a select list having the static values [DEPT, EMP], item P44_WHERE1 is a text area, and P44_RESULT1 is display-only. Its buttons are named Count1 and Delete1, and their actions are Submit Page.
The Version 2 region has five items. The item P44_TABLE2 has the same definition as P44_TABLE1. The item P44_COLUMN2 is a select list having P44_TABLE2 as its cascading parent; its values are defined by this SQL query:
select Column_Name as DisplayVal, Column_Name as ResultVal
from User_Tab_Cols
where Table_Name = :P44_TABLE2
order by DisplayVal
The item P44_VALUE2 is a text field, and P44_RESULT2 is a display-only item. Item P44_OP2 is a radio group with the three static values [<,=,>]. Its Template property is Optional-Above, so that the label can appear above the radio group. The region’s buttons are named Count2 and Delete2, and their actions are Submit Page.
The most interesting aspect of the page is how to write the processes for the four buttons. Each process performs the same three tasks:
It constructs a string containing the appropriate SQL command.
It executes that string.
It uses the result of the execution to formulate the output message.
The source code for a dynamic report needs to perform only the first task because APEX executes the query string when it renders the report. A process, on the other hand, does not have this luxury and it has to explicitly execute the SQL string.
The PL/SQL command to execute an SQL string is called execute immediate. This command is somewhat intricate to use—in fact, each of the four button processes uses it slightly differently. Let’s examine each process in turn.
First, consider the button Delete1. Its process, also named Delete1, needs to execute an SQL deletion command. Most of the time, you can write the command directly as a PL/SQL statement; but in this case you won’t know the table and its where clause until runtime. Thus, you need to use the execute immediate command, as shown in Listing 12-2.
declare
v_cmd varchar2(100);
begin
v_cmd := 'delete from ' || :P44_TABLE1 || ' where ' || :P44_WHERE1;
execute immediate v_cmd;
:P44_RESULT1 := SQL%rowcount || ' records were deleted.';
end;
Listing 12-2
Code for the Delete1 Process
The first statement constructs the SQL deletion command as a string using the chosen table and specified condition. The second statement uses the execute immediate command in its most basic form: you simply pass the SQL string to it. The third statement assigns a value to the result item by using the SQL%rowcount function (which was introduced in Listing 7-11).
Now consider the button Count1. Its process, named Count1, needs to execute a query to calculate the record count and save the retrieved value in a variable. Listing 7-4 showed how to use the into clause of an SQL query for that purpose. For example, if you did not have to use dynamic SQL, you could write the query corresponding to Figure 12-4 like this:
select count(*) into v_count
from EMP
where Job = 'ANALYST'
In dynamic SQL, however, the into clause is associated with the execute immediate command instead of with the SQL query. Listing 12-3 shows the proper code.
declare
v_query varchar2(100);
v_count integer;
begin
v_query := 'select count(*) from ' || :P44_TABLE1 ||
' where ' || :P44_WHERE1;
execute immediate v_query
into v_count;
:P44_RESULT1 := 'There are ' || v_count || ' records.';
end;
Listing 12-3
Code for the Count1 Process
Now consider the process for the button Delete2, which is also named Delete2. The main issue with writing this process is how to handle string constants. Note that the value ANALYST in Figure 12-4 is not in quotes. Thus, the straightforward approach, shown in Listing 12-4, will not work.
declare
v_cmd varchar2(100);
begin
v_cmd := 'delete from ' || :P44_TABLE2 ||
' where ' || :P44_COLUMN2 || :P44_OP2 || :P44_VALUE2;
execute immediate v_cmd;
end;
Listing 12-4
Incorrect Code for the Delete2 Process
The issue is how to get a query to place quotes around the value if it is a string, but not if it is a number. The solution, as you saw in Chapter 3, is to use a bind variable reference. For example, the query you would like to generate for the Delete2 process should look like this:
select count(*) from EMP into v_count
where Job = :P44_VALUE
However, the execute immediate command is fussy about bind variables. In particular, the command does not allow bind variables in the generated query; instead, it has a using clause especially for this purpose. Listing 12-5 gives the correct code for the Delete2 process.
declare
v_cmd varchar2(100);
begin
v_cmd := 'delete from ' || :P44_TABLE2 ||
' where ' || :P44_COLUMN2 || :P44_OP2 || ' :1';
execute immediate v_cmd
using :P44_VALUE2;
:P44_RESULT2 := SQL%rowcount || ' records were deleted.';
end;
Listing 12-5
Correct Code for the Delete2 Process
Note that the generated query has the expression “:1” where the bind variable belongs. This expression is a placeholder. When the execute immediate command runs, it will replace the placeholder with the value in its using clause. If the query requires more than one bind variable, then it uses multiple placeholders and the bind variables in the using clause are separated by commas.
In Listing 12-5, there is only one placeholder, namely, :1. A placeholder has the same function as the formal parameter of a procedure. In effect, the execute immediate statement “calls” the SQL statement, passing it the value of each bind variable reference. The names of the placeholders are irrelevant. APEX will assign the values from the using clause to the placeholders in the order in which the placeholders appear in the SQL statement.
Finally, the process for the button Count2, also named Count2, appears in Listing 12-6. Note that the constructed string is a query and uses a bind variable; thus, the execute immediate command will use both the into and using clauses.
declare
v_query varchar2(100);
v_count int;
begin
v_query := 'select count(*) from ' || :P44_TABLE2 ||
' where ' || :P44_COLUMN2 || :P44_OP2 || ' :1';
execute immediate v_query
into v_count
using :P44_VALUE2;
:P44_RESULT2 := 'There are ' || v_count || ' records.';
end;
Listing 12-6
Code for the Count2 Process
Combining Dynamic Reports and Processes
For a final example, I want to reconsider the Single Row View page from Figure 7-17, which is page 20 of the Employee Demo application. Recall that this page displays a report of all employees, sorted by EName. When a user selects an employee, the page turns into single row mode, displaying the data of the selected row and providing buttons to navigate to the previous and next row in sorted order.
The task is to modify the page so that a user can dynamically change the sort order of the rows. Figure 12-5 illustrates the new page, called Sortable Single Row View, which is page 45 of the demo application. The page is identical to the Single Row View page except that it also has a select list for specifying the desired sort field. Selecting a sort field will cause the report to be redisplayed in that sort order; in addition, clicking the Previous or Next button will use that sort order to determine the new current row.
Figure 12-5
Sortable Single Row View page
As with Figure 7-17, Figure 12-5 shows both the Employees and Emp Info regions, even though only one of them is displayed at a time.
The easiest way to create this page is to copy page 20. This operation was discussed in Chapter 7 (see Figure 7-8). To review, go to the page designer for any page, click the + icon near the top, and select Page as Copy to initiate the Page Copy wizard. If you have trouble following the wizard, refer back to Chapter 7.
When copying a page, you must ensure that its various item references are updated. It turns out that item references within the PL/SQL code get updated, but references produced by the link builder do not. Thus, the target of the link for the EMPNO column incorrectly redirects to page 20 and sets the value of P20_EMPNO. In general, you should correct these values, but in this case there is no need because you are about to replace these columns with new ones.
After you have successfully copied the page, you can modify it. The first modification is to add a select list to the Employees region so users can choose the sort field. This select list is named P45_SORTFIELD and has the static values [EName, Job, Sal, DeptNo]. Its action should be Redirect and Set Value.
The presence of a changeable sort field affects two parts of the page: the source query for the report and the process that computes the next/previous records in single-record mode. You need to use dynamic SQL in both cases. The report’s source query is generated by the PL/SQL code of Listing 12-7.
This query uses dynamic SQL to construct the appropriate query, based on the selected sort field. If no sort field has been selected, EName is the default. Because you are using dynamic SQL, you should enable the Use Generic Column Names property and specify a Generic Column Count of 5. APEX will create five columns, named COL01 through COL05. Because the column headings in this report will be the same regardless of the sort field, you can hardcode them into the report’s Heading section. In particular, the value of the PL/SQL Function Body property will be
return ':EName:Job:Sal:DeptNo';
This string begins with a colon because the heading of the first column is empty.
You also need to specify the link for the first column. Recall that its name is COL01 even though it contains EmpNo values. So select COL01 from the rendering tree and set its type to Link. Click its Link Target property and configure the Link Builder wizard as shown in Figure 12-6. Then set the column’s Link Text property to View.
Figure 12-6
Specifying the behavior of the column link
You also need to configure the sortability of the report’s columns. Recall from Chapter 3 that each column in a classic report has a property named Sortable—turning on its value enables users to sort on that column by clicking its header, and turning it off disables sorting on that column. The issue is how APEX should handle sortability when the source query also has an order by clause. APEX resolves this issue differently, depending on whether columns are generic or not. If columns are not generic, then the order by clause takes precedence—the Sortable property of each column will be turned off and cannot be turned on. On the other hand, if the columns are generic, then their Sortable properties take precedence—they are turned on by default, and the order by clause of the source query is ignored. APEX will only recognize the order by clause when the Sortable property of each column has been turned off.
In other words, if you want your report to be sorted according to the value of P45_SORTFIELD, then you must turn off the Sortable property for each of the five generic columns in the Employees report.
You should now have a working sortable report. Test it out. Selecting a sort field should cause the report to re-render with the new sort order, and clicking the link for a row should display the Emp Info region for the selected row.
The remaining issue is that the Previous and Next buttons still use EName as the sort field. You need to modify the process that underlies those buttons so that it refers to P45_SORTFIELD instead of EName. This process was called FindPreviousNext in Chapter 7, and its code appeared in Listing 7-18. For reference, Listing 12-8 reprints that code.
begin
if :P20_EMPNO is not null then
select PrevEmp, NextEmp
into :P20_PREV, :P20_NEXT
from (select EmpNo, lag(EmpNo) over (order by EName) as PrevEmp,
lead(EmpNo) over (order by EName) as NextEmp
from EMP)
where EmpNo = :P20_EMPNO;
end if;
end;
Listing 12-8
Original Code for the FindPreviousNext Process
The revised code appears in Listing 12-9. Although this code seems complex, it is essentially the original code broken into pieces and translated into dynamic SQL. The initial if-statement handles the case in which no sort field has been chosen.
declare
v_subquery varchar2(200);
v_query varchar2(250);
v_sort varchar2(20);
begin
if :P45_EMPNO is not null then
if :P45_SORTFIELD is null then
v_sort := 'EName';
else
v_sort := :P45_SORTFIELD;
end if;
v_subquery :=
'select EmpNo, ' ||
'lag(EmpNo) over (order by ' || v_sort || ') as PrevEmp, ' ||
'lead(EmpNo) over (order by ' || v_sort || ') as NextEmp ' ||
'from EMP';
v_query := 'select PrevEmp, NextEmp ' ||
'from (' || v_subquery || ') ' ||
'where EmpNo = :1';
execute immediate v_query
into :P45_PREV, :P45_NEXT
using :P45_EMPNO;
end if;
end;
Listing 12-9
Revised Code for the FindPreviousNext Process
Summary
This chapter examined some situations in which it was necessary to customize the table names and column names in an SQL query. You saw how to handle such situations by using dynamic SQL to construct and execute an SQL query string at runtime. In the case of customizing a report, you learned how to use a PL/SQL function to generate the source of the report. In the case of customizing a PL/SQL process, you learned how to use its execute immediate command.
Dynamic SQL forces APEX to validate and process the query string at runtime; this additional overhead increases the time it takes to process the page. Moreover, in the next chapter, you shall see that the use of dynamic SQL can open a window for potential security breaches. Consequently, dynamic SQL should be used only of necessity. Such situations occur rarely, but it is good to know how to handle them when they do occur.