As you have seen, it is possible to write highly functional web pages using only items, reports, and charts. But to implement anything more complex, you have to be able to perform calculations and interact with the database more generally. The notion of a process addresses both issues. This chapter examines some typical situations that require the use of processes and introduces the basics of PL/SQL so that you can write your own code to implement these processes. It also examines the pitfalls you might encounter when writing PL/SQL code, such as the possibility of lost updates.
Stages of a Submit Action
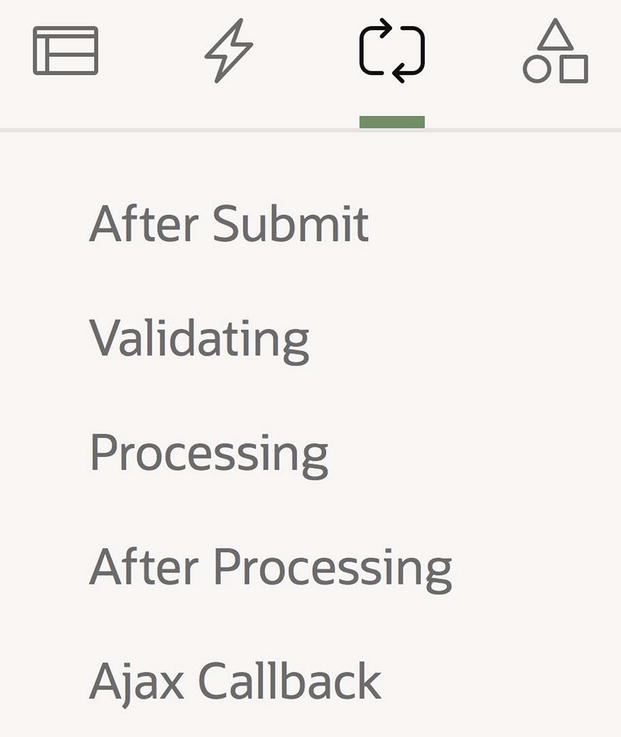
Processing tab of the page designer
During the After Submit stage, the server computes additional session state values in preparation for the main processing activity. Such computations are occasionally useful and are briefly discussed in Chapter 10.
During the Validation stage, the server runs validation checks to ensure that the submit request has been called with appropriate data. The server will abort further processing if it detects a problem. Validation is the subject of Chapter 8.
During the Processing stage, the server executes the processes that have been associated with the submit request. The definition and use of these processes is the subject of this chapter and Chapter 10.
During the After Processing stage, the server uses branches to decide which page to send to the browser. Branching is the subject of Chapter 9.
The fifth node in Figure 7-1, named Ajax Callback, is not an execution point; instead, its purpose is to hold code that can be called from JavaScript functions. As the use of JavaScript in APEX is beyond the scope of this book, I shall not mention this node further.
Creating a Process

The Processing component tree
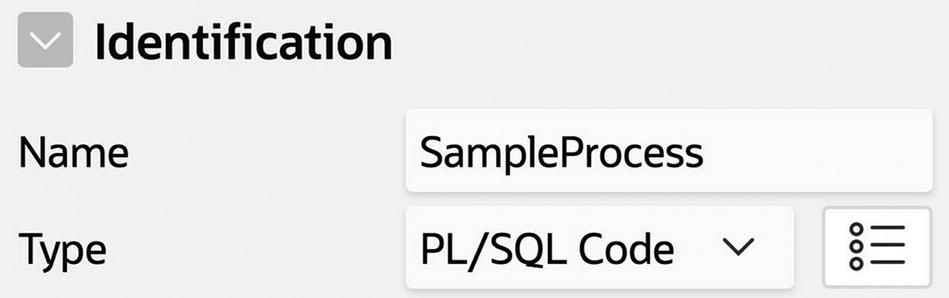
Specifying the name and type of a process
Click the select list for the Type property and look at the other process types that are available. These types facilitate special purpose actions, such as modifying a table, sending email, or clearing the session state, and are the subject of Chapter 10. This chapter focuses exclusively on the PL/SQL Code process type, which enables you to write your own general-purpose actions.
The code for a PL/SQL process is specified in its Source section by the property PL/SQL Code. Look at the Source section for your new process—you will see that it has no code, which is why the node in Figure 7-2 is flagged as having an error. Let’s fix that.
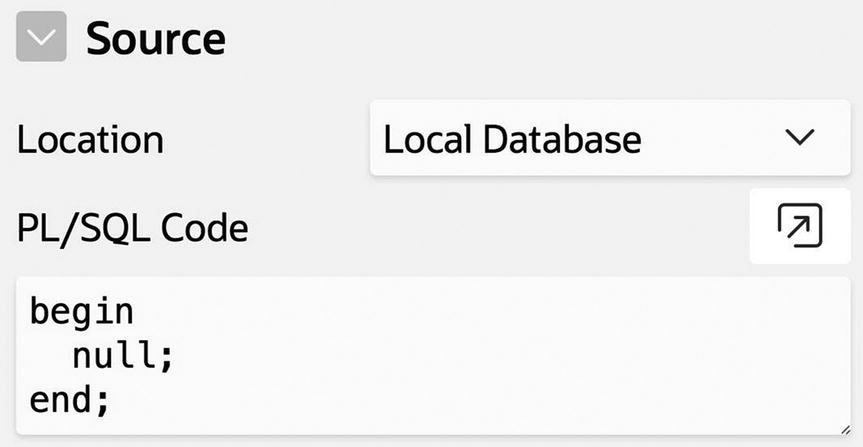
A PL/SQL code block to do nothing
Note the semicolons. Each statement must be followed by a semicolon, as must the end keyword. If you forget to do this (and you probably will at some point), APEX will display an error message. When in doubt, check for forgotten semicolons.
Adding this code to your process will remove the error flag. When you run the page, the process will execute every time you click the Submit button. Of course, you have no way of knowing this because the code does nothing. The remainder of this chapter examines how you can add meaningful content to your processes.
PL/SQL to Access the Database
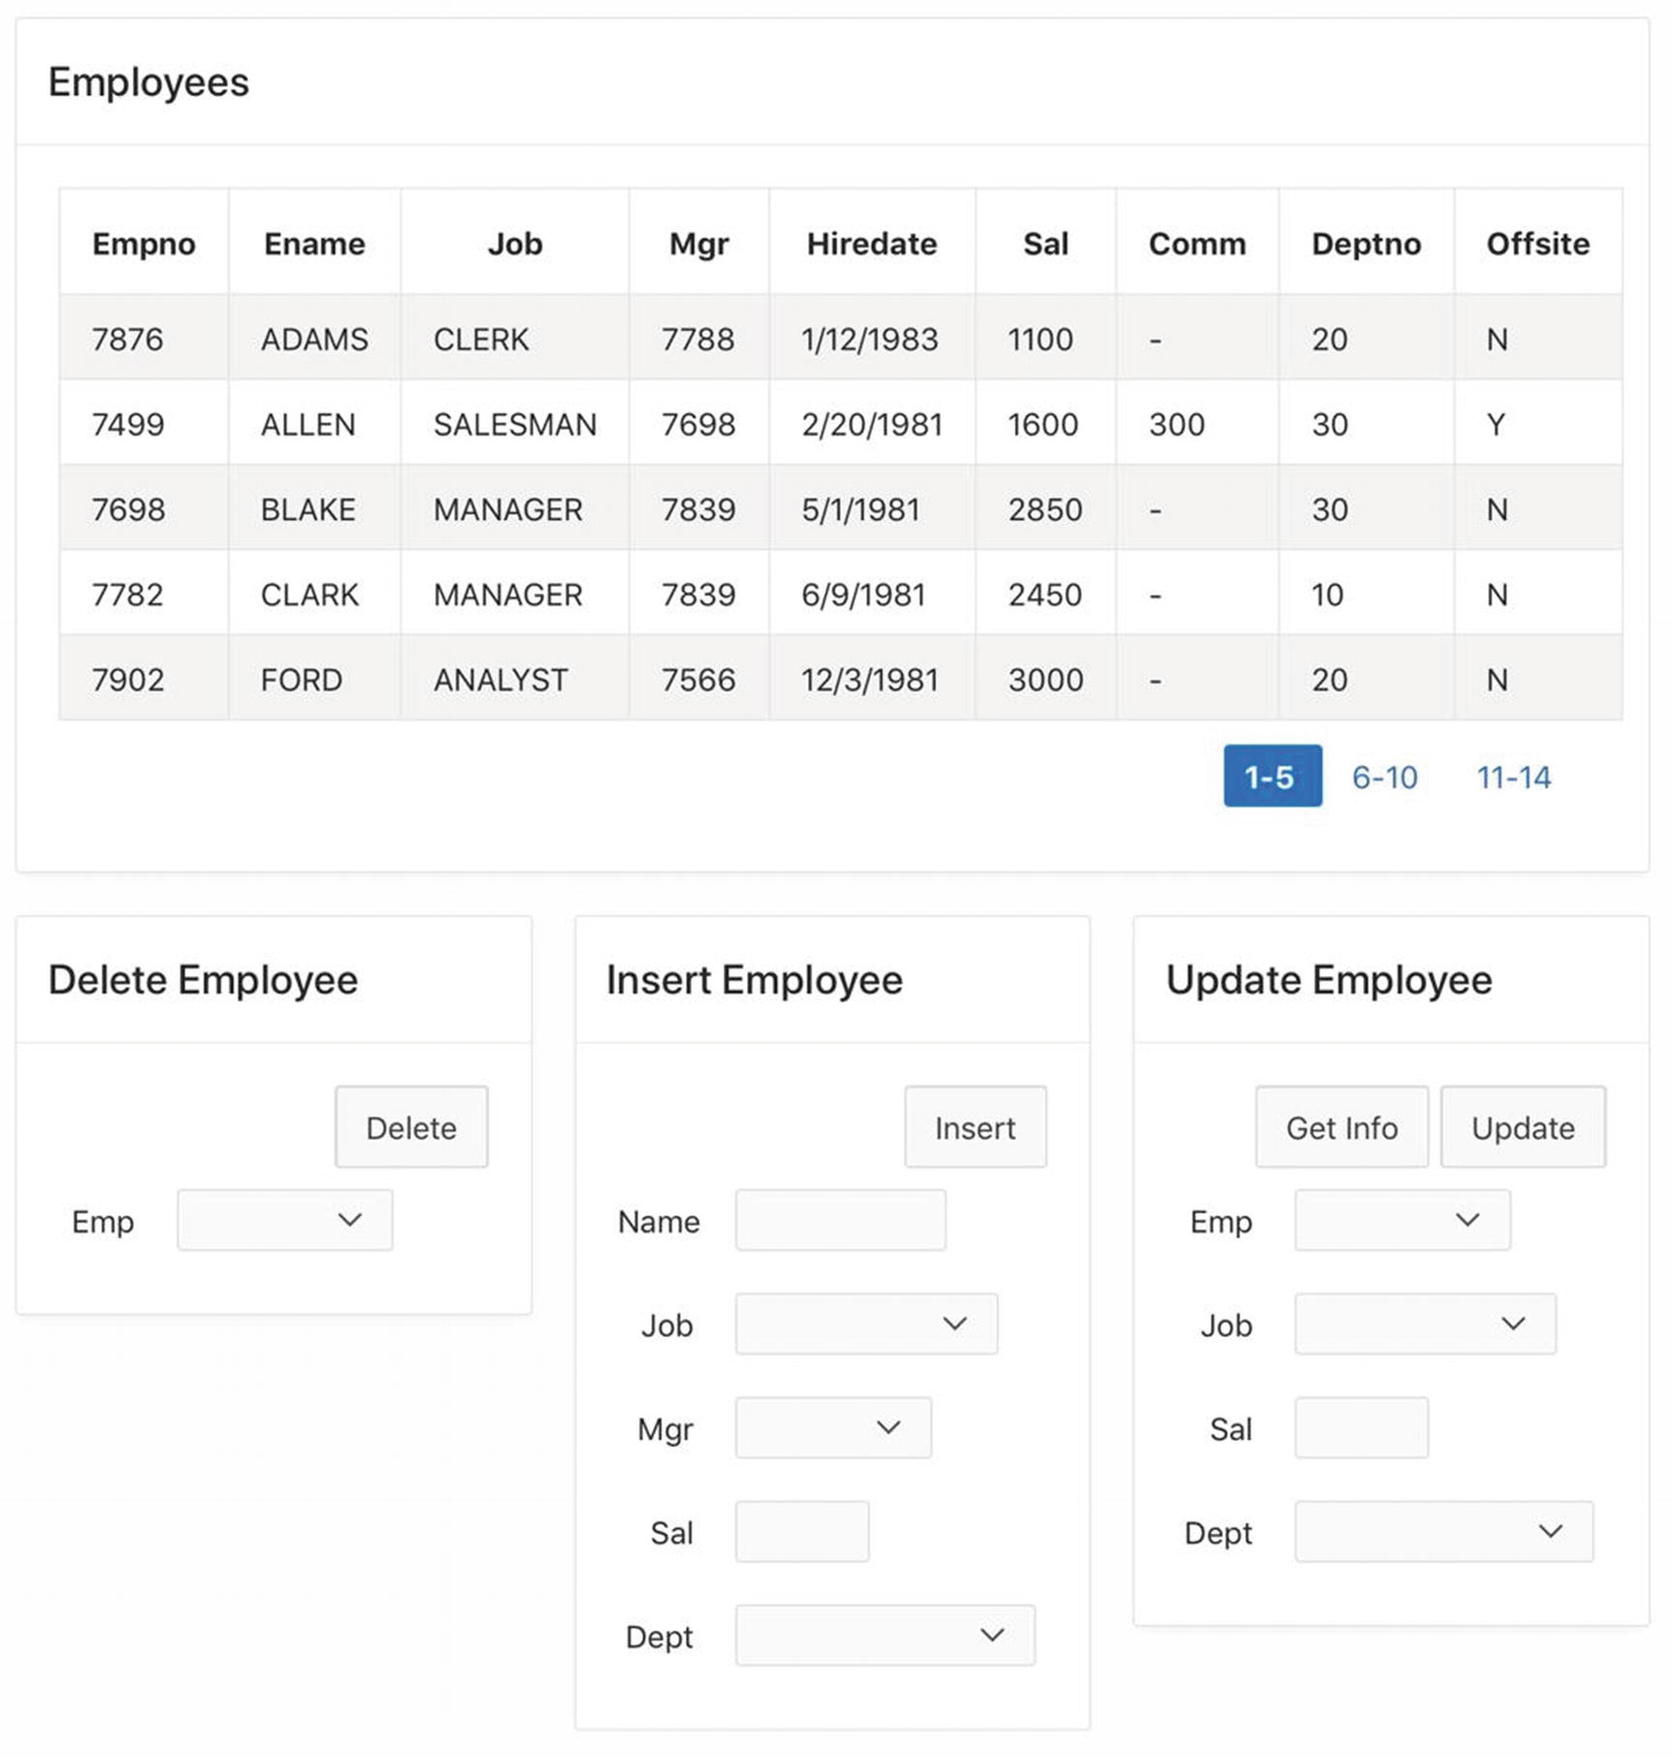
The Employee Data Entry page
To create this page, begin by creating a blank page and four regions. The Employees region is a classic report region whose source is the entire EMP table. The other three regions are static content regions, positioned as follows: Delete Employee begins a new row, and the remaining two regions begin a new column of that row. The following subsections discuss the content of these three regions.
Delete Employee Region
The button is named Delete, and its action is Submit. The idea is that a user chooses an employee from the list and clicks the Delete button to submit the page; during the submit, the APEX server will execute a process to delete that employee’s record. The following steps explain how to create this process and associate it with the button.
First, go to the Processing tab of the page designer, right-click the Processes node, and choose Create Process. Give the new process a name, such as DeleteEmp.
PL/SQL Code for the DeleteEmp Process
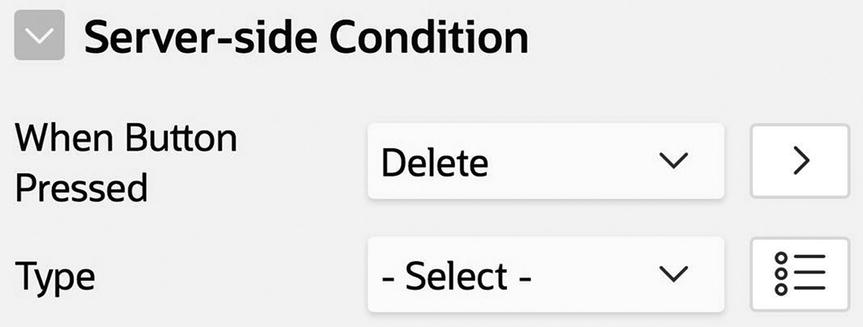
Setting the When Button Pressed property
Insert Employee Region
The Insert Employee region contains five items and a button. The items correspond to columns of the EMP table and have the names P17_INSERT_ENAME, P17_INSERT_JOB, and so on. Item P17_INSERT_ENAME is a text field and P17_INSERT_SAL is a number field. The other three items are select lists, whose values are defined via the following list-of-values queries.
EmpNo automatically gets the next value in the sequence determined by EMP’s built-in insertion trigger.
HireDate gets the current date.
Comm gets 0.
Offsite gets 'N'.
PL/SQL Code for the InsertEmp Process
At this point, you might want to test your page as it stands. Insert a record and make sure it appears correctly in the report. Then delete it, and watch the report return to its original state.
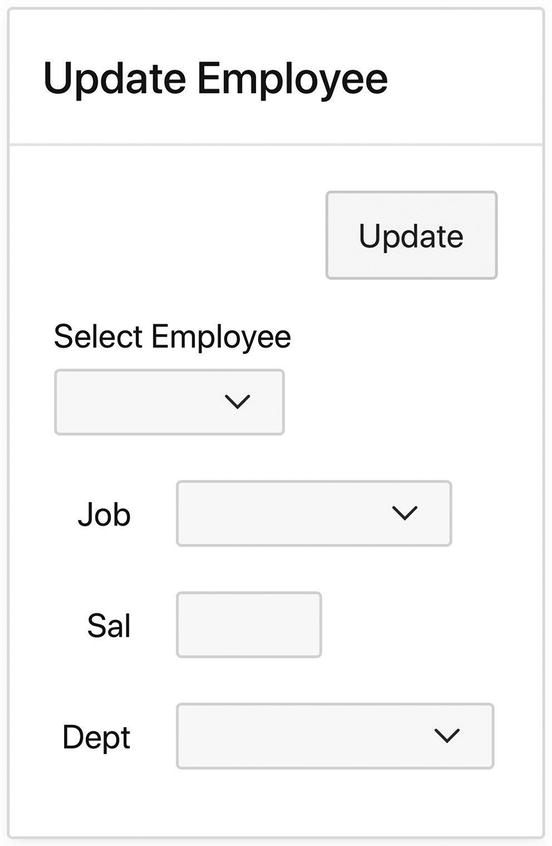
Update Employee Region
The Update Employee region has four items and two buttons. The items are named P17_UPDATE_EMPNO, P17_UPDATE_JOB, and so on. The select list values are defined the same as in the other regions. The buttons are named GetInfo and Update, and both have the action Submit.
Two steps are required to use this region. First, a user selects the desired employee from P17_UPDATE_EMPNO and clicks the GetInfo button. The process associated with this button populates the items P17_UPDATE_JOB, P17_UPDATE_SAL, and P17_UPDATE_DEPTNO with the corresponding values from that employee’s EMP record. The user then changes those items as desired. When the user clicks the Update button, the process associated with that button updates the record with the new values.
PL/SQL Code for the UpdateEmp Process
PL/SQL Code for the GetEmpInfo Process
The critical part of the query is the clause beginning with the keyword into. This clause indicates that the query’s three output values will be placed into the three specified items. In other words, the into clause turns an SQL query into a PL/SQL statement that extracts values from the database and assigns them to items. Note that the into clause makes sense only if the SQL query returns exactly one row. A process that executes a multi-row SQL query needs to do something totally different with the query output, as you will see later in the next section.
PL/SQL to Compute Values
This section considers the programming-language aspects of PL/SQL. At its heart, PL/SQL is a traditional programming language with variables, assignment statements, conditionals, and loops. In this regard, it is not much different from C, Java, Python, and similar languages. If you have experience with any of these languages, then the most difficult part of writing PL/SQL code will probably be figuring out the appropriate syntax.
Page to calculate sales commissions
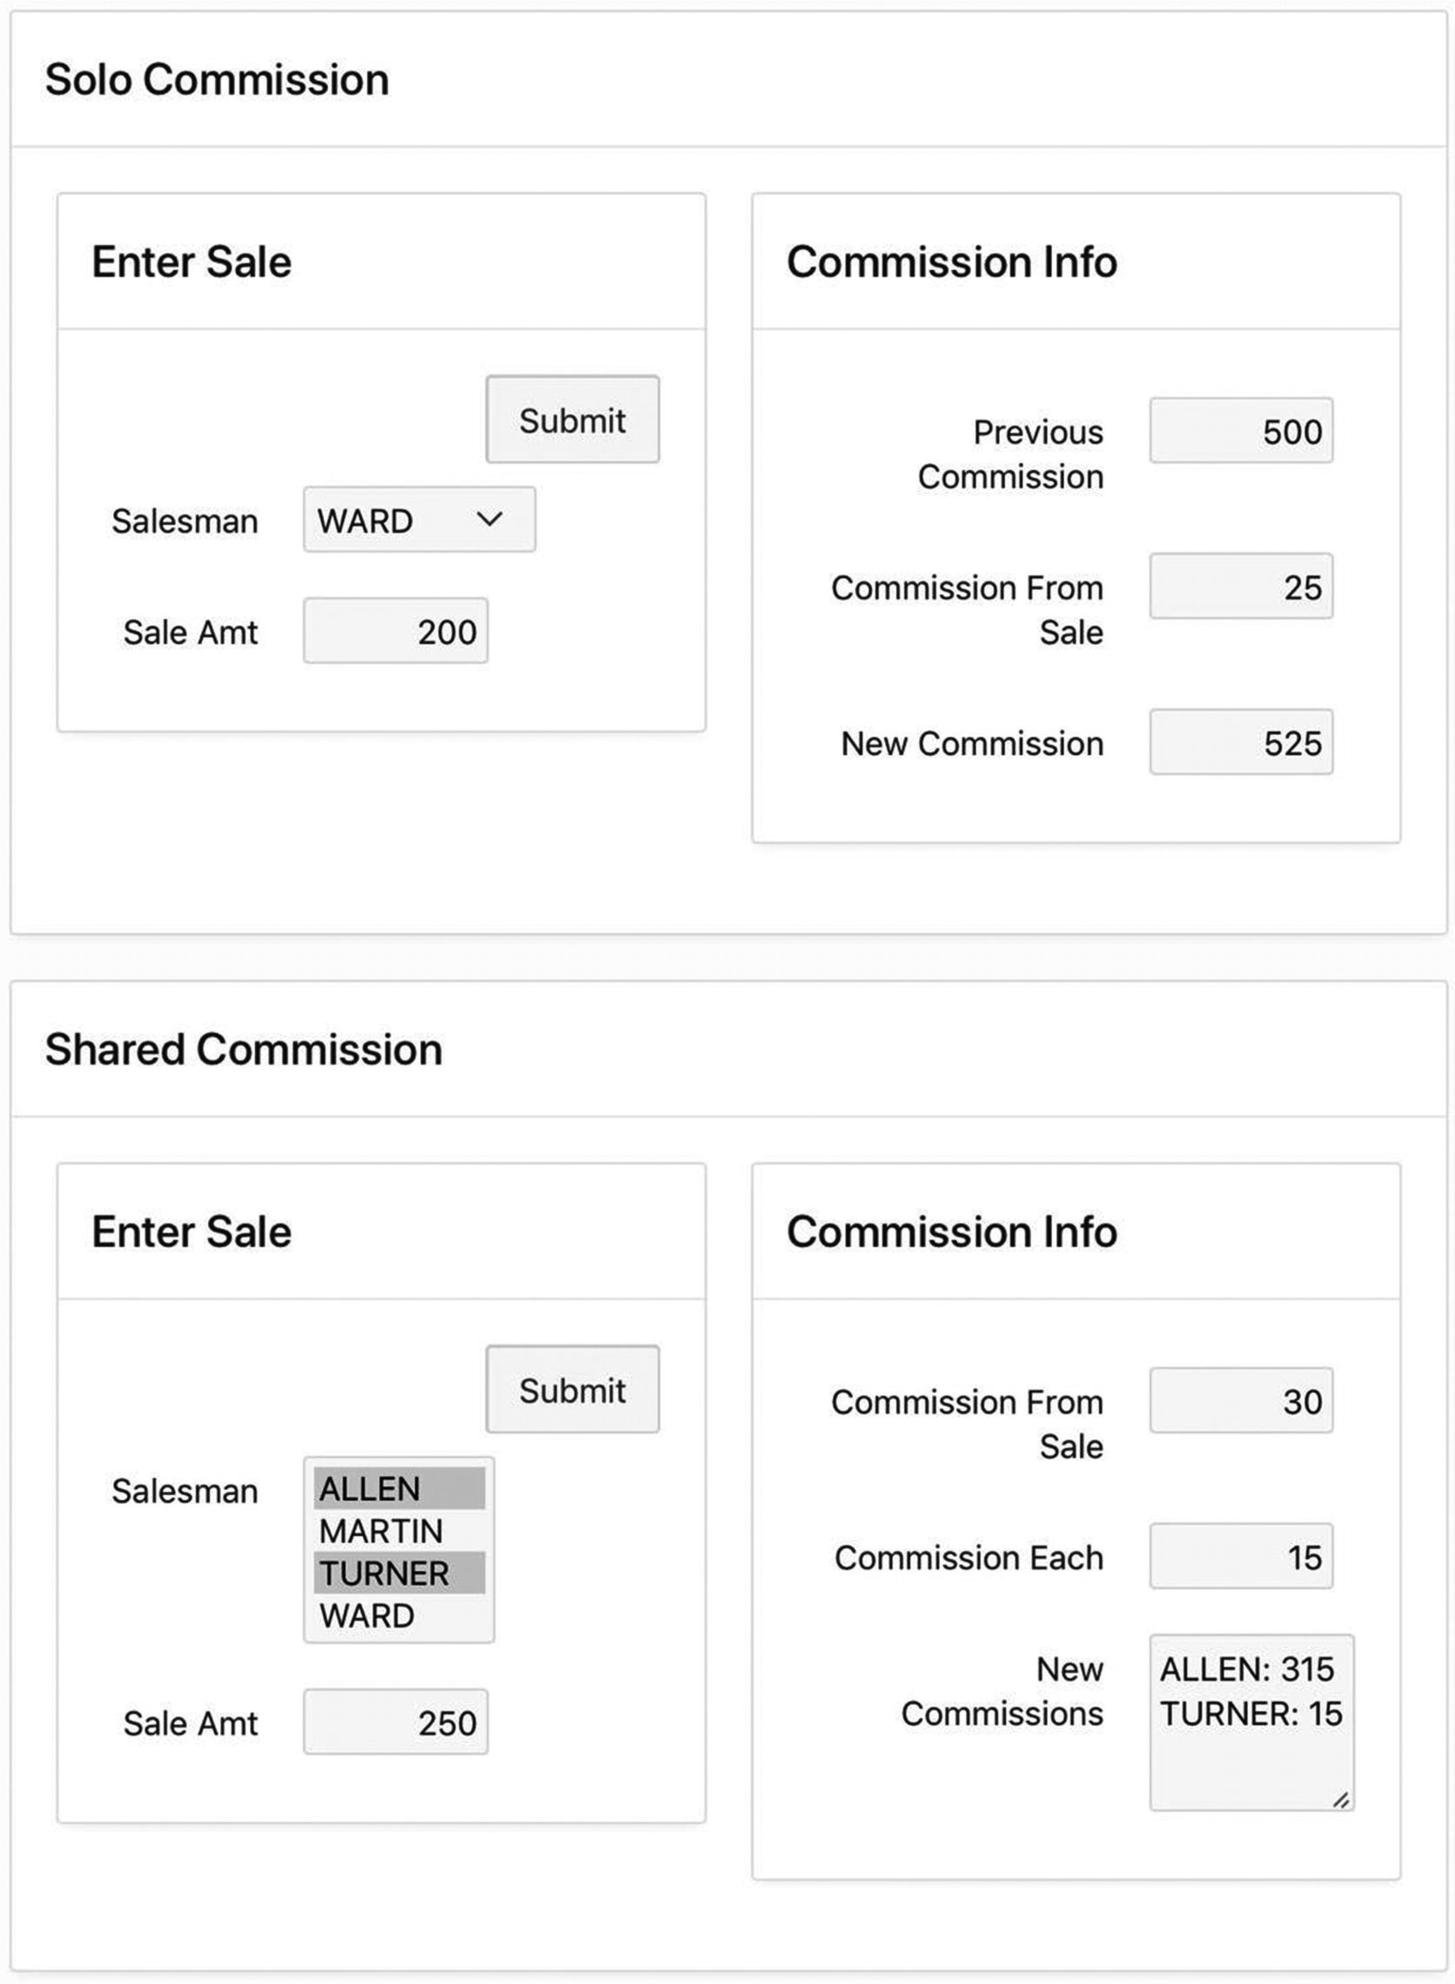
This page will get used each time a salesman makes a sale. Assume that salesmen receive 15 percent commission on the first $100 of a sale and 10 percent on the remaining amount; if several salesmen collaborate on a sale, they split the commission equally. The page has two outer regions. The top region, titled Solo Commission, is for entering an individual sale. The bottom region, titled Shared Commission, is for entering a collaborative sale.
The Solo Commission region works as follows. A user selects the salesman’s name and enters the amount of the sale into the Enter Sale region. Clicking the Submit button submits the page and causes a process to execute. This process does several things: It calculates the commission based on the sale amount, retrieves the salesman’s previous commission from the EMP table, calculates the new commission amount by summing the two values, and places those three values into the three corresponding items of the Commission Info region. It also updates the EMP table with the new commission value.
The Shared Commission region works similarly, except that several salesmen can be chosen from the select list. Its process calculates the total commission on the sale and the prorated amount, updates the EMP table, and writes the new commissions of the collaborating salesmen into the text area.
PL/SQL Code to Handle a Solo Commission
Local Variables
A PL/SQL block can have a variable declaration section prior to the begin keyword. The declaration section starts with the keyword declare and is followed by a series of variable declarations. The code of Listing 7-5 declares four local variables: v_amount, v_saleCommission, v_prevCommission, and v_newCommission. The syntax for each declaration is similar to the syntax for declaring table columns in SQL, and the possible variable types are also the same. For example, the last three variables have the type number(7,2), which is the same type as the column Comm in the EMP table.
Local variables and item references can be used interchangeably in a PL/SQL block. The difference is that local variables are referenced as is, whereas an item reference requires a prepended colon. For example, the SQL update command in step 3 references both the local variable v_newCommission and the item P18_SOLO_SALESMAN. Because items are referenced using bind variable syntax, they are easy to spot. However, local variable references in SQL commands are hard to distinguish from column names or function calls. To avoid confusion, you should always name local variables so that people know they are variables. A common convention, which is adopted here, is to begin each local variable name with v_.
Comments
As in SQL, PL/SQL denotes comments with two consecutive minus signs. All characters following the two minus signs are ignored until the end of the line.
Assignment Statements
Assignment statements in PL/SQL use := as the assignment operator. Assignment can also be used in the declare section to assign an initial value to a local variable.
Conditional Statements
PL/SQL supports several forms of a conditional statement; the form appearing in step 1 of Listing 7-5 is good for general-purpose use. Note that the keywords act as section boundaries: the conditional expression appears between if and then, the statements to be executed when the condition is true appear between then and else, and the statements to be executed when the condition is false appear between else and end if. As usual, if there are no statements between the else and end if keywords, the else keyword can be omitted.
Handling Multi-Row SQL Queries
Now let’s see how to build the Shared Commission region of Figure 7-7. Its Enter Sale region is essentially the same as in the Solo Commission region. Its item names are P18_SHARED_SALESMAN and P18_SHARED_AMOUNT. The items in the Commission Info region are named P18_SHARED_SALE_COMMISSION, P18_SHARED_COMMISSION_EACH, and P18_SHARED_NEW_COMMISSIONS.
The select list P18_SHARED_SALESMAN has the same property values as P18_SOLO_SALESMAN; the difference is that its Allow Multi Selection property is set to Yes, with a Height value of 4. Recall from Chapter 5 that the value of such an item is a string containing the return values separated by colons. For example, in Figure 7-7, ALLEN and TURNER are chosen from the multi-value select list P18_SHARED_SALESMAN. Because their corresponding employee numbers are 7499 and 7844, the value of this item is the string "7499:7844".
It is not especially easy to extract the information you need from this string, so some fancy footwork is required. You will need to do two things: determine the number of selected employees, and extract their records from the EMP table.
PL/SQL Code to Handle Shared Commissions
Step 1, which calculates the commission on the sale, is the same as before. Step 2 calculates the prorated commission for each employee, which you get from dividing the commission by the employee count. Step 3 updates the records for the selected employees. Step 5 writes a value to each item in the Commission region.
The most interesting code appears in step 4, in which you handle each selected employee. The issue is that the SQL query to retrieve the employee information returns multiple rows, so you cannot use the into clause the way that you did earlier. Instead, the technique is to loop through the records in the query, processing one row each time through the loop.
Variable r need not be declared. Each time through the loop it will hold the next row of the query. If C is an output column of the query, the expression r.C will return the C-value of the current row. For example, in Listing 7-6, the row variable is named row, and the two output columns of the query are EName and Comm. The loop code therefore makes reference to row.EName and row.Comm.
The body of the loop processes each selected employee. Its task is to construct the string that summarizes the new commission of that employee. The code creates the summary string by concatenating the employee’s name with the new commission value. The expression chr(13) denotes a newline character.
Concurrent Database Updates
At any point in time, a web server such as APEX may be executing requests from multiple users concurrently. The users are not aware of this concurrency because the server gives each user the illusion that their application is the only one running on the system. However, application developers must see beyond the illusion. Applications that are unaware of this illusion can unintentionally interfere with each other, with disastrous consequences. This section discusses these issues.
Lost Update Problem
One frequently encountered situation is called the lost update problem . It arises when two users update the same database record at approximately the same time, and the timing of the updates is such that the database system loses one of them. Here are two scenarios that illustrate the problem.
For the first scenario, consider the Employee Data Entry page of Figure 7-5. Assume that two users use the Update Employee region to update Allen’s record—user A wants to change the salary to 1800, and user B wants to change the job to ANALYST. If both users click the GetInfo button at approximately the same time, then they both will retrieve the same record from the EMP table, which says that Allen is a salesman who has a salary of 1600. When user A changes the salary and clicks the Update button, that record will be replaced by one saying that Allen is a salesman who has a salary of 1800. User B, however, doesn’t see the updated salary. When user B changes the job and clicks the Update button, the record will be replaced by one saying that Allen is an analyst making 1600.
This scenario is problematic, regardless of who writes first. If user A modifies first, user B will overwrite the new salary with its previous value; if user B modifies first, user A will overwrite the new job with its previous value. No matter what happens, the database system will lose one of the updates.
You can verify this scenario for yourself. Open the Employee Data Entry page in two private browser windows (using private windows keeps APEX from realizing that they both belong to you). Select the same employee in each window and click the GetInfo button. Then do an update in each window and click their Update button. Now look at the modified record in the report—you will see that your first update was lost.
For the second scenario, consider the Sales Commission page of Figure 7-7. Suppose that Allen made solo sales of $100 and $200, earning commissions of $15 and $25, respectively. Users A and B each enter one of the sales into the Solo Commission region of the page and click its Submit button concurrently. Suppose that the execution of their PL/SQL processes both hit step 2 of Listing 7-5 at roughly the same time, meaning that both processes would see a current commission of $300. User A’s process would then calculate a new commission of $315 in step 3, and user B’s process would calculate a new commission of $325. Whichever process updates last would overwrite the commission of the process updating first. The overwritten update would be lost.
This statement causes the process to sleep for 10 seconds before beginning step 3. Now repeat the experiment. If you click the two Submit buttons within 10 seconds of each other, the problem scenario will occur and the first commission you submitted will be lost.
In both of these scenarios, the occurrence of a lost update depends entirely on the timing of the user requests. This dependence on timing means that lost updates tend to occur at seemingly random times. For example, it is quite possible for an application to run for months (or years) without a lost update and then have several in short succession.
Lost updates are clearly a very bad thing. A lost update might not be detected until long after it occurred, at which point it might be too late. The application developer must ensure that they never occur. Their unpredictable nature makes it hard to discover the problem via testing. Consequently, any PL/SQL process that updates the database must be written specifically to avoid lost updates.
Avoiding Lost Updates
Lost updates occur when two concurrent processes read the same data and then make conflicting updates to it. The way to avoid this problem is to force the conflicting processes to interact sequentially, so that the second process reads the data written by the first one.
The Oracle database system uses write locks to ensure this sequentiality. You specify write locks by adding the clause for update to an SQL query. When your process executes a query having that clause, the database system locks the query’s output records so that they cannot be read or modified by any other process. Your process can then modify these records without fear of conflict. The database system releases the locks when your process completes.
If another process tries to access this record while it is locked, the database system will delay that process until your process completes. Consequently, step 3 of your process can modify the record, secure in the knowledge that it will not overwrite the modification of another process.
Go to page 18 of your Employee Demo application and make this modification to the process for the Solo Commission region. Then use two private browser windows to verify that it works, as described in the previous section. The page should never lose an updated commission, even if you add the sleep statement before step 3 of the process.
Now consider the first scenario, in which two users concurrently update an employee record. In this scenario, the activity of updating a record requires two processes: the GetEmpInfo process reads values from a specified record, and the UpdateEmp process modifies that record. It is not sufficient for GetEmpInfo to lock its records, because the locks will be released when GetEmpInfo finishes (and therefore, before UpdateEmp begins). Instead, explicit cooperation between these two processes is needed. Here is a good strategy.
The GetEmpInfo process reads the values of the selected record, displays them on the page, and saves the original values for future reference. The UpdateEmp process rereads the values from the database and compares them with the saved values. If they match, then the process can perform the update. If not, then another process must have updated the record, which means that UpdateEmp must refuse to perform the update.
Page 19 of the Employee Demo application, named Revised Employee Data Entry, contains the implementation of this strategy. It looks the same as page 17 and has the same behavior. The only difference (for the moment) is that its GetEmpInfo and UpdateEmp processes have been revised so that they cannot lose updates.
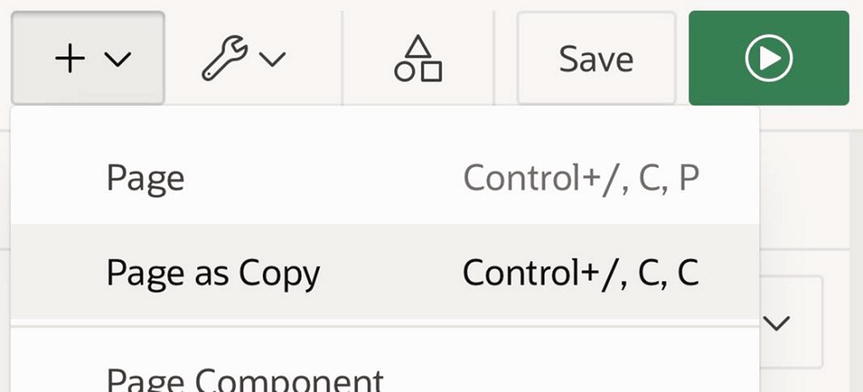
Selecting the Page as Copy wizard
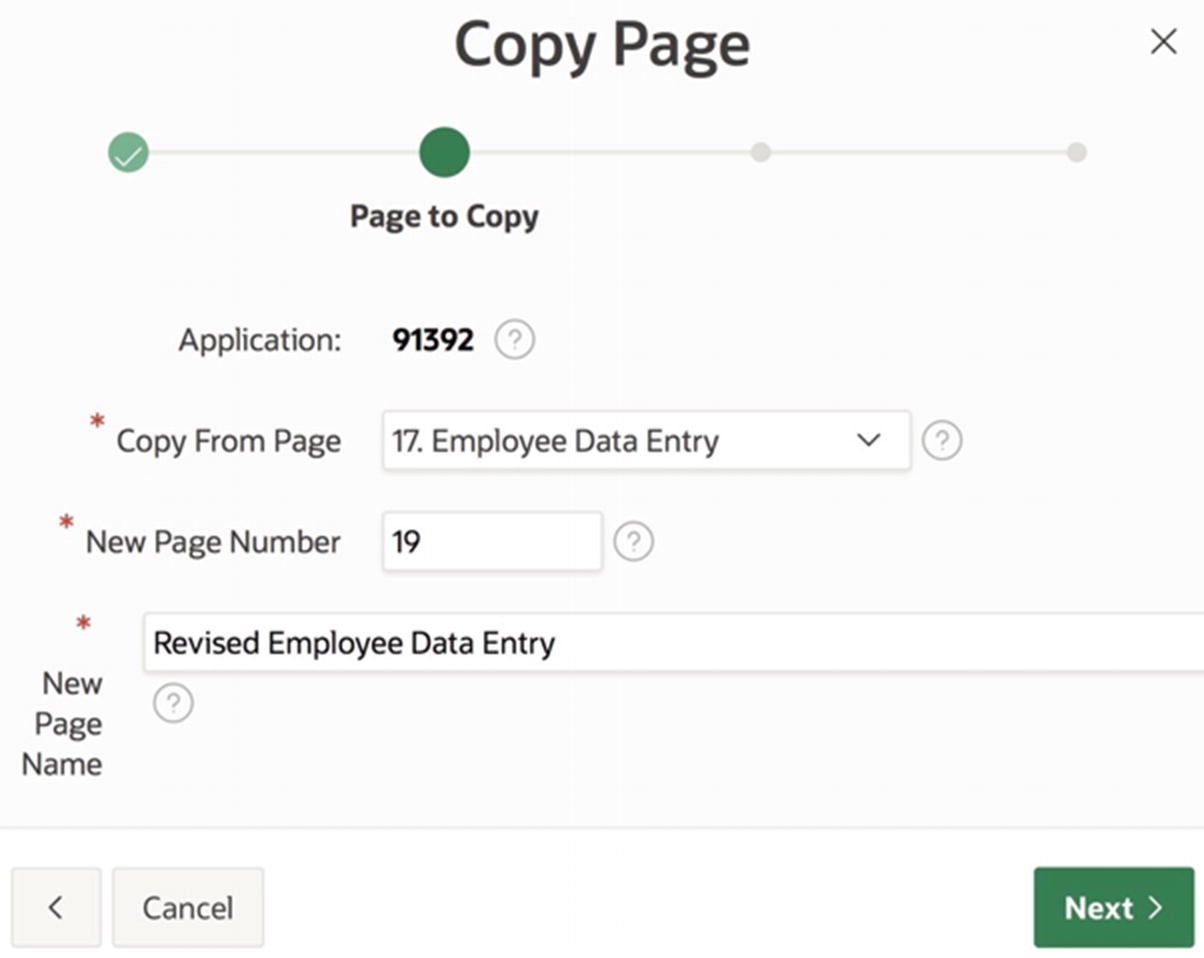
Copying a page
Revising the GetEmpInfo Code of Listing 7-4
Revising the UpdateEmp Code of Listing 7-3
The code to abort the process requires explanation. The raise_application_error function causes APEX to abort the process and display an error message on the page. The function takes two arguments: the first argument is the error code, which can be any number between –20,000 and –20,999; the second argument is the error message.
Note that the query contains the for update clause. The process needs to lock the specified EMP record until it can execute the update statement, to ensure that the record cannot be modified in the meantime.

Error message arising from an avoided lost update
Using a Hash Function
Although this revised code works, the technique does not scale well. The need to save and compare all the original values is tedious and will become more so as the number of saved values increases. An easier approach is to combine all the original values into a single value; you can then save and compare that one value. The preferred technique is to use a hash function , which transforms a collection of values into a single fixed-length value, called a checksum . A hash function also obfuscates its input, which makes it useful for encoding user passwords—as will be seen in Chapter 13.
The first line of the code declares a variable v_vals of type apex_t_varchar2 and assigns it the collection that gets created by the type’s constructor function (which is also called apex_t_varchar2). The arguments to the constructor function are the values 'CLERK' and 20. The second line of the code declares a variable v_result of type varchar2(1000) and assigns it the result of the apex_util.get_hash function. In other words, the variable v_result will contain the hash of the values ['CLERK', 20].
Second Revision of the GetEmpInfo Process of Listing 7-4
Second Revision of the Update Code of Listing 7-3
Although this code does what you want, it is somewhat clunky. This code will be revisited at the end of Chapter 8, where you will see how to improve it using validations.
Success and Error Messages
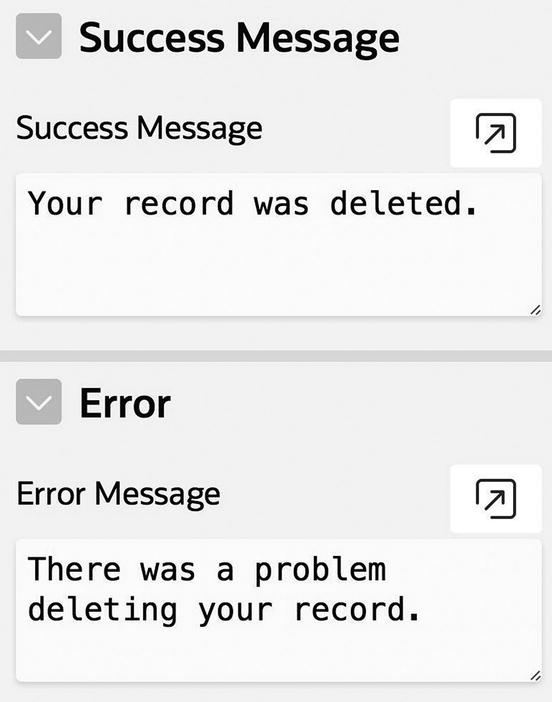
Success and error message properties
Go to the property editor and add success and error messages to the processes in your Sales Commission and Revised Employee Data Entry pages. Run a page and make some changes. Your specified success messages will be displayed when the page is re-rendered. (If you are interested in seeing the error message in action, modify the process’s PL/SQL code so that it refers to a nonexistent table.)
Success and error messages can contain HTML code and item references. For example, suppose that you want the success message in Figure 7-11 to indicate the number of records affected, the way the SQL command window in the APEX SQL Workshop does. How do you get the number of affected records into the process’ success message?
Revising the DeleteEmp Process of Listing 7-1
Note that the reference to P19_DELETE_COUNT uses bind variable syntax in the PL/SQL process and substitution string syntax in the HTML message.
Conditional Processes
So far, each process you have written has had an associated button, and you used its When Button Pressed property to specify the association between the process and its button. This is a natural and typical way to use processes and usually all you need.
There are two situations in which the When Button Pressed property is not sufficient: when the submit action was not caused by a button and when the process is relevant to multiple buttons. The following subsections consider these situations.
Submitting via Items
Recall that items of certain types (i.e., radio groups, select lists, text fields, and password fields) can be configured to perform a submit action. Such items should be able to have an associated process. The problem is that the When Button Pressed property doesn’t give you the option of picking an item.
The solution to this conundrum is to forego the When Button Pressed property in the Server-side Condition section and instead use the property below it named Type (refer back to Figure 7-6). That property lets you explicitly specify a condition for when the process should execute. Its options are the same as for conditional rendering, described in Chapter 6.
Using a select list to invoke the GetEmpInfo process

The select list now submits when changed
The revised condition for the GetEmpInfo process
When you are done, you can delete the GetInfo button from the page.
Multiple-Use Processes
Another situation that cannot make use of the When Button Pressed property is when a process is applicable to more than one button. This section contains two examples related to the Revised Employee Data Entry page.
For the first example, suppose that you want to log all changes made to the EMP table. In particular, each click of the Delete, Insert, or Update button should cause an appropriate record to be inserted into a table named EMPLOG.
SQL Code to Create the EMPLOG Table
PL/SQL Code for the LogChanges Process
This code refers to the built-in variables APP_USER and REQUEST, both of which you have seen before. The variable APP_USER holds the name of the logged in user, and REQUEST holds the name of the button or item that performed the submit action. Thus, the LogChanges process inserts a record into the EMPLOG table containing the source of the submit action, the user who performed it, and the date it occurred.
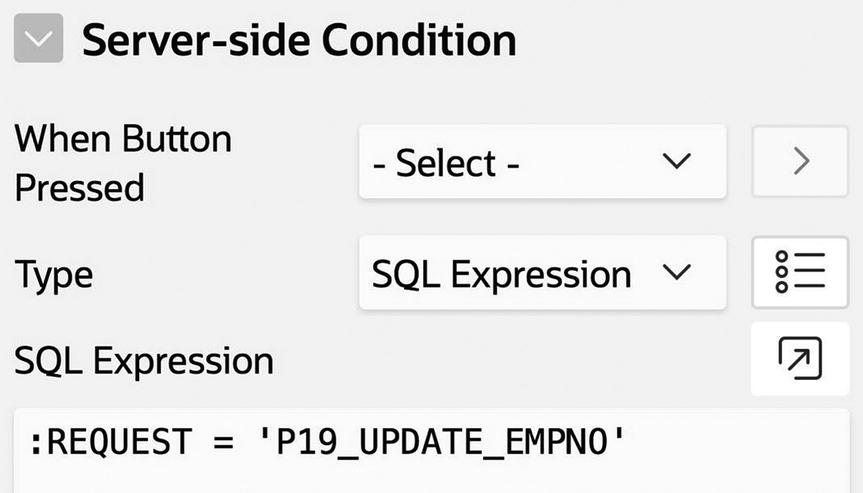
This process needs to execute each time the Insert, Delete, or Update button is clicked, but not when a value is chosen from the item P19_UPDATE_EMPNO. Clearly, the When Button Pressed property is of no use here because it lets you choose only a single button.

Condition section for the LogChanges process
You might be thinking that you don’t need a separate process to do the logging; instead, you could append the logging code to each of the button-specific processes for these buttons. This strategy works, but is not advisable. The problem is that doing so would duplicate the logging code, which means that if you want to change the way the logging works (such as by adding a new column to the EMPLOG table or changing the RequestDate column to hold the time as well as the date), you will need to update it in three places. Moreover, if you decide to add a new button to the page, you must remember to extract this logging code from an existing button and add it to the process for the new button. It is much more elegant and practical to have a separate process that can be called by multiple buttons.
A second example of a process that cannot make use of the When Button Pressed property involves the sending of email. In particular, suppose that you want the Revised Employee Data Entry page to send an email to the database administrator when it detects a suspicious modification. Let’s define a suspicious modification as a deletion or update that occurs outside of normal 9 a.m. to 5 p.m. working hours. To implement this feature, you will need to do two things: create a process (call it SendSuspiciousEmail) to send the email, and specify a condition for when it will fire.
Code for the SendSuspiciousEmail process
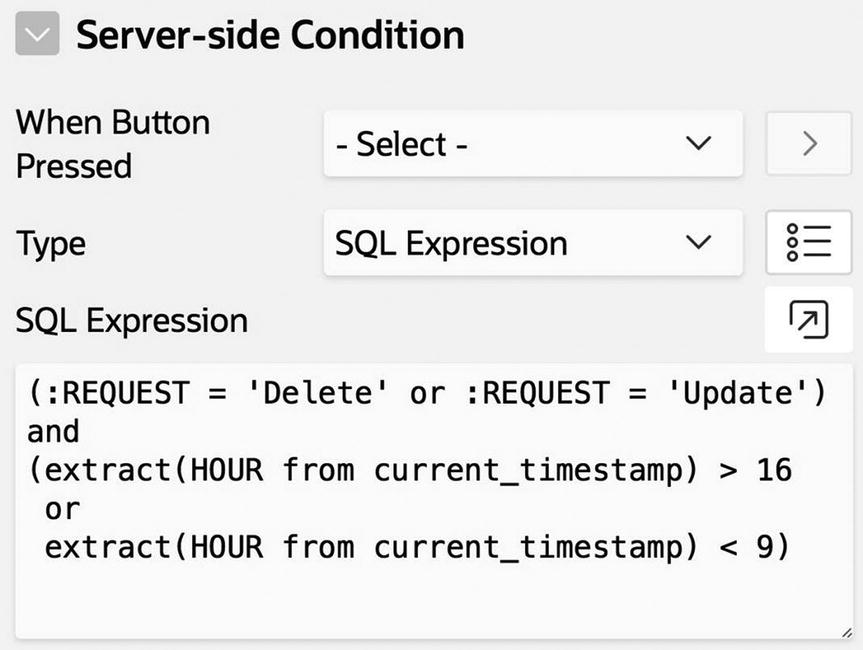
Condition for the SendSuspiciousEmail process
Page Rendering Processes
So far, all the processes in this chapter have executed during submit. The remainder of the chapter considers processes that execute during page rendering. This situation often arises when a page uses redirection instead of submit, such as when linking from a row of a report.
For an example, recall from Chapter 3 how an interactive report can have a link column, such that clicking a row’s link column displays the values for that row in single row view (refer to Figures 3-66 and 3-67). The single row view has buttons to move to the previous and next rows of the table and another button to move back to report view.
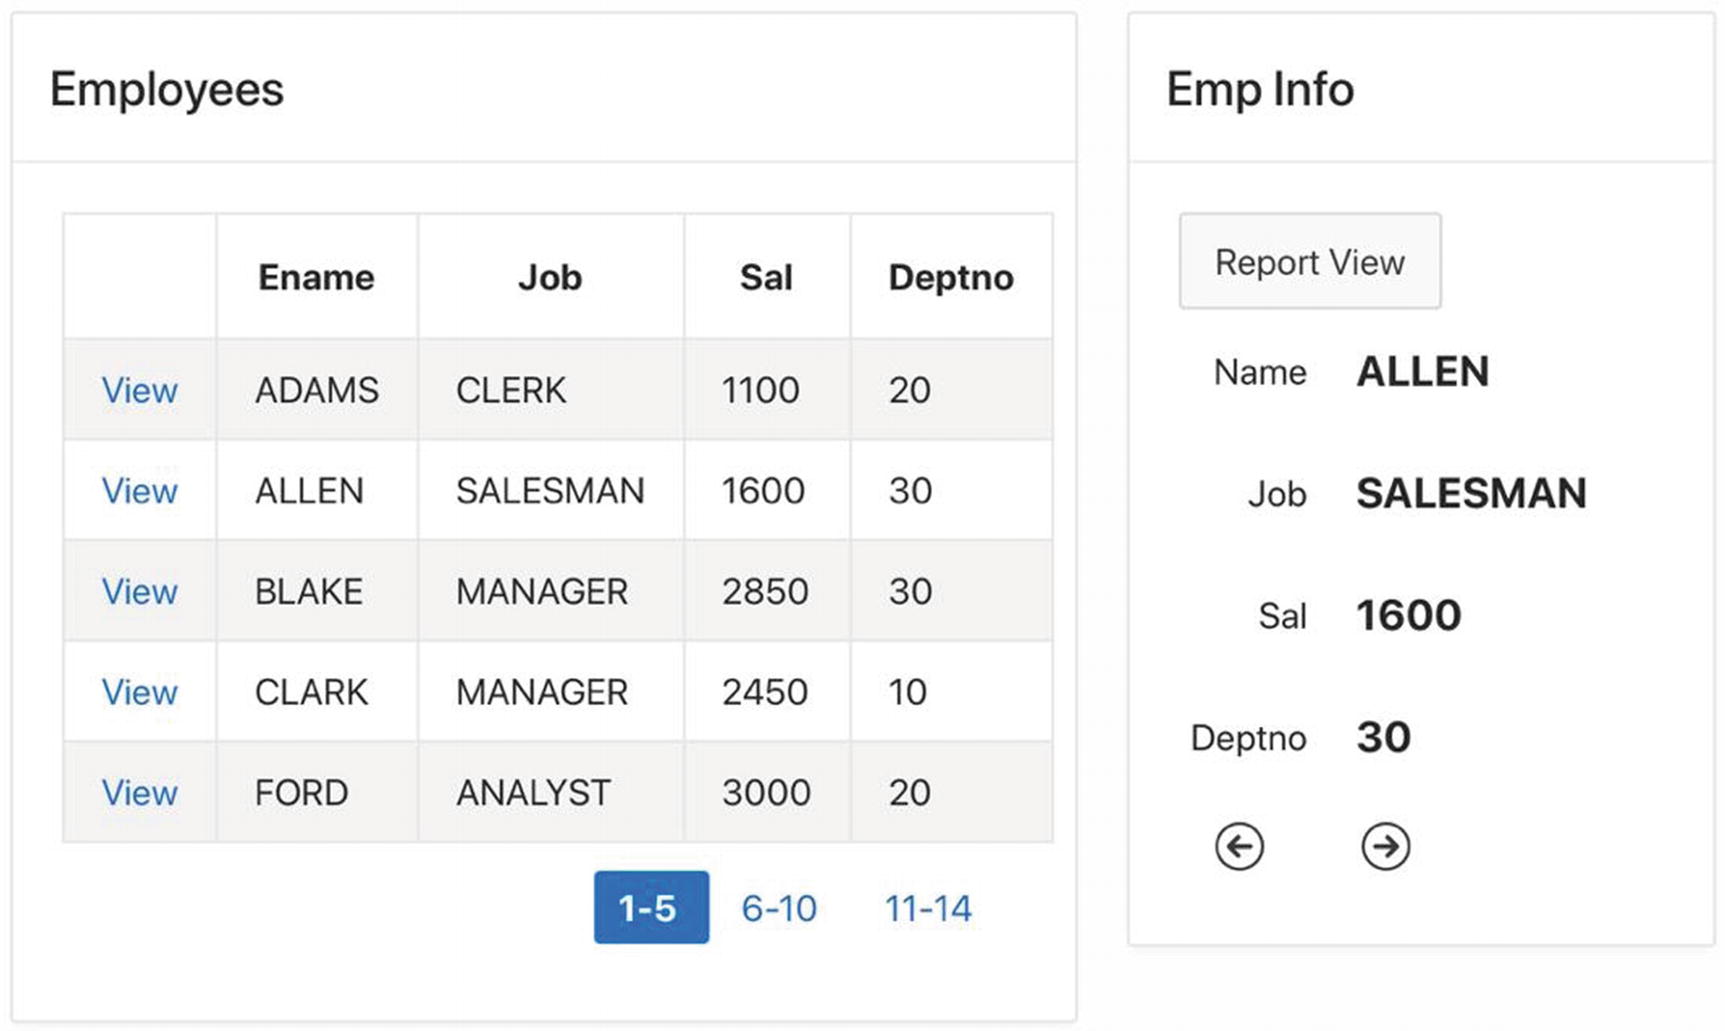
Single Row View page
Although Figure 7-17 shows the Employees and Emp Info regions together, they actually are never displayed this way. The Employees region is displayed only when there is no selected record, and the Emp Info region is displayed only when there is a selected record.
Several issues arise when you try to implement this page. How and when do the items in the Emp Info region get their values? How does the page know whether to display the Employees region or the Emp Info region? How are the arrow buttons implemented? These issues are discussed in the following sections.
Executing a Process Without a Submit

Configuring the link for the EmpNo column
Now consider the Emp Info region . It should have four items and three buttons. The items are named P20_ENAME, P20_JOB, P20_SAL, and P20_DEPTNO. They all have the type Display Only so that they cannot be modified. The buttons are named ReportView, Previous, and Next. ReportView is positioned Above Region, and Previous and Next are positioned Below Region; all three buttons are aligned left.

Appearance section for the previous button
To specify that the button should be displayed as an icon, you set the value of the Button Template property to Icon and the value of the Icon property to the name of the desired icon file. You can get this file name by clicking the quick-pick symbol to the right of the Icon property and choosing from the large number of icons displayed. Clicking the Template Options property lets you customize the button’s appearance. In particular, setting the Style property to Remove UI Decoration displays the icon without the rectangle that typically outlines the button. The property settings for the Next button are the same as for the Previous button, except that the icon is a right-facing arrow.
PL/SQL Code for the FetchRow Process
Although this process has the correct code, it has the wrong execution point. The Processing execution point means that the process executes when a submit action occurs. But the Employees region does not perform a submit; instead, it invokes a link, and links perform a redirect. What you need is for the process to execute after the redirection occurs—that is, during page rendering.

Possible process execution points
If a process has the execution point New Session, it will execute only when a session begins. The execution points from Before Header to After Footer denote the six stages of page rendering; a process assigned to one of these points will execute during the specified rendering stage. The execution points After Submit and Processing are two stages of a submit action. You assign the process to the After Submit point if you want it to execute before the validation stage and to Processing if you want it to execute after validation.
Although these options can be useful for advanced applications, the differences between many of the execution points are subtle and in most cases irrelevant. For our purposes, the only interesting distinction is between processes that execute during submit and those that execute during rendering. In particular, all processes in this book have the execution point After Header when they execute during page rendering, and Processing when they execute during submit.

FetchRow is now a rendering process
FetchRow will get called each time the page is rendered. But it doesn’t make sense for it to go to the database unless the user has selected a row—that is, it should execute its SQL statement only when P20_EMPNO is non-null. That is the purpose of the if-statement in Listing 7-15. (An equally good equivalent solution is to remove the if-statement and change the Server-side Condition properties of the process so that it executes only when P20_EMPNO is not null.)
Instead of creating FetchRow as a submit process and then changing its execution point, it is easier to create it directly as a rendering process. You simply need to right-click the After Header node in the rendering tree and select Create Process.
Moving Between Regions
At this point in your application, you should verify that clicking a link on the Employees report will correctly place the values for the selected employee into the items of Emp Info. The next issue is to work out a plan for how the regions can “take turns” rendering themselves.
The key idea is to realize that a non-null value for P20_EMPNO indicates that a row has been selected. So to “un-select” a row, it follows that you should put a null value into P20_EMPNO. The two regions can thus use the value of that item to determine their conditional rendering—the Employees region should be visible when the item value is null, and the Emp Info region should be visible when the value is not null. In other words, the value of P20_EMPNO determines whether the page is in report mode or single row mode.
This reasoning also leads to a natural way to implement the ReportView button. It should simply redirect to the same page, setting P20_EMPNO to null. Make these changes, and test your page again. Clicking a row of the report should display the Emp Info region for that employee, and clicking the Report View button should display the report again.
Finding Previous and Next Rows
The final issue is how to implement the Previous and Next buttons so that clicking them causes the region to display the previous (or next) row of the report. This section considers two different ways to implement this functionality. The first approach is easier to understand, but it has some limitations. The second approach is a bit harder to understand but is much more elegant.
Approach 1: Different Processes for Previous and Next
Simplified Code for the Previous Button, Approach 1
The if-statement is necessary to handle the case when you try to get the previous row of the first employee. In this case, the query would return a null value. Without the if-statement, the button would put that null into P20_EMPNO, effectively deselecting the row and returning to report mode. By using the if-statement, clicking the Previous button from the first row will have no effect.
PL/SQL Code for the Previous Button, Approach 1
The inner query creates a two-column table of employee numbers, in which each employee is paired with the employee appearing immediately before in the sort order. The outer query then selects the row from that table whose EmpNo value equals P20_EMPNO and returns the PrevEmp value of that record.
In addition to the lag function, SQL also has the lead function that behaves the same way, except that it returns the next-highest value in the sort order. This function can be used in the implementation of the Next button, and its PL/SQL code is similar to Listing 7-17 (and thus is omitted).
Because the Previous and Next buttons each have their own process, you should set their actions to submit. You should also configure each process to execute conditionally on its button. Although this is not the best solution to the problem, it works well and is worth implementing just to see it in action.
Approach 2: A Unified Previous/Next Process
Approach 1 suffers from the fact the Previous and Next buttons don’t have any visible effect when they get to the first or last record; to the user, they seem to have stopped working. An alternative idea is to hide the buttons when they are not applicable. To do this, the page needs to “read ahead.” That is, in addition to keeping track of the current employee number, the page also needs to keep track of the previous and next values. This way, it can hide the Previous button if the previous value is null and similarly for the Next button.
PL/SQL Code to Find Previous and Next Values
This code is similar to the code in Listing 7-17, but differs in that it is not specific to any particular button. In fact, it must execute whenever a row gets selected, regardless of whether the selection is via a link from the report or via one of the Previous or Next buttons. In other words, the FindPreviousNext process should execute during page rendering, just like the FetchRow process.
Configuring the action of the Previous button
Customizing when the Previous button is displayed
To summarize, approach 2 implements previous/next functionality as follows. You first create hidden items P20_PREV and P20_NEXT. You then create the process FindPreviousNext, which calculates the value of these two items using the code of Listing 7-18 and executes during page rendering.
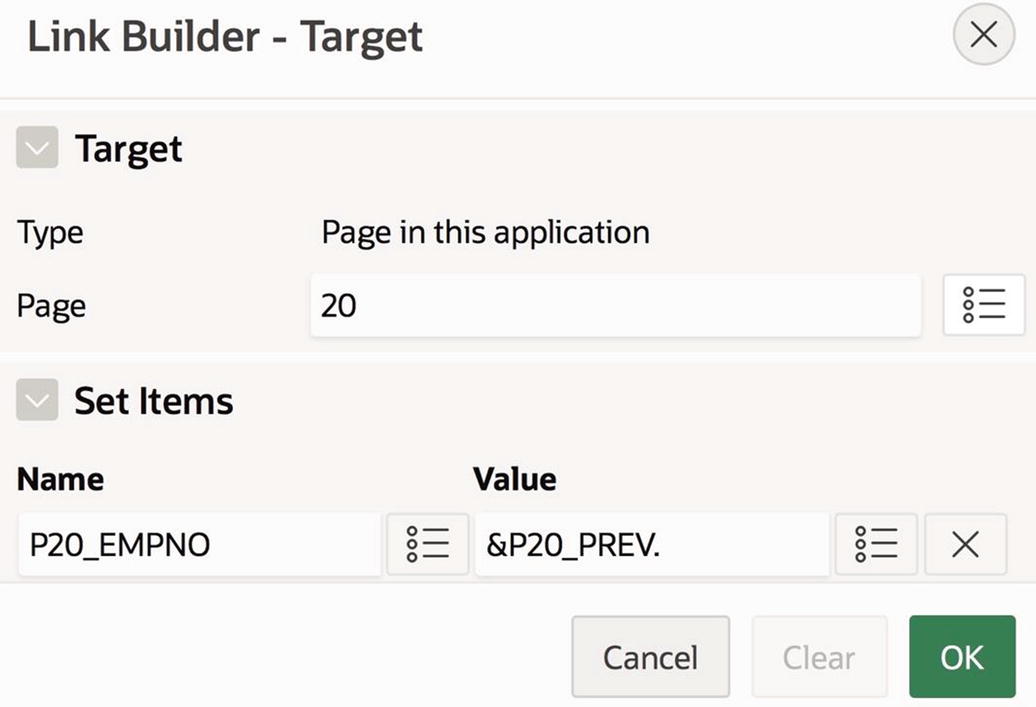
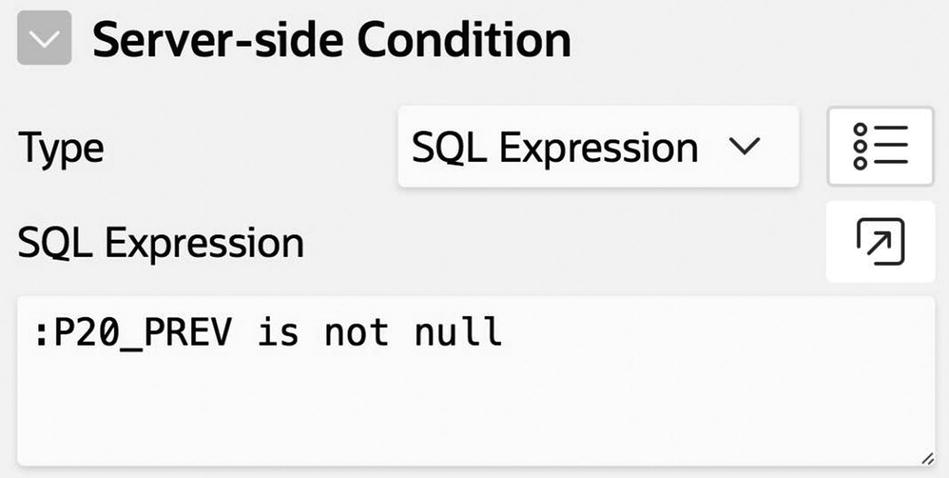
Finally, you configure the Previous and Next buttons to redirect to the current page, assigning a value to P20_EMPNO. The Previous button uses the value of P20_PREV, and the Next button uses the value of P20_NEXT. Each button uses conditional rendering, so that it displays only when its associated item value is not null.
As a result, the entire page consists of two relatively small processes: one that fetches the values of the selected row and one that calculates the employee number of the previous and next records. Both processes execute during page rendering. A user will select a row by clicking either a report link or a Previous/Next button. In each case, the page will determine the employee number of the selected record, save it to the item P20_EMPNO, and redirect, thereby causing the two processes to execute. Everything works without any submit operations.
Single Row Update

Single Row Update page
Initially, the page displays the Employees region in report mode. From there, the user can click the Insert button to move to insert mode or click one of the Edit links to move to update mode.
The page displays the Insert Employee region when in insert mode. This region is essentially the same as the corresponding region in the Employee Data Entry page. Its Create button creates a new EMP record having the specified values and then clears the items in anticipation of another insertion. The Cancel button returns to report mode.
The page displays the Update/Delete Employee region when in update mode. The region’s items are initially populated with the chosen employee’s information. The user can change item values in the region and click the Update button, which updates the database. Alternatively, clicking the Delete button deletes the chosen record. Deleting a record also returns to report mode because there is no longer a record to display. Clicking the Cancel button simply returns to report mode.
Now that you know how the page should work, you can consider how to implement each region. The following subsections examine these issues.
Implementing the Report Region
The implementation of the report region is essentially the same as in the Single Row View page of Figure 7-17. One difference is that it also has a hidden item, called P21_MODE, to distinguish between the three modes. The item will have the values Report, Insert, and Update, as appropriate, with a null value indicating report mode.
Implementing the Insert Region
PL/SQL Code for the InsertEmp Process
The CancelInsert button redirects, setting P21_MODE to Report.
Implementing the Update/Delete Region
PL/SQL Code for the FetchRowForUpdate Process
Code for the DeleteEmp Process
Code for the UpdateEmp Process
To summarize, the Single Row Update page has four processes. Three of the processes execute during submit; their responsibilities are to run their respective insert, delete, and update SQL statements. The fourth process is responsible for running an SQL query to initialize a region’s items; it executes during page rendering.
Summary
A process is a page component that lets you access the database and perform calculations. This chapter examined the role that processes play in an application. For example, a button that performs a submit action typically has an associated process that will execute when the button is clicked. A process can also be configured to execute during page rendering and calculate initial values for items.
This chapter focused entirely on PL/SQL processes. To specify the behavior of a PL/SQL process, you write PL/SQL code. PL/SQL integrates SQL commands directly into a general-purpose programming language, which makes it easy to write database-aware code. Chapter 10 examines other process types.
Although PL/SQL processes can be very useful, they require careful coding. This chapter examined one common pitfall, known as the lost update problem. You learned how to recognize the problem and how to write the necessary PL/SQL code to avoid it.