
Chapter 5. Environment Setup
To be able to test locally and see how HBase behaves, we will install and configure a standalone HBase environment that will be used to run the given examples. HBase can run in three modes, each of which offers different behaviors (the first two modes are mainly for testing purposes, while the last one is the mode you will use for your production HBase cluster):
- Standalone mode
-
This mode starts all of the HBase processes in a single virtual machine (VM). Standalone mode uses the local disk for HBase storage and does not require any specific configuration. Data will be stored in the current user-configured temporary folder (usually /tmp) in a folder named hbase-$USERNAME. Removing this folder when HBase is down will remove all HBase data. This is the simplest mode for running HBase, and it’s the one we will use for our testing. Using this mode allows the end user to easily clear all HBase content and restart with a blank installation. This mode doesn’t require running any other external service (e.g., ZooKeeper or HDFS).
- Pseudodistributed mode
-
In pseudodistributed mode, HBase will run the same processes as in fully distributed mode, but as a single node cluster. HBase will start the ZooKeeper process and both the HBase Master and RegionServer processes.
- Fully distributed mode
-
Last, fully distributed mode is when HBase runs on multiple machines with all required services (ZooKeeper, Hadoop, etc.).
System Requirements
Whether you are choosing a standalone, pseudo-distributed, or fully distributed deployment, the choices made around the environment will be key for its success. There will be choices around using bare metal or VMs for the core infrastructure; which OS should you install; what Hadoop distribution you should use; the Java version to deploy on; and the most important question, what system resources are going to be needed for success. The following sections will help guide and answer these questions for you.
Operating System
All example outputs provided in this book are captured from a Linux shell terminal using HBase 1.0.1 (some on Debian, some on CentOS). In order to reproduce our results, try to use the same Linux version that we have used. The examples can be run in a Linux environment running on either a physical or virtual machine. Commands might also work in other environments (Windows, Mac OS X, etc.) or on Cygwin, but we have not tested them.
If you want to install a Linux environment, you can download and install one of the following distributions:
This is a nonexhaustive list—there are many other distributions and versions available today, and any of them should work. You should choose and install the one you are most comfortable working with. If you decide to use an Apache Hadoop distribution, make sure to validate which Linux distribution and version it is compatible with.
Virtual Machine
As described in the following subsections, there are multiple ways to use a VM to run a pseudodistributed HBase environment. Let’s take a look at each of these options.
VM modes
- Local VM
-
You can install a virtual machine support (e.g., VirtualBox) on your local computer and then create a Linux VM into which you can install HBase and run it in either standalone or pseudodistributed mode.
- Public cloud
-
This is similar to the previous option, except that you create the Linux VM (instance) on a public cloud such as Amazon EC2. You then install the HBase software and run it in standalone or pseudodistributed mode. You can also provision multiple virtual nodes and run HBase in a fully distributed mode. Be careful with running a production HBase cluster in a public cloud, as some specific configuration might be required.
- Local virtual distribution
-
Install a virtual machine support (e.g., VirtualBox) on your local computer and instead of installing software manually, simply download the Cloudera QuickStart VM, which includes a fully functional HBase installation in pseudodistributed mode (no manual installation required).
- Linux environment
-
If you don’t have a computer available on which to install a Linux distribution, you can run one on your local environment by running it in a local VM. The following applications will help you to run a Linux environment in a local VM:
Hadoop distribution
This book covers HBase application design and development, but to be fully implemented, some use cases might require other external applications, such as Solr or Flume. Installing, configuring, and running those tools is outside the scope of this book. If you want to implement those integration examples, you will need to have a VM with an entire Hadoop distribution already installed. A Hadoop distribution is a bundle, usually packaged by a Hadoop vendor, including most if not all of the Hadoop-related applications. This is usually easier to install, as all the applications are configured to work together and they usually come with some setup scripts to prepare them all.
For simplicity and because it already contains all the applications we need (HDFS, HBase, Solr, Flume, etc.), you can use the Cloudera QuickStart VM. We used version 5.4.2 of this VM to build all those use cases, and all the examples are tested with it. If you are not familiar with Linux or HBase and Hadoop installation, it might be easier for you to follow the same path and use the QuickStart VM.
All of the examples in the book are built for HBase 1.0.1. If you choose to use another Hadoop distribution in a virtual environment or if you decide to install HBase locally, you’ll need to make sure that the distribution you choose comes with the same HBase version. While the examples might work with more recent versions, most of them will fail with older ones.
If you choose to use a Hadoop distribution, we still recommend reading the following sections so that you can become familiar with HBase, its constraints, and its installation.
In order to make the most of HBase’s capabilities, all of the examples in this book are tested against a local Linux standalone HBase server and the Cloudera QuickStart VM. If you have access to a Hadoop test cluster (physical or virtual), you can also use it. That will allow you to choose the environment with which you are the most comfortable to run your tests.
Resources
The necessary resources are an important choice when choice when starting down the HBase path. Having enough resources will decide early success or failure.
Memory
Whether you are working in your local environment or on a VM, you need enough memory for provide to HBase and the other services to run. A standalone HBase environment running locally will require a minimum of 1 GB memory. However, if possible, we recommend allocating more memory, as doing so will allow you to run the tests on bigger datasets and to have a better view of the results and the behaviors of the application. If you are testing the examples directly in a Hadoop distribution running in a virtual environment, you should allocate a minimum of 4 GB to the VM. Here again, giving more memory to the environment will allow you to have a better response time from your applications and to run on bigger datasets. That’s why we recommend allocating at least 8 GB to your virtual machine.
Tip
You should allocate as much memory as possible to your virtual machine. If you have 32 GB or more in your environment, make sure to allocate as much as you can to your VM. We ran most of the examples on a 12 GB VirtualBox virtual environment.
Disk space
The HBase installation file takes less than 100 MB (and the examples require just a few megabytes), so you can run all of the examples with less than 1 GB of available disk space. However, if you want to see all of the features in the examples pushed further, you’ll need to create bigger datasets—and that requires more space for you to test. Therefore, we recommend allowing for at least 10 GB of available disk space.
If you want to run in a virtual environment, you will need at least 4 GB of available disk space to download the VM and another 4 GB to extract it. The Cloudera QuickStart VM is configured to allow its virtual disk to grow up to 64 GB. Creating big datasets and running HBase for a long period will create a lot of data in your virtual environment. As a result, you will easily use up to 50 GB of disk space. Although it’s possible to start with less, we recommend that you to have this space available before you start.
Java
HBase is written in Java and therefore it depends on specific versions of the JDK. It supports version 7 since HBase 0.94 and version 8 since HBase 0.99, while Java 6 support has been dropped starting with HBase 1.0. To run your local HBase version and the given examples, we recommend using the most up-to-date Java 7 version available. The VM we used for the examples runs with Java 1.7.0_67, so you should use that version to ensure that you will get the same results.
Warning
Be careful when choosing your JVM version—you need to make sure it is bug free.
As an example, JDK 1.7.0_75 has some issues with the jps command when running it in sudo mode.
| Version | Recommended JDK | Other JDKs |
|---|---|---|
1.x |
JDK 7 |
JDK 8 |
0.98 |
JDK 7 |
JDK 6, JDK 8 |
0.96 |
JDK 7 |
JDK 6 |
0.94 |
JDK 6 |
JDK 7 |
HBase Standalone Installation
This section will describe the steps necessary for installing HBase on metal or on a VM running Linux.
Running a standalone HBase installation should be a straightforward process—you simply need to download the HBase binary, extract it, and finally, run it.
At the time of this writing, the last stable Apache HBase version from the stable branch is version 1.0.1.
We recommend using a mirror to download the release.
Once you have found the best mirror to download the HBase release, the file to download should be named something like hbase-1.0.x-bin.tar.gz, where x is the last subrelease number.
Take the downloaded file and extract it to the directory of your choice using tar -xzf from the command line.
The instructions that follow will assume that HBase has been extracted or is accessible from the ~/hbase directory and that the hbase/bin folder has been added to the user path.
Using the Unix command line, the steps just described can be achieved as follows:
#:~$ cd ~
#:~$ wget
"http://www.us.apache.org/dist/hbase/hbase-1.0.1/hbase-1.0.1-bin.tar.gz"
#:~$ tar -xzf hbase-1.0.1-bin.tar.gz
#:~$ ln -s hbase-1.0.1 hbase
#:~$ rm hbase-1.0.1-bin.tar.gz
#:~$ cd hbase
#:~/hbase$ export PATH=$PATH:~/hbase/bin
Warning
Because this is based on HBase release 1.0.1, the download of the binaries might fail if this release is replaced by a more recent one. Go to http://www.apache.org/dyn/closer.cgi/hbase/ to check for the last available version, and update the preceding command if necessary.
The next step is to specify which JDK should be used to run HBase (we recommend configuring the same JDK that will be used in the development environment). Once you’ve specified the JDK, you will need to let HBase know about the location of your JDK. First, identify the version and the location using the java -version and which java commands. When you have identified the location of your JDK, you can export the JAVA_HOME variable. Here are two examples of potential Java locations:
#:~$ export JAVA_HOME=/usr # If using your Linux distribution JDK
#:~$ export JAVA_HOME=/usr/local/jdk1.7.0_60/ # If installed manually
When your JAVA_HOME variable has been defined correctly, the HBase standalone server can simply be started using the following command:
#:~$ start-hbase.sh
Tip
Instead of exporting the JAVA_HOME variable each time you start the server, you can also edit the conf/hbase-env.sh file to get this value automatically defined when the HBase command is launched.
At this point, the HBase environment should be running locally. There are multiple ways to verify that HBase is functioning correctly. In the later examples, we will see how to do that using Java code. As a matter of simplicity, we will use the HBase shell for now.
To start the HBase shell, run the following command:
#:~$ hbase shell
The output should look something like this:
HBase Shell; enter 'help<RETURN>' for list of supported commands.
Type "exit<RETURN>" to leave the HBase Shell
Version 1.1.5, r239b8045640b2e562a5568b5c744252e,
Sun May  8 20:29:26 PDT 2016

hbase(main):001:0>
Tip
You might encounter some informational messages with warnings about deprecated properties or missing native libraries. For this example, it is safe to ignore them (and for brevity, we removed them from the code displayed here). The warnings could impact performance in a fully distributed system, but for a standalone HBase server they are not a cause for concern.
While in the HBase shell, simply run the status command to see HBase statistics:
hbase(main):001:0> status
1 servers, 0 dead, 2.0000 average load
The output from the status command explains that there is one HBase server running, with an average of two HBase regions per RegionServer. At this point, if your environment is not running correctly, refer to “Troubleshooting”.
Tip
Even if you just installed HBase, it already contains two regions: one for the hbase:meta table (which contains all information for all other table regions) and another for the hbase:namespace table (which contains the details of the available namespaces). Those two tables are HBase system tables and therefore belong to the hbase namespace (for more information regarding namespaces, refer to “HBase Filesystem Layout”).
The HBase standalone server is now available for the next set of tests. tests. If anything is not as expected, refer to “Troubleshooting”.
Now that the environment is running, it can be accessed by its web interface at http://localhost:16010 or you can replace localhost by the local machine hostname or IP.
The HBase cluster can be stopped by calling the stop-hbase.sh script as follows:
#:~$ stop-hbase.sh
stopping hbase..........
Depending on server performance and the state of the environment, it might take some time for HBase to properly shut down.
HBase in a VM
To install and run a virtual machine, you first need to have a virtualization environment (e.g, VirtualBox, KVM, or VMWare) installed and running locally. Because the computer we used to build the examples runs on Debian, and because it is available as a Debian distribution package, we used VirtualBox for our tests. The next step is to download the QuickStart VM file and extract it where you have enough space available. Then import it into your virtualization environment. For VirtualBox users, this can be done by navigating to the File menu and selecting “Import virtual application” (it can take some time to complete the import). The last step is to configure your newly imported virtual environment to have enough memory.
When all of those steps are completed, you can start your environment. The first time you run it, it will take some time to perform initialization steps that are not required for subsequent restarts. When the VM is started and ready to be used, a browser should automatically open and be visible in the VM with some useful links and information on the home page.
To validate that HBase is already correctly installed, configured, and running, simply open a terminal and proceed with the same steps as the standalone installation.
Open the HBase shell:
#:~$ hbase shell
And use the status command to make sure it is running:
hbase(main):001:0> status
1 servers, 0 dead, 2.0000 average load
Then you can close the terminal you just opened. Congratulations! You have a pseudodistributed (cluster features but with a single node) HBase, HDFS, YARN, etc. installation running.
If HBase is not running but was running correctly before, it might have been killed because you paused your VM. You can use the sudo jps command to list all of the running Java processes:
[cloudera@quickstart ~]$ sudo jps
3097 HMaster
2820 ResourceManager
1915 DataNode
2270 SecondaryNameNode
5199
4914 Bootstrap
5225
1844 QuorumPeerMain
2137 NameNode
4380 Worker
2050 JournalNode
3629 RunJar
4054 HistoryServer
6242 Jps
4151 Master
3445 RunJar
3346 ThriftServer
5171 Bootstrap
2397 Bootstrap
3213 RESTServer
4278 HRegionServer
4026 Bootstrap
2452 JobHistoryServer
2547 NodeManager
This lists all of the Java processes currently running on your environment.
What we are looking for here is 3097 HMaster and 4278 HRegionServer.
The former is the HBase master server process, while the latter is the RegionServer process.
The number before the process name is the process ID, which might change after each restart.
If you don’t see either of those processes running, restart your HBase server using the hbase-start.sh command or your manager web interface.
Local Versus VM
If you are still are still deciding which mode to run (e.g., local mode, a virtual Linux environment, or a QuickStart VM), consider the pros and cons for each. Keep in mind that whichever mode you decide to run HBase in, you can always move to another one by exporting the examples again.
Local Mode
This mode is the fastest to run, and requires the least amount of memory. However, if you are not running a Linux environment or if you are not savvy at the Linux shell, you might prefer to run another mode.
Pros
-
Requires less than 1 GB of disk space and only a few gigabytes of memory
-
Very fast to stop and start
Cons
-
Does not allow running of complex use cases where other tools are required
-
Needs to run on a Linux-like environment
Virtual Linux Environment
This mode is a good compromise between the local mode and the QuickStart VM mode. Choose this mode if you are not running a local Linux environment but are comfortable with the command line and don’t need the other applications (Solr, etc.) to be running.
Pros
-
Allows you to easily run HBase on non-Linux systems
-
Avoid conflicts with already-installed applications
Cons
-
Requires at least 3 GB of memory (2 GB for the operating system and 1 GB for HBase)
-
Slower to start compared to the local mode
QuickStart VM (or Equivalent)
This is the most resource-demanding mode. It will start slowly and will use more disk space and memory. However, it comes preconfigured with all of the applications you will need to fully run the examples in this book. If you want to skip all of the installation steps but still have a powerful enough environment, choose this option—it’s the one we used to develop this book’s examples.
Pros
-
Allows you to easily run HBase and other related applications (Solr, HDFS, YARN, etc.)
-
Avoid conflicts with already installed applications
Cons
-
Requires more memory than the two other modes (4 GB minimum, with 8+ GB recommended)
-
Slowest mode to start/restart
Troubleshooting
When HBase is not starting correctly or is showing some issues, the first place to look is the logs directory. Three types of files can be found in this directory:
-
The HBase scripts log files ending with the .out extension containing the start process output
-
The security logs in the SecurityAuth.audit file, which should be empty
-
And finally, the most important one for us, the HBase application log files ending with .log
In standalone mode, the one you will look at is hbase-$USERNAME-master-$HOSTNAME.log. In pseudodistributed mode, you will look at hbase-$USERNAME-regionserver-$HOSTNAME.log in addition to hbase-$USERNAME-master-$HOSTNAME.log
Next, we discuss some options that may cause failures if not configured correctly.
IP/Name Configuration
The /etc/hosts file allows you to define an IP address for the localhost. The localhost entry is usually assigned to 127.0.0.1 and the local IP to the hostname. Verify that the /etc/hosts file looks something like the following:
127.0.0.1       localhost
192.168.1.3     myhostname
In standalone mode, because HBase will start multiple processes by doing remote connections, it is required to have passwordless SSH authentication to the localhost.
Access to the /tmp Folder
In standalone mode and pseudodistributed mode, when HBase HDFS root.dir is not configured, HBase will store all of its data into the /tmp/hbase-USERNAME folder. If write access to this folder is not available or if this device is full, HBase will fail to start. Using the following commands, verify that files can be created in this directory:
mkdir /tmp/hbase-$USERNAME
touch /tmp/hbase-$USERNAME/test.txt
rm -rf /tmp/hbase-$USERNAME
If any of those three commands fail, verify the rights in the /tmp folder.
Environment Variables
Different Hadoop or HBase-related tools might have already been tested, and might have required some environment variable to be defined.
They most probably will cause issues for HBase to start.
Make sure that neither HADOOP_HOME nor HBASE_HOME are defined in your environment.
To list all Hadoop and HBase-related variables, use the following commands:
export -p | egrep -i "(hadoop|hbase)"
The unset command can be used to remove those variables, but this might have an impact on the other running applications.
Available Memory
By default, HBase will let the JVM assign a maximum heap size to all HBase processes. On a 16 GB machine, the 1.7 JDK will allow a Java process to use up to 4 GB of memory. The following command will print how much memory is allocated for a Java process when no memory parameters are specified:
java -XX:+PrintFlagsFinal -version | grep MaxHeapSize
This applies to the standalone HBase process, but also to RegionServer and Master services when running in pseudo or fully distributed mode. It is not recommended to run HBase with less than 1 GB; it is important to make sure you have enough memory available for it. It is possible to modify this limit in the hbase-env.sh file by modifying the HBASE_HEAPSIZE variable, but this variable impacts all HBase roles.
If you want to modify the Java heap size for a specific role only, add the Java -Xmx parameter to the HBASE_service_OPTS option where service represents the service you want to configure (e.g., MASTER, REGIONSERVER, THRIFT, ZOOKEEPER, or REST).
Don’t use these options at the same time, as they might conflict.
If you decide to modify each process configuration using the HBASE_service_OPTS approach, then keep the HBASE_HEAPSIZE commented and specify the required amount of memory you want to use for each of the processes.
If you decide to use the HBASE_HEAPSIZE property to allocate the same amount of memory for all the services, don’t use the HBASE_service_OPTS approach.
In the following example, we allocate 2 GB of memory for the Master role and 8 GB for the RegionServer role:
# export HBASE_HEAPSIZE=1000
export HBASE_MASTER_OPTS="$HBASE_MASTER_OPTS $HBASE_JMX_BASE -Xmx2g
       -Dcom.sun.management.jmxremote.port=10101"
export HBASE_REGIONSERVER_OPTS="$HBASE_REGIONSERVER_OPTS $HBASE_JMX_BASE -Xmx8g
       -Dcom.sun.management.jmxremote.port=10102"
Make sure you have at least 1 GB heap size allocated to HBase (however, note that we recommend 4 GB for the examples in this book).
First Steps
Now that HBase is running, let’s perform a few additional steps to get comfortable working with it. We will run some very basic HBase commands, download and install the book examples, and then run some of those examples. All of the examples described in the following sections are available via the book’s GitHub page. Once you get the hang of things, feel free to make modifications to see the result and impacts of the different available options.
Basic Operations
Because the HBase shell will be used throughout all the development chapters, let’s go back and run some basic operations to get familiar with it. If you find yourself lost at any time, you can always type exit or press Ctrl-C to come back to the Unix command line and restart the shell by running hbase shell or bin/hbase shell. When running in a standalone environment, if your HBase instance enters a bad state, you can stop it, remove the contents of the /tmp/hbase-$USERNAME folder, and restart. For the VM environment, you will need to stop HBase, remove /hbase content from HDFS, remove /hbase content from ZooKeeper, and restart.
The following commands might help you to achieve this:
hadoop fs -rm -r /hbase
echo "rmr /hbase" | grep hbase zkcli
The last command involves the ZooKeeper client. Depending on how your environment has been installed, the client might have to be called in a different way.
We conclude this section by demonstrating a few basic commands to display HBase help, create a table, and then list all of the current nonsystem tables.
list
The list command shows the newly created table:
hbase(main):003:0> list
TABLE
t1
1 row(s) in 0.0100 seconds

=> ["t1"]
hbase(main):004:0>
list only reports user tables. User tables are nonsystem tables (i.e., they are tables that are explicitly created by the user).
If everything has been installed and is running correctly, you should have been able to run those three commands with outputs very similar to what has been reported.
Import Code Examples
The examples presented in this book are available in full via the book’s GitHub repository. For the sake of brevity and to focus on the most important parts of the code, the examples presented here have been condensed.
The names of the examples used in the book match the names of the files in the GitHub repository.
Package names correspond to this book’s chapter numbering.
This naming convention will allow you to easily and quickly find the code you are looking for in the example repository.
For example, the TestInstallation sample code that we will use in Example 5-1 is available in package com.architecting.ch05 under the name TestInstallation.java.
Note
Also, because many examples depend on others (e.g., scan depends on table creation and data generation), some examples will reuse other examples, and some helper classes are used to prepare the environment and make results predictable. You are invited to modify those helpers and those examples to create different environments and test different scenarios, such as generating more data, bigger values, or even corrupted information to test failure handling.
To download, build, and modify the examples, you will need the following tools to be installed and configured (if you are running the examples in the QuickStart VM, all those tools are already installed for you; if you are running the examples in a Linux VM, you will need to use package management tools such as APT or yum to install them):
- Text editor
-
To look at the examples and modify them, you will need a text editor. It can be
viin a terminal,xemacs, or any other kind of editor you want as long as you are comfortable with it. For simplicity, we built all the examples and code using Eclipse. - Git
-
As stated on its website, “Git is a free and open source distributed version control system designed to handle everything from small to very large projects with speed and efficiency.” You will need Git to retrieve the source code for the examples. It is available on all major Linux distributions.
This book’s examples are hosted on GitHub, which provides an online public Git service. You can also access and download the examples using a web browser.
- Maven
-
The Apache website defines Maven as “a software project management and comprehension tool. Based on the concept of a project object model (POM), Maven can manage a project’s build, reporting and documentation from a central piece of information.” The Architecting HBase Applications source code is configured to build using Maven. The instructions for building and packaging the examples are provided in the following subsections.
Warning
If you choose to use the Cloudera QuickStart VM 5.4.0 or older to develop, you will need to use the command line to retrieve the Git repository. Indeed, the Eclipse version provided with the VM is not compatible with the Eclipse m2e-egit plugin. If you prefer to use Eclipse in the VM and use the import wizard, you will need to upgrade it to a more recent version.
Download from command line
The first thing we need to do is download the source repository. As we explained in the previous section, examples are hosted on a Git repository. If you prefer to use Eclipse for all those operations, refer to “Download and build using Eclipse”.
The following Git command will download a copy of the examples into a local folder:
git clone https://github.com/ArchitectingHBase/examples.git ~/ahae
This will create a directory called architecting-hbase-applications-examples, which looks like this:
#:~/ahae$ ll
total 32K
drwxr-xr-x 2 jmspaggiari jmspaggiari  4096 Sep 11 21:09 conf
-rw-r--r-- 1 jmspaggiari jmspaggiari 11324 Sep 11 21:09 LICENSE
-rwxr-xr-x 1 jmspaggiari jmspaggiari  5938 Sep 11 21:09 pom.xml
-rw-r--r-- 1 jmspaggiari jmspaggiari    38 Sep 11 21:09 README.md
drwxr-xr-x 3 jmspaggiari jmspaggiari  4096 Sep 11 21:09 src
If you are using Eclipse from the VM, you can now import the project into Eclipse using the Import command and the “Maven/Existing maven projects” entry.
Build from command line
Now that you have the sources available, you can build them using Maven with the following command:
#:~/ahae$ mvn package
This will download all of the required dependencies, compile the sources into binaries, and package them. You should see something like this in your console:
#:~/ahae$ mvn package
[INFO] Scanning for projects...
[INFO]
[INFO] ------------------------------------------------------------------------
[INFO] Building architecting-hbase-applications-examples 1
[INFO] ------------------------------------------------------------------------
Downloading: http://onejar-maven-plugin.googlecode.com/svn/mavenrepo/org/apache/
maven/plugins/maven-resources-plugin/2.3/maven-resources-plugin-2.3.pom
Downloading: http://repo.maven.apache.org/maven2/org/apache/maven/plugins/
maven-resources-plugin/2.3/maven-resources-plugin-2.3.pom
Downloaded: http://repo.maven.apache.org/maven2/org/apache/maven/plugins/
maven-resources-plugin/2.3/maven-resources-plugin-2.3.pom (5 KB at 18.1 KB/sec)
Downloading: http://onejar-maven-plugin.googlecode.com/svn/mavenrepo/org/apache/
maven/plugins/maven-resources-plugin/2.3/maven-resources-plugin-2.3.jar
Downloading: http://repo.maven.apache.org/maven2/org/apache/maven/plugins/
maven-resources-plugin/2.3/maven-resources-plugin-2.3.jar
.
.
.
[INFO] Building jar: /home/cloudera/ahae/target/ahae.jar
[INFO] ------------------------------------------------------------------------
[INFO] BUILD SUCCESS
[INFO] ------------------------------------------------------------------------
[INFO] Total time: 51.574s
[INFO] Finished at: Thu Sep 11 21:16:10 EDT 2014
[INFO] Final Memory: 40M/916M
[INFO] ------------------------------------------------------------------------
The first time you run the build command, depending on the speed of your Internet connection and the dependencies to be downloaded, this operation can take a few minutes. Dependencies will be stored in a local Maven cache folder and will not have to be downloaded again unless they change. When completed, you should find the examples packaged under the target directory with the name ahae-1.jar. This is the file we will use to run all of our examples.
Download and build using Eclipse
If you want to use Eclipse to look at the examples, you will need to make sure that you have the m2e Eclipse Maven plugin and the required EGit connectors installed. Using Eclipse will allow you to run the examples in the step-by-step mode to inspect the different variables and results. This is the way we recommend to run the examples.
Import the examples into the Eclipse Java Browsing perspective by selecting the Import option from the File menu. Eclipse will prompt you with a list of all the different kinds of projects it can import. Under the Maven section, select “Check out Maven Projects from SCM” and press Next. This option will be available only if you have correctly installed the m2e plugin or if your Eclipse version comes with the plugin already installed.
As illustrated in Figure 5-1, select “git” in the SCM URL drop-down menu, and enter the Git repository URL in the text area: https://github.com/ArchitectingHBase/examples. If the “git” option is not available, make sure you have the correct connector installed. You can use the “m2e Marketplace” link in the same window to install the connector. When all of this is completed, simply press Finish to get the project imported. This will close the window, download all the dependencies defined into the project, and import the source code into your Eclipse workshop into a project called architecting-hbase-applications-examples. This operation can take a few minutes, so now is a good time to grab a coffee or go for a walk—by the time you get back, the project should be available in your workspace.
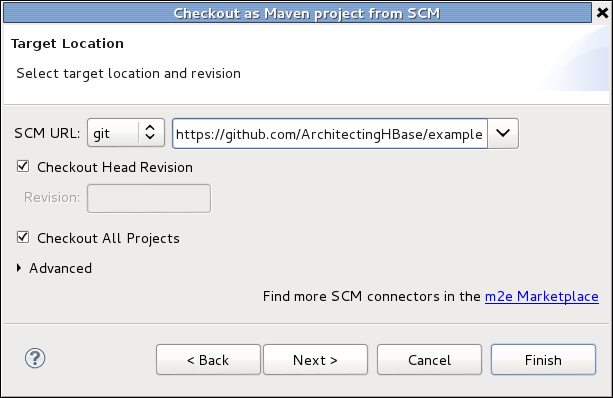
Figure 5-1. Eclipse MVN import window
We are also going to use Maven to build the application using Eclipse. To do so, right-click on the newly imported project, select the “Run As” option, and then “Maven Build…”. This will open a window to configure the way you want to build this project. The only part you need to modify is the “Goals” text field where you need to enter “package”. Once you’ve completed these steps, simply click on the “Apply” button, and then the “Run” button. In the “Console” view, you will see Maven building and packaging the examples for you. The output should be the same as in “Build from command line”.
To simplify all of the command lines, create a symbolic link to the project folder in your home directory:
ln -s ~/workspace/architecting-hbase-applications-examples ~/ahae
Testing the Examples
Now that you have both a running HBase standalone server instance and all the examples downloaded and built locally in your system, we will try to run a simple test to make sure everything is configured correctly.
HBase configuration information is stored in the hbase-site.xml file under the conf folder. When running in standalone mode, you can keep this file empty, so you can run with or without this file in the classpath. However, if you make changes to this file, you need to make sure it is accessible in the classpath in order for the modifications to be used. The steps for adding the configuration files into the classpath depend on whether you are using the command line or Eclipse to run the examples.
From command line
When running the examples from the command line, you need to make sure that all HBase binaries and configuration files are in the classpath.
HBase provides you its classpath when you issue the HBase classpath command.
In addition to the example packaged binaries, those are the paths you will need to give to Java to correctly run the examples.
The following command will run the TestInstallation example from the com.architecting.ch05 package:
#:~/ahae$ java -classpath ~/ahae/target/ahae.jar:`hbase classpath`
                                         com.architecting.ch05.TestInstallation
TestInstallation is a simple piece of Java code that will try to call HBase to determine whether it is running (see Example 5-1).
Example 5-1. Using TestInstallation to check if HBase is running (Java)
publicclassTestInstallation{privatestaticfinalLogLOG=LogFactory.getLog(TestInstallation.class);publicstaticvoidmain(String[]args){Configurationconf=HBaseConfiguration.create();try{LOG.info("Testing HBase connection...");HBaseAdmin.checkHBaseAvailable(conf);LOG.info("HBase is running correctly...");}catch(MasterNotRunningExceptione){LOG.error("Unable to find a running HBase instance",e);}catch(ZooKeeperConnectionExceptione){LOG.error("Unable to connect to ZooKeeper",e);}catch(ServiceExceptione){LOG.error("HBase service unavailable",e);}catch(IOExceptione){LOG.error("Error when trying to get HBase status",e);}}}
This command calls the hbase classpath command to get the current HBase classpath, then it appends the example’s JAR and runs one of the programs in the JAR.
This command will produce a lot of output from the different HBase classes.
What you need to look at is the output from the example itself, which should look like the following snippet (note that some lines have been removed or shortened for the sake of brevity; also, you can export the classpath variable into your running environment to avoid having to specify it for each of the Java commands you will run):
export CLASSPATH= ~/ahae/target/ahae.jar:`hbase classpath`
2014-09-14 INFO [main] ch05.TestInstallation: Testing HBase connection...2014-09-14 WARN [main] util.NativeCodeLoader: Unable to load native-hadoop library for your platform... using builtin-java classes where applicable 2014-09-14 INFO [main] zk.RecoverableZooKeeper: Process identifier=hconnection- 0x783c342b connecting to ZooKeeper ensemble=localhost:2181 2014-09-14 INFO [main] zk.ZooKeeper: Client environment:zookeeper. version=3.4.6-1565, built on 02/20/2014 09:09 GMT 2014-09-14 INFO [main] zk.ZooKeeper: Client environment:host.name=t430s 2014-09-14 INFO [main] zk.ZooKeeper: Client environment:java.version=1.7.0_60 2014-09-14 INFO [main] zk.ZooKeeper: Client environment:java.io.tmpdir=/tmp 2014-09-14 INFO [main] zk.ZooKeeper: Client environment:java.compiler=<NA> 2014-09-14 INFO [main] zk.ZooKeeper: Client environment:os.name=Linux 2014-09-14 INFO [main] zk.ZooKeeper: Initiating client connection, connectString=localhost:2181 sessionTimeout=90000 watcher=hconnection- 0x783c342b, quorum=localhost:2181, baseZNode=/hbase 2014-09-14 INFO [main-SendThread(localhost:2181)] zookeeper.ClientCnxn: Socket connection established to localhost/0:0:0:0:0:0:0:1:2181, initiating session 2014-09-14 INFO [main] client.HConnectionManager$HConnectionImplementation: Closing master protocol: MasterService 2014-09-14 INFO [main] client.HConnectionManager$HConnectionImplementation: Closing zookeeper sessionid=0x1487467e621000a 2014-09-14 INFO [main] zk.ZooKeeper: Session: 0x1487467e621000a closed 2014-09-14 INFO [main-EventThread] zookeeper.ClientCnxn: EventThread shut down 2014-09-14 INFO [main] ch05.TestInstallation: HBase is running correctly...

![]() and
and ![]() are two lines printed by the example.
are two lines printed by the example.
If you don’t see the “HBase is running correctly…” line, you’ll need to make sure your HBase server is running correctly and examples have been built as expected.
From Eclipse
To run an example from Eclipse, you simply need to right-click on it, select “Run As” and then “Java Application”.
Output of the same TestInstallation example run from Eclipse should be shorter and should include the HBase outputted logs.
You should see the following lines printed in the console:
2014-09-14 18:45:34 INFO ch05.TestInstallation: Testing HBase connection...
...
2014-09-14 18:45:35 INFO ch05.TestInstallation: HBase is running correctly...
Caution
When running examples from Eclipse, the hbase-site.xml file that was used for the configuration is the default one embedded in the dependencies. Modifications of your local configuration file will not be used by your examples running in Eclipse unless you specifically add your HBase configuration directory into your project classpath. You can do this in your project properties. In the Java Build Path section, go to the Libraries tab, click on “Add External Class Folder…” and add the directory where your hbase-site.xml file is. If you installed HBase in standalone mode, the file should be under ~/hbase/conf; otherwise, the file should be under /etc/hbase/conf/. We also recommend doing the same thing for the Hadoop configuration files.
Pseudodistributed and Fully Distributed
Running and managing an HBase cluster in distributed mode is beyond the scope of this book and will not be discussed here. To better understand how to configure and run HBase in this mode, we recommend referring to the Apache HBase Reference Guide. We will, however, provide a few configuration hints for running in pseudo- distributed mode.
To configure your HBase instance to run in pseudodistributed or distributed mode, add the following required configuration parameters into the conf/hbase-site.xml:
  <property>
    <name>hbase.cluster.distributed</name>
    <value>true</value>
    <description>The mode the cluster will be in. Possible values are
      false: standalone and pseudodistributed setups with managed ZooKeeper
      true: fully distributed with unmanaged ZooKeeper Quorum (see hbase-env.sh)
    </description>
  </property>
Unless you are running ZooKeeper separately, you will also need to tell HBase to manage it for you.
To do that, open the hbase/hbase-env.sh file and update the following entry to set it to true:
# Tell HBase whether it should manage its own instance of ZooKeeper or not.
export HBASE_MANAGES_ZK=true
Finally, also in the hbase/hbase-env.sh file, configure JAVA_HOME to point to your local Java installation.
If you encounter any issues with these steps, refer to “Troubleshooting” above or to the Apache HBase Reference Guide.