
Chapter 2. Building Interactive Apps: Apps That Do Something

Most apps need to respond to the user in some way.
In this chapter, you’ll see how you can make your apps a bit more interactive. You’ll learn how to get your app to do something in response to the user, and how to get your activity and layout talking to each other like best buddies. Along the way, we’ll take you a bit deeper into how Android actually works by introducing you to R, the hidden gem that glues everything together.
Let’s build a Beer Adviser app
In Chapter 1, you saw how to create an app using the Android Studio New Project wizard, and how to change the text displayed in the layout. But when you create an Android app, you’re usually going to want the app to do something.
In this chapter, we’re going to show you how to create an app that the user can interact with: a Beer Adviser app. In the app, users can select the types of beer they enjoy, click a button, and get back a list of tasty beers to try out.
Here’s how the app will be structured:
The layout specifies what the app will look like.
It includes three GUI components:
A drop-down list of values called a spinner, which allows the user to choose which type of beer they want.
A button that when pressed will return a selection of beer types.
A text field that displays the types of beer.
The file strings.xml includes any String resources needed by the layout—for example, the label of the button specified in the layout and the types of beer.
The activity specifies how the app should interact with the user.
It takes the type of beer the user chooses, and uses this to display a list of beers the user might be interested in. It achieves this with the help of a custom Java class.
The custom Java class contains the application logic for the app.
It includes a method that takes a type of beer as a parameter, and returns a list of beers of this type. The activity calls the method, passes it the type of beer, and uses the response.

Here’s what we’re going to do
So let’s get to work. There are a few steps you need to go through to build the Beer Adviser app (we’ll tackle these throughout the rest of the chapter):
Create a project.
You’re creating a brand-new app, so you’ll need to create a new project. Just like before, you’ll need to create an empty activity with a layout.
Note
We’ll show you the details of how to do this on the next page.
Update the layout.
Once you have the app set up, you need to amend the layout so that it includes all the GUI components your app needs.

Connect the layout to the activity.
The layout only creates the visuals. To add smarts to your app, you need to connect the layout to the Java code in your activity.
Write the application logic.
You’ll add a Java custom class to the app, and use it to make sure users get the right beer based on their selection.

Create the project

Let’s begin by creating the new app (the steps are similar to those we used in the previous chapter):
Open Android Studio and choose “Start a new Android Studio project” from the welcome screen. This starts the wizard you saw in Chapter 1.
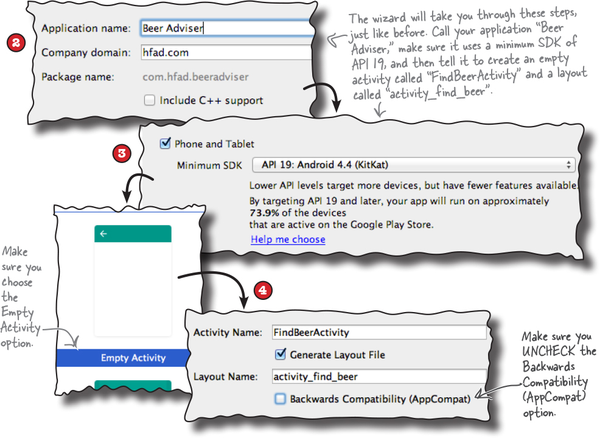
When prompted, enter an application name of “Beer Adviser” and a company domain of “hfad.com”, making your package name
com.hfad.beeradviser. Make sure you uncheck the option to include C++ support.Note
If your version of Android Studio has an option to include Kotlin support, uncheck this option too.
We want the app to work on most phones and tablets, so choose a minimum SDK of API 19, and make sure the option for “Phone and Tablet” is selected. This means that any phone or tablet that runs the app must have API 19 installed on it as a minimum. Most Android devices meet this criterion.
Choose an empty activity for your default activity. Call the activity “FindBeerActivity” and the accompanying layout “activity_find_beer”. Make sure the option to generate the layout is selected and you uncheck the Backwards Compatibility (AppCompat) option.
We’ve created a default activity and layout
When you click on the Finish button, Android Studio creates a new project containing an activity called FindBeerActivity.java and a layout called activity_find_beer.xml.

Let’s start by changing the layout file. To do this, switch to the Project view of Android Studio’s explorer, go to the app/src/main/res/layout folder, and open the file activity_find_beer.xml. Then switch to the text version of the code to open the code editor, and replace the code in activity_find_beer.xml with the following (we’ve bolded all the new code):

We’ve just changed the code Android Studio gave us so that it uses a <LinearLayout>. This is used to display GUI components next to each other, either vertically or horizontally. If it’s vertically, they’re displayed in a single column, and if it’s horizontally, they’re displayed in a single row. You’ll find out more about how this works as we go through the chapter.
Any changes you make to a layout’s XML are reflected in Android Studio’s design editor, which you can see by clicking on the Design tab. We’ll look at this in more detail on the next page.

A closer look at the design editor

The design editor presents you with a more visual way of editing your layout code than editing XML. It features two different views of the layouts design. One shows you how the layout will look on an actual device, and the other shows you a blueprint of its structure:


To the left of the design editor, there’s a palette that contains components you can drag to your layout. We’ll use this next.

Add a button using the design editor

We’re going to add a button to our layout using the design editor. Find the Button component in the palette, click on it, and then drag it into the design editor so that it’s positioned above the text view. The button appears in the layout’s design:

Changes in the design editor are reflected in the XML
Dragging GUI components to the layout like this is a convenient way of updating the layout. If you switch to the code editor, you’ll see that adding the button via the design editor has added some lines of code to the file:

activity_find_beer.xml has a new button
The editor added a new <Button> element to activity_find_beer.xml:
<Button
    android:id="@+id/button"
    android:layout_width="match_parent"
    android:layout_height="wrap_content"
    android:text="Button" />
A button in Androidville is a pushbutton that the user can press to trigger an action. The <Button> element includes properties controlling its size and appearance. These properties aren’t unique to buttons—other GUI components including text views have them too.
Buttons and text views are subclasses of the same Android View class
There’s a very good reason why buttons and text views have properties in common—they both inherit from the same Android View class. You’ll find out more about this later in the book, but for now, here are some of the more common properties.
android:id
This gives the component an identifying name. The id property enables you to control what components do via activity code:
android:id="@+id/button"
android:layout_width, android:layout_height
These properties specify the width and height of the component. "wrap_content" means it should be just big enough for the content, and "match_parent" means it should be as wide as the layout containing it:
android:layout_width="match_parent"
android:layout_height="wrap_content"

android:text
This tells Android what text the component should display. In the case of <Button>, it’s the text that appears on the button:
android:text="Button"
A closer look at the layout code

Let’s take a closer look at the layout code, and break it down so that you can see what it’s actually doing (don’t worry if your code looks a little different, just follow along with us):

The LinearLayout element
The first element in the layout code is <LinearLayout>. The <LinearLayout> element tells Android that the different GUI components in the layout should be displayed next to each other in a single row or column.
Note
There are other ways of laying out your GUI components too. You’ll find out more about these later in the book.
You specify the orientation using the android:orientation attribute. In this example we’re using:
android:orientation="vertical"
so the GUI components are displayed in a single vertical column.
A closer look at the layout code (continued)

The <LinearLayout> contains two elements: a <Button> and a <TextView>.
Using a linear layout means that GUI components are displayed in a single row or column.
The Button element
The first element is the <Button>:
...
    <Button
        android:id="@+id/button"
        android:layout_width="match_parent"
        android:layout_height="wrap_content"
        android:text="Button" />
...
As this is the first element inside the <LinearLayout>, it appears first in the layout at the top of the screen. It has a layout_width of "match_parent", which means that it should be as wide as its parent element, the <LinearLayout>. Its layout_height has been set to "wrap_content", which means it should be tall enough to display its text.
The TextView element
The final element inside the <LinearLayout> is the <TextView>:
...
    <TextView
        android:id="@+id/textView"
        android:layout_width="wrap_content"
        android:layout_height="wrap_content"
        android:text="This is a text view" />
...
As this is the second element and we’ve set the linear layout’s orientation to "vertical", it’s displayed underneath the button (the first element). Its layout_width and layout_height are set to "wrap_content" so that it takes up just enough space to contain its text.

Changes to the XML...
You’ve seen how adding components to the design editor adds them to the layout XML. The opposite applies too—any changes you make to the layout XML are applied to the design.
Try this now. Update your activity_find_beer.xml code with the following changes (highlighted in bold):

Do this!
Update the contents of activity_find_beer.xml with the changes shown here.
... are reflected in the design editor

Once you’ve changed the layout XML, switch to the design editor. Instead of a layout containing a button with a text view underneath it, you should now see a spinner, button, and text view centered in a single column.
A spinner provides a drop-down list of values. It allows you to choose a single value from a set of values.
A spinner is the Android term for a drop-down list of values. When you press it, it expands to show you the list so that you can pick a single value.
GUI components such as buttons, spinners, and text views have very similar attributes, as they are all types of View. Behind the scenes, they all inherit from the same Android View class.

We’ve shown you how to add GUI components to the layout with the aid of the design editor, and also by adding them through XML. In general, you’re more likely to hack the XML for simple layouts to get the results you want without using the design editor. This is because editing the XML directly gives you more direct control over the layout.
Let’s take the app for a test drive


We still have more work to do on the app, but let’s see how it’s looking so far. Save the changes you’ve made by choosing File→Save All, then choose the “Run ‘app’” command from the Run menu. When prompted, select the option to launch the emulator.
Wait patiently for the app to load, and eventually it should appear.

Try pressing the spinner. It’s not immediately obvious, but when you press it, the spinner presents you with a drop-down list of values—it’s just at this point we haven’t added any values to it.
Here’s what we’ve done so far
Here’s a quick recap of what we’ve done so far:
We’ve created a layout that specifies what the app looks like.
It includes a spinner, a button, and a text view.
The activity specifies how the app should interact with the user.
Android Studio has created an activity for us, but we haven’t done anything with it yet.

The next thing we’ll do is look at replacing the hardcoded String values for the text view and button text.
Hardcoding text makes localization hard

So far, we’ve hardcoded the text we want to appear in our text views and buttons using the android:text property:

While this is fine when you’re just learning, hardcoding text isn’t the best approach.
Suppose you’ve created an app that’s a big hit on your local Google Play Store. You don’t want to limit yourself to just one country or language—you want to make it available internationally and for different languages. But if you’ve hardcoded all of the text in your layout files, sending your app international will be difficult.
It also makes it much harder to make global changes to the text. Imagine your boss asks you to change the wording in the app because the company’s changed its name. If you’ve hardcoded all of the text, this means that you need to edit a whole host of files in order to change the text.
Put String values in strings.xml rather than hardcoding them. strings.xml is a resource file used to hold name/value pairs of Strings. Layouts and activities can look up String values using their names.
Put the text in a String resource file
A better approach is to put your text values into a String resource file called strings.xml.
Having a String resource file makes it much easier to internationalize your app. Rather than having to change hardcoded text values in a whole host of different activity and layout files, you can simply replace the strings.xml file with an internationalized version.
This approach also makes it much easier to make global changes to text across your whole application as you only need to edit one file. If you need to make changes to the text in your app, you only need to edit strings.xml.
How do you use String resources?
In order to use a String resource in your layout, there are two things you need to do:
Create the String resource by adding it to strings.xml.
Use the String resource in your layout.
Let’s see how this is done.
Create the String resource

We’re going to create two String resources, one for the text that appears on the button, and another for the default text that appears in the text view.
To do this, use Android Studio’s explorer to find the file strings.xml in the app/src/main/res/values folder. Then open it by double-clicking on it.

The file should look something like this:
<resources>
    <string name="app_name">Beer Adviser</string>
</resources>
strings.xml contains one string resource named "app_name", which has a value of Beer Adviser. Android Studio created this String resource for us automatically when we created the project.

We’re first going to add a new resource called "find_beer" that has a value of Find Beer! To do this, edit strings.xml so that you add it as a new line like this:

Then add a new resource named "brands" with a value of No beers selected:

Once you’ve updated the file, go to the File menu and choose the Save All option to save your changes. Next, we’ll use the String resources in our layout.
Use the String resource in your layout

You use String resources in your layout using code like this:
android:text="@string/find_beer" />
You’ve seen the android:text part of the code before; it specifies what text should be displayed. But what does "@string/find_beer" mean?
Let’s start with the first part, @string. This is just a way of telling Android to look up a text value from a String resource file. In our case, this is the file strings.xml that you just edited.
The second part, find_beer, tells Android to look up the value of a resource with the name find_beer. So "@string/find_beer" means “look up the String resource with the name find_beer, and use the associated text value.”

We want to change the button and text view elements in our layout XML so that they use the two String resources we’ve just added.
Go back to the layout file activity_find_beer.xml file, and make the following code changes: You can see the code on the next page.
Change the line:
android:text="Button"
to:
android:text="@string/find_beer"
Change the line:
android:text="TextView"
to:
android:text="@string/brands"
Watch it!

Android Studio sometimes displays the values of references in the code editor in place of actual code.
As an example, it may display the text "Find Beer!" instead of the real code "@string/find_beer". Any such substitutions should be highlighted in the code editor. If you click on them, or hover over them with your mouse, the true code will be revealed.

You can see the code on the next page.
The code for activity_find_beer.xml
Here’s the updated code for activity_find_beer.xml (changes are in bold); update your version of the file to match ours.

When you’re done, save your changes.
We’ve put a summary of adding and using String resources on the next page.
Time for a test drive
Let’s see how the app’s looking now. Save the changes you’ve made, then choose the “Run ‘app’” command from the Run menu. When prompted, select the option to launch the emulator.
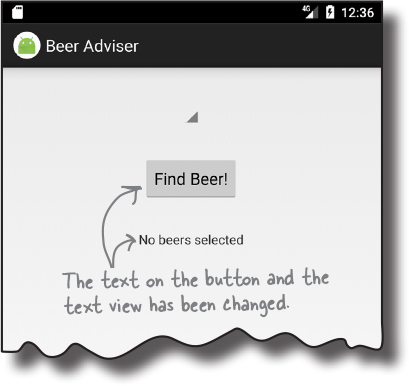
This time when we run the app, the text for the button and the text view has changed to the String values we added to strings.xml. The button says “Find Beer!” and the text view says “No beers selected.”
Here’s what we’ve done so far
Here’s a quick recap of where we’ve got to:
We’ve created a layout that specifies what the app looks like.
It includes a spinner, a button, and a text view.
The file strings.xml includes the String resources we need.
We’ve added a label for the button, and default text for the list of suggested beer brands to try.
The activity specifies how the app should interact with the user.
Android Studio has created an activity for us, but we haven’t done anything with it yet.

Next we’ll look at how you add a list of beers to the spinner.
Add values to the spinner

At the moment, the layout includes a spinner, but it doesn’t have anything in it. Whenever you use a spinner, you need to get it to display a list of values so that the user can choose the value they want.
We can give the spinner a list of values in pretty much the same way that we set the text on the button and the text view: by using a resource. So far, we’ve used strings.xml to specify individual String values. For the spinner, all we need to do is specify an array of String values, and get the spinner to reference it.
Resources are noncode assets, such as images or Strings, used by your app.
Adding an array resource is similar to adding a String
As you already know, you can add a String resource to strings.xml using:
<string name="string_name">string_value</string>
where string_name is the identifier of the String, and string_value is the String value itself.
To add an array of Strings, you use the following syntax:

where string_array_name is the name of the array, and string_value1, string_value2, string_value3 are the individual String values that make up the array.
Let’s add a string-array resource to our app that can be used by the spinner.
Add the string-array to strings.xml

To add the string-array, open up strings.xml, and add the array like this:

Get the spinner to reference a string-array
A layout can reference a string-array using similar syntax to how it would retrieve the value of a String. Rather than use:

you use the syntax:
where array_name is the name of the array.
Let’s use this in the layout. Go to the layout file activity_find_beer.xml and add an entries attribute to the spinner like this:

Those are all the changes you need in order to get the spinner to display a list of values. Let’s see what it looks like.
Test drive the spinner

So let’s see what impact these changes have had on our app. Save your changes, then run the app. You should get something like this:

Where we’ve got to
Here’s a reminder of what we’ve done so far:
We’ve created a layout that specifies what the app looks like.
It includes a spinner, a button, and a text view.
The file strings.xml includes the String resources we need.
We’ve added a label for the button, default text for the suggested beer brands, and an array of values for the spinner.
The activity specifies how the app should interact with the user.
Android Studio has created an activity for us, but we haven’t done anything with it yet.

So what’s next?
We need to make the button do something

What we need to do next is make the app react to the value we select in the spinner when the Find Beer button is clicked. We want our app to behave something like this:
The user chooses a type of beer from the spinner.
The user clicks the Find Beer button, and the layout specifies which method to call in the activity.
The method in the activity retrieves the value of the selected beer in the spinner and passes it to the getBrands() method in a Java custom class called BeerExpert.
BeerExpert’s getBrands() method finds matching brands for the type of beer and returns them to the activity as an ArrayList of Strings.
The activity gets a reference to the layout text view and sets its text value to the list of matching beers.
After all those steps are completed, the list is displayed on the device.

Let’s start by getting the button to call a method.
Make the button call a method

Whenever you add a button to a layout, it’s likely you’ll want it to do something when the user clicks on it. To make this happen, you need to get the button to call a method in your activity.
To get our button to call a method in the activity when it’s clicked, we need to make changes to two files:
Change the layout file activity_find_beer.xml.
We’ll specify which method in the activity will get called when the button is clicked.
Change the activity file FindBeerActivity.java.
We need to write the method that gets called.
Let’s start with the layout.
Use onClick to say which method the button calls
It only takes one line of XML to tell Android which method a button should call when it’s clicked. All you need to do is add an android:onClick attribute to the <button> element, and tell it the name of the method you want to call:

Let’s try this now. Go to the layout file activity_find_beer.xml, and add a new line of XML to the <button> element to say that the method onClickFindBeer() should be called when the button is clicked:

Once you’ve made these changes, save the file.
Now that the layout knows which method to call in the activity, we need to write the method. Let’s take a look at the activity.
What activity code looks like
When we first created a project for our app, we asked the wizard to create an empty activity called FindBeerActivity. The code for this activity is held in a file called FindBeerActivity.java. Open this file by going to the app/src/main/java folder and double-clicking on it.

When you open the file, you’ll see that Android Studio has generated some Java code for you. Rather than taking you through all the code that Android Studio may (or may not) have created, we want you to replace the code that’s currently in FindBeerActivity.java with the code shown here:

The above code is all you need to create a basic activity. As you can see, it’s a class that extends the android.app.Activity class, and implements an onCreate() method.
All activities (not just this one) have to extend the Activity class or one of its subclasses. The Activity class contains a bunch of methods that transform your Java class from a plain old Java class into a full-fledged, card-carrying Android activity.
All activities also need to implement the onCreate() method. This method gets called when the activity object gets created, and it’s used to perform basic setup such as what layout the activity is associated with. This is done via the setContentView() method. In the example above, setContentView(R.layout.activity_find_beer) tells Android that this activity uses activity_find_beer as its layout.
On the previous page, we added an onClick attribute to the button in our layout and gave it a value of onClickFindBeer. We need to add this method to our activity so it will be called when the button gets clicked. This will enable the activity to respond when the user touches the button in the user interface.
Do this!
Replace the code in your version of FindBeerActivity.java with the code shown on this page.
Add an onClickFindBeer() method to the activity

The onClickFindBeer() method needs to have a particular signature, or otherwise it won’t get called when the button specified in the layout gets clicked. The method needs to take the following form:

If the method doesn’t take this form, then it won’t respond when the user presses the button. This is because behind the scenes, Android looks for a public method with a void return value, with a method name that matches the method specified in the layout XML.
The View parameter in the method may seem unusual at first glance, but there’s a good reason for it being there. The parameter refers to the GUI component that triggers the method (in this case, the button). As we mentioned earlier, GUI components such as buttons and text views are all types of View.
If you want a method to respond to a button click, it must be public, have a void return type, and take a single View parameter.
So let’s update our activity code. Add the onClickFindBeer() method below to your activity code (FindBeerActivity.java):

onClickFindBeer() needs to do something

Now that we’ve created the onClickFindBeer() method in our activity, the next thing we need to do is get the method to do something when it runs. Specifically, we need to get our app to display a selection of different beers that match the beer type the user has selected.
In order to achieve this, we first need to get a reference to both the spinner and text view GUI components in the layout. This will allow us to retrieve the value of the chosen beer type from the spinner, and display text in the text view.
Use findViewById() to get a reference to a view
We can get references for our two GUI components using a method called findViewById(). This method takes the ID of the GUI component as a parameter, and returns a View object. You then cast the return value to the correct type of GUI component (for example, a TextView or a Button).
Here’s how you’d use findViewById() to get a reference to the text view with an ID of brands:

Take a closer look at how we specified the ID of the text view. Rather than pass in the name of the text view, we passed in an ID of the form R.id.brands. So what does this mean? What’s R?
R.java is a special Java file that gets generated by Android Studio whenever you create or build your app. It lives within the app/build/generated/source/r/debug folder in your project in a package with the same name as the package of your app. Android uses R.java to keep track of the resources used within the app, and among other things it enables you to get references to GUI components from within your activity code.
R is a special Java class that enables you to retrieve references to resources in your app.
If you open up R.java, you’ll see that it contains a series of inner classes, one for each type of resource. Each resource of that type is referenced within the inner class. As an example, R.java includes an inner class called id, and the inner class includes a static final brands value. Android added this code to R.java when we used the code "@+id/brands" in our layout. The line of code:
(TextView) findViewById(R.id.brands);
uses the value of brands to get a reference to the brands text view.
Relax

R.java gets generated for you.
You never change any of the code within this file, but it’s useful to know it’s there.
Once you have a view, you can access its methods

The findViewById() method provides you with a Java version of your GUI component. This means that you can get and set properties in the GUI component using the methods exposed by the Java class. Let’s take a closer look.
Setting the text in a text view
As you’ve seen, you can get a reference to a text view in Java using:
TextView brands = (TextView) findViewById(R.id.brands);
When this line of code gets called, it creates a TextView object called brands. You are then able to call methods on this TextView object.
Let’s say you wanted to set the text displayed in the brands text view to “Gottle of geer”. The TextView class includes a method called setText() that you can use to change the text property. You use it like this:

Retrieving the selected value in a spinner
You can get a reference to a spinner in a similar way to how you get a reference to a text view. You use the findViewById() method as before, but this time you cast the result as a spinner:
Spinner color = (Spinner) findViewById(R.id.color);
This gives you a Spinner object whose methods you can now access. As an example, here’s how you retrieve the currently selected item in the spinner, and convert it to a String:

The code:
color.getSelectedItem()
actually returns a generic Java object. This is because spinner values can be something other than Strings, such as images. In our case, we know the values are all Strings, so we can use String.valueOf() to convert the selected item from an Object to a String.
The first version of the activity

Our cunning plan is to build the activity in stages and test it as we go along. In the end, the activity will take the selected value from the spinner, call a method in a custom Java class, and then display matching types of beer. For this first version, our goal is just to make sure that we correctly retrieve the selected item from the spinner.
Here is our activity code, including the method you pieced together on the previous page. Apply these changes to FindBeerActivity.java, then save them:

What the code does

Before we take the app for a test drive, let’s look at what the code actually does.
The user chooses a type of beer from the spinner and clicks on the Find Beer button. This calls the public void onClickFindBeer(View) method in the activity.
The layout specifies which method in the activity should be called when the button is clicked via the button’s
android:onClickproperty.
The activity retrieves the currently selected value of the spinner (in this case amber), and converts it to a String.

The activity gets references to the Spinner and TextView GUI components using calls to the findViewById() method.

The activity then sets the text property of the TextView to reflect the currently selected item in the spinner.


Build the custom Java class
As we said at the beginning of the chapter, the Beer Adviser app decides which beers to recommend with the help of a custom Java class. This Java class is written in plain old Java, with no knowledge of the fact it’s being used by an Android app.

Custom Java class spec
The custom Java class should meet the following requirements:
The package name should be
com.hfad.beeradviser.The class should be called
BeerExpert.It should expose one method,
getBrands(), that takes a preferred beer color (as a String), and return aList<String>of recommended beers.
Build and test the Java class
Java classes can be extremely complicated and involve calls to complex application logic. You can either build and test your own version of the class, or use our sophisticated version of the class shown here:

Do this!
Add the BeerExpert class to your project. Select the com.hfad.beeradviser package in the app/src/main/java folder, go to File→New...→Java Class, name the file “BeerExpert”, and make sure the package name is “com.hfad.beeradviser”. This creates the BeerExpert.java file.
Enhance the activity to call the custom Java class so that we can get REAL advice

In version two of the activity we need to enhance the onClickFindBeer() method to call the BeerExpert class for beer recommendations. The code changes needed are plain old Java. You can try to write the code and run the app on your own, or you can follow along with us. But before we show you the code changes, try the exercise below; it’ll help you create some of the activity code you’ll need.
Activity code version 2

Here’s our full version of the activity code. Apply the changes shown here to your version of FindBeerActivity.java, make sure you’ve added the BeerExpert class to your project, and then save your changes:

What happens when you run the code
When the user clicks on the Find Beer button, the onClickFindBeer() method in the activity gets called.
The method creates a reference to the spinner and text view, and gets the currently selected value from the spinner.

onClickFindBeer() calls the getBrands() method in the BeerExpert class, passing in the type of beer selected in the spinner.
The
getBrands()method returns a list of brands.
The onClickFindBeer() method formats the list of brands and uses it to set the text property in the text view.

Test drive your app

Once you’ve made the changes to your app, go ahead and run it. Try selecting different types of beer and clicking on the Find Beer button.

When you choose different types of beer and click on the Find Beer button, the app uses the BeerExpert class to provide you with a selection of suitable beers.
Chapter 2 Your Android Toolbox

You’ve got Chapter 2 under your belt and now you’ve added building interactive Android apps to your toolbox.
Note
You can download the full code for the chapter from https://tinyurl.com/HeadFirstAndroid.