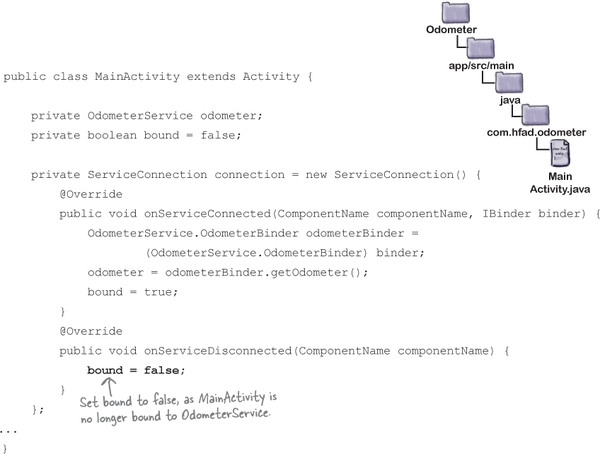
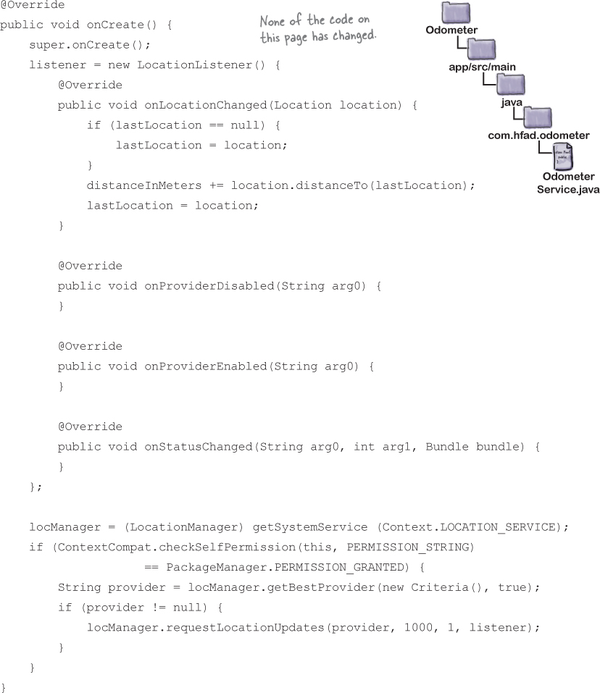
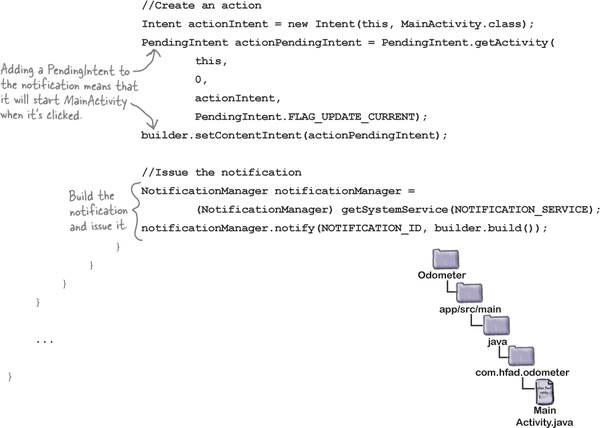
The MainActivity.java code (continued)


That’s all the code you need to get MainActivity to use OdometerService. Let’s go through what happens when you run the code.

Started services are great for background operations, but what if you need a service that’s more interactive? In this chapter you’ll discover how to create a bound service, a type of service your activity can interact with. You’ll see how to bind to the service when you need it, and how to unbind from it when you’re done to save resources. You’ll find out how to use Android’s Location Services to get location updates from your device GPS. Finally, you’ll discover how to use Android’s permission model, including handling runtime permission requests.
As you saw in Chapter 18, a started service is one that starts when it’s passed an intent. It runs code in the background, and stops when the operation is complete. It continues running even if the component that starts it gets destroyed.
A bound service is one that’s bound to another application component, such as an activity. Unlike a started service, the component can interact with the bound service and call its methods.
To see this in action, we’re going to create a new odometer app that uses a bound service. We’ll use Android’s location service to track the distance traveled:

On the next page we’ll look at the steps we’ll go through to create the app.
We’re going to build the app in three main steps:
Create a basic version of a bound service called OdometerService.
We’ll add a method to it, getDistance(), which will return a random number.

Get an activity, MainActivity, to bind to OdometerService and call its getDistance() method.
We’ll call the method every second, and update a text view in MainActivity with the results.

Update OdometerService to use Android’s Location Services.
The service will get updates on the user’s current location, and use these to calculate the distance traveled.

We’ll start by creating the project. Create a new Android project for an application named “Odometer” with a company domain of “hfad.com”, making the package name com.hfad.odometer. The minimum SDK should be API 19 so that it will work with most devices. You’ll need an empty activity named “MainActivity” and a layout named “activity_main” so that your code matches ours. Make sure that you uncheck the Backwards Compatibility (AppCompat) option when you create the activity.

You create a bound service by extending the Service class. This class is more general than the IntentService class we used in Chapter 18, which is used for started services. Extending Service gives you more flexibility, but requires more code.
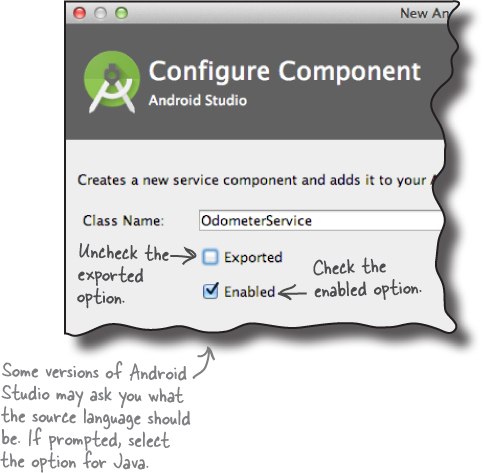
We’re going to add a new bound service to our project, so switch to the Project view of Android Studio’s explorer, click on the com.hfad.odometer package in the app/src/main/java folder, go to File→New..., and select the Service option. When prompted, choose the option to create a new Service (not an Intent Service), and name the service “OdometerService”. Uncheck the “Exported” option, as this only needs to be true if you want services outside this app to access the service. Make sure that the “checkednabled” option is checked; if it isn’t, the activity won’t be able to run the app. Then replace the code in OdometerService.java with this (shown here in bold):
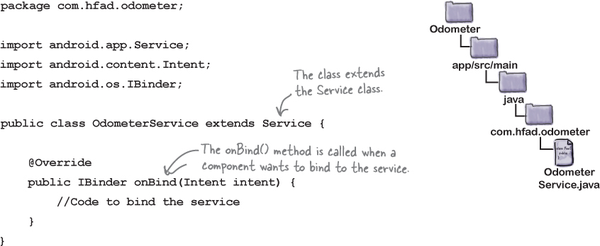
The above code implements one method, onBind(), which gets called when a component, such as an activity, wants to bind to the service. It has one parameter, an Intent, and returns an IBinder object.
IBinder is an interface that’s used to bind your service to the activity, and you need to provide an implementation of it in your service code. We’ll look at how you do this next.

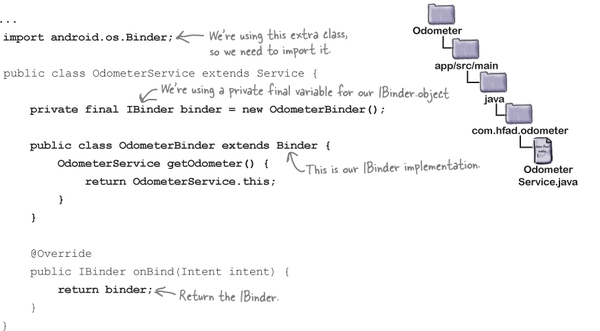
You implement the IBinder by adding a new inner class to your service code that extends the Binder class (which implements the IBinder interface). This inner class needs to include a method that activities can use to get a reference to the bound service.
We’re going to define a binder called OdometerBinder that MainActivity can use to get a reference to OdometerService. Here’s the code we’ll use to define it:

We need to return an instance of the OdometerBinder in OdometerService’s onBind() method. To do this, we’ll create a new private variable for the binder, instantiate it, and return it in the onBind() method. Update your OdometerService.java code to include our changes below:
We’ve now written all the service code we need to allow MainActivity to bind to OdometerService. Next, we’ll add a new method to the service to make it return a random number.
We’re going to add a method to OdometerService called getDistance(), which our activity will call. We’ll get it to return a random number for now, and later on we’ll update it to use Android’s location services.
Here’s the full code for OdometerService.java including this change; update your version to match ours:

Next we’ll update MainActivity so that it uses OdometerService.

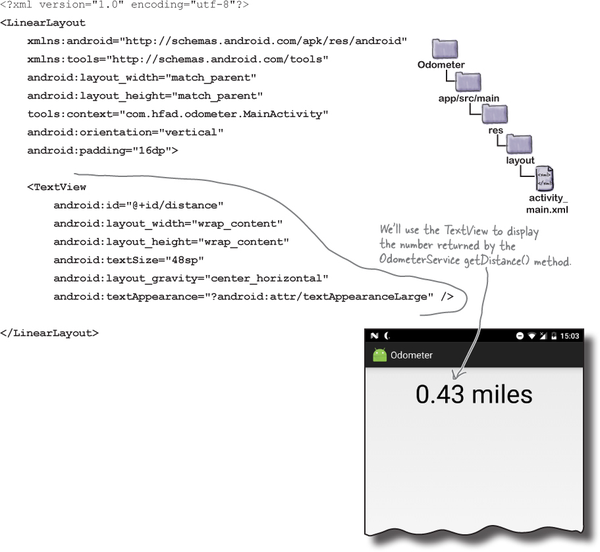
The next step in creating our app is to get MainActivity to bind to OdometerService and call its getDistance() method. We’re going to start by adding a text view to MainActivity’s layout. This will display the number returned by OdometerService’s getDistance() method.
Update your version of activity_main.xml to reflect our changes:
Now that we’ve added a text view to MainActivity’s layout, we’ll update its activity code. Let’s go through the changes we need to make.
To get an activity to connect to a bound service and call its methods, there are a few steps you need to perform:
Create a ServiceConnection.
This uses the service’s IBinder object to form a connection with the service.

Bind the activity to the service.
Once you’ve bound it to the service, you can call the service’s methods directly.

Interact with the service.
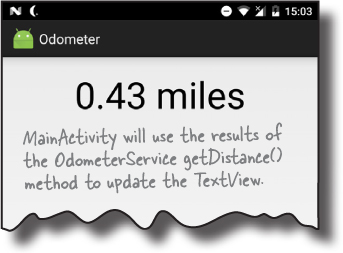
In our case, we’ll use the service’s getDistance() method to update the activity’s text view.

Unbind from the service when you’ve finished with it.
When the service is no longer used, Android destroys the service to free up resources.

We’ll go through these steps with MainActivity, starting with creating the ServiceConnection.

A ServiceConnection is an interface that enables your activity to bind to a service. It has two methods that you need to define: onServiceConnected() and onServiceDisconnected(). The onServiceConnected() method is called when a connection to the service is established, and onServiceDisconnected() is called when it disconnects.
We need to add a ServiceConnection to MainActivity. Here’s what the basic code looks like; update your version of MainActivity.java to matches ours:

We’ll update the onServiceConnected() and onServiceDisconnected() methods on the next page.

As we said on the previous page, the onServiceConnected() method is called when a connection is established between the activity and the service. It takes two parameters: a ComponentName object that describes the service that’s been connected to, and an IBinder object that’s defined by the service:
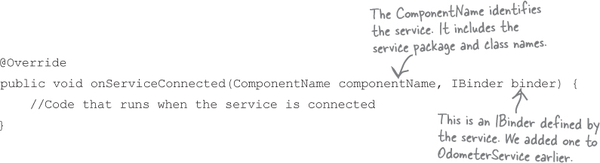
There are two things we need the onServiceConnected() method to do:
Use its IBinder parameter to get a reference to the service we’re connected to, in this case OdometerService. We can do this by casting the IBinder to an OdometerService.OdometerBinder (as this is the type of IBinder we defined in OdometerService) and calling its getOdometer() method.
Record that the activity is bound to the service.
Here’s the code to do these things (update your version of MainActivity.java to include our changes):


The onServiceDisconnected() method is called when the service and the activity are disconnected. It takes one parameter, a ComponentName object that describes the service:
@Override
public void onServiceDisconnected(ComponentName componentName) {
    //Code that runs when the service is disconnected
}
There’s only one thing we need the onServiceDisconnected() method to do when it’s called: record that the activity is no longer bound to the service. Here’s the code to do that; update your version of MainActivity.java to match ours:
Next we’ll look at how you bind to and unbind from the service.

When you bind your activity to a service, you usually do it in one of two places:
In the activity’s onStart() method when the activity becomes visible. This is appropriate if you only need to interact with the service when it’s visible.
You don’t usually bind to a service in the activity’s onResume() method in order to keep the processing done in this method to a minimum.
In the activity’s onCreate() method when the activity gets created. Do this if you need to receive updates from the service even when the activity’s stopped.
In our case, we only need to display updates from OdometerService when MainActivity is visible, so we’ll bind to the service in its onStart() method.
To bind to the service, you first create an explicit intent that’s directed at the service you want to bind to. You then use the activity’s bindService() method to bind to the service, passing it the intent, the ServiceConnection object defined by the service, and a flag to describe how you want to bind.

To see how you do this, here’s the code you’d use to bind MainActivity to OdometerService (we’ll add this code to MainActivity.java a few pages ahead):

In the above code, we’ve used the flag Context.BIND_AUTO_CREATE to tell Android to create the service if it doesn’t already exist. There are other flags you can use instead; you can see all the available ones in the Android documentation here:
https://developer.android.com/reference/android/content/Context.html
Next, we’ll look at how you unbind the activity from the service.

When you unbind your activity from a service, you usually add the code to do so to your activity’s onStop() or onDestroy() method. The method you use depends on where you put your bindService() code:
If you bound to the service in your activity’s onStart() method, unbind from it in the onStop() method.
If you bound to the service in your activity’s onCreate() method, unbind from it in the onDestroy() method.

In our case, we used MainActivity’s onStart() method to bind to OdometerService, so we’ll unbind from it in the activity’s onStop() method.
You unbind from a service using the unbindService() method. The method takes one parameter, the ServiceConnection object. Here’s the code that we need to add to MainActivity (we’ll add this code to MainActivity.java a few pages ahead):
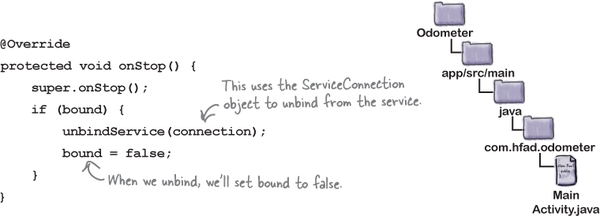
In the above code we’re using the value of the bound variable to test whether or not we need to unbind from the service. If bound is true, this means MainActivity is bound to OdometerService. We need to unbind the service, and set the value of bound to false.
So far we have an activity that binds to the service when the activity starts, and unbinds from it when the activity stops. The final thing we need to do is get MainActivity to call OdometerService’s getDistance() method, and display its value.

Once your activity is bound to the service, you can call its methods. We’re going to call the OdometerService’s getDistance() method every second, and update MainActivity’s text view with its value.
To do this, we’re going to write a new method called displayDistance(). This will work in a similar way to the runTimer() code we used in Chapter 4 and Chapter 11.
Here’s our displayDistance() method. We’ll add it to MainActivity.java a couple of pages ahead:

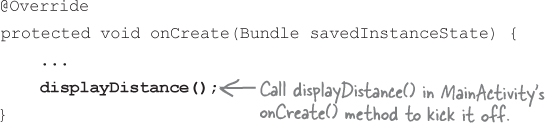
We’ll call the displayDistance() method in MainActivity’s onCreate() method so that it starts running when the activity gets created (we’ll add this code to MainActivity.java on the next page):
We’ll show you the full code for MainActivity on the next page.

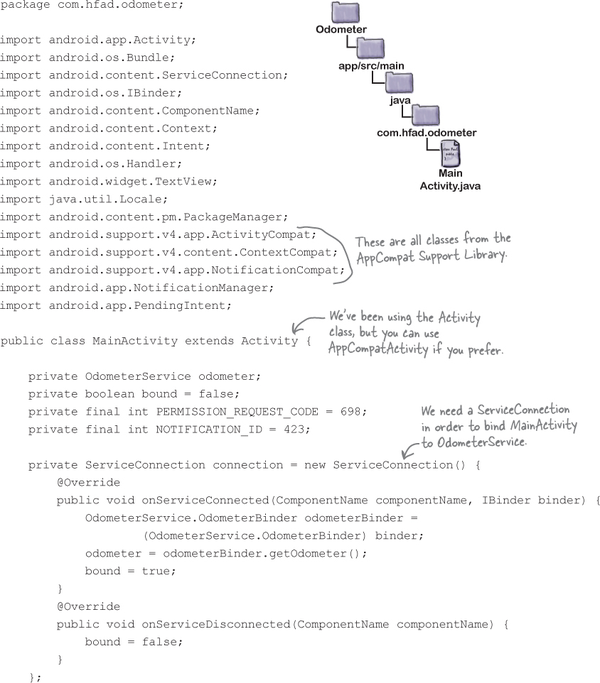
Here’s the complete code for MainActivity.java; make sure your version of the code matches ours:

The code continues on the next page.
That’s all the code you need to get MainActivity to use OdometerService. Let’s go through what happens when you run the code.

Before you see the app up and running, let’s walk through what the code does.
When MainActivity is created, it creates a ServiceConnection object and calls the displayDistance() method.

MainActivity calls bindService() in its onStart() method.
The bindService() method includes an intent meant for OdometerService, and a reference to the ServiceConnection.

Android creates an instance of the OdometerService, and passes it the intent by calling its onBind() method.


OdometerService’s onBind() method returns a Binder.
The Binder is passed to MainActivity’s ServiceConnection.

The ServiceConnection uses the Binder to give MainActivity a reference to OdometerService.

MainActivity’s displayDistance() method calls OdometerService’s getDistance() method every second.
OdometerService returns a random number to MainActivity, in this case 0.56.

When MainActivity stops, it disconnects from OdometerService by calling unbindService().
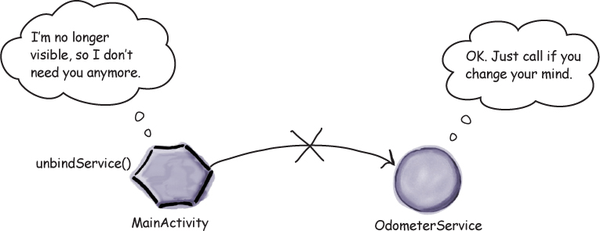
OdometerService is destroyed when MainActivity is no longer bound to it.

Now that you understand what happens when the code runs, let’s take the app for a test drive.


When we run the app, a random number is displayed in MainActivity. This number changes every second.

We now have a working service that MainActivity can bind to. We still need to change the service so that the getDistance() method returns the distance traveled instead of a random number. Before we do that, however, we’re going to take a closer look at how bound services work behind the scenes.
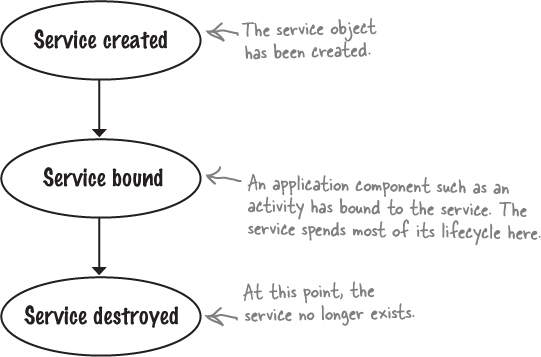
When an application component (such as an activity) binds to a service, the service moves between three states: being created, being bound, and being destroyed. A bound service spends most of its time in a bound state.
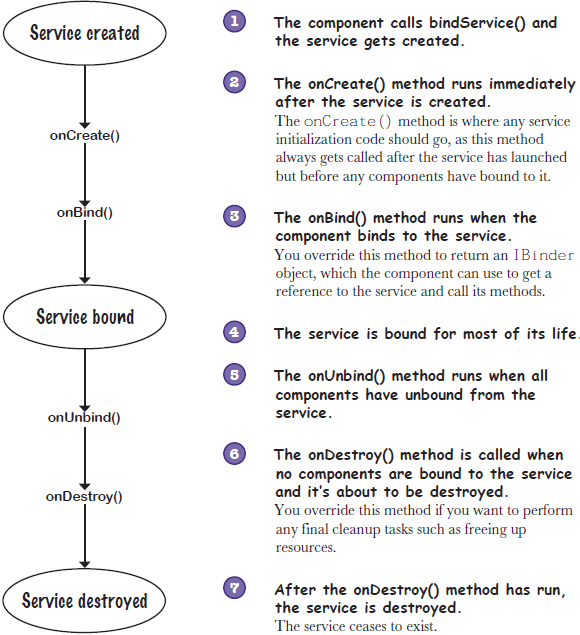
Just like a started service, when a bound service is created, its onCreate() method gets called. As before, you override this method if you want to perform any tasks needed to set up the service.
The onBind() method runs when a component binds to the service. You override this method to return an IBinder object to the component, which it uses to get a reference to the service.
When all components have unbound from the service, its onUnbind() method is called.
A bound service is destroyed when no components are bound to it.
Finally, the onDestroy() method is called when no components are bound to the service and it’s about to be destroyed. As before, you override this method to perform any final cleanup tasks and free up resources.
We’ll take a closer look at how these methods fit into the service states on the next page.
Here’s a more detailed overview of the bound service lifecycle from birth to death.
Now that you have a better understanding of how bound services work, let’s change our Odometer app so that it displays the actual distance traveled by the user.

We need to get our OdometerService to return the distance traveled in its getDistance() method. To do this, we’ll use Android’s Location Services. These allow you to get the user’s current location, request periodic updates, and ask for an intent to be fired when the user comes within a certain radius of a particular location.
In our case, we’re going to use the Location Services to get periodic updates on the user’s current location. We’ll use these to calculate the distance the user has traveled.
To do this, we’ll perform the following steps:
Remove location updates just before the service is destroyed.
This will free up system resources.
Set up a location listener when the service is created.
This will be used to listen for updates from the Location Services.
Request location updates.
We’ll create a location manager, and use it to request updates on the user’s current location.
Calculate the distance traveled.
We’ll keep a running total of the distance traveled by the user, and return this distance in the OdometerService’s getDistance() method.
Declare we need permission to use the Location Services.
Our app can only use the Location Services if the user grants our app permission to do so.
Before we start, we’ll add the AppCompat Support Library to our project, as we’ll need to use it in our code.

To get our location code working properly, there are a couple of classes we need to use from the AppCompat Support Library, so we’ll add it to our project as a dependency. You do this in the same way that you did in earlier chapters. Choose File→Project Structure, then click on the app module and choose Dependencies. You’ll be presented with the following screen:
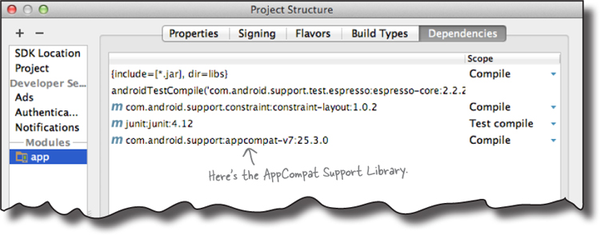
Android Studio may have already added the AppCompat Support Library automatically. If so, you will see it listed as appcompat-v7, as shown above.
If the AppCompat Library isn’t listed, you will need to add it yourself. To do this, click on the “+” button at the bottom or right side of the screen, choose the Library Dependency option, select the appcompat-v7 library, then click on the OK button. Click on OK again to save your changes and close the Project Structure window.
Next, we’ll look at how to declare we need permission to use Android’s Location Services.

Android allows you to perform many actions by default, but there are some that the user needs to give permission for in order for them to work. This can be because they use the user’s private information, or could affect stored data or the way in which other apps function. Location Services is one of those things that the user needs to grant your app permission to use.
You declare the permissions your app requires in AndroidManifest.xml using the <uses-permission> element, which you add to the root <manifest> element. In our case, we need to access the user’s precise location in order to display the distance traveled, so we need to declare the ACCESS_FINE_LOCATION permission. To do this, you add the following declaration to AndroidManifest.xml (update your version of the file to reflect this change):

How the app uses the above declaration depends on your app’s target SDK (usually the most recent version of Android) and the API level of the user’s device:
If your target SDK is API level 23 or above, and the user’s device is running 23 or above, the app requests permission at runtime. The user can deny or revoke permission, so whenever your code wants to use the thing that requires permission, it needs to check that permission is still granted. You’ll find out how to do this later in the chapter.
If your target SDK is API level 22 or below, or the user’s device is running 22 or below, the app requests permission when it’s installed. If the user denies permission, the app isn’t installed. Once granted, permission can’t be revoked except by uninstalling the app.
Now that we’ve declared that our app needs to know the user’s location, let’s get to work on OdometerService.

You create a location listener by implementing the LocationListener interface. It has four methods that you need to define: onLocationChanged(), onProviderEnabled(), onProviderDisabled(), and onStatusChanged(). onLocationChanged() gets called when the user’s location has changed. We’ll use this method later in the chapter to track the distance the user has traveled. The onProviderEnabled(), onProviderDisabled(), and onStatusChanged() methods are called when the location provider is enabled, when it is disabled, or when its status has changed, respectively.
We’ll look at location providers on the next page.
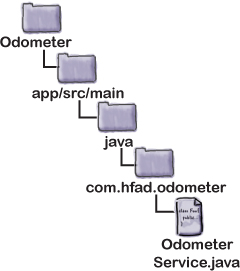
We need to set up a location listener when OdometerService is first created, so we’ll implement the interface in OdometerService’s onCreate() method. Update your version of OdometerService.java to include our changes below:

To get location updates, we need to do three things: create a location manager to get access to Android’s Location Services, specify a location provider, and request that the location provider sends regular updates on the user’s current location to the location listener we added on the previous page. We’ll start by getting a location manager.
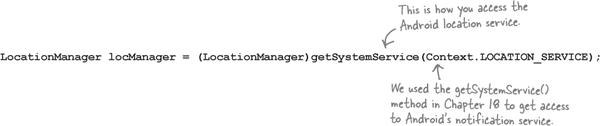
You create a location manager in a similar way to how you created a notification manager in Chapter 18: using the getSystemService() method. Here’s the code to create a location manager that you can use to access Android’s Location Services (we’ll add the code to OdometerService’s onCreate() method later on):
Next, we need to specify the location provider, which is used to determine the user’s location. There are two main options: GPS or network. The GPS option uses the device’s GPS sensor to establish the user’s location, whereas the network option looks at Wi-Fi, Bluetooth, or mobile networks.
Not all devices have both types of location provider, so you can use the location manager’s getBestProvider() method to get the most accurate location provider on the device. This method takes two parameters: a Criteria object you can use to specify criteria such as power requirements, and a flag to indicate whether it should currently be enabled on the device.
We want to use the location provider on the device with the greatest accuracy, so we’ll use the following (we’ll add it to OdometerService later):

Next we’ll get the location provider to send location updates to the location listener.

You get the location provider to send updates to the location listener using the location manager’s requestLocationUpdates() method. It takes takes four parameters: the location provider, the minimum time interval between updates in milliseconds, the minimum distance between location updates in meters, and the location listener you want to receive the updates. As an example, here’s how you’d request location updates from the location provider every second when the device has moved more than a meter:

If your app’s target SDK is API level 23 or above, you need to check at runtime whether the user has granted you permission to get their current location. (As we said earlier in the chapter, if your target SDK is API level 23 or above, and the user’s device is running one of these versions, the user may have installed the app without granting Location Services permission. You therefore have to check whether permission’s been granted before running any code that requires Location Services, or your code won’t compile.)
You can check your app’s target SDK version by choosing File -> Project Structure, clicking on the app option, and then choosing Flavors.
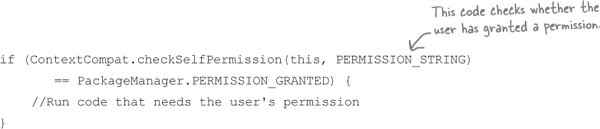
You check whether permission’s been granted using the ContextCompat.checkSelfPermission() method. ContextCompat is a class from the AppCompat Support Library that provides backward compatibility with older versions of Android. Its checkSelfPermission() method takes two parameters: the current Context (usually this) and the permission you want to check. It returns a value of PackageManager.PERMISSION_GRANTED if permission has been granted.

In our case, we want to check whether the app’s been granted ACCESS_FINE_LOCATION permission. Here’s the code to do that:

On the next page we’ll show you all the code you need to add to OdometerService.java to request location updates.

Here’s the full code to request location updates (update your version of OdometerService.java to include our changes):

Next we’ll get our location listener to deal with the location updates.

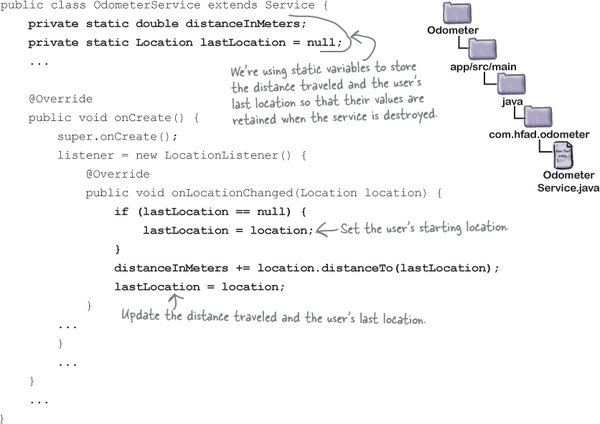
So far, we’ve requested that the location listener be notified when the user’s current location changes. When this happens, the listener’s onLocationChanged() method gets called.
This method has one parameter, a Location object representing the user’s current location. We can use this object to calculate the distance traveled by keeping a running total of the distance between the user’s current location and their last.
You find the distance in meters between two locations using the Location object’s distanceTo() method. As an example, here’s how you’d find the distance between two locations called location and lastLocation:

Here’s the code we need to add to OdometerService to record the distance traveled by the user (update your version of OdometerService.java to match ours):
We’ll use this code to return the distance traveled to MainActivity.

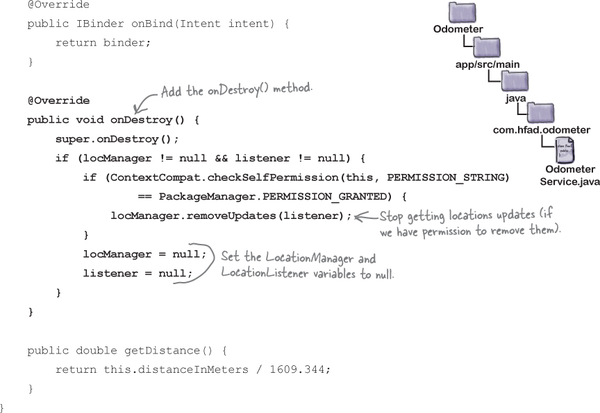
To tell MainActivity how far the user has traveled, we need to update OdometerService’s getDistance() method. It currently returns a random number, so we’ll change it to convert the value of the distanceInMeters variable to miles and return that value. Here’s the new version of the getDistance() method; update your version of it to match ours:

Finally, we’ll stop the listener getting location updates when the service is about to be destroyed.
Finally, we’ll stop the listener getting location updates when the service is about to be destroyed.
You stop the updates by calling the location manager’s removeUpdates() method. It takes one parameter, the listener you wish to stop receiving the updates:

If your app’s target SDK is API level 23 or above, you need to check whether the user has granted ACCESS_FINE_LOCATION permission before calling the removeUpdates() method. This is because you can only use this method if the user’s granted this permission, and Android Studio will complain if you don’t check first. You check whether permission’s been granted in the same way we did earlier, by checking the return value of the ContextCompat.checkSelfPermission() method:

Over the next few pages we’ll show you the full code for OdometerService, including the new onDestroy() method.

We’ve now done everything we need to get OdometerService to return the distance traveled. Update your version of OdometerService.java to match ours.

The code continues on the next page.

The code continues on the next page.
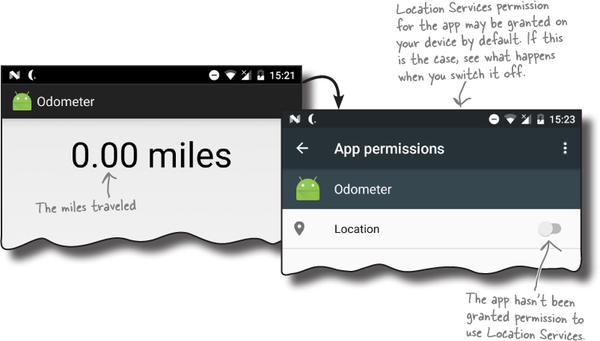
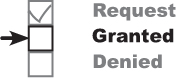
When we launch the app, 0.0 miles is initially displayed. When we check the app permissions, permission hasn’t been granted to use Location Services. You can check this on your device by opening the device settings, choosing Apps, selecting the Odometer app, and opening the Permissions section:
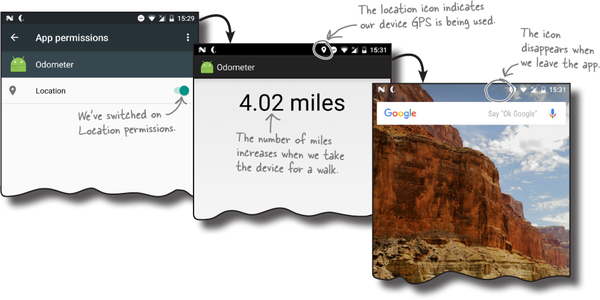
When we grant Location permission for the Odometer app and return to the app, the location icon is displayed in the status bar, and the number of miles traveled increases when we take the device for a walk. The location icon disappears when we leave the app:
The odometer works when we grant the app Location permission, but doesn’t when permission’s been denied.
So far, we’ve made OdometerService check whether it has permission to get the user’s precise location. If permission’s been granted, it uses the Android Location Services to track the distance the user travels. But what if permission hasn’t been granted?
If the app doesn’t have permission to get the user’s precise location, OdometerService can’t use the Location Services we require. Rather than just accepting this, the app would work better if it were to ask the user to grant the permission.
We’re going to change MainActivity so that if the user hasn’t granted the permission we need, we’ll request it. To achieve this, we’ll get MainActivity to do three things:
Before MainActivity binds to the service, request ACCESS_FINE_LOCATION permission if it’s not already been granted.
This will present the user with a permission request dialog.

Check the response, and bind to the service if permission is granted.
If permission is denied, issue a notification.

Let’s start by looking at how you make an activity request permissions at runtime.

Earlier in the chapter, you saw how to check whether the user has granted a particular permission using the ContextCompat.checkSelfPermission() method:
If the user has granted permission, the method returns a value of PackageManager.PERMISSION_GRANTED, and the code requiring the permission will run successfully. But what if permission has been denied?
The requestPermissions() method can only be called by an activity. It can’t be called from a service.
If the user hasn’t granted one or more permissions needed by your code, you can use the ActivityCompat.requestPermissions() method to request permission at runtime. ActivityCompat is a class from the AppCompat Support Library that provides backward compatibility with older versions of Android. Its requestPermissions() method takes three parameters: a Context (usually this), a String array of permissions you want to check, and an int request code for the permission request. As an example, here’s how you’d use the method to request the ACCESS_FINE_LOCATION permission:

When the requestPermissions() method is called, it displays one or more dialogs asking the user for each permission. The dialog gives the user a choice between denying or allowing the permission, and there’s also a checkbox they can check if they don’t want to be asked about the permission again. If they check the checkbox and deny the permission, subsequent calls to the requestPermissions() method won’t display the dialog.
Note that the requestPermissions() method can only be called from an activity. You can’t request permissions from a service.

We’re going to update MainActivity so that it requests permission to get the device’s location if it hasn’t already been granted.

We’re currently using MainActivity’s onStart() method to bind the activity to OdometerService. We’re going to change the code so that MainActivity only binds to the service if the user has granted the permission specified by the PERMISSION_STRING constant we defined in OdometerService. If permission’s not been granted, we’ll ask for it.
Here’s the updated code for MainActivity.java; update your version of the code with our changes:

Once you’ve requested permission from the user, you need to check the user’s response. We’ll do that next.
When you ask the user to grant a permission using the requestPermissions() method, you can’t determine whether permission was granted by checking its return value. That’s because the permission request happens asynchronously so that the current thread isn’t blocked while you wait for the user to respond.
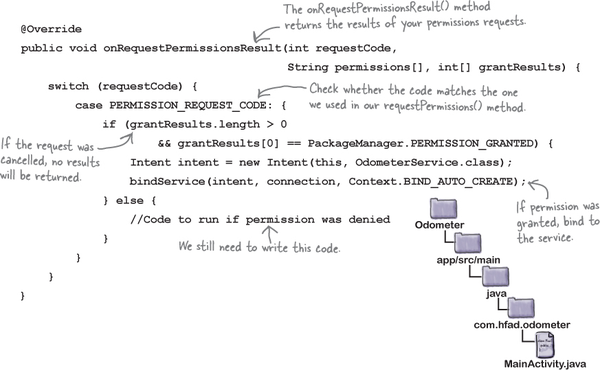
Instead, you check the user’s response by overriding the activity’s onRequestPermissionsResult() method. This has three parameters: an int request code to identify the permissions request, a String array of permissions, and an int array for the results of the requests.
To use this method, you first check whether the int request code matches the one you used in the requestPermissions() method. If it does, you then check whether the permission has been granted.
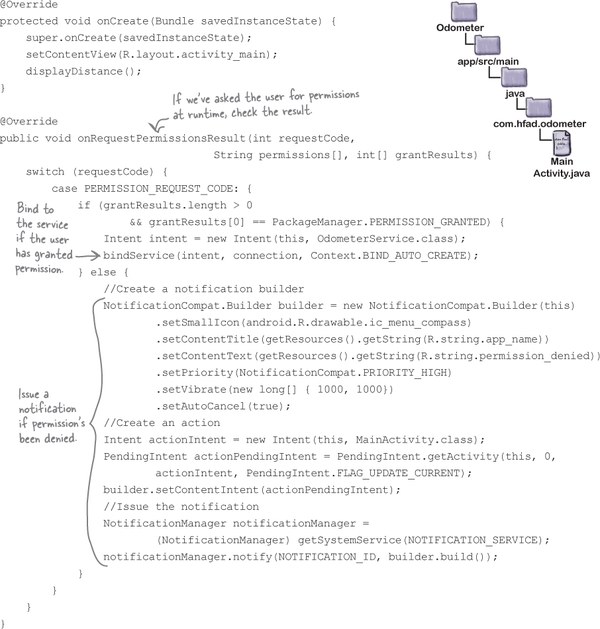
The code below checks whether the user granted the permission we requested using the requestPermissions() method on the previous page. If permission’s been granted, it binds to OdometerService. Add this method to your version of MainActivity.java:
Finally, if the user doesn’t give us permission to use their current location, we need to inform them that the odometer won’t work.

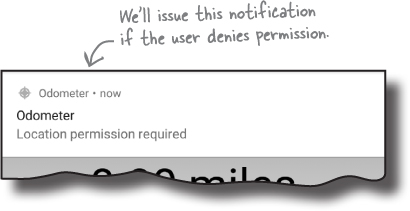
If the user decides not to grant permission to use their current location, the OdometerService won’t be able to tell how far they’ve traveled. If this happens, we’ll issue a notification to inform the user. We’re going to use a notification because it will remain in the notification area until the user has decided what to do. Another advantage of using a notification is that we can get it to start MainActivity when it’s clicked. Doing this means that MainActivity’s onStart() method will run, which will again prompt the user to grant the permission (unless the user has previously selected the option not to be asked again).
See if you can build the notification we require by having a go at the exercise on the next page.

We’ll update our MainActivity code so that if the user denies our permission request, it issues a heads-up notification.
First, add the following Strings to Strings.xml; we’ll use these for the notification’s title and text:

Then update your version of MainActivity.java with the following code:

The code continues on the next page.
That’s all the code we need to display a notification if the user decides to deny us ACCESS_FINE_LOCATION permission. We’ll show you the full MainActivity code over the next few pages, then take the app for a final test drive.

Here’s our complete code for MainActivity.java; make sure your version of the code matches ours:
The code continues on the next page.

The code continues on the next page.


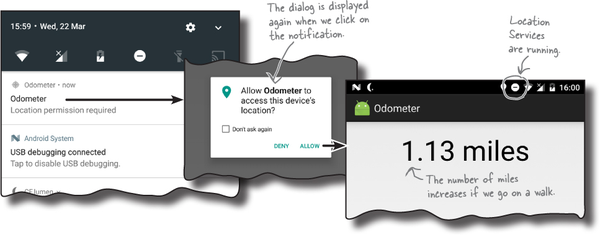
When we run the app with its Location permission switched off, a permission request dialog is displayed. If we click on the Deny option, a notification is issued:
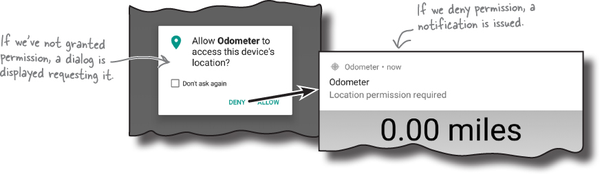
When we click on the notification, the permission request dialog is displayed again. If we click on the option to allow permission, the Location icon appears in the status bar and the number of miles increases when we take the device on a road trip:
We know you’re full of great ideas for improving the Odometer app, so why not try them out? As an example, try adding Start, Stop, and Reset buttons to start, stop, and reset the distance traveled.

You’ve got Chapter 19 under your belt and now you’ve added bound services to your toolbox.
You can download the full code for the chapter from https://tinyurl.com/HeadFirstAndroid.

We’re sad to see you leave, but there’s nothing like taking what you’ve learned and putting it to use. There are still a few more gems for you in the back of the book and a handy index, and then it’s time to take all these new ideas and put them into practice. Bon voyage!