Chapter 16. Basic Cursors: Getting Data Out

So how do you connect your app to a SQLite database?
So far you’ve seen how to create a SQLite database using a SQLite helper. The next step is to get your activities to access it. In this chapter, we’ll focus on how you read data from a database. You’ll find out how to use cursors to get data from the database. You’ll see how to navigate cursors, and how to get access to their data. Finally, you’ll discover how to use cursor adapters to bind cursors to list views.
The story so far...
In Chapter 15, you created a SQLite helper for Starbuzz Coffee. The SQLite helper creates a Starbuzz database, adds a DRINK table to it, and populates the table with drinks.
The activities in the Starbuzz app currently get their data from the Java Drink class. We’re going to change the app so the activities get data from the SQLite database instead.

Here’s a reminder of how the app currently works:
TopLevelActivity displays a list of options for Drinks, Food, and Stores.
When the user clicks on the Drinks option, it launches DrinkCategoryActivity.
This activity displays a list of drinks that it gets from the Java
Drinkclass.When the user clicks on a drink, its details get displayed in DrinkActivity.
DrinkActivitygets details of the drink from the JavaDrinkclass.

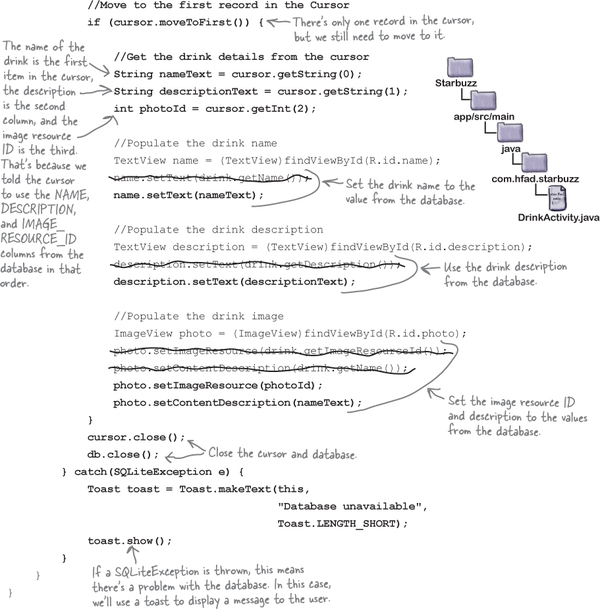
The new Starbuzz app structure
There are two activities that use the Drink class: DrinkActivity and DrinkCategoryActivity. We need to change these activities so that they read data from the SQLite database with assistance from the SQLite helper.
Here’s what the new structure of the Starbuzz app will look like:
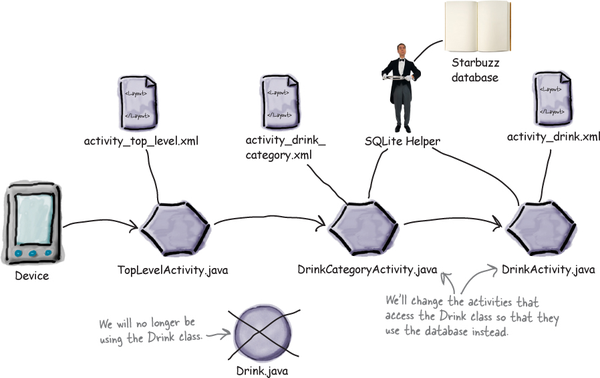
We’ll start by updating DrinkActivity, and we’ll change DrinkCategoryActivity later on in the chapter.
Do this!
We’re going to update the Starbuzz app in this chapter, so open your Starbuzz project in Android Studio.
What we’ll do to change DrinkActivity to use the Starbuzz database
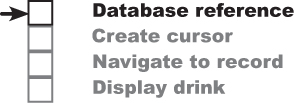
There are a number of steps we need to go through to change DrinkActivity so that it uses the Starbuzz database:
Get a reference to the Starbuzz database.
We’ll do this using the Starbuzz SQLite helper we created in Chapter 15.

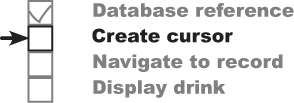
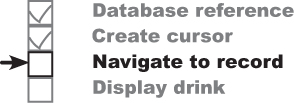
Create a cursor to read drink data from the database.
We need to read the data held in the Starbuzz database for the drink the user selects in
DrinkCategoryActivity. The cursor will give us access to this data. (We’ll explain cursors soon.)Navigate to the drink record.
Before we can use the data retrieved by the cursor, we need to explicitly navigate to it.
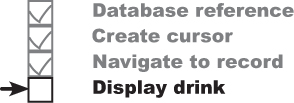
Display details of the drink in DrinkActivity.
Once we’ve navigated to the drink record in the cursor, we need to read the data and display it in
DrinkActivity.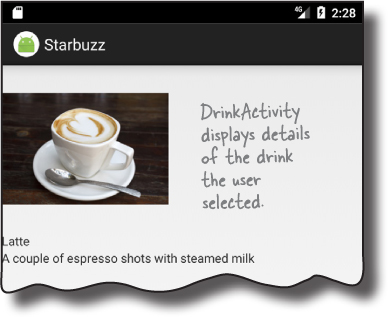
Before we begin, let’s remind ourselves of the DrinkActivity.java code we created in Chapter 7.
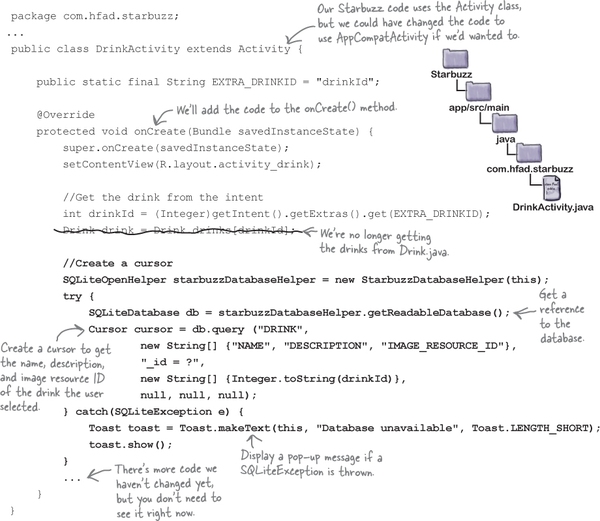
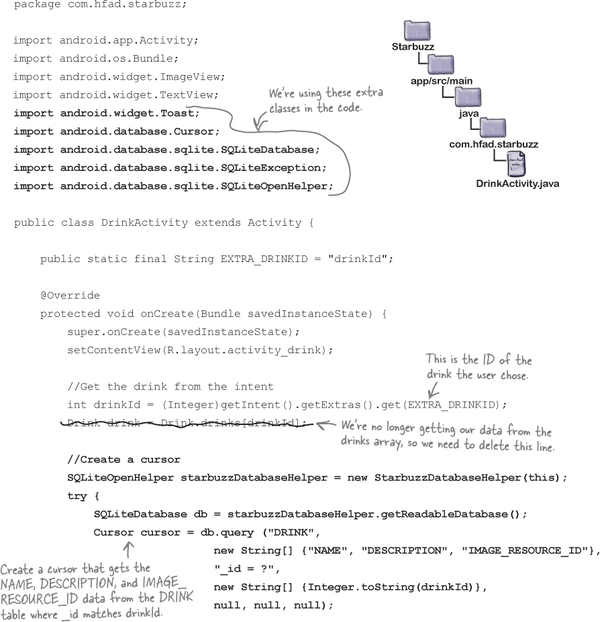
The current DrinkActivity code
Below is a reminder of the current DrinkActivity.java code. The onCreate() method gets the drink ID selected by the user, gets the details of that drink from the Drink class, and then populates the activity’s views using the drink attributes. We need to change the code in the onCreate() method to get the data from the Starbuzz database.

Get a reference to the database

The first thing we need is to get a reference to the Starbuzz database using the SQLite helper we created in the last chapter. To do that, you start by getting a reference to the SQLite helper:

You then call the SQLite helper’s getReadableDatabase() or getWritableDatabase() to get a reference to the database. You use the getReadableDatabase() method if you need read-only access to the database, and the getWritableDatabase() method if you need to perform any updates. Both methods return a SQLiteDatabase object that you can use to access the database:
SQLiteDatabase db = starbuzzDatabaseHelper.getReadableDatabase();
or:
SQLiteDatabase db = starbuzzDatabaseHelper.getWritableDatabase();
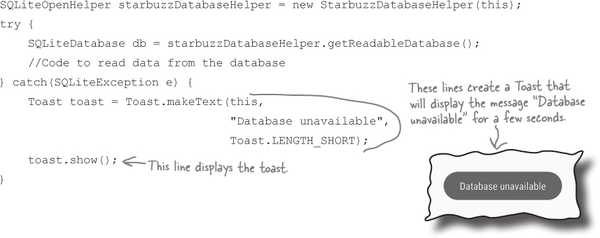
If Android fails to get a reference to the database, a SQLiteException is thrown. This can happen if, for example, you call the getWritableDatabase() to get read/write access to the database, but you can’t write to the database because the disk is full.
In our particular case, we only need to read data from the database, so we’ll use the getReadableDatabase() method. If Android can’t get a reference to the database and a SQLiteException is thrown, we’ll use a Toast (a pop-up message) to tell the user that the database is unavailable:
Once you have a reference to the database, you can get data from it using a cursor. We’ll look at cursors next.
Get data from the database with a cursor

As we said in Chapter 15, a cursor lets you read from and write to the database. You specify what data you want access to, and the cursor brings back the relevant records from the database. You can then navigate through the records supplied by the cursor.

You create a cursor using a database query. A database query lets you specify which records you want access to from the database. As an example, you can say you want to access all the records from the DRINK table, or just one particular record. These records are then returned in the cursor.
You create a cursor using the SQLiteDatabase query() method:

There are many overloaded versions of this method with different parameters, so rather than go into each variation, we’re only going to show you the most common ways of using it.
Return all the records from a table

The simplest type of database query is one that returns all the records from a particular table in the database. This is useful if, for instance, you want to display all the records in a list in an activity. As an example, here’s how you’d return the values in the _id, NAME, and DESCRIPTION columns for every record in the DRINK table:
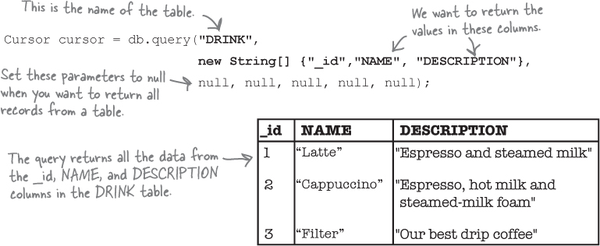
To return all the records from a particular table, you pass the name of the table as the query() method’s first parameter, and a String array of the column names as the second. You set all of the other parameters to null, as you don’t need them for this type of query.

Next we’ll look at how you can return the records in a particular order.
Behind the scenes, Android uses the query() method to construct an SQL SELECT statement.
Return records in a particular order
If you want to display data in your app in a particular order, you use the query to sort the data by a particular column. This can be useful if, for example, you want to display drink names in alphabetical order.
By default, the data in the table appears in _id order, as this was the order in which data was entered:

If you wanted to retrieve data from the _id, NAME, and FAVORITE column in ascending NAME order, you would use the following:

The ASC keyword means that you want to order that column in ascending order. Columns are ordered in ascending order by default, so if you want you can omit the ASC. To order the data in descending order instead, you’d use DESC.
You can sort by multiple columns too. As an example, here’s how you’d order by FAVORITE in descending order, followed by NAME in ascending order:

Next we’ll look at how you return selected records from the database.
Return selected records

You can filter your data by declaring conditions the data must meet, just as you did in Chapter 15. As an example, here’s how you’d return records from the DRINK table where the name of the drink is “Latte”:
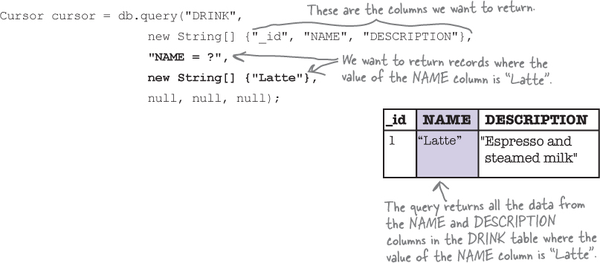
The third and fourth parameters in the query describe the conditions the data must meet.
The third parameter specifies the column in the condition. In the above example we want to return records where the value of the NAME column is “Latte”, so we use "NAME = ?". We want the value in the NAME column to be equal to some value, and the ? symbol is a placeholder for this value.
The fourth parameter is an array of Strings that specifies what the value of the condition should be. In the above example we want to update records where the value of the NAME column is “Latte”, so we use:
new String[] {"Latte"};The value of the condition must be an array of Strings, even if the column you’re applying the condition to contains some other type of data. As an example, here’s how you’d return records from the DRINK table where the drink _id is 1:

You’ve now seen the most common ways of using the query() method to create a cursor, so try the following exercise to construct the cursor we need for DrinkActivity.java.
Note
To find out more ways of using the query() method, visit the SQLiteDatabase documentation:
https://developer.android.com/reference/android/database/sqlite/SQLiteDatabase.html
The DrinkActivity code so far

We want to change DrinkActivity.java’s onCreate() method so that DrinkActivity gets its drink data from the Starbuzz database instead of from the Drink Java class. Here’s the code so far (we suggest you wait until we show you the full code—a few pages ahead—before you update your version of DrinkActivity.java):
Now that we’ve created our cursor, the next thing we need to do is get the drink name, description, and image resource ID from the cursor so that we can update DrinkActivity’s views.
To read a record from a cursor, you first need to navigate to it
You’ve now seen how to create a cursor; you get a reference to a SQLiteDatabase, and then use its query() method to say what data you want the cursor to return. But that’s not the end of the story—once you have a cursor, you need to read values from it.
Whenever you need to retrieve values from a particular record in a cursor, you first need to navigate to that record.

In our particular case, we have a cursor that’s composed of a single record that contains details of the drink the user selected. We need to navigate to that record in order to read details of the drink.
Navigate cursors

There are four main methods you use to navigate through the records in a cursor: moveToFirst(), moveToLast(), moveToPrevious(), and moveToNext().
To go to the first record in a cursor, you use its moveToFirst() method. This method returns a value of true if it finds a record, and false if the cursor hasn’t returned any records):
if (cursor.moveToFirst()) {
    //Do something
};
To go to the last record, you use the moveToLast() method. Just like the moveToFirst() method, it returns a value of true if it finds a record, and false if it doesn’t:
if (cursor.moveToLast()) {
    //Do something
};
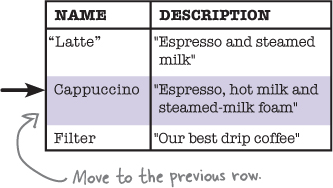
To move through the records in the cursor, you use the moveToPrevious() and moveToNext() methods.
The moveToPrevious() method moves you to the previous record in the cursor. It returns true if it succeeds in moving to the previous record, and false if it fails (for example, if it’s already at the first record):
if (cursor.moveToPrevious()) {
    //Do something
};
The moveToNext() method works in a similar way to the moveToPrevious() method, except that it moves you to the next record in the cursor instead:
if (cursor.moveToNext()) {
    //Do something
};
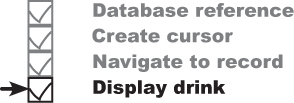
In our case, we want to read values from the first (and only) record in the cursor, so we’ll use the moveToFirst() method to navigate to this record.
Once you’ve navigated to a record in your cursor, you can access its values. We’ll look at how to do that next.
Get cursor values
You retrieve values from a cursor’s current record using the cursor’s get*() methods: getString(), getInt(), and so on. The exact method you use depends on the type of value you want to retrieve. To get a String value, for example, you’d use the getString() method, and to get an int value you’d use getInt(). Each of the methods takes a single parameter: the index of the column whose value you want to retrieve, starting at 0.
As an example, we’re using the following query to create our cursor:
Cursor cursor = db.query ("DRINK",
                          new String[] {"NAME", "DESCRIPTION", "IMAGE_RESOURCE_ID"},
                          "_id = ?",
                          new String[] {Integer.toString(1)},
                          null, null, null);
The cursor has three columns: NAME, DESCRIPTION, and IMAGE_RESOURCE_ID. The first two columns, NAME and DESCRIPTION, contain Strings, and the third column, IMAGE_RESOURCE_ID, contains int values.

Suppose you wanted to get the value of the NAME column for the current record. NAME is the first column in the cursor, and contains String values. You’d therefore use the getString() method, passing it a parameter of 0 for the column index:

Similarly, suppose you wanted to get the contents of the IMAGE_RESOURCE_ID column. This has a column index of 2 and contains int values, so you’d use the code:

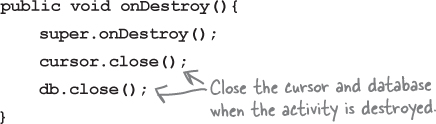
Finally, close the cursor and the database
Once you’ve finished retrieving values from the cursor, you need to close the cursor and the database in order to release their resources. You do this by calling the cursor and database close() methods:

We’ve now covered all the code you need to replace the code in DrinkActivity so that it gets its data from the Starbuzz database. Let’s look at the revised code in full.
Note
You can find details of all the cursor get methods in http://developer.android.com/reference/android/database/Cursor.html.
The DrinkActivity code

Here’s the full code for DrinkActivity.java (apply the changes in bold to your code, then save your work):
The code continues on the next page.
The DrinkActivity code (continued)
Relax

Connecting your activities to a database takes more code than using a Java class.
But if you take your time working through the code in this chapter, you’ll be fine.
So that’s the complete DrinkActivity code. Let’s review where we’ve got to, and what we need to do next.
What we’ve done so far
Now that we’ve finished updating the DrinkActivity.java code, let’s look at the app structure diagram to see what we’ve done, and what we need to do next.
DrinkActivity now gets all of its drink data from the Starbuzz database. Next, we need to update the code in DrinkCategoryActivity so that it uses data from the database rather than from the Java Drink class. We’ll look at the steps to do this on the next page.
What we’ll do to change DrinkCategoryActivity to use the Starbuzz database
When we updated DrinkActivity to get it to read data from the Starbuzz database, we created a cursor to read data for the drink the user selected, and then we used the values from the cursor to update DrinkActivity’s views.
The steps we need to go through to update DrinkCategoryActivity are slightly different. This is because DrinkCategoryActivity displays a list view that uses the drink data as its source. We need to switch the source of this data to be the Starbuzz database.
Here are the steps we need to go through to change DrinkCategoryActivity so that it uses the Starbuzz database:
Create a cursor to read drink data from the database.
As before, we need to get a reference to the Starbuzz database. Then we’ll create a cursor to retrieve the drink names from the DRINK table.

Replace the list view’s array adapter with a cursor adapter.
The list view currently uses an array adapter to get its drink names. This is because the data’s held in an array in the
Drinkclass. Because we’re now accessing the data using a cursor, we’ll use a cursor adapter instead.
Before we get started on these tasks, let’s remind ourselves of the DrinkCategoryActivity.java code we created in Chapter 7.
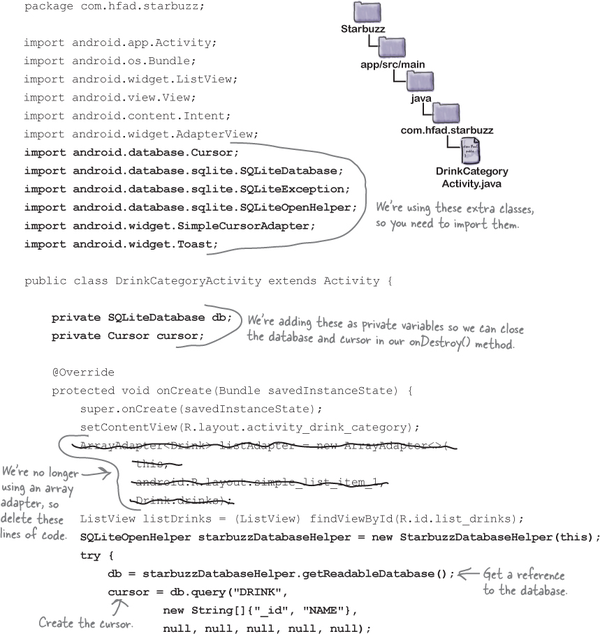
The current DrinkCategoryActivity code
Here’s a reminder of what the current DrinkCategoryActivity.java code looks like. The onCreate() method populates a list view with drinks using an array adapter. The onListItemClick() method adds the drink the user selects to an intent, and then starts DrinkActivity:

Get a reference to the Starbuzz database...

We need to change DrinkCategoryActivity so that it gets its data from the Starbuzz database. Just as before, this means that we need to create a cursor to return the data we need.
We start by getting a reference to the database. We only need to read the drink data and not update it, so we’ll use the getReadableDatabase() method as we did before:

... then create a cursor that returns the drinks
To create the cursor, we need to specify what data we want it to contain. We want to use the cursor to display a list of drink names, so the cursor needs to include the NAME column. We’ll also include the _id column to get the ID of the drink: we need to pass the ID of the drink the user chooses to DrinkActivity so that DrinkActivity can display its details. Here’s the cursor:

Putting this together, here’s the code to get a reference to the database and create the cursor (you’ll add this code to DrinkCategoryActivity.java later when we show you the full code listing):

Next we’ll use the cursor’s data to populate DrinkCategoryActivity’s list view.
How do we replace the array data in the list view?

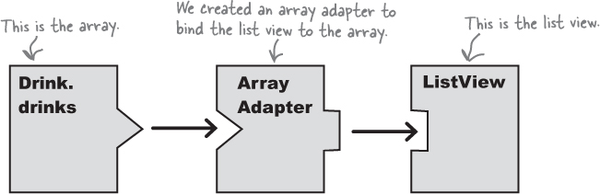
When we wanted DrinkCategoryActivity’s list view to display data from the Drink.drinks array, we used an array adapter. As you saw back in Chapter 7, an array adapter is a type of adapter that works with arrays. It acts as a bridge between the data in an array and a list view:
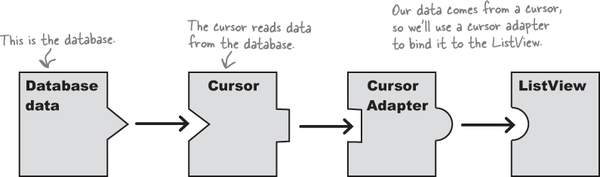
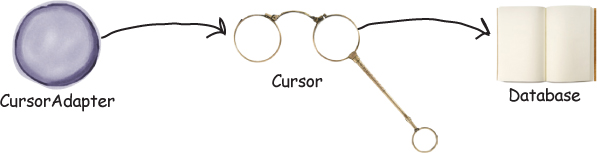
Now that we’re getting our data from a cursor, we’ll use a cursor adapter to bind the data to our list view. A cursor adapter is just like an array adapter, except that instead of getting its data from an array, it reads the data from a cursor:
We’ll look at this in more detail on the next page.
ListViews and Spinners can use any subclass of the Adapter class for their data. This includes ArrayAdapter, CursorAdapter, and SimpleCursorAdapter (a subclass of CursorAdapter).
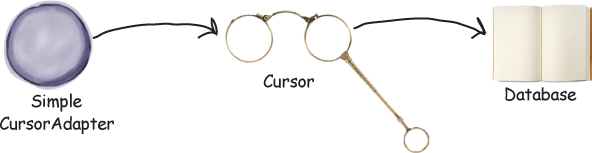
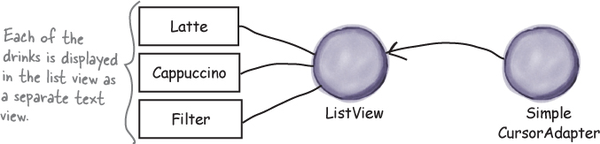
A simple cursor adapter maps cursor data to views

We’re going to create a simple cursor adapter, a type of cursor adapter that can be used in most cases where you need to display cursor data in a list view. It takes columns from a cursor, and maps them to text views or image views, for example in a list view.
In our case, we want to display a list of drink names. We’ll use a simple cursor adapter to map the name of each drink returned by our cursor to DrinkCategoryActivity’s list view.
Here’s how it will work:
The list view asks the adapter for data.

The adapter asks the cursor for data from the database.
The adapter returns the data to the list view.
The name of each drink is displayed in the list view as a separate text view.
Let’s construct the simple cursor adapter.
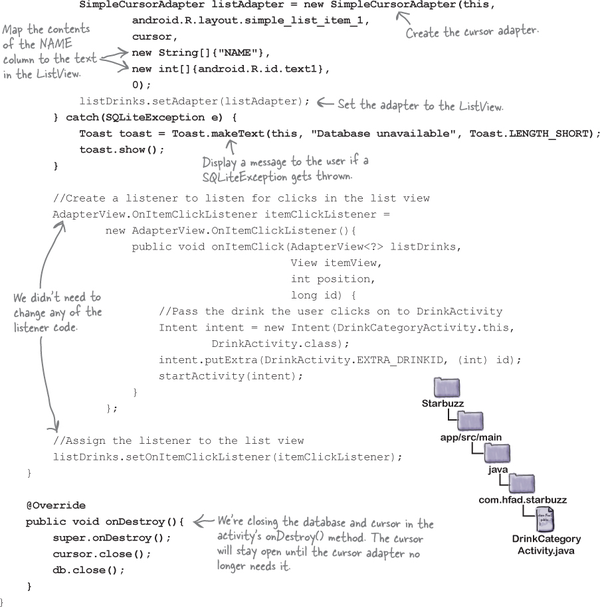
How to use a simple cursor adapter

You use a simple cursor adapter in a similar way to how you use an array adapter: you initialize the adapter, then attach it to the list view.
We’re going to create a simple cursor adapter to display a list of drink names from the DRINK table. To do this, we’ll create a new instance of the SimpleCursorAdapter class, passing in parameters to tell the adapter what data to use and how it should be displayed. Finally, we’ll assign the adapter to the list view.
Here’s the code (you’ll add it to DrinkCategoryActivity.java later in the chapter):

The general form of the SimpleCursorAdapter constructor looks like this:
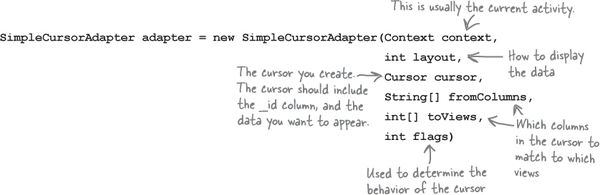
The context and layout parameters are exactly the same ones you used when you created an array adapter: context is the current context, and layout says how you want to display the data. Instead of saying which array we need to get our data from, we need to specify which cursor contains the data. You then use fromColumns to specify which columns in the cursor you want to use, and toViews to say which views you want to display them in.
The flags parameter is usually set to 0, which is the default. The alternative is to set it to FLAG_REGISTER_CONTENT_OBSERVER to register a content observer that will be notified when the content changes. We’re not covering this alternative here, as it can lead to memory leaks (you’ll see how to deal with changing content in the next chapter).
Any cursor you use with a cursor adapter MUST include the _id column or it won’t work.
Close the cursor and database

When we introduced you to cursors earlier in the chapter, we said that you needed to close the cursor and database after you’d finished with it in order to release their resources. In our DrinkActivity code, we used a cursor to retrieve drink details from the database, and once we’d used these values with our views, we immediately closed the cursor and database.
When you use a cursor adapter, (including a simple cursor adapter) it works slightly differently; the cursor adapter needs the cursor to stay open in case it needs to retrieve more data from it. Let’s look in more detail at how cursor adapters work to see why this might happen.
The list view gets displayed on the screen.
When the list is first displayed, it will be sized to fit the screen. Let’s say it has space to show five items.
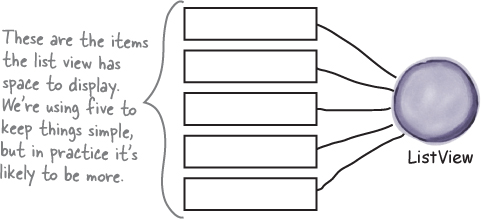
The list view asks its adapter for the first five items.

The cursor adapter asks its cursor to read five rows from the database.
No matter how many rows the database table contains, the cursor only needs to read the first five rows.
The story continues

As the user scrolls the list, the adapter asks the cursor to read more rows from the database. This works fine if the cursor’s still open. But if the cursor’s already been closed, the cursor adapter can’t get any more data from the database.

This means that you can’t immediately close the cursor and database once you’ve used the setAdapter() method to connect the cursor adapter to your list view. Instead, we’ll close the cursor and database in the activity’s onDestroy() method, which gets called just before the activity is destroyed. Because the activity’s being destroyed, there’s no further need for the cursor or database connection to stay open, so they can be closed:
That’s everything you need to know in order to update the code for DrinkCategoryActivity, so have a go at the exercise on the next page.

The DrinkCategoryActivity code (continued)

Let’s try running our freshly updated app.
Test drive the app


When you run the app, TopLevelActivity gets displayed.
When you click on the Drinks item, DrinkCategoryActivity is launched. It displays all the drinks from the Starbuzz database.
When you click on one of the drinks, DrinkActivity is launched and details of the selected drink are displayed.
The app looks exactly the same as before, but now the data is being read from the database. In fact, you can now delete the Drink.java code, because we no longer need the array of drinks. Every piece of data we need is now coming from the database.

Chapter 16 Your Android Toolbox

You’ve got Chapter 16 under your belt and now you’ve added basic cursors to your toolbox.
Note
You can download the full code for the chapter from https://tinyurl.com/HeadFirstAndroid.