
Chapter 15. SQLite Databases: Fire Up the Database

If you’re recording high scores or saving tweets, your app will need to store data. And on Android you usually keep your data safe inside a SQLite database. In this chapter, we’ll show you how to create a database, add tables to it, and prepopulate it with data, all with the help of the friendly SQLite helper. You’ll then see how you can cleanly roll out upgrades to your database structure, and how to downgrade it if you need to undo any changes.
Back to Starbuzz
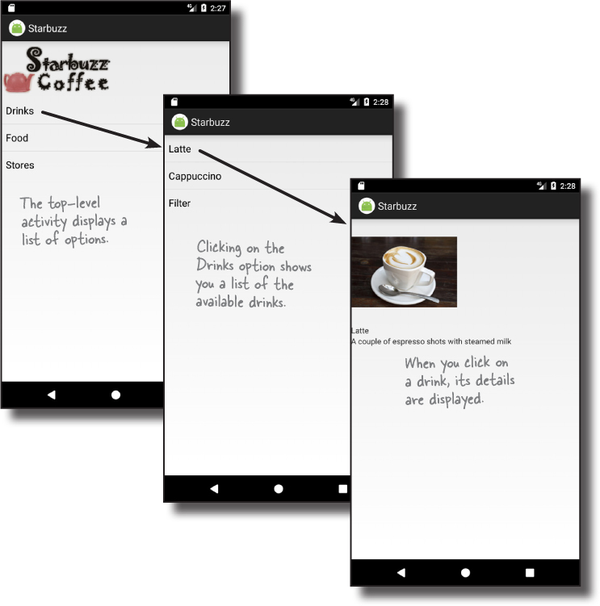
Back in Chapter 7, we created an app for Starbuzz Coffee. The app allows the user to navigate through a series of screens so that she can see the drinks available at Starbuzz.
The Starbuzz database gets its drink data from a Drink class containing a selection of drinks available at Starbuzz. While this made building the first version of the app easier, there’s a better way of storing and persisting data.
Over the next two chapters, we’re going to change the Starbuzz app so that it gets its data from a SQLite database. In this chapter, we’ll see how to create the database, and in the next chapter, we’ll show you how to connect activities to it.
Android uses SQLite databases to persist data
All apps need to store data, and the main way you do that in Androidville is with a SQLite database. Why SQLite?
It’s lightweight.
Most database systems need a special database server process in order to work. SQLite doesn’t; a SQLite database is just a file. When you’re not using the database, it doesn’t use up any processor time. That’s important on a mobile device, because we don’t want to drain the battery.
It’s optimized for a single user.
Our app is the only thing that will talk to the database, so we shouldn’t have to identify ourselves with a username and password.
It’s stable and fast.
SQLite databases are amazingly stable. They can handle database transactions, which means if you’re updating several pieces of data and mess up, SQLite can roll the data back. Also, the code that reads and writes the data is written in optimized C code. Not only is it fast, but it also reduces the amount of processor power it needs.
We’re going to go through the basics of SQLite in this chapter.
If you plan on doing a lot of database heavy lifting in your apps, we suggest you do more background reading on SQLite and SQL.
Where’s the database stored?
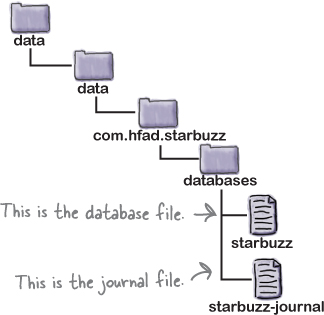
Android automatically creates a folder for each app where the app’s database can be stored. When we create a database for the Starbuzz app, it will be stored in the following folder on the device:

An app can store several databases in this folder. Each database consists of two files.
The first file is the database file and has the same name as your database—for example, “starbuzz”. This is the main SQLite database file. All of your data is stored in this file.
The second file is the journal file. It has the same name as your database, with a suffix of “-journal”—for example, “starbuzz-journal”. The journal file contains all of the changes made to your database. If there’s a problem, Android will use the journal to undo your latest changes.
Android comes with SQLite classes
Android uses a set of classes that allows you to manage a SQLite database. There are three types of object that do the bulk of this work:
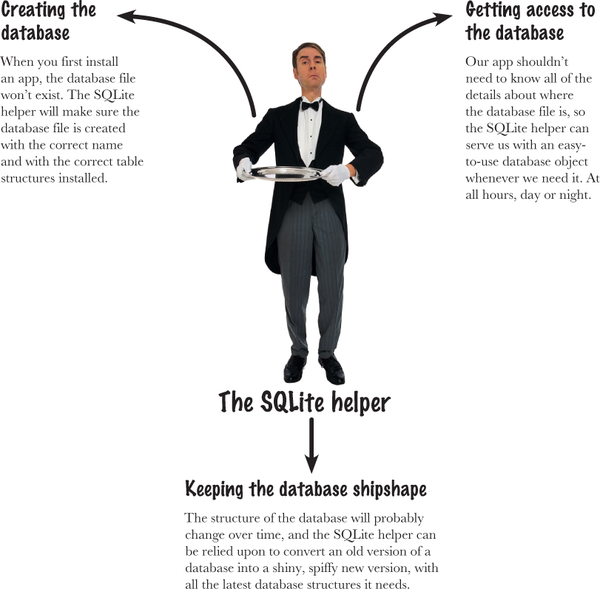
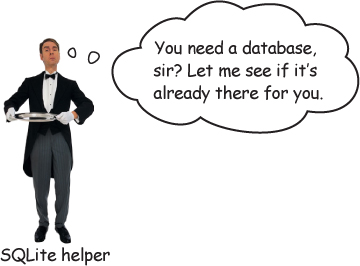
The SQLite Helper
A SQLite helper enables you to create and manage databases. You create one by extending the SQLiteOpenHelper class.

The SQLite Database
The SQLiteDatabase class gives you access to the database. It’s like a SQLConnection in JDBC.

Cursors
A Cursor lets you read from and write to the database. It’s like a ResultSet in JDBC.

We’re going to use these objects to show you how to create a SQLite database your app can use to persist data by replacing the Drink class with a SQLite database.
The current Starbuzz app structure
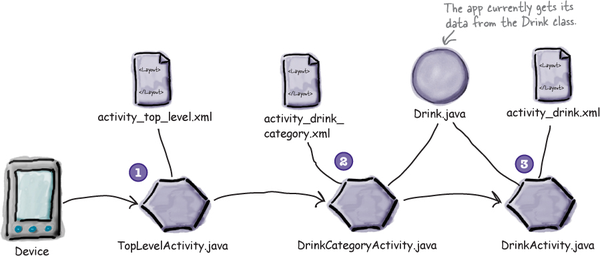
Here’s a reminder of the current structure of the Starbuzz app:
TopLevelActivity displays a list of options: Drinks, Food, and Stores.
When the user clicks on the Drinks option, it launches DrinkCategoryActivity.
This activity displays a list of drinks that it gets from the Java
Drinkclass.When the user clicks on a drink, its details get displayed in DrinkActivity.
DrinkActivitygets details of the drink from the JavaDrinkclass.
How does the app structure need to change if we’re to use a SQLite database?
Do this!
We’re going to update the Starbuzz app in this chapter, so open your original Starbuzz project in Android Studio.
Let’s change the app to use a database
We’ll use a SQLite helper to create a SQLite database we can use with our Starbuzz app. We’re going to replace our Drink Java class with a database, so we need our SQLite helper to do the following:
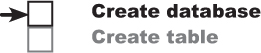
Create the database.
Before we can do anything else, we need to get the SQLite helper to create version 1 (the first version) of our Starbuzz database.
Create the Drink table and populate it with drinks.
Once we have a database, we can create a table in it. The table’s structure needs to reflect the attributes in the current
Drinkclass, so it needs to be able to store the name, description, and image resource ID of each drink. We’ll then add three drinks to it.
The app has the same structure as before except that we’re replacing the file Drink.java with a SQLite helper and a SQLite Starbuzz database. The SQLite helper will maintain the Starbuzz database, and provide access to it for the other activities. We’ll change the activities to use the database in the next chapter.

Let’s start by looking at the SQLite helper.

Create the SQLite helper
You create a SQLite helper by writing a class that extends the SQLiteOpenHelper class. When you do this, you must override the onCreate() and onUpgrade() methods. These methods are mandatory.
The onCreate() method gets called when the database first gets created on the device. The method should include all the code needed to create the tables you need for your app.
The onUpgrade() method gets called when the database needs to be upgraded. As an example, if you need to modify the structure of the database after it’s been released, this is the method to do it in.
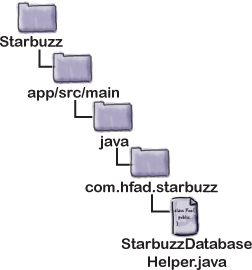
In our app, we’re going to use a SQLite helper called StarbuzzDatabaseHelper. Create this class in your Starbuzz project by switching to the Project view of Android Studio’s explorer, selecting the com.hfad.starbuzz package in the app/src/main/java folder, and navigating to File→New...→Java Class. Name the class “StarbuzzDatabaseHelper”, make sure the package name is com.hfad.starbuzz and then replace its contents with the code below:

To get the SQLite helper to do something, we need to add code to its methods. The first thing to do is tell the SQLite helper what database it needs to create.
Specify the database

There are two pieces of information the SQLite helper needs in order to create the database.
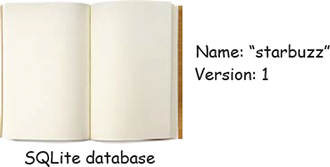
First, we need to give the database a name. By giving the database a name, we make sure that the database remains on the device when it’s closed. If we don’t, the database will only be created in memory, so once the database is closed, it will disappear.
Note
Creating databases that are only held in memory can be useful when you’re testing your app.
The second piece of information we need to provide is the version of the database. The database version needs to be an integer value, starting at 1. The SQLite helper uses this version number to determine whether the database needs to be upgraded.
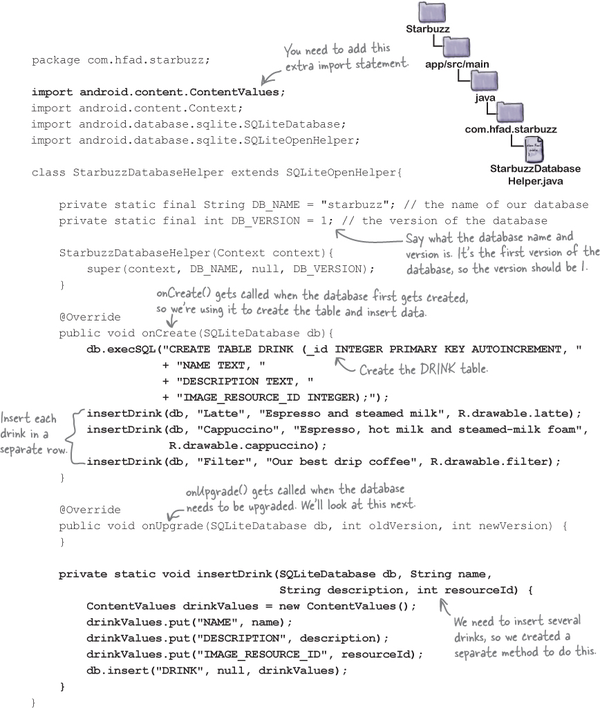
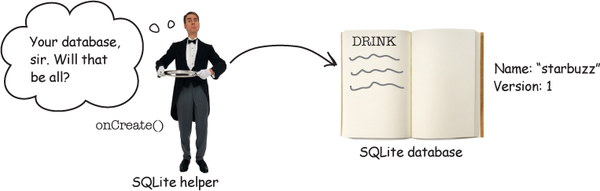
You specify the database name and version by passing them to the constructor of the SQLiteOpenHelper superclass. We’re going to give our database a name of “starbuzz”, and as it’s the first version of the database, we’ll give it a version number of 1. Here’s the code we need (update your version of StarbuzzDatabaseHelper.java to match the code below):

The constructor specifies details of the database, but the database doesn’t get created at that point. The SQLite helper waits until the app needs to access the database, and then creates the database.
We’ve now done everything we need to tell the SQLite helper what database to create. The next step is to tell it what tables to create.
Inside a SQLite database

The data inside a SQLite database is stored in tables. A table contains several rows, and each row is split into columns. A column contains a single piece of data, like a number or a piece of text.
You need to create a table for each distinct piece of data that you want to record. In the Starbuzz app, for example, we’ll need to create a table for the drink data. It will look something like this:

Some columns can be specified as primary keys. A primary key uniquely identifies a single row. If you say that a column is a primary key, then the database won’t allow you to store rows with duplicate keys.
We recommend that your tables have a single column called _id to hold the primary key that contains integer values. This is because Android code is hardwired to expect a numeric _id column, so not having one can cause you problems later on.
It’s an Android convention to call your primary key columns _id. Android code expects there to be an _id column on your data. Ignoring this convention will make it harder to get the data out of your database and into your user interface.
Storage classes and data types
Each column in a table is designed to store a particular type of data. For example, in our DRINK table, the DESCRIPTION column will only ever store text data. Here are the main data types you can use in SQLite, and what they can store:
| Any integer type |
| Any character type |
| Any floating-point number |
| Booleans, dates, and date-times |
| Binary Large Object |
Unlike most database systems, you don’t need to specify the column size in SQLite. Under the hood, the data type is translated into a much broader storage class. This means you can say very generally what kind of data you’re going to store, but you’re not forced to be specific about the size of data.
You create tables using Structured Query Language (SQL)
Every application that talks to SQLite needs to use a standard database language called Structured Query Language (SQL). SQL is used by almost every type of database. If you want to create the DRINK table, you will need to do it in SQL.
This is the SQL command to create the table:

The CREATE TABLE command says what columns you want in the table, and what the data type is of each column. The _id column is the primary key of the table, and the special keyword AUTOINCREMENT means that when we store a new row in the table, SQLite will automatically generate a unique integer for it.
The onCreate() method is called when the database is created
The SQLite helper is in charge of creating the SQLite database. An empty database is created on the device the first time it needs to be used, and then the SQLite helper’s onCreate() method is called. The onCreate() method has one parameter, a SQLiteDatabase object that represents the database that’s been created.
The SQLiteDatabase class gives you access to the database.
You can use the SQLiteDatabase execSQL() method to execute SQL on the database. This method has one parameter, the SQL you want to execute.

We’ll use the onCreate() method to create the DRINK table. Here’s the code (we’ll add the code in a few pages):

This gives us an empty DRINK table. We want to prepopulate it with drink data, so let’s look at how you do that.
Insert data using the insert() method

To insert data into a table in a SQLite database, you start by specifying what values you want to insert into the table. To do this, you first create a ContentValues object:
ContentValues drinkValues = new ContentValues();
A ContentValues object describes a set of data. You usually create a new ContentValues object for each row of data you want to create.
You add data to the ContentValues object using its put() method. This method adds name/value pairs of data: NAME is the column you want to add data to, and value is the data:

As an example, here’s how you’d use the put() method to add the name, description, and image resource ID of a latte to a ContentValues object called drinkValues:

Once you’ve added a row of data to the ContentValues object, you insert it into the table using the SQLiteDatabase insert() method. This method inserts data into a table, and returns the ID of the record once it’s been inserted. If the method is unable to insert the record, it returns a value of -1. As an example, here’s how you’d insert the data from drinkValues into the DRINK table:

The middle parameter is usually set to null, as in the above code. It’s there in case the ContentValues object is empty, and you want to insert an empty row into your table. It’s unlikely you’d want to do this, but if you did you’d replace the null value with the name of one of the columns in your table.
Running the lines of code above will insert a Latte row into the DRINK table:

The insert() methods inserts one row of data at a time. But what if you want to insert multiple records?
Insert multiple records

To insert multiple rows into a table, you need to make repeat calls to the insert() method. Each call to the method inserts a separate row.
To insert multiple rows, you usually create a new method that inserts a single row of data, and call it each time you want to add a new row. As an example, here’s an insertDrink() method we wrote to insert drinks into the DRINK table:

To add three drinks to the DRINK table, each one a separate row of data, you’d call the method three times:
insertDrink(db, "Latte", "Espresso and steamed milk", R.drawable.latte);
insertDrink(db, "Cappuccino", "Espresso, hot milk and steamed-milk foam",
                R.drawable.cappuccino);
insertDrink(db, "Filter", "Our best drip coffee", R.drawable.filter);
That’s everything you need to know to insert data into tables. On the next page we’ll show you the revised code for StarbuzzDatabaseHelper.java.

What the SQLite helper code does

The user installs the app and launches it.
When the app needs to access the database, the SQLite helper checks to see if the database already exists.
If the database doesn’t exist, it gets created.
It’s given the name and version number specified in the SQLite helper.

When the database is created, the onCreate() method in the SQLite helper is called.
It adds a DRINK table to the database, and populates it with records.
What if you need to make changes to the database?
So far, you’ve seen how to create a SQLite database that your app will be able to use to persist data. But what if you need to make changes to the database at some future stage?
As an example, suppose lots of users have already installed your Starbuzz app on their devices, and you want to a add a new FAVORITE column to the DRINK table. How would you distribute this change to new and existing users?

When you need to change an app’s database, there are two key scenarios you have to deal with.
The first scenario is that the user has never installed your app before, and doesn’t have the database installed on their device. In this case, the SQLite helper creates the database the first time the database needs to be accessed, and runs its onCreate() method.
The second scenario is where the user installs a new version of your app that includes a different version of the database. If the SQLite helper spots that the database that’s installed is out of date, it will call either the onUpgrade() or onDowngrade() method.
So how can the SQLite helper tell if the database is out of date?
SQLite databases have a version number

The SQLite helper can tell whether the SQLite database needs updating by looking at its version number. You specify the version of the database in the SQLite helper by passing it to the SQLiteOpenHelper superclass in its constructor.
Earlier on, we specified the version number of the database like this:
...
     private static final String DB_NAME = "starbuzz";
     private static final int DB_VERSION = 1;

     StarbuzzDatabaseHelper(Context context) {
          super(context, DB_NAME, null, DB_VERSION);
     }
...
When the database gets created, its version number gets set to the version number in the SQLite helper, and the SQLite helper onCreate() method gets called.
When you want to update the database, you change the version number in the SQLite helper code. To upgrade the database, specify a number that’s larger than you had before, and to downgrade your database, specify a number that’s lower:

Most of the time, you’ll want to upgrade the database, so specify a number that’s larger. You usually only downgrade your database when you want to undo changes you made in a previous upgrade.
When the user installs the latest version of the app on their device, the first time the app needs to use the database, the SQLite helper checks its version number against that of the database on the device.
If the version number in the SQLite helper code is higher than that of the database, it calls the SQLite helper onUpgrade() method. If the version number in the SQLite helper code is lower than that of the database, it calls the onDowngrade() method instead.
Once it’s called either of these methods, it changes the version number of the database to match the version number in the SQLite helper.
Geek Bits

SQLite databases support a version number that’s used by the SQLite helper, and an internal schema version. Whenever a change is made to the database schema, such as the table structure, the database increments the schema version by 1. You have no control over this value, it’s just used internally by SQLite.
What happens when you change the version number

Let’s look at what happens when you release a new version of the app where you’ve changed the SQLite helper version number from 1 to 2. We’ll consider two scenarios: where a first-time user installs the app, and when an existing user installs it.
Scenario 1: A first-time user installs the app
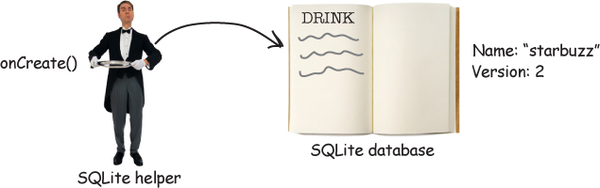
The first time the user runs the app, the database doesn’t exist, so the SQLite helper creates it.
The SQLite helper gives the database the name and version number specified in the SQLite helper code.

When the database is created, the onCreate() method in the SQLite helper is called.
The
onCreate()method includes code to populate the database.
That’s what happens when a first-time user installs the app. What about when an existing user installs the new version?
Scenario 2: an existing user installs the new version

When the user runs the new version of the app, the database helper checks whether the database exists.
If the database already exists, the SQLite helper doesn’t recreate it.

The SQLite helper checks the version number of the existing database against the version number in the SQLite helper code.
If the SQLite helper version number is higher than the database version, it calls the
onUpgrade()method. If the SQLite helper version number is lower than the database version, it calls theonDowngrade()method. It then changes the database version number to reflect the version number in the SQLite helper code.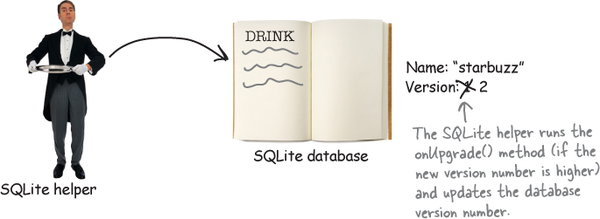
Now that you’ve seen under what circumstances the onUpgrade() and onDowngrade() methods get called, let’s find out more about how you use them.
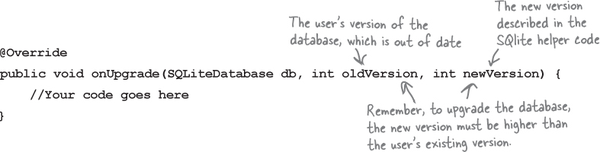
Upgrade your database with onUpgrade()

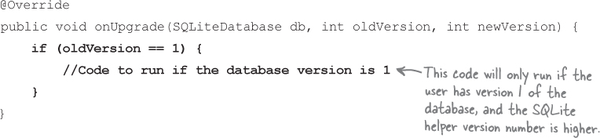
The onUpgrade() method has three parameters—the SQLite database, the user’s version number of the database, and the new version of the database that’s passed to the SQLiteOpenHelper superclass:
The version numbers are important, as you can use them to say what database changes should be made depending on which version of the database the user already has. As an example, suppose you needed to run code if the user has version 1 of the database, and the SQLite helper version number is higher. Your code would look like this:
You can also use the version numbers to apply successive updates like this:
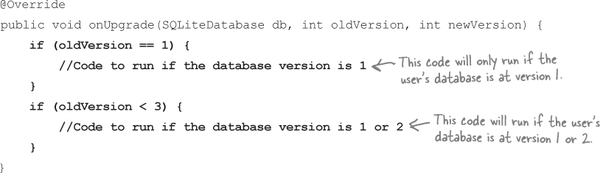
Using this approach means that you can make sure that the user gets all the database changes applied that they need, irrespective of which version they have installed.
The onDowngrade() method works in a similar way to the onUpgrade() method. Let’s take a look on the next page.
Downgrade your database with onDowngrade()

The onDowngrade() method isn’t used as often as the onUpgrade() method, as it’s used to revert your database to a previous version. This can be useful if you release a version of your app that includes database changes, but you then discover that there are bugs. The onDowngrade() method allows you to undo the changes and set the database back to its previous version.
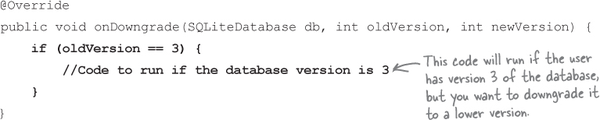
Just like the onUpgrade() method, the onDowngrade() method has three parameters—the SQLite database you want to downgrade, the version number of the database itself, and the new version of the database that’s passed to the SQLiteOpenHelper superclass:

Just as with the onUpgrade() method, you can use the version numbers to revert changes specific to a particular version. As an example, if you needed to make changes to the database when the user’s database version number is 3, you’d use code like following:
Now that you know how to upgrade and downgrade a database, let’s walk through the more common scenario: upgrading.
Let’s upgrade the database

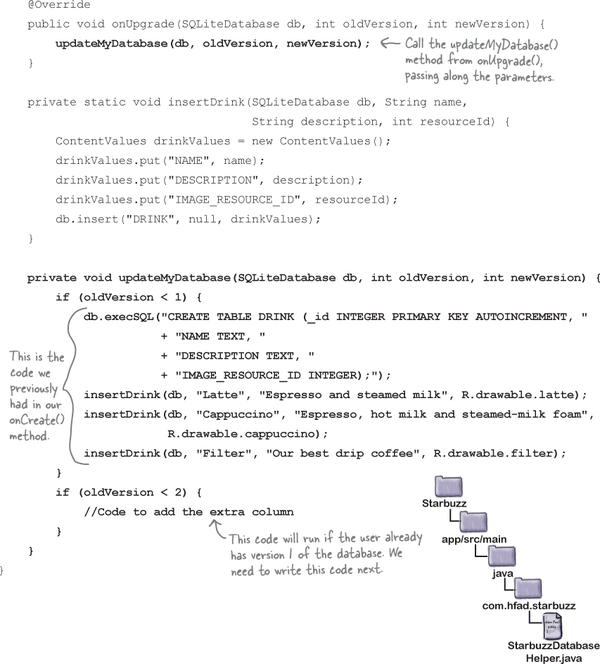
Suppose we need to upgrade our database to add a new column to the DRINK table. As we want all new and existing users to get this change, we need to make sure that it’s included in both the onCreate() and onUpgrade() methods. The onCreate() method will make sure that all new users get the new column, and the onUpgrade() method will make sure that all existing users get it too.
Rather than put similar code in both the onCreate() and onUpgrade() methods, we’re going to create a separate updateMyDatabase() method, called by both the onCreate() and onUpgrade() methods. We’ll move the code that’s currently in the onCreate() method to this new updateMyDatabase() method, and we’ll add extra code to create the extra column. Using this approach means that you can put all of your database code in one place, and more easily keep track of what changes you’ve made each time you’ve updated the database.
Here’s the full code for StarbuzzDatabaseHelper.java (update your code to reflect our changes):

The SQLite helper code (continued)

The next thing we need to do is write the code to upgrade the database. Before we do that, try the exercise on the next page.
Upgrade an existing database

When you need to upgrade your database, there are two types of actions you might want to perform:
Change the database records.
Earlier in the chapter, you saw how to insert records in your database using the
SQLiteDatabase insert()method. You may want to add more records when you upgrade the database, or update or delete the records that are already there.Change the database structure.
You’ve already seen how you can create tables in the database. You may also want to add columns to existing tables, rename tables, or remove tables completely.
We’ll start by looking at how you change database records.
How to update records
You update records in a table in a similar way to how you insert them.
You start by creating a new ContentValues object that specifies what you want to update values to. As an example, suppose you wanted to update the Latte data in the DRINK table so that the value of the DESCRIPTION field is “Tasty”:

To do this, you’d create a new ContentValues object that describes the data that needs to be updated:

Notice that when you’re updating records, you only need to specify the data you want to change in the ContentValues object, not the entire row of data.
Once you’ve added the data you want to change to the ContentValues object, you use the SQLiteDatabase update() method to update the data. We’ll look at this on the next page.
Update records with the update() method

The update() method lets you update records in the database, and returns the number of records it’s updated. To use the update() method, you specify the table you want to update records in, the ContentValues object that contains the values you want to update, and the conditions for updating them.
As an example, here’s how you’d change the value of the DESCRIPTION column to “Tasty” where the name of the drink is “Latte”:

The first parameter of the update() method is the name of the table you want to update (in this case, the DRINK table).
The second parameter is the ContentValues object that describes the values you want to update. In the example above, we’ve added "DESCRIPTION" and "Tasty" to the ContentValues object, so it updates the value of the DESCRIPTION column to “Tasty”.
The last two parameters specify which records you want to update by describing conditions for the update. Together, they form the WHERE clause of a SQL statement.
The third parameter specifies the name of the column in the condition. In the above example, we want to update records where the value of the NAME column is “Latte”, so we use "NAME =?"; it means that we want the value in the NAME column to be equal to some value. The ? symbol is a placeholder for this value.
The last parameter is an array of Strings that says what the value of the condition should be. In our particular case we want to update records where the value of the NAME column is “Latte”, so we use:
new String[] {"Latte"});Watch it!

If you set the last two parameters of the update() method to null, ALL records in the table will be updated.
As an example, the code:
db.update("DRINK",
          drinkValues,
          null, null);
will update all records in the DRINK table.
We’ll look at more complex conditions on the next page.
Apply conditions to multiple columns

You can also specify conditions that apply to multiple columns. As an example, here’s how you’d update all records where the name of the drink is “Latte”, or the drink description is “Our best drip coffee”:
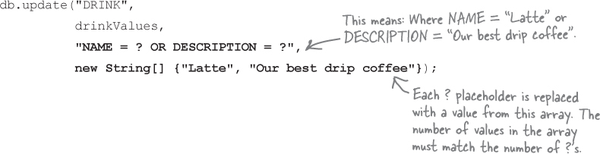
If you want to apply conditions that cover multiple columns, you specify the column names in the update() method’s third parameter. As before, you add a placeholder ? for each value you want to add as part of each condition. You then specify the condition values in the update() method’s fourth parameter.
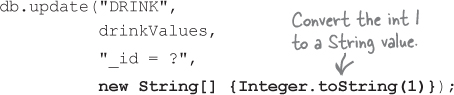
The condition values must be Strings, even if the column you’re applying the condition to contains some other type of data. As an example, here’s how you’d update DRINK records where the _id (numeric) is 1:
Delete records with the delete() method
You delete records using the SQLiteDatabase delete() method. It works in a similar way to the update() method you’ve just seen. You specify the table you want to delete records from, and conditions for deleting the data. As an example, here’s how you’d delete all records from the DRINK table where the name of the drink is “Latte”:

The first parameter is the name of the table you want to delete records from (in this case, DRINK). The second and third arguments allow you to describe conditions to specify exactly which records you wish to delete (in this case, where NAME = “Latte”).
Change the database structure

In addition to creating, updating, or deleting database records, you may want to make changes to the database structure. As an example, in our particular case we want to add a new FAVORITE column to the DRINK table.
Add new columns to tables using SQL
Earlier in the chapter, you saw how you could create tables using the SQL CREATE TABLE command like this:

You can also use SQL to change an existing table using the ALTER TABLE command. As an example, here’s what the command looks like to add a column to a table:

In the example above, we’re adding a column to the DRINK table called FAVORITE that holds numeric values.
Renaming tables
You can also use the ALTER TABLE command to rename a table. As an example, here’s how you’d rename the DRINK table to FOO:

On the next page, we’ll show you how to remove a table from the database.
Delete tables by dropping them

If you want to delete a table from the database, you use the DROP TABLE command. As an example, here’s how you’d delete the DRINK table:

This command is useful if you have a table in your database schema that you know you don’t need anymore, and want to remove it in order to save space. Make sure you only use the DROP TABLE command if you’re absolutely sure you want to get rid of the table and all of its data.
Execute the SQL using execSQL()
As you saw earlier in the chapter, you execute SQL commands using the SQLiteDatabase execSQL() method:
SQLiteDatabase.execSQL(String sql);
You use the execSQL() method any time you need to execute SQL on the database. As an example, here’s how you’d execute SQL to add a new FAVORITE column to the DRINK table:
db.execSQL("ALTER TABLE DRINK ADD COLUMN FAVORITE NUMERIC;");Now that you’ve seen the sorts of actions you might want to perform when upgrading your database, let’s apply this to StarbuzzDatabaseHelper.java.
The full SQLite helper code

Here’s the full code for StarbuzzDatabaseHelper.java that will add a new FAVORITE column to the DRINK table. Update your code to match ours (the changes are in bold):

The code continues over the page.
The SQLite helper code (continued)


The new code in the SQLite helper means that existing users will get the new FAVORITE column added to the DRINK table the next time they access the database. It also means that any new users will get the complete database created for them, including the new column.
We’ll go through what happens when the code runs on the next page. Then in the next chapter, you’ll see how to use the database data in your activities.
What happens when the code runs
1 When the database first needs to be accessed, the SQLite helper checks whether the database already exists.
2a If the database doesn’t exist, the SQLite helper creates it and runs its onCreate() method.
Our onCreate() method code calls the updateMyDatabase() method. This creates the DRINK table (including the new FAVORITE column) and populates the table with records.
2b If the database already exists, the SQLite helper checks the version number of the database against the version number in the SQLite helper code.
If the SQLite helper version number is higher than the database version, it calls the onUpgrade() method. If the SQLite helper version number is lower than the database version, it calls the onDowngrade() method. Our SQLite helper version number is higher than that of the existing database, so the onUpgrade() method is called. It calls the updateMyDatabase() method, and this adds the new FAVORITE column to the DRINK table.

Chapter 15 Your Android Toolbox

You’ve got Chapter 15 under your belt and now you’ve added creating, updating, and upgrading databases to your toolbox.
Note
You can download the full code for the chapter from https://tinyurl.com/HeadFirstAndroid.