
Chapter 13. Recycler Views and Card Views: Get Recycling
You’ve already seen how the humble list view is a key part of most apps. But compared to some of the material design components we’ve seen, it’s somewhat plain. In this chapter, we’ll introduce you to the recycler view, a more advanced type of list that gives you loads more flexibility and fits in with the material design ethos. You’ll see how to create adapters tailored to your data, and how to completely change the look of your list with just two lines of code. We’ll also show you how to use card views to give your data a 3D material design appearance.
There’s still work to do on the Bits and Pizzas app
In Chapter 12, we updated the Bits and Pizzas app to include components from the Design Support Library, including a tab layout, FAB, and collapsing toolbar. We added these to help users navigate to places in the app more easily, and to implement a consistent material design look and feel. If you recall, material design is inspired by paper and ink, and uses print-based design principles and movement to reflect how real-world objects (such as index cards and pieces of paper) look and behave. But there’s one key area we didn’t look at: lists.
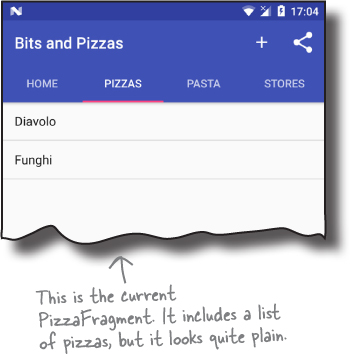
We’re currently using list views in PizzaFragment, PastaFragment, and StoresFragment to display the available pizzas, pasta, and stores. These lists are very plain compared with the rest of the app, and could do with some work to give them the same look and feel.
Another disadvantage of list views is that they don’t implement nested scrolling. In Chapter 12, we made MainActivity’s toolbar scroll in response to the user scrolling content in the activity’s fragments. This currently works for TopFragment, as it uses a nested scroll view. As none of the other fragments use nested scrolling, however, the toolbar remains fixed when the user tries to scroll their content.
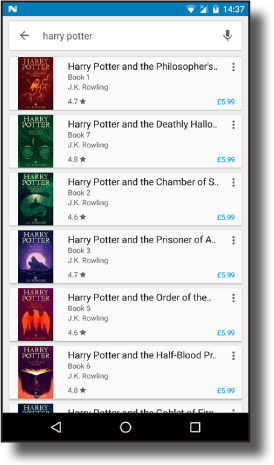
To address these issues, we’re going to change PizzaFragment to use a recycler view. This is a more advanced and flexible version of a list view that implements nested scrolling. Instead of displaying just the names of each pizza in a list view, we’ll use a recycler view to display its name and image:

Recycler views from 10,000 feet
Before we dive into the code, let’s take a look at how recycler views work. As a recycler view is more flexible than a list view, it takes a lot more setting up.
Like list views, recycler views efficiently manage a small number of views to give the appearance of a large collection of views that extend beyond the screen. They allow you greater flexibility about how the data is displayed than list views do.
A recycler view accesses its data using an adapter. Unlike a list view, however, it doesn’t use any of the built-in Android adapters such as array adapters. Instead, you have to write an adapter of your own that’s tailored to your data. This includes specifying the type of data, creating views, and binding the data to the views.
Items are positioned in a recycler view using a layout manager. There are a number of built-in layout managers you can use that allow you to position items in a linear list or grid.
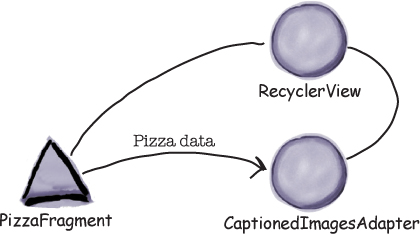
Here’s a diagram of all those elements put together:

In our particular case, we’re going to create a recycler view to display pizza names and images. We’ll go through the steps for how to do this on the next page.
Here’s what we’re going to do
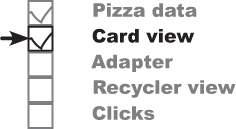
There are five main steps we’ll go through to get the recycler view working:
Add the pizza data to the project.
We’ll add images of the pizzas to the app, along with a new
Pizzaclass. This class will be the recycler view’s data source.
Create a card view for the pizza data.
We’re going to make each pizza in the recycler view look as though it’s displayed on a separate card. To do this, we’ll use a new type of view called a card view.
Create a recycler view adapter.
As we said on the previous page, when you use a recycler view you need to write your own adapter for it. Our adapter needs to take the pizza data and bind each item to a card view. Each card will then be able to be displayed in the recycler view.
Add a recycler view to PizzaFragment.
After we’ve created the adapter, we’ll add the recycler view to
PizzaFragment. We’ll make it use the adapter, and use a layout manager to display pizza data in a two-column grid.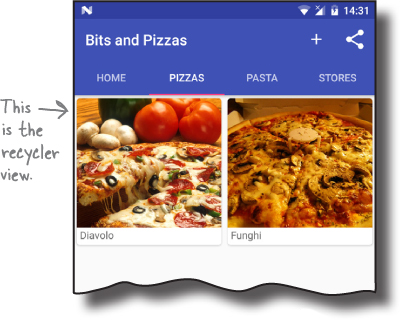
Make the recycler view respond to clicks.
We’ll create a new activity,
PizzaDetailActivity, and get it to start when the user clicks on one of the pizzas. We’ll display details of the pizza in the activity.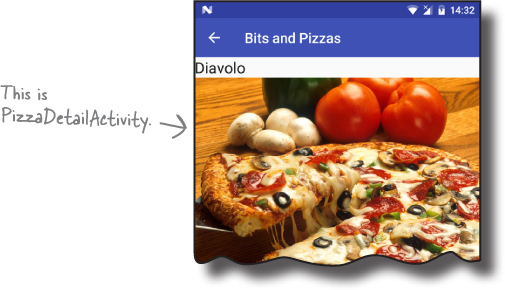
The first thing we’ll do is add the pizza data.
Do this!
We’re going to update the Bits and Pizzas app in this chapter, so open your Bits and Pizzas project in Android Studio.
Add the pizza data
We’ll start by adding the pizza images to the Bits and Pizzas project. Download the files diavolo.jpg and funghi.jpg from https://git.io/v9oet, then add them to the folder app/src/main/res/drawable-nodpi. This folder should already exist in your project, as we added an image to it in Chapter 12.

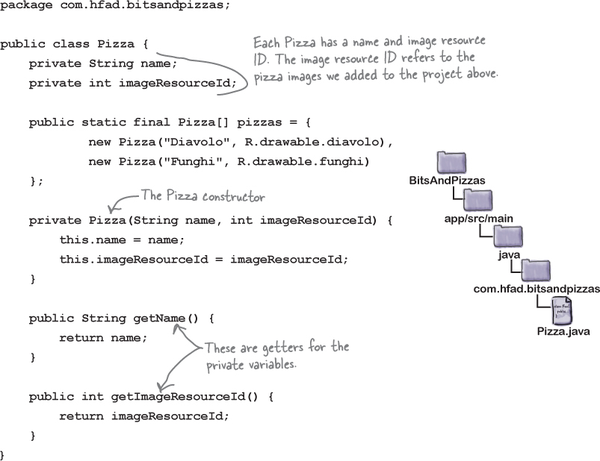
Add the Pizza class
We’ll get our data from a Pizza class, which we need to add. The class defines an array of two pizzas, where each pizza has a name and image resource ID. Switch to the Project view of Android Studio’s explorer, highlight the com.hfad.bitsandpizzas package in the app/src/main/java folder, then go to File→New...→Java class. When prompted, name the class “Pizza” and make sure the package name is com.hfad.bitsandpizzas. Finally, replace the code in Pizza.java with the following:
Note
In a real app, we might use a database for this. We’re using a Java class here for simplicity.
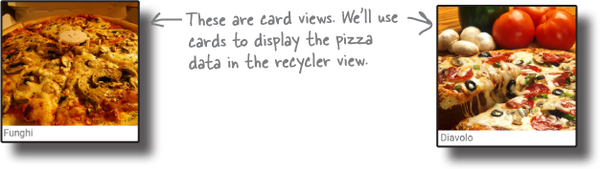
Display the pizza data in a card

The next thing we need to do is define a layout for the pizza data. This layout will be used by the recycler view’s adapter to determine how each item in the recycler view should look. We’re going to use a card view for this layout.
A card view is a type of frame layout that lets you display information on virtual cards. Card views can have rounded corners and shadows to make it look as though they’re positioned above their background. If we use a card view for our pizza data, each pizza will look as though it’s displayed on a separate card in the recycler view.
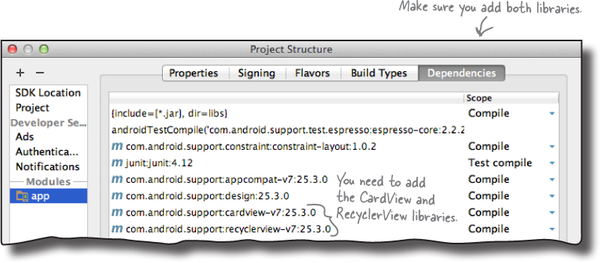
Add the CardView and RecyclerView Support Libraries
Card views and recycler views come from the CardView and RecyclerView v7 Support Libraries, respectively, so before we can go any further, you need to add them to your project as dependencies.
In Android Studio go to File→Project Structure. In the Project Structure window, click on the “app” option and switch to the Dependencies tab. Then click on the “+” button at the bottom or right side of the screen, choose the “Library dependency” option, and add the CardView Library. Repeat these steps to add the RecyclerView-v7 Library, then click on the OK button to save your changes.
Now that you’ve added the Support Libraries, we’ll create a card view that we can use for our pizza data.
How to create a card view

We’re going to create a card view that displays an image with a caption. We’ll use it here for the name and image of individual pizzas, but you could also use the same layout for different categories of data such as pasta or stores.
You create a card view by adding a <CardView> element to a layout. If you want to use the card view in a recycler view (as we do here), you need to create a new layout file for the card view. Do this by highlighting the app/src/main/res/layout folder, and choosing File→New→Layout resource file. When prompted, name the layout “card_captioned_image”.
You add a card view to your layout using code like this:
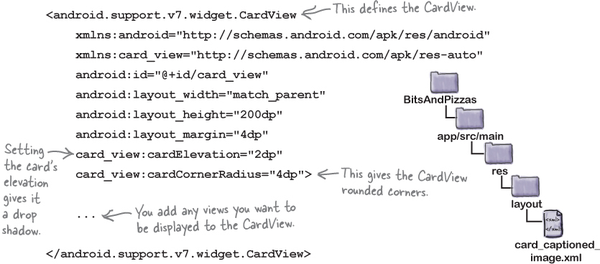
In the above code, we’ve added an extra namespace of:
xmlns:card_view="http://schemas.android.com/apk/res-auto"
so that we can give the card rounded corners and a drop shadow to make it look higher than its background. You add rounded corners using the card_view:cardCornerRadius attribute, and the card_view:cardElevation attribute sets its elevation and adds drop shadows.
Once you’ve defined the card view, you need to add any views you want to display to it. In our case, we’ll add a text view and image view to display the name and image of the pizza. We’ll show you the full code for this on the next page.
The full card_captioned_image.xml code
Here’s the full code for card_captioned_image.xml (update your version of the file to match ours):
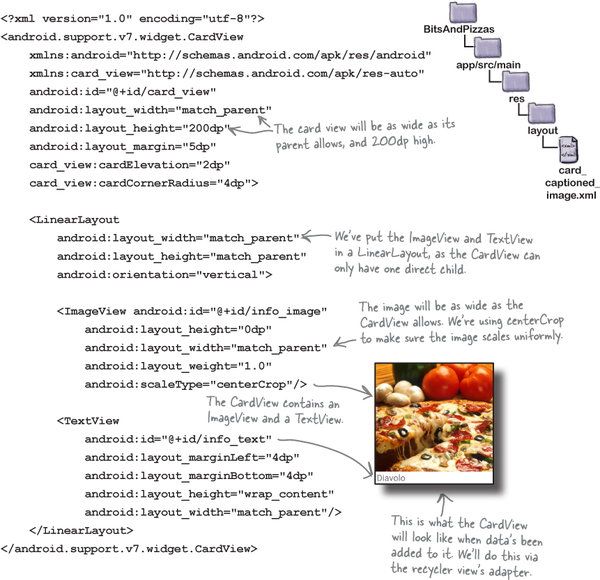
Note that the above layout doesn’t explicitly mention pizza data. This means we can use the same layout for any data items that consist of a caption and an image, such as pasta.
Now that we’ve created a layout for the card views, we’ll move on to creating the recycler view’s adapter.
How our recycler view adapter will work

As we said earlier, when you use a recycler view in your app, you need to create a recycler view adapter. That’s because unlike a list view, recycler views don’t use any of the built-in adapters that come with Android. While writing your own adapter may seem like hard work, on the plus side it gives you more flexibility than using a built-in one.
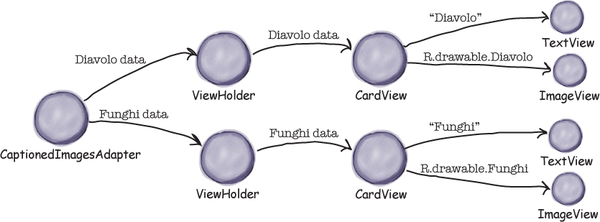
The adapter has two main jobs: to create each of the views that are visible within the recycler view, and to bind each view to a piece of data. In our case, the recycler view needs to display a set of cards, each containing a pizza image and caption. This means that the adapter needs to create each card and bind data to it.
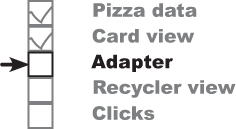
We’ll create the recycler view adapter over the next few pages. Here are the steps we’ll go through to create it: We’ll start by adding a RecyclerView.Adapter class to our project.
Specify what data the adapter should work with.
We want the adapter to work with the pizza data. Each pizza has a name and image resource ID, so we’ll pass the adapter an array of pizza names, and an array of image resource IDs.
Define the views the adapter should populate.
We want to use the data to populate a set of pizza cards defined by card_captioned_image.xml. We then need to create a set of these cards that will be displayed in the recycler view, one card per pizza.
Bind the data to the cards.
Finally, we need to display the pizza data in the cards. To make that happen, we need to populate the
info_texttext view with the name of the pizza, and theinfo_imageimage view with the pizza’s image.
Add a recycler view adapter
You create a recycler view adapter by extending the RecyclerView.Adapter class and overriding various methods; we’ll cover these over the next few pages. You also need to define a ViewHolder as an inner class, which tells the adapter which views to use for the data items.
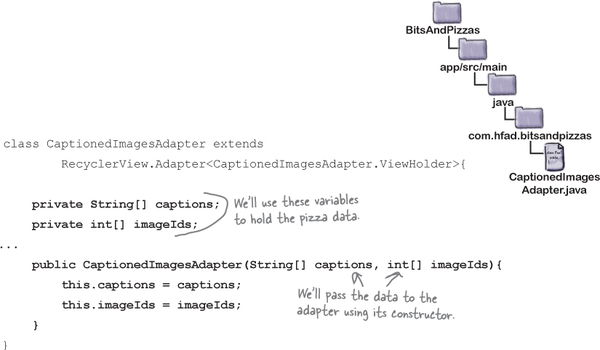
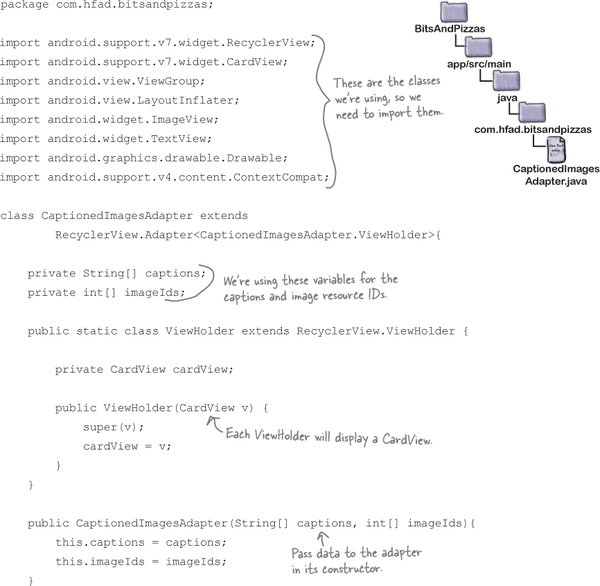
We’re going to create a recycler view adapter called CaptionedImagesAdapter. In Android Studio, highlight the com.hfad.bitsandpizzas package in the app/src/main/java folder, then go to File→New...→Java class. When prompted, name the class “CaptionedImagesAdapter” and make sure the package name is com.hfad.bitsandpizzas. Then replace the code in CaptionedImagesAdapter.java with the following:

As you can see, the ViewHolder inner class you define is a key part of the adapter. We’ve left the ViewHolder class empty for now, but we’ll come back to it later in the chapter.
Before we look in more detail at view holders, we’ll tell the adapter what sort of data it should use by adding a constructor.
Relax

Don’t worry if Android Studio gives you error messages when you add the above code to your project.
It’s just warning you that the code isn’t complete yet. We still need to override various methods in our adapter code to tell it how to behave, and we’ll do this over the next few pages.
Tell the adapter what data it should work with...

When you define a recycler view adapter, you need to tell it what sort of data it should use. You do this by defining a constructor that includes the data types you want the adapter to use as parameters.
In our case, we want the adapter to take String captions and int image IDs. We’ll therefore add String[] and int[] parameters to the constructor, and save the arrays as private variables. Here’s the code that does this; you can either update your version of CaptionedImagesAdapter.java now, or wait until we show you the full adapter code later in the chapter.
... and implement the getItemCount() method
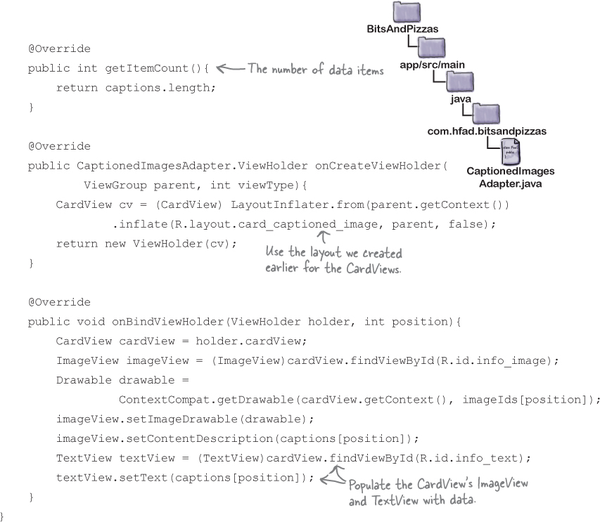
We also need to tell the adapter how many data items there are. You do this by overriding the RecyclerViewAdapter getItemCount() method. This returns an int value, the number of data items. We can derive this from the number of captions we pass the adapter. Here’s the code:

Next we’ll define the adapter’s view holder.
Define the adapter’s view holder
The view holder is used to define what view or views the recycler view should use for each data item it’s given. You can think of it as a holder for the views you want the recycler view to display. In addition to views, the view holder contains extra information that’s useful to the recycler view, such as its position in the layout.

In our case, we want to display each item of pizza data on a card, which means we need to specify that the adapter’s view holder uses a card view. Here’s the code to do this (we’ll show you the full adapter code later in the chapter):
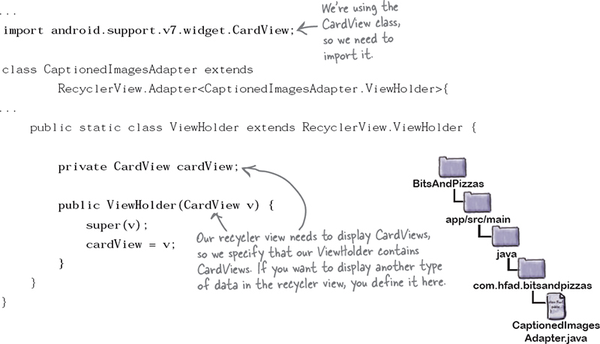
When you create a view holder, you must call the ViewHolder super constructor using:
super(v);
This is because the ViewHolder superclass includes metadata such as the item’s position in the recycler view, and you need this information for the adapter to work properly.
Now that we’ve defined our view holders, we need to tell the adapter how to construct one. We’ll do this by overriding the adapter’s onCreateViewHolder() method.
Override the onCreateViewHolder() method

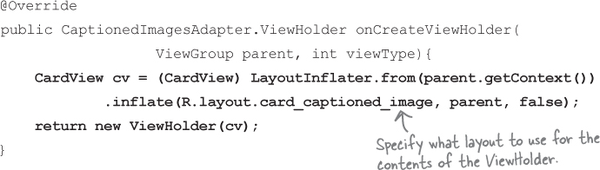
The onCreateViewHolder() method gets called when the recycler view requires a new view holder. The recycler view calls the method repeatedly when the recycler view is first constructed to build the set of view holders that will be displayed on the screen.
The method takes two parameters: a ViewGroup parent object (the recycler view itself) and an int parameter called viewType, which is used if you want to display different kinds of views for different items in the list. It returns a view holder object. Here’s what the method looks like:

We need to add code to the method to instantiate the view holder. To do this, we need to call the ViewHolder’s constructor, which we defined on the previous page. The constructor takes one parameter, a CardView. We’ll create the CardView from the card_captioned_image.xml layout we created earlier in the chapter using this code:

Here’s the full code for the onCreateViewHolder() method (we’ll add this to the adapter later):
Now that the adapter can create view holders, we need to get it to populate the card views they contain with data.
Add the data to the card views

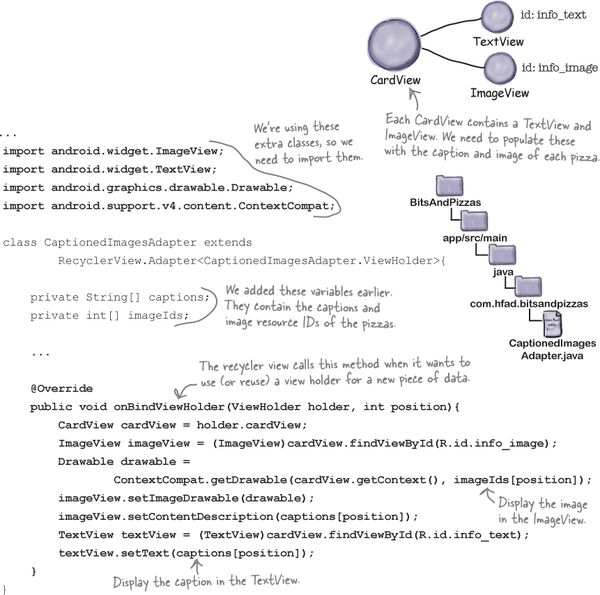
You add data to the card views by implementing the adapter’s onBindViewHolder() method. This gets called whenever the recycler view needs to display data in a view holder. It takes two parameters: the view holder the data needs to be bound to, and the position in the data set of the data that needs to be bound.
Our card view contains two views, an image view with an ID of info_image, and a text view with an ID of info_text. We’ll populate these with data from the captions and imageIds arrays. Here’s the code that will do that:
That’s all the code we need for our adapter. We’ll show you the full code over the next couple of pages.
The full code for CaptionedImagesAdapter.java
Here’s our complete code for the adapter. Update your version of CaptionedImagesAdapter.java so that it matches ours.
The code continues on the next page.
The full CaptionedImagesAdapter.java code (continued)

That’s all the code we need for our adapter. So what’s next?
Create the recycler view

So far we’ve created a card view layout that displays captioned images, and an adapter that creates the cards and populates them with data. The next thing we need to do is create the recycler view, which will pass pizza data to the adapter so that it can populate the cards with the pizza images and captions. The recycler view will then display the cards.
We’re going to add the recycler view to our existing PizzaFragment. Whenever the user clicks on the Pizzas tab in MainActivity, the pizzas will be displayed:

Add a layout for PizzaFragment
Before we can add the recycler view, we need to add a new layout file to our project for PizzaFragment to use. This is because we intially created PizzaFragment as a ListFragment, and these define their own layout.
To add the layout file, highlight the app/src/main/res/layout folder in Android Studio, and choose File→New→Layout resource file. When prompted, name the layout “fragment_pizza”.
Add the RecyclerView to PizzaFragment’s layout

You add a recycler view to a layout using the <RecyclerView> element from the RecyclerView Support Library.
Our PizzaFragment layout only needs to display a single recycler view, so here’s the full code for fragment_pizza.xml (update your version of the code to match ours):
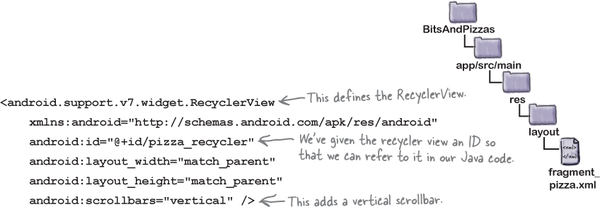
You add scrollbars to the recycler view using the android:scrollbars attribute. We’ve set this to "vertical" because we want our recycler view to be able to scroll vertically. We’ve also given the recycler view an ID so that we can get a reference to it in our PizzaFragment code; we need this in order to control its behavior.
Now that we’ve added a recycler view to PizzaFragment’s layout, we need to update our fragment code to get the recycler view to use the adapter we created.
Get the recycler view to use the adapter
To get the recycler view to use the adapter, there are two things we need to do: tell the adapter what data to use, then attach the adapter to the recycler view. We can tell the adapter what data to use by passing it the pizza names and image resource IDs via its constructor. We’ll then use the RecyclerView setAdapter() method to assign the adapter to the recycler view.
The code to do this is all code that you’ve seen before, so we’ll show you the full PizzaFragment code on the next page.
The full PizzaFragment.java code
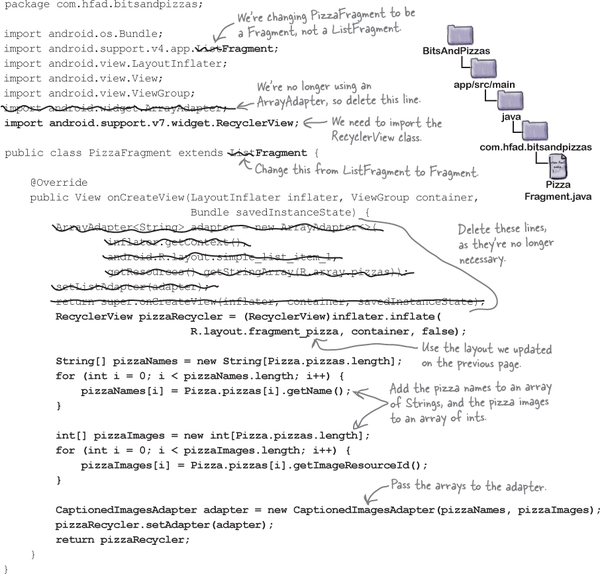
Here’s our full code for PizzaFragment.java (update your version of the code to match our changes):
There’s just one more thing we need to do: specify how the views in the recycler view should be arranged.
A recycler view uses a layout manager to arrange its views
One of the ways in which a recycler view is more flexible than a list view is in how it arranges its views. A list view displays its views in a single vertical list, but a recycler view gives you more options. You can choose to display views in a linear list, a grid, or a staggered grid.
You specify how to arrange the views using a layout manager. The layout manager positions views inside a recycler view: the type of layout manager you use determines how items are positioned. Here are some examples:
Note
We don’t cover how to do it, but you can also write your own layout managers. If you search for “android recyclerview layoutmanager” you’ll find many third-party ones you can use in your code, from carousels to circles.
Linear layout manager
This arranges items in a vertical or horizontal list.

Grid layout manager
This arranges items in a grid.

Staggered grid layout manager
This arranges unevenly sized items in a staggered grid.
On the next page, we’ll show you how to specify which layout manager to use in your recycler view.
Specify the layout manager

You tell the recycler view which layout manager it should use by creating a new instance of the type of layout manager you want to use, then attaching it to the recycler view.
Linear layout manager
To tell the recycler view that you want it to display its views in a linear list, you’d use the following code:

The LinearLayoutManager constructor takes one parameter, a Context. If you’re using the code in an activity, you’d normally use this to pass it the current activity (a context). The above code uses getActivity() instead, as our recycler view is in a fragment.
Grid layout manager
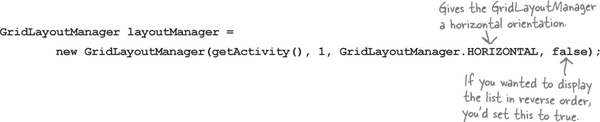
You use similar code to specify a grid layout manager, except that you need to create a new GridLayoutManager object instead. The GridLayoutManager takes two parameters in its constructor: a Context, and an int value specifying the number of columns the grid should have.

You can also change the orientation of the grid. To do this, you add two more parameters to the constructor: the orientation, and whether you want the views to appear in reverse order.
Staggered grid layout manager
You tell the recycler view to use a staggered grid layout manager by creating a new StaggeredGridLayoutManager object. Its constructor takes two parameters: an int value for the number of columns or rows, and an int value for its orientation. As an example, here’s how you’d specify a staggered grid layout oriented vertically with two rows:

Let’s add a layout manager to our recycler view.
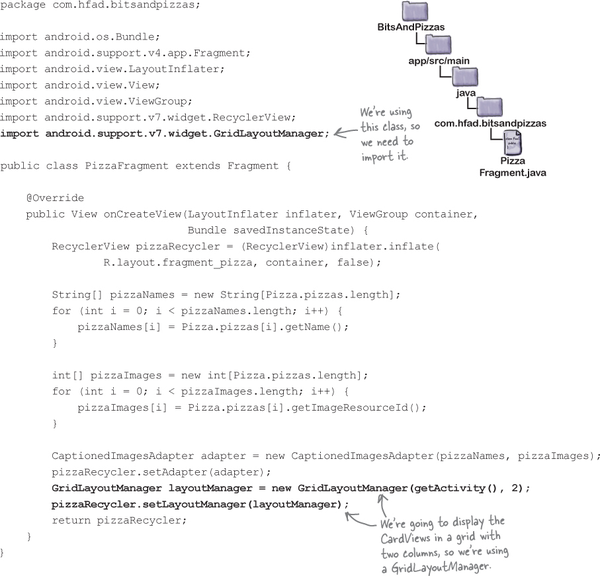
The full PizzaFragment.java code

We’re going to use a GridLayoutManager to display the pizza data in a grid. Here’s the full code for PizzaFragment.java, update your version of the code to match our changes (in bold):
Next we’ll examine what happens when the code runs, then take our app for a test drive.
What happens when the code runs

The user clicks on the Pizzas tab in MainActivity.
PizzaFragmentis displayed, and itsonCreateView()method runs.
The PizzaFragment onCreateView() method creates a new CaptionedImagesAdapter.
The method passes the names and images of the pizzas to the adapter using the adapter’s constructor, and sets the adapter to the recycler view.
The PizzaFragment onCreateView() method creates a GridLayoutManager and assigns it to the recycler view.
The
GridLayoutManagermeans that the views will be displayed in a grid. As the recycler view has a vertical scrollbar, the list will be displayed vertically.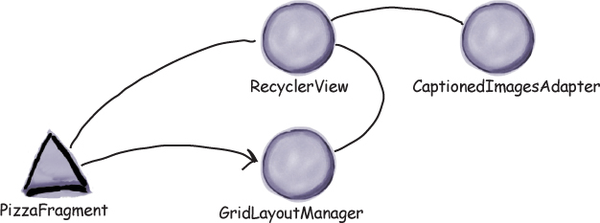


Test drive the app


When we run the app, MainActivity is displayed. When we click on or swipe to the Pizzas tab, the pizzas are displayed in a grid. When we scroll the pizza data, MainActivity’s toolbar responds.

As you can see, adding a recycler view is more involved than adding a list view, but it gives you a lot more flexibility. Most of the work comes from having to write a bespoke recycler view adapter, but you can reuse it elsewhere in your app. As an example, suppose you wanted to display pasta cards in a recycler view. You would use the same adapter we created earlier, but pass it pasta data instead of pizzas.
Before we move on, have a go at the following exercise.
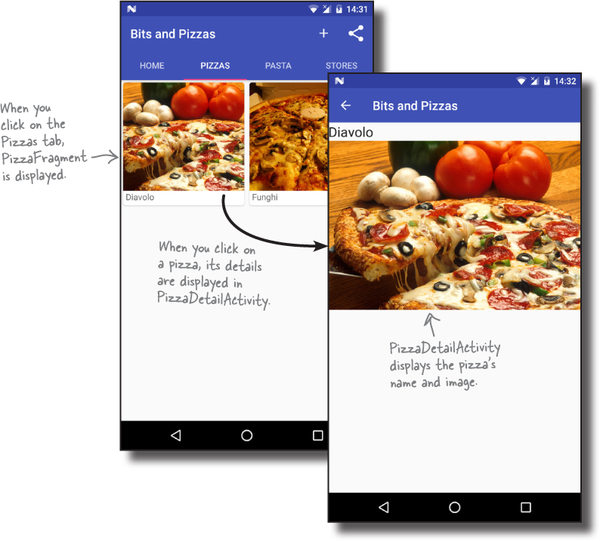
Make the recycler view respond to clicks

So far, we’ve added a recycler view to PizzaFragment, and created an adapter to populate it with pizza data.
The next thing we need to do is get the recycler view to respond to clicks. We’ll create a new activity, PizzaDetailActivity, which will start when the user clicks on one of the pizzas. The name and image of the pizza the user selects will be displayed in the activity:

Before we can get the recycler view to respond to clicks, we need to create PizzaDetailActivity.
Create PizzaDetailActivity

To create PizzaDetailActivity, click on the com.hfad.bitsandpizzas package in the Bits and Pizzas folder structure, then go to File→New...→Activity→Empty Activity. Name the activity “PizzaDetailActivity”, name the layout “activity_pizza_detail”, make sure the package name is com.hfad.bitsandpizzas, and check the Backwards Compatibility (AppCompat) option.
Note
If prompted for the activity’s source language, select the option for Java.
Now let’s update PizzaDetailActivity’s layout. Open activity_pizza_detail.xml, and update it with the code below, which adds a text view and image view to the layout that we’ll use to display details of the pizza:

We’ll look at what we need the code for PizzaDetailActivity.java to do on the next page.
What PizzaDetailActivity needs to do

There are a couple of things that we need PizzaDetailActivity to do:
PizzaDetailActivity’s main purpose is to display the name and image of the pizza the user has selected. To do this, we’ll get the selected pizza’s ID from the intent that starts the activity. We’ll pass this toPizzaDetailActivityfromPizzaFragmentwhen the user clicks on one of the pizzas in the recycler view.We’ll enable the
PizzaDetailActivity’s Up button so that when the user clicks on it, they’ll get returned toMainActivity.
Update AndroidManifest.xml to give PizzaDetailActivity a parent
We’ll start by updating AndroidManifest.xml to specify that MainActivity is the parent of PizzaDetailActivity. This means that when the user clicks on the Up button in PizzaDetailActivity’s app bar, MainActivity will be displayed. Here’s our version of AndroidManifest.xml (update your version to match our changes in bold):

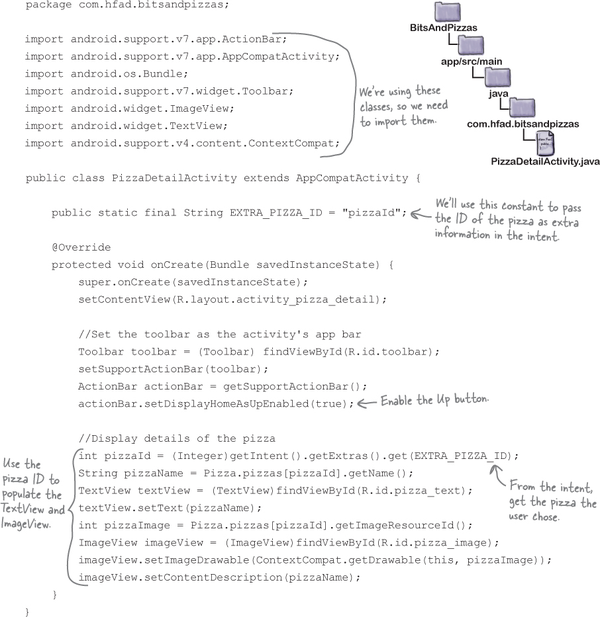
Next, we’ll update PizzaDetailActivity.java. You’ve already seen how to do everything we need, so we’re just going to show you the full code.
The code for PizzaDetailActivity.java

Here’s the full code for PizzaDetailActivity.java; update your version of the code to match ours:
Get a recycler view to respond to clicks
Next, we need to get items in the recycler view to respond to clicks so that we can start PizzaDetailActivity when the user clicks on a particular pizza.
When you create a navigation list with a list view, you can respond to click events within the list by giving the list view an OnItemClickListener. The list view then listens to each of the views that it contains, and if any of them are clicked, the list view calls its OnItemClickListener. That means that you can respond to list item clicks with very little code.
List views are able to do this because they inherit a bunch of functionality from a deep hierarchy of superclasses. Recycler views, however, don’t have such a rich set of built-in methods, as they don’t inherit from the same superclasses. Here’s a class hierarchy diagram for the ListView and RecyclerView classes:

While this gives recycler views more flexibility, it also means that with a recycler view you have to do a lot more of the work yourself. So how do we get our recycler view to respond to clicks?
You can listen for view events from the adapter

To get your recycler view to respond to click events, you need access to the views that appear inside it. These views are all created inside the recycler view’s adapter. When a view appears onscreen, the recycler view calls the CaptionedImagesAdapter’s onBindViewHolder() method to make the card view match the details of the list item.
When the user clicks on one of the pizza cards in the recycler view, we want to start PizzaDetailActivity, passing it the position of the pizza that was clicked. That means you could put some code inside the adapter to start an activity like this:
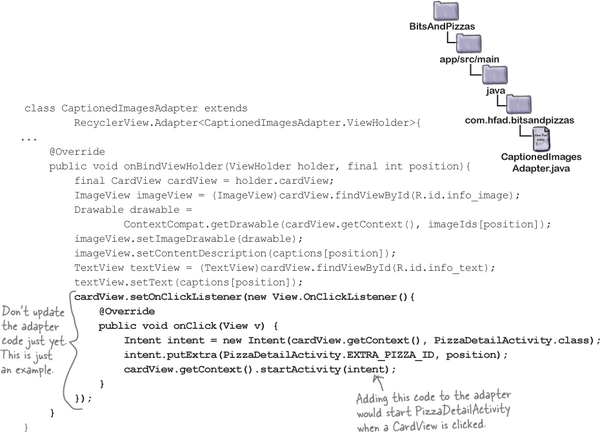
But just because you could write this code, it doesn’t necessarily mean that you should.
Keep your adapters reusable

If you deal with click events in the CaptionedImagesAdapter class, you’ll limit how that adapter can be used. Think about the app we’re building. We want to display lists of pizzas, pasta, and stores. In each case, we’ll probably want to display a list of captioned images. If we modify the CaptionedImagesAdapter class so that clicks always send the user to an activity that displays details of a single pizza, we won’t be able to use the CaptionedImagesAdapter for the pasta and stores lists. We’ll have to create a separate adapter for each one.
Decouple your adapter with an interface
Instead of that approach, we’ll keep the code that starts the activity outside of the adapter. When someone clicks on an item in the list, we want the adapter to call the fragment that contains the list, and then the fragment code can fire off an intent to the next activity. That way we can reuse CaptionedImagesAdapter for the pizzas, pasta, and stores lists, and in each case leave it to the fragments to decide what happens in response to a click.
We’re going to use a similar pattern to the one that allowed us to decouple a fragment from an activity in Chapter 9. We’ll create a Listener interface inside CaptionedImagesAdapter like this:
interface Listener {
    void onClick(int position);
}
We’ll call the listener’s onClick() method whenever one of the card views in the recycler view is clicked. We’ll then add code to PizzaFragment so that it implements the interface; this will allow the fragment to respond to clicks and start an activity.
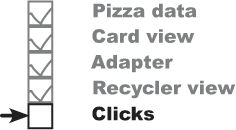
This is what will happen at runtime:
A user will click on a card view in the recycler view.
The
Listener’sonClick()method will be called.The
onClick()method will be implemented inPizzaFragment. Code in this fragment will startPizzaDetailActivity.
Let’s start by adding code to CaptionedImagesAdapter.java.
Add the interface to the adapter
We’ve updated our CaptionedImagesAdapter.java code to add the Listener interface and call its onClick() method whenever one of the card views is clicked. Apply the changes below (in bold) to your code, then save your work:
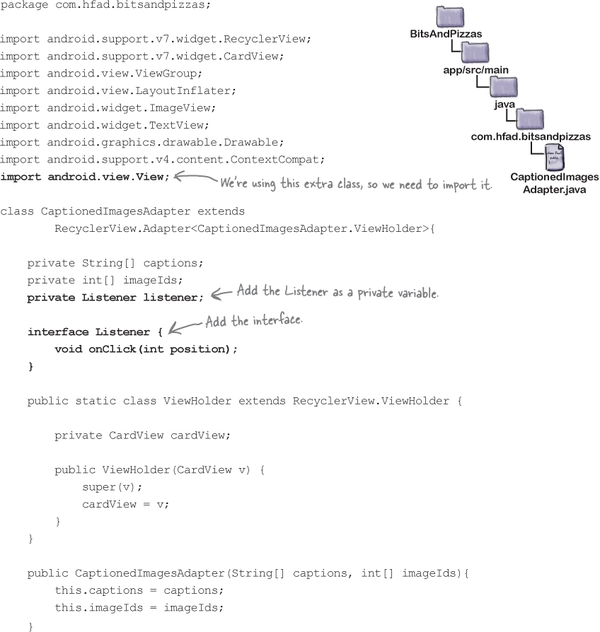
The code continues on the next page.
The CaptionedImagesAdapter.java code (continued)

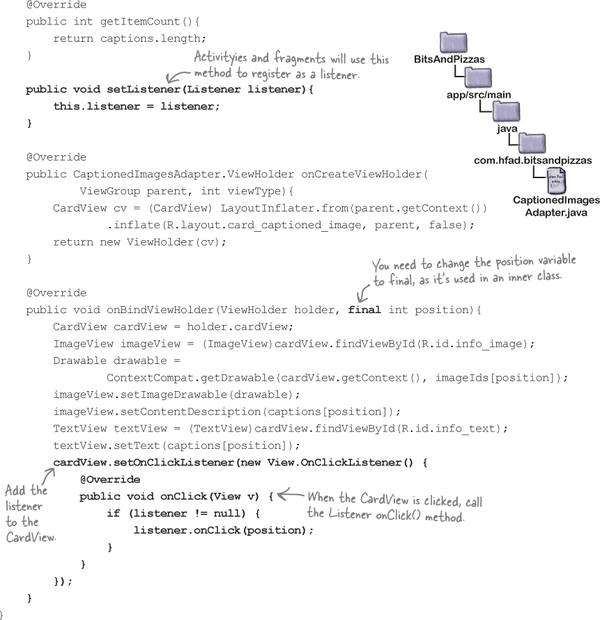
Now that we’ve added a listener to the adapter, we need to implement it in PizzaFragment.
Implement the listener in PizzaFragment.java

We’ll implement CaptionedImagesAdapter’s Listener interface in PizzaFragment so that when a card view in the recycler view is clicked, PizzaDetailActivity will be started. Here’s the updated code; update your version of the code to match ours (our changes are in bold):

The code continues on the next page.
The PizzaFragment.java code (continued)

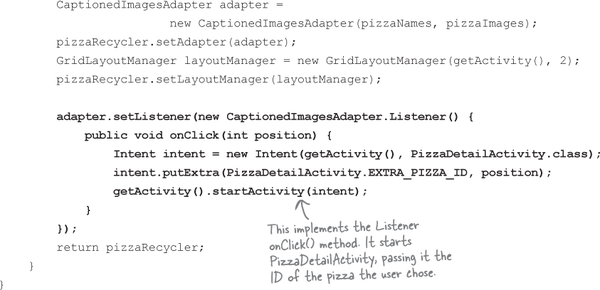
That’s all the code we need to make views in the recycler view respond to clicks. By taking this approach, we can use the same adapter and card view for different types of data that is composed of an image view and text view.

Let’s see what happens when we run the code.
Test drive the app

When we run the app and click on the Pizzas tab, PizzaFragment is displayed. When we click on one of the pizzas, PizzaDetailActivity starts, and details of that pizza are displayed.
The card view responds to clicks, and displays PizzaDetailActivity.
Chapter 13 Your Android Toolbox

You’ve got Chapter 13 under your belt and now you’ve added recycler views and card views to your toolbox.
Note
You can download the full code for the chapter from https://tinyurl.com/HeadFirstAndroid.