You’ve seen how to create apps that work in the same way no matter what device they’re running on.
But what if you want your app to look and behave differently depending on whether it’s running on a phone or a tablet? In this case you need fragments, modular code components that can be reused by different activities. We’ll show you how to create basic fragments and list fragments, how to add them to your activities, and how to get your fragments and activities to communicate with one another.
Your app needs to look great on ALL devices
One of the great things about Android development is that you can put the exact same app on devices with completely different screen sizes and processors, and have them run in exactly the same way. But that doesn’t mean that they always have to look exactly the same.
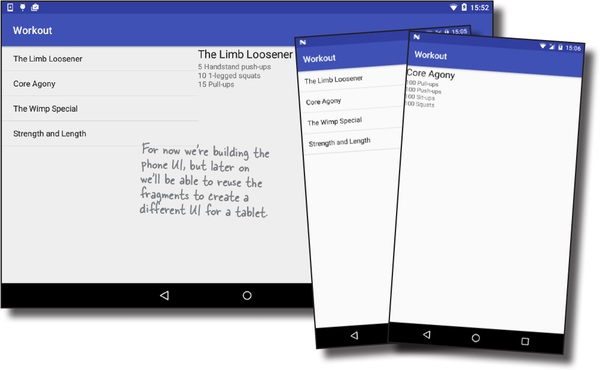
On a phone:
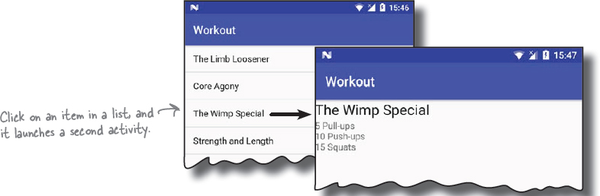
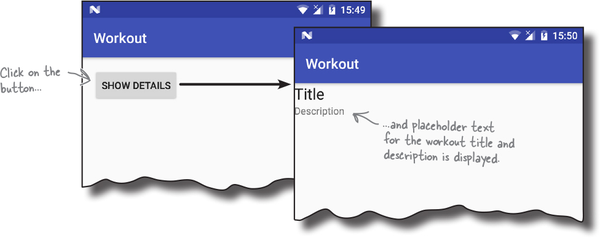
Take a look at this image of an app on a phone. It displays a list of workouts, and when you click on one, you are shown the details of that workout.
On a tablet:
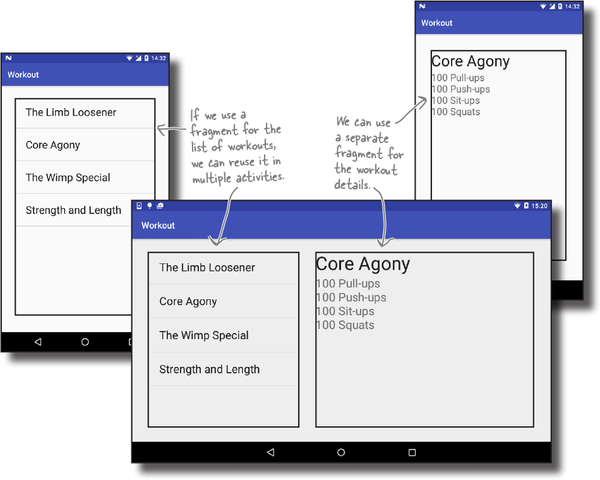
On a larger device, like a tablet, you have a lot more screen space available, so it would be good if all the information appeared on the same screen. On the tablet, the list of workouts only goes partway across the screen, and when you click on an item, the details appear on the right.
To make the phone and tablet user interfaces look different from each other, you can use separate layouts for large devices and small devices.
Your app may need to behave differently too
It’s not enough to simply have different layouts for different devices. You also need different Java code to run alongside the layouts so that the app can behave differently depending on the device. In our Workout app, for instance, we need to provide one activity for tablets, and two activities for phones.
On a phone:
On a tablet:
But that means you might duplicate code
The second activity that runs only on phones will need to insert the details of a workout into the layout. But that code will also need to be available in the main activity for when the app is running on a tablet. The same code needs to be run by multiple activities.
Rather than duplicate the code in the two activities, we can use fragments. So what’s a fragment?
Fragments allow you to reuse code
Fragments are like reusable components or subactivities. A fragment is used to control part of a screen, and can be reused between screens. This means we can create a fragment for the list of workouts, and a fragment to display the details of a single workout. These fragments can then be shared between layouts.
A fragment has a layout
Just like an activity, a fragment has an associated layout. If you design it carefully, the fragment’s Java code can be used to control everything within the interface. If the fragment code contains all that you need to control its layout, it greatly increases the chances that you’ll be able to reuse it elsewhere in the app.
We’re going to show you how to create and use fragments by building the Workout app.
The phone version of the app
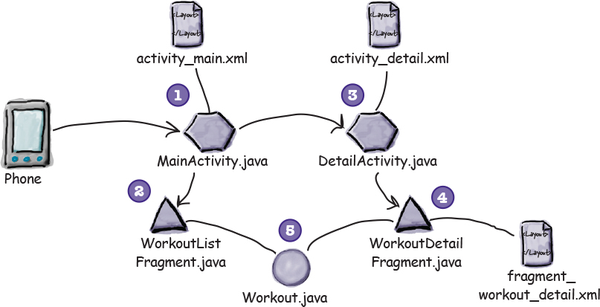
We’re going to build the phone version of the app in this chapter, and reuse the fragments we create to build the tablet version of the app in Chapter 10. Here’s how the phone version of the app will work:
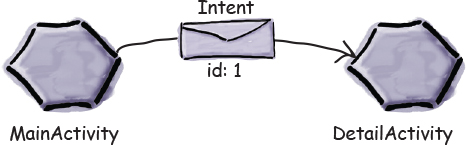
When the app gets launched, it starts MainActivity.
MainActivity uses activity_main.xml for its layout, and contains a fragment called WorkoutListFragment.
WorkoutListFragment displays a list of workouts.
When the user clicks on one of the workouts, DetailActivity starts.
DetailActivity uses activity_detail.xml for its layout, and contains a fragment called WorkoutDetailFragment.
WorkoutDetailFragment uses fragment_workout_detail.xml for its layout.
It displays the details of the workout the user has selected.
WorkoutListFragment and WorkoutDetailFragment get their workout data from Workout.java.
Workout.java contains an array of Workouts.
Relax
Don’t worry if the app structure looks complex.
We’ll work through it step by step over the course of this chapter.
We’ll go through the steps for creating this app on the next page.
Here’s what we’re going to do
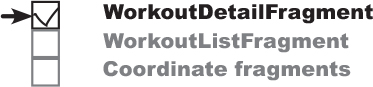
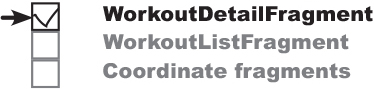
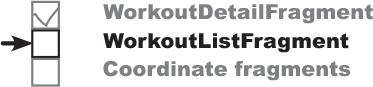
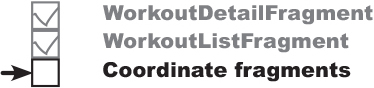
There are three main steps we’ll go through to build the app:
Create WorkoutDetailFragment.
WorkoutDetailFragment displays the details of a specific workout. We’ll start by creating two activities, MainActivity and DetailActivity, and then we’ll add WorkoutDetailFragment to DetailActivity. We’ll also get MainActivity to launch DetailActivity when a button is pressed. We’ll also add a plain old Java class, Workout.java, that will provide the data for WorkoutDetailFragment.
Create WorkoutListFragment.
WorkoutListFragment displays a list of workouts. We’ll add this fragment to MainActivity.
Coordinate the fragments to display the correct workout. When the user clicks on an item in
WorkoutListFragment, we’ll start DetailActivity and get WorkoutDetailFragment to display details of the workout the user selected.
Let’s get started.
Create the project and activities
We’re going to start by creating a project that contains two activities, MainActivity and DetailActivity. MainActivity will be used for the fragment that displays a list of workouts, and DetailActivity will be used for the fragment that displays details of one particular workout.
To do this, first create a new Android project with an empty activity for an application named “Workout” with a company domain of “hfad.com”, making the package name com.hfad.workout. The minimum SDK should be API 19 so that it works on most devices. Name the activity “MainActivity” and name the layout “activity_main”. Make sure you check the Backwards Compatibility (AppCompat) checkbox.
Next, create a second empty activity by highlighting the com.hfad.workout package in the app/src/main/java folder, and going to File→New...→Activity→ Empty Activity. Name the activity “DetailActivity”, name the layout “activity_detail”, make sure the package name is com.hfad.workout, and check the Backwards Compatibility (AppCompat) checkbox.
Note
If prompted for the activity’s source language, select the option for Java.
Add the AppCompat Support Library
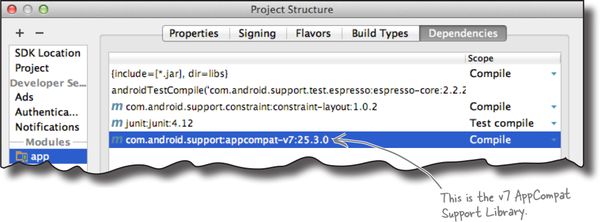
We’re going to be using activities and fragments from the v7 AppCompat Library, which means you need to make sure the library has been added to your project as a dependency. To do this, go to the File menu and choose Project Structure. Then click on the app module and choose Dependencies.
If Android Studio has already added the v7 AppCompat Support Library to your project, you’ll see it listed in the list of dependencies. If it’s not there, you’ll need to add it yourself. To do this, click on the “+” button at the bottom or right side of the screen. When prompted, choose the Library Dependency option, then select the appcompat-v7 library from the list of options. Finally, use the OK buttons to save your changes.
Once you’ve made sure the v7 AppCompat Support Library has been added, you can close the Project Structure window. On the next page we’ll update MainActivity.
Add a button to MainActivity’s layout
We’re going to add a button to MainActivity that will start DetailActivity. This is because we’re going to work on the fragment for DetailActivity first, and adding a button to MainActivity will give us an easy way of navigating from MainActivity to DetailActivity.
We’ll start by adding the button to the layout. Open file activity_main. xml, then update your code so that it matches ours below:
The button uses a String resource for its text, so we need to add it to the String resource file. Open file strings.xml, then add the following String resource:
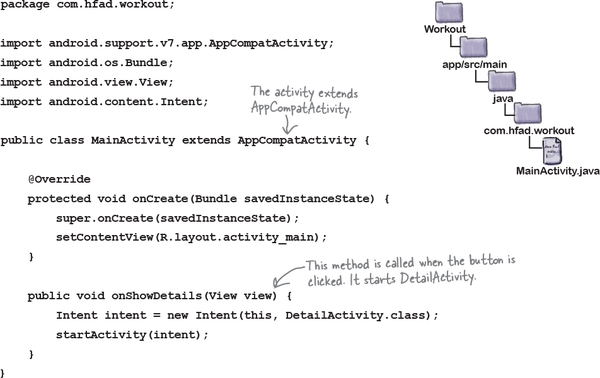
When the button is clicked, we’ve specified that MainActivity’s onShowDetails() method should be called. We’ll write the code for this method next.
Make the button respond to clicks
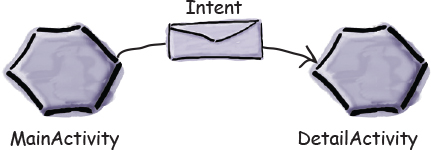
We need to get MainActivity’s button to start DetailActivity when it’s clicked. To do this, we’ll add a method called onShowDetails() to MainActivity. The method will start DetailActivity using an intent, just as we’ve done in previous chapters.
Here’s the full code for MainActivity.java. Update your code so that it matches ours.
That’s everything we need to get MainActivity to start DetailActivity. On the next page we’ll add a new fragment to our project called WorkoutDetailFragment that we’ll then add to DetailActivity.
How to add a fragment to your project
We’re going to add a new fragment called WorkoutDetailFragment to the project to display details of a single workout. You add a new fragment in a similar way to how you add a new activity: by switching to the Project view of Android Studio’s explorer, highlighting the com.hfad. workout package in the app/src/main/java folder, going to the File menu, and choosing New...→Fragment→Fragment (Blank).
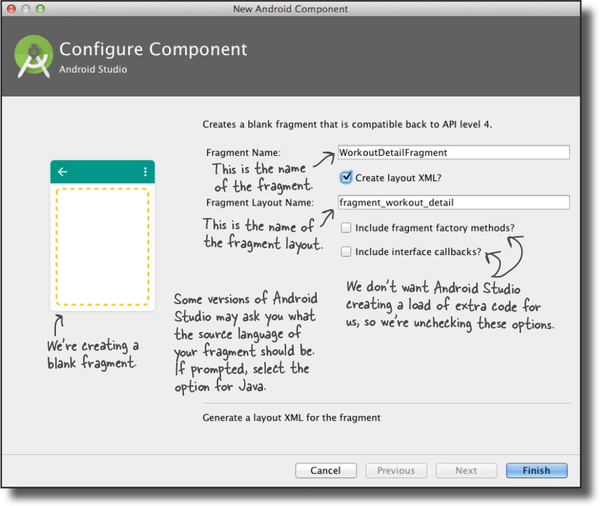
You will be asked to choose options for your new fragment. Name the fragment “WorkoutDetailFragment”, check the option to create layout XML for it, and give the fragment layout a name of “fragment_workout_detail”. Uncheck the options to include fragment factory methods and interface callbacks; these options generate extra code that you don’t need to use. When you’re done, click on the Finish button.
Note
We suggest looking at the extra code Android generates for you after you’ve finished this book. You might find some of it useful depending on what you want to do.
When you click on the Finish button, Android Studio creates your new fragment and adds it to the project.
What fragment code looks like
When you create a fragment, Android Studio creates two files for you: Java code for the fragment itself, and XML code for the fragment’s layout. The Java code describes the fragment’s behavior, and the layout describes the fragment’s appearance.
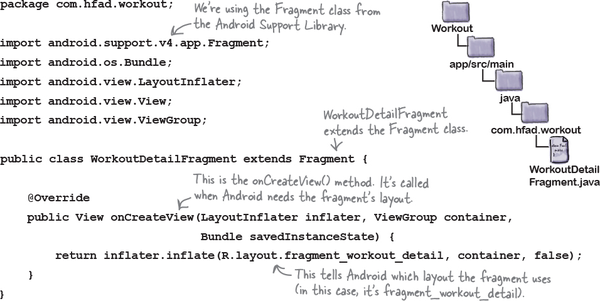
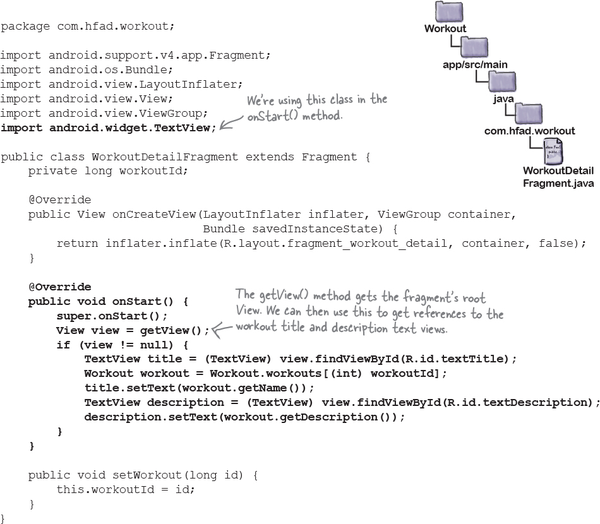
We’ll look at the Java code first. Go to the com.hfad.workout package in the app/src/main/java folder and open the file WorkoutDetailFragment.java that Android Studio just created for us. Then replace the code that Android Studio generated with the code below:
The above code creates a basic fragment. As you can see, the code for a fragment looks very similar to activity code.
To create a fragment, you first need to extend the Fragment class or one of its subclasses. We’re using fragments from the Support Library, so our fragment needs to extend the android.support.v4.app.Fragment class. This is because the Support Library fragments are backward compatible with earlier versions of Android, and contain the latest fragment features.
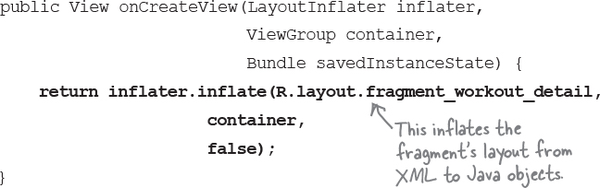
The fragment implements the onCreateView() method, which gets called each time Android needs the fragment’s layout, and it’s where you say which layout the fragment uses. The onCreateView() method is optional, but as you need to implement it whenever you’re creating a fragment with a layout, you’ll need to implement it nearly every time you create a fragment. We’ll look at this method in more detail on the next page.
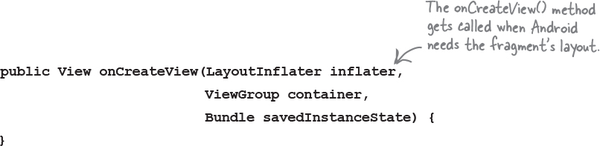
The fragment’s onCreateView() method
The onCreateView() method returns a View object that represents the fragment’s user interface. It gets called when Android is ready to instantiate the user interface, and it takes three parameters:
The first parameter is a LayoutInflator that you can use to inflate the fragment’s layout. Inflating the layout turns your XML views into Java objects.
The second parameter is a ViewGroup. This is the ViewGroup in the activity’s layout that will contain the fragment.
The final parameter is a Bundle. This is used if you’ve previously saved the fragment’s state, and want to reinstate it.
You specify the fragment’s layout using the LayoutInflator’s inflate() method:
Watch it!
All fragments must have a public no-argument constructor.
Android uses it to reinstantiate the fragment when needed, and if it’s not there, you’ll get a runtime exception.
In practice, you only need to add a public no-argument constructor to your fragment code if you include another constructor with one or more arguments. This is because if a Java class contains no constructors, the Java compiler automatically adds a public no-argument constructor for you.
This is the fragment equivalent of calling an activity’s setContentView() method. You use it to say what layout the fragment should use, in this case R.layout.fragment_workout_detail.
The inflate() method’s container argument specifies the ViewGroup in the activity that the fragment’s layout needs to be inserted into. It gets passed to the fragment as the second parameter in the fragment’s onCreateView() method.
Now that you’ve seen the fragment’s code, let’s have a look at its layout.
Fragment layout code looks just like activity layout code
As we said earlier, fragments use layout files to describe their appearance. Fragment layout code looks just like activity layout code, so when you write your own fragment layout code, you can use any of the views and layouts you’ve already been using to write activity layout code.
We’re going to update our layout code so that our fragment contains two text views, one for the workout title and one for the workout description.
Open the file fragment_workout_detail.xml in the app/src/res/layout folder, and replace its contents with the code below:
For now we’re using static String resources for the title and description of the workout so that we can see our fragment working. Open strings.xml, and add the following String resources:
That’s everything we need for our fragment. On the next page we’ll look at how you add the fragment to an activity.
Add a fragment to an activity’s layout
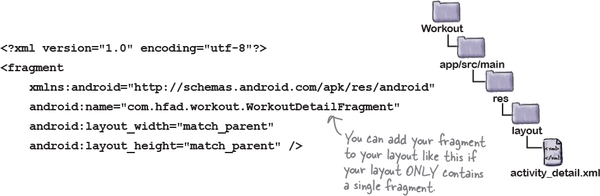
We’re going to add our WorkoutDetailFragment to DetailActivity so that the fragment gets displayed in the activity’s layout. To do this, we’re going to add a <fragment> element to DetailActivity’s layout.
The <fragment> element is a view that specifies the name of the fragment you want to display. It looks like this:
You specify the fragment using the android:name attribute and giving it a value of the fully qualified name of the fragment. In our case, we want to display a fragment called WorkoutDetailFragment that’s in the com.hfad.workout package, so we use:
When Android creates the activity’s layout, it replaces the <fragment> element with the View object returned by the fragment’s onCreateView() method. This view is the fragment’s user interface, so the <fragment> element is really a placeholder for where the fragment’s layout should be inserted.
You add the <fragment> element to your layout in the same way that you add any other element. As an example, here’s how you’d add the fragment to a linear layout:
If your layout only contains a single fragment with no other views, however, you can simplify your layout code.
Simplify the layout
If the layout code for your activity comprises a single fragment contained within a layout element with no other views, you can simplify your layout code by removing the root layout element.
Each layout file you create must have a single root element that’s either a view or view group. This means that if your layout contains multiple items, these items must be contained within a view group such as a linear layout.
If your layout contains a single fragment, the <fragment> element can be the layout file’s root. This is because the <fragment> element is a type of view, and Android replaces it with the layout of the fragment at runtime.
A layout file requires a single view or view group as its root element. If your activity only contains a fragment, the fragment itself can be the root element.
In our code example on the previous page, we showed you a fragment contained within a linear layout. As there are no other views in the layout, we can remove the linear layout so that our code looks like this:
This code does exactly the same thing as the code on the previous page, but it’s much shorter.
That’s the only code we need for DetailActivity’s layout, so replace the code you have in your version of activity_detail.xml, with the code above and save your changes.
On the next page we’ll look at the code for the activity itself.
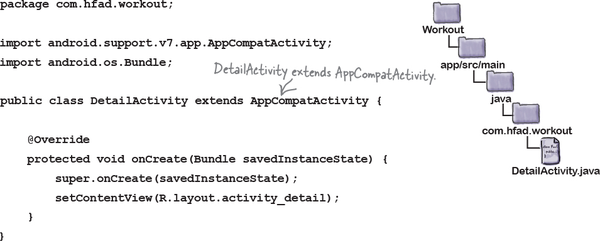
Support Library fragments need activities that extend FragmentActivity
When you add a fragment to an activity, you usually need to write code that controls any interactions between the fragment and the activity. You’ll see examples of this later in the chapter.
Currently, WorkoutDetailFragment only contains static data. DetailActivity only has to display the fragment, and doesn’t need to interact with it, so this means that we don’t need to write any extra activity code to control the interaction.
There’s one important point to be aware of, however. When you’re using fragments from the Support Library, as we are here, you must make sure that any activity you want to use them with extends the FragmentActivity class, or one of its subclasses. The FragmentActivity class is designed to work with Support Library fragments, and if your activity doesn’t extend this class, your code will break.
In practice, this isn’t a problem. This is because the AppCompatActivity class is a subclass of FragmentActivity, so as long as your activity extends the AppCompatActivity class, your Support Library fragments will work.
Here’s the code for DetailActivity.java. Update your code so that it matches ours below:
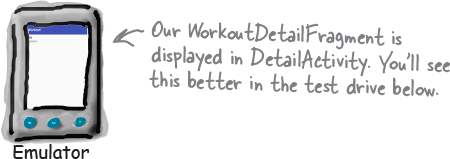
That’s everything we need to display the WorkoutDetailFragment in our activity. Let’s see what happens when we run the app.
What the code does
Before we take the app for a test drive, let’s go through what happens when the code runs.
When the app is launched, activity MainActivity gets created.
The user clicks on the button in MainActivity to start DetailActivity.
DetailActivity’s onCreate() method runs.
The onCreate() method specifies that activity_detail.xml should be used for DetailActivity’s layout.
activity_detail.xml sees that it includes a <fragment> element that refers to WorkoutDetailFragment.
WorkoutDetailFragment’s onCreateView() method is called.
The onCreateView() method specifies that fragment_workout_detail.xml should be used for WorkoutDetailFragment’s layout. It inflates the layout to a View object.
The story continues
activity_detail.xml’s Views are inflated to View Java objects.
DetailActivity layout uses WorkoutDetailFragment’s View object in place of the <fragment> element in its layout’s XML.
Finally, DetailActivity is displayed on the device.
Its layout contains the fragment WorkoutDetailFragment.
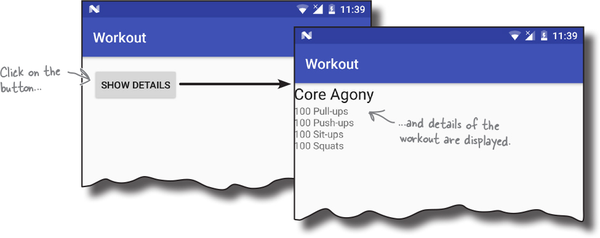
Test drive the app
When we run our app, MainActivity gets launched.
When we click on MainActivity’s button, it starts DetailActivity. DetailActivity contains WorkoutDetailFragment, and we see this on the device.
Get the fragment and activity to interact
So far we’ve looked at how you add a basic fragment to an activity. The next thing we’ll look at is how you get the fragment and activity to interact.
To do this, we’ll start by changing WorkoutDetailFragment so that it displays details of a workout instead of the placeholder text we have currently.
The first thing we’ll do is update the fragment’s layout to remove the static text that’s currently displayed. Open file fragment_workout_detail.xml, then update the code to match our changes below:
On the next page we’ll add a new class to our project to hold the workout data.
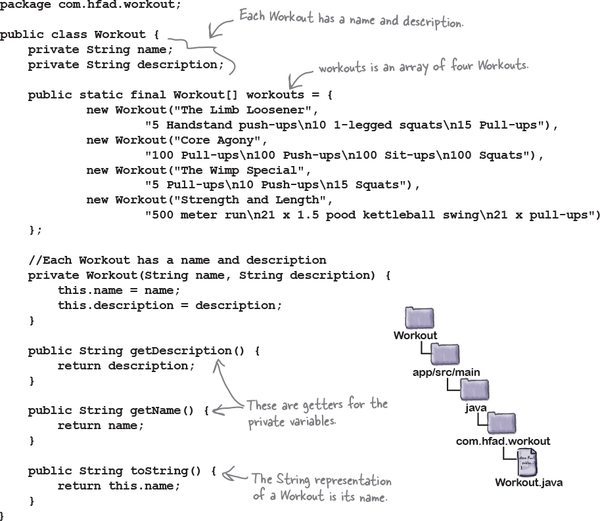
The Workout class
We’re going to hold our workout data in a file called Workout.java, which is a pure Java class file that the app will get workout data from. The class defines an array of four workouts, where each workout is composed of a name and description. Select the com.hfad.workout package in the app/src/main/java folder in your project, then go to File→New...→Java Class. When prompted, name the class “Workout”, and make sure the package name is com.hfad.workout. Then replace the code in Workout.java with the following, and save your changes.
The data will be used by the fragment to display details of a particular workout. We’ll look at this next.
Pass the workout ID to the fragment
When you have an activity that uses a fragment, the activity will usually need to talk to the fragment in some way. As an example, if you have a fragment that displays detail records, you need the activity to tell the fragment which record it needs to display details of.
In our case, we need WorkoutDetailFragment to display details of a particular workout. To do this, we’ll add a simple setter method to the fragment that sets the value of the workout ID. The activity will then be able to use this method to set the workout ID. Later on, we’ll use the workout ID to update the fragment’s views.
Here’s the revised code for WorkoutDetailFragment (update your code with our changes):
We need to get the DetailActivity to call the fragment’s setWorkout() method and pass it the ID of a particular workout. In order to do this, the activity must get a reference to the fragment. But how?
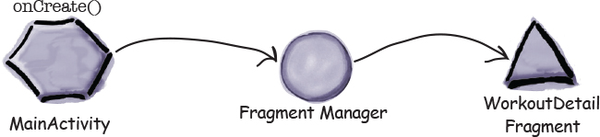
Use the fragment manager to manage fragments
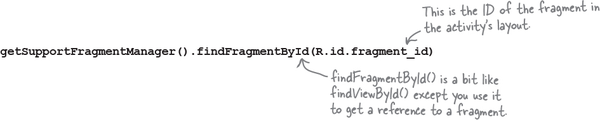
Before an activity can talk to its fragment, the activity first needs to get a reference to the fragment. You get a reference to an activity’s fragments using the activity’s fragment manager. The fragment manager is used to keep track of and deal with any fragments used by the activity.
There are two methods for getting a reference to the fragment manager, getFragmentManager() and getSupportFragmentManager(). The getSupportFragmentManager() method gets a reference to the fragment manager that deals with fragments from the Support Library like ours, and the getFragmentManager() method gets a reference to the fragment manager that deals with fragments that use the native Android fragment class instead. You then use the fragment manager’s findFragmentById() method to get a reference to the fragment.
We’re using fragments from the Support Library, so we’re going to use the getSupportFragmentManager() method like this:
We’re going to use DetailActivity’s fragment manager to get a reference to its WorkoutDetailFragment. In order to do this, we first need to assign an ID to the fragment.
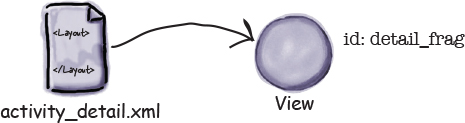
You assign an ID to an activity’s fragment in the activity’s layout. Open the file activity_detail.xml, then add an ID to the activity’s fragment by adding the line of code highlighted below:
The above code gives the fragment an ID of detail_frag. On the next page we’ll use the ID to get a reference to the fragment.
Get the activity to set the workout ID
To get a reference to the fragment, we need to add the following code:
We can then call the fragment’s setWorkout() method to tell the fragment which workout we want it to display details for. For now, we’ll hardcode which workout we want it to display so that we can see it working. Later on, we’ll change the code so that the user can select which workout she wants to see.
Here’s our revised code for DetailActivity.java. Update your code to reflect our changes:
As you can see, we’ve got a reference to the fragment after calling setContentView(). Getting the reference here is really important, because before this point, the fragment won’t have been created.
The next thing we need to do is get the fragment to update its views when the fragment is displayed to the user. Before we can do this, we need to understand the fragment’s lifecycle so that we add our code to the correct method in the fragment.
Activity states revisited
Just like an activity, a fragment has a number of key lifecycle methods that get called at particular times. It’s important to know what these methods do and when they get called so your fragment works in just the way you want.
Fragments are contained within and controlled by activities, so the fragment lifecycle is closely linked to the activity lifecycle. Here’s a reminder of the different states an activity goes through, and on the next page we’ll show you how these relate to fragments.
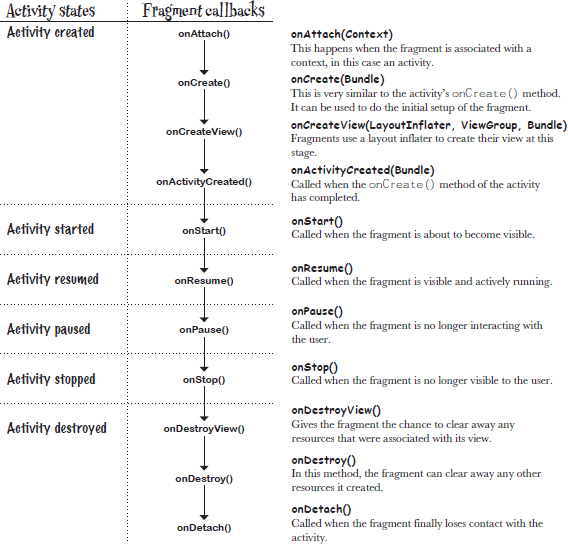
The fragment lifecycle
A fragment’s lifecycle is very similar to an activity’s, but it has a few extra steps. This is because it needs to interact with the lifecycle of the activity that contains it. Here are the fragment lifecycle methods, along with where they fit in with the different activity states.
Fragments inherit lifecycle methods
As you saw earlier, our fragment extends the Android fragment class. This class gives our fragment access to the fragment lifecycle methods. Here’s a diagram showing the class hierarchy.
Even though fragments have a lot in common with activities, the Fragment class doesn’t extend the Activity class. This means that some methods that are available to activities aren’t available to fragments.
Note that the Fragment class doesn’t implement the Context class. Unlike an activity, a fragment isn’t a type of context and therefore doesn’t have direct access to global information about the application environment. Instead, fragments must access this information using the context of other objects such as its parent activity.
Now that you understand the fragment’s lifecycle better, let’s get back to getting WorkoutDetailFragment to update its views.
Set the view’s values in the fragment’s onStart() method
We need to get WorkoutDetailFragment to update its views with details of the workout. We need to do this when the activity becomes visible, so we’ll use the fragment’s onStart() method. Update your code to match ours:
As we said on the previous page, fragments are distinct from activities, and therefore don’t have all the methods that an activity does. Fragments don’t include a findViewById() method, for instance. To get a reference to a fragment’s views, we first have to get a reference to the fragment’s root view using the getView() method, and use that to find its child views.
You should always call up to the superclass when you implement any fragment lifecycle methods.
Now that we’ve got the fragment to update its views, let’s take the app for a test drive.
What happens when the code runs
Before we run the app, let’s go through what happens when the code runs.
When the app is launched, MainActivity gets created.
The user clicks on the button in MainActivity to start DetailActivity.
DetailActivity’s onCreate() method runs.
The onCreate() method specifies that activity_detail.xml should be used for DetailActivity’s layout. activity_detail.xml includes a <fragment> element with an ID of detail_frag that refers to the fragment WorkoutDetailFragment.
The onCreateView() method specifies that fragment_workout_detail.xml should be used for WorkoutDetailFragment’s layout. It inflates the layout to a View object.
The story continues
activity_detail.xml’s Views are inflated to View Java objects.
DetailActivity uses WorkoutDetailFragment’s View object in place of the <fragment> element in its layout’s XML, and gives it an ID of detail_frag.
DetailActivity’s onCreate() method continues to run.
DetailActivity gets a reference to WorkoutDetailFragment by asking the fragment manager for the fragment with an ID of detail_frag.
DetailActivity passes WorkoutDetailFragment a workout ID of 1. The fragment sets its workoutId variable to 1.
The fragment uses the value of the workout ID in its onStart() method to set the values of its views.
Let’s take the app for a test drive.
Test drive the app
When we run the app, MainActivity is launched.
When we click on MainActivity’s button, it starts DetailActivity. DetailActivity contains WorkoutDetailFragment, and the fragment displays details of the Core Agony workout.
Where we’ve got to
Here’s a reminder of the structure of the app, and what we want it to do:
When the app gets launched, it starts MainActivity.
MainActivity uses activity_main.xml for its layout, and contains a fragment called WorkoutListFragment.
WorkoutListFragment displays a list of workouts.
When the user clicks on one of the workouts, DetailActivity starts.
DetailActivity uses activity_detail.xml for its layout, and contains a fragment called WorkoutDetailFragment.
WorkoutDetailFragment uses fragment_workout_detail.xml for its layout.
It displays the details of the workout the user has selected.
WorkoutListFragment and WorkoutDetailFragment get their workout data from Workout.java.
Workout.java contains an array of Workouts.
So far we’ve created both activities and their layouts, WorkoutDetailFragment.java and its layout, and also Workout.java. The next thing we need to look at is WorkoutListFragment.
We need to create a fragment with a list
We need to create a second fragment, WorkoutListFragment, that contains a list of the different workouts that the user can choose from. Using a fragment for this means that later on, we’ll be able to use it to create different user interfaces for phones and tablets.
You’ve already seen how to add a list view to an activity, so we could do something similar for the fragment. But rather than create a new fragment with a layout that contains a single list view, we’re going to use a different approach that involves a new type of fragment called a list fragment.
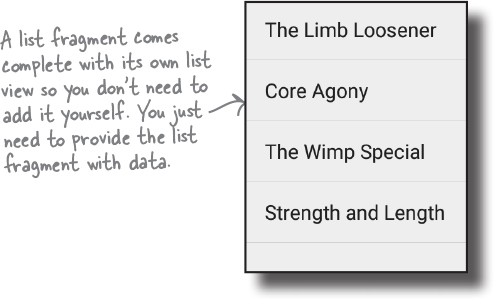
A list fragment is a fragment that contains only a list
A list fragment is a type of fragment that specializes in working with a list. It’s automatically bound to a list view, so you don’t need to create one yourself. Here’s what one looks like:
There are a couple of major advantages in using a list fragment to display categories of data:
You don’t need to create your own layout.
List fragments define their own layout programmatically, so there’s no XML layout for you to create or maintain. The layout the list fragment generates includes a single list view. You access this list view in your fragment code using the list fragment’s getListView() method. You need this in order to specify what data should be displayed in the list view.
You don’t have to implement your own event listener.
The ListFragment class automatically implements an event listener that listens for when items in the list view are clicked. Instead of creating your own event listener and binding it to the list view, you just need to implement the list fragment’s onListItemClick() method. This makes it easier to get your fragment to respond when the user clicks on items in the list view. You’ll see this in action later on.
A list fragment is a type of fragment that specializes in working with a list view. It has a default layout that contains the list view.
So what does the list fragment code look like?
How to create a list fragment
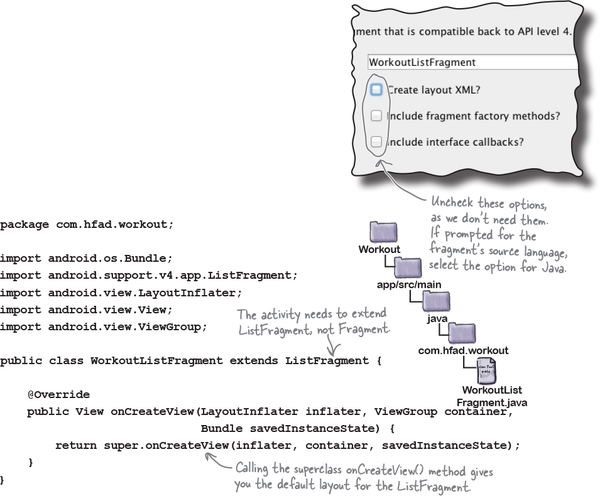
You add a list fragment to your project in the same way you add a normal fragment. Highlight the com.hfad.workout package in the app/src/main/java folder, then go to File→New...→Fragment→Fragment (Blank). Name the fragment “WorkoutListFragment”, and then uncheck the options to create layout XML, and also the options to include fragment factory methods and interface callbacks (list fragments define their own layouts programmatically, so you don’t need Android Studio to create one for you). When you click on the Finish button, Android Studio creates a new list fragment in a file called WorkoutListFragment.java in the app/src/main/java folder.
Here’s what the basic code looks like to create a list fragment. As you can see, it’s very similar to that of a normal fragment. Replace the code in WorkoutListFragment.java with the code below:
The above code creates a basic list fragment called WorkoutListFragment. As it’s a list fragment, it needs to extend the ListFragment class rather than Fragment.
The onCreateView() method is optional. It gets called when the fragment’s view gets created. We’re including it in our code as we want to populate the fragment’s list view with data as soon as it gets created. If you don’t need your code to do anything at this point, you don’t need to include the onCreateView() method.
The next thing we need to do is add data to the list view in the onCreateView() method.
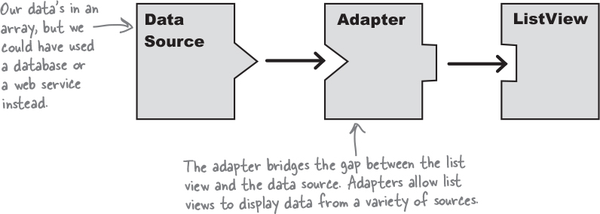
Adapters revisited
As we said in Chapter 7, you can connect data to a list view using an adapter. The adapter acts as a bridge between the data and the list view. This is still the case when your list view is in a fragment, or a list fragment:
An adapter acts as a bridge between a view and a data source. An array adapter is a type of adapter that specializes in working with arrays.
We want to supply the list view in WorkoutListFragment with an array of workout names, so we’ll use an array adapter to bind the array to the list view as before. As you may recall, an array adapter is a type of adapter that’s used to bind arrays to views. You can use it with any subclass of the AdapterView class, which means you can use it with both list views and spinners.
In our case, we’re going to use an array adapter to display an array of data from the Workout class in the list view.
We’ll see how this works on the next page.
Our previous array adapter
As we said in Chapter 7, you use an array adapter by initializing it and attaching it to the list view.
To initialize the array adapter, you first specify what type of data is contained in the array you want to bind to the list view. You then pass it three parameters: a Context (usually the current activity), a layout resource that specifies how to display each item in the array, and the array itself.
Here’s the code we used in Chapter 7 to create an array adapter to displays Drink data from the Drink.drinks array:
There’s a big difference between the situation we had back in Chapter 7 and the situation we have now. Back in Chapter 7, we used the array adapter to display data in an activity. But this time, we want to display data in a fragment. What difference does this make?
A fragment isn’t a subclass of Context
As you saw earlier in the book, the Activity class is a subclass of the Context class. This means that all of the activities you create have access to global information about the app’s environment.
But the Fragment class isn’t a subclass of the Context class. It has no access to global information, and you can’t use this to pass the current context to the array adapter. Instead, you need to get the current context in some other way.
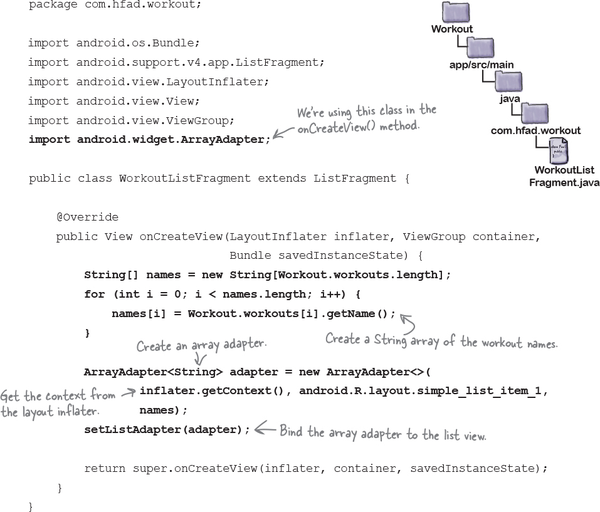
One way is to use another object’s getContext() method to get a reference to the current context. If you create the adapter in the fragment’s onCreateView() method, you can use the getContext() method of the onCreateView() LayoutInflator parameter to get the context instead.
Once you’ve created the adapter, you bind it to the ListView using the fragment’s setListAdapter() method:
setListAdapter(listAdapter);
We’ll show you the full code on the next page.
The updated WorkoutListFragment code
We’ve updated our WorkoutListFragment.java code so that it populates the list view with the names of the workouts. Apply these changes to your code, then save your changes:
Now that the WorkoutListFragment contains a list of workouts, let’s add it to MainActivity.
Display WorkoutListFragment in the MainActivity layout
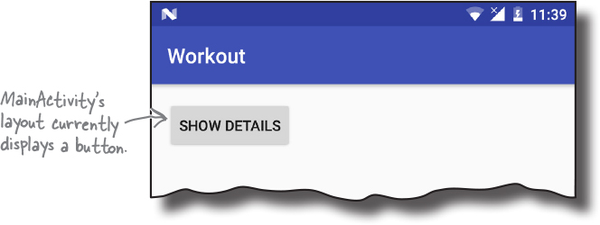
We’re going to add our new WorkoutListFragment to MainActivity’s layout activity_main.xml. The layout currently displays a button that we’re using to navigate from MainActivity to DetailActivity:
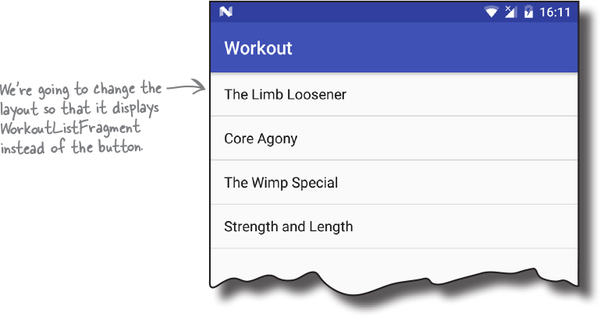
We want to remove the button, and display WorkoutListFragment in its place. Here’s what the new version of the layout will look like:
What will the code be like? Have a go at the exercise on the next page.
The code for activity_main.xml
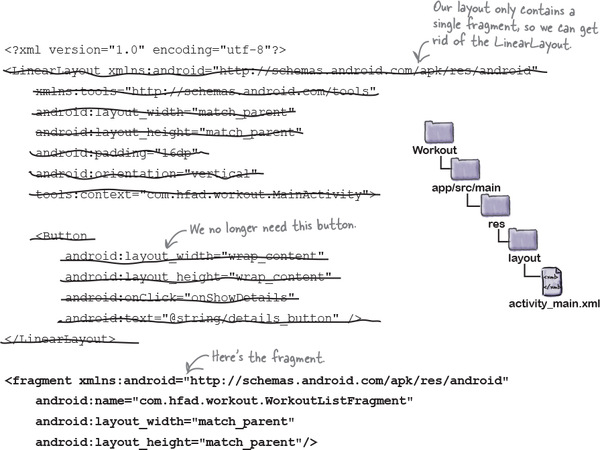
As we want MainActivity’s layout to only contain a single fragment, we can replace nearly all of the code we currently have.
Here’s the updated code for activity_main.xml. As you can see, it’s much shorter than the original version. Update your version of the code to reflect our changes.
We’ll go through what happens when this code runs over the next couple of pages.
What happens when the code runs
Here’s a runthrough of what happens when we run the app.
When the app is launched, MainActivity gets created.
MainActivity’s onCreate() method runs. This specifies that activity_main.xml should be used for MainActivity’s layout. activity_main.xml includes a <fragment> element that refers to WorkoutListFragment.
WorkoutListFragment is a ListFragment, so it uses a ListView as its layout.
WorkoutListFragment creates an ArrayAdapter<String>, an array adapter that deals with arrays of String objects.
The ArrayAdapter<String> retrieves data from the names array.
The story continues
WorkoutListFragment attaches the array adapter to the ListView using the setListAdapter() method.
The list view uses the array adapter to display a list of the workout names.
Test drive the app
When we run the app, MainActivity gets launched.
MainActivity’s layout contains the fragment WorkoutListFragment. The fragment contains a list of the workout names, and this is displayed in the activity.
That looks great, but when we click on one of the workouts, nothing happens. We need to update the code so that when we click on one of the workouts, details of that workout are displayed.
Connect the list to the detail
There are a few ways that we can start DetailActivity and display the details of the workout that was clicked. We’ll use this technique:
Add code to WorkoutListFragment that waits for a workout to be clicked.
When that code runs, call some code in MainActivity.java that will start DetailActivity, passing it the ID of the workout.
Get DetailActivity to pass the ID to WorkoutDetailFragment so that the fragment can display details of the correct workout.
We don’t want to write code in WorkoutListFragment that talks directly to MainActivity. Can you think why?
The answer is reuse. We want our fragments to know as little as possible about the environment that contains them so that we can reuse them elsewhere. The more a fragment needs to know about the activity using it, the less reusable it is.
We need to use aninterfaceto decouple the fragment from the activity.
We have two objects that need to talk to each other—the fragment and the activity—and we want them to talk without one side knowing too much about the other. The way we do that in Java is with an interface. When we define an interface, we’re saying what the minimum requirements are for one object to talk usefully to another. That means that we’ll be able to get the fragment to talk to any activity, so long as that activity implements the interface.
We need to decouple the fragment by using an interface
We’re going to create an interface called Listener. If MainActivity implements the interface, WorkoutListFragment will be able to tell MainActivity when one of its items has been clicked. To do this, we’ll need to make changes to WorkoutListFragment and MainActivity.
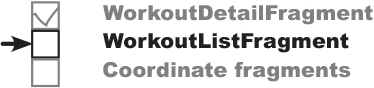
What WorkoutListFragment needs to do
We’ll start with the code for WorkoutListFragment. There are a few changes we need to make, in this order.
We’ll go through each change individually, then show you the full code.
1. Define the listener interface
We want any activities that implement the listener interface to respond to item clicks, so we’ll define a method for the interface, itemClicked(). The itemClicked() method has one parameter, the ID of the item that’s clicked.
Here’s the interface:
Next we’ll look at how you register the listener on the next page.
2. Register the listener
We need to save a reference to the activity WorkoutListFragment gets attached to. This activity will implement the Listener interface, so we’ll add the following private variable to WorkoutListFragment:
private Listener listener;
We need to set this variable when WorkoutListFragment gets attached to an activity. If you look back at the fragment lifecycle, when a fragment gets attached to an activity, the fragment’s onAttach() method is called. We’ll use this method to set the value of the listener:
3. Respond to clicks
When an item in WorkoutListFragment gets clicked, we want to call the listener’s itemClicked() method. This is the method we defined in the interface on the previous page. But how can we tell when an item’s been clicked?
Whenever an item gets clicked in a list fragment, the list fragment’s
The onListItemClick() method has four parameters: the list view, the item in the list that was clicked, its position, and the row ID of the underlying data. This means we can use the method to pass the listener the ID of the workout the user clicked on:
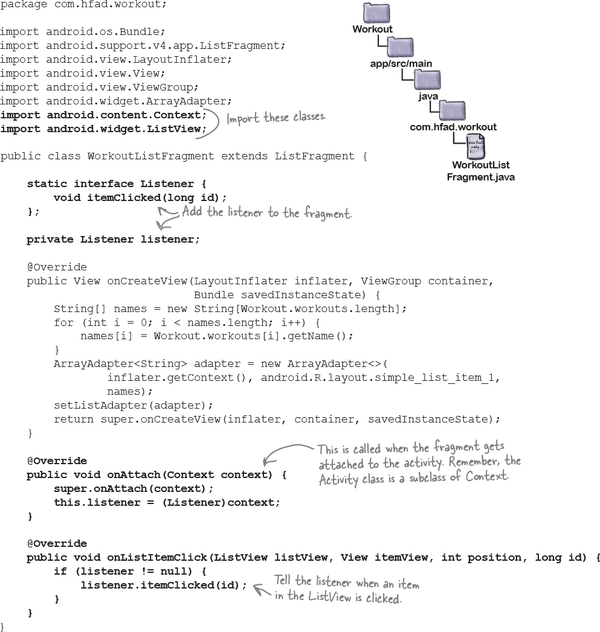
The code for WorkoutListFragment.java
Here’s the full code for WorkoutListFragment.java code (apply these changes to your code, then save your work):
MainActivity needs to implement the interface
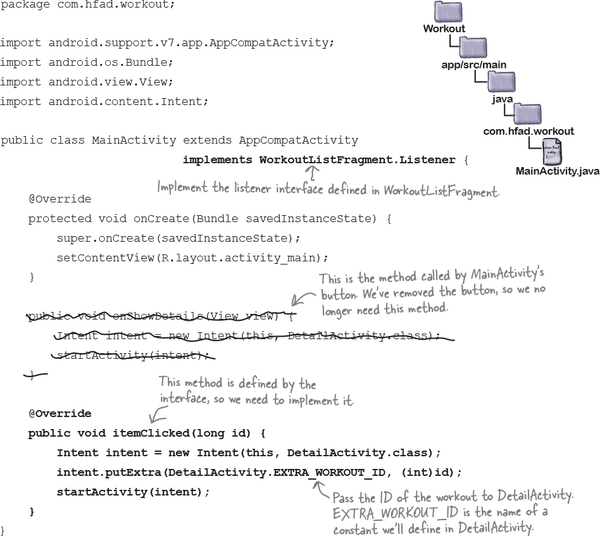
Next we need to make MainActivity implement the Listener interface we just created. The interface specifies an itemClicked() method, so we’ll make the method start DetailActivity, passing it the ID of the workout the user selected.
Here’s the full code for MainActivity.java. Update your code so that it matches ours.
Those are all the changes we need to make to MainActivity. There’s just one more code change we need to make to our app.
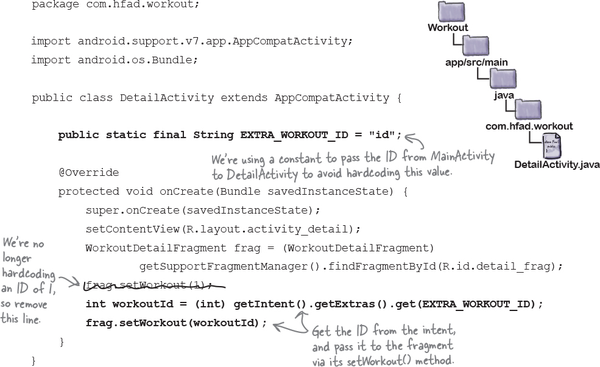
DetailActivity needs to pass the ID to WorkoutDetailFragment
So far, WorkoutListFragment passes the ID of the workout that was clicked to MainActivity, and MainActivity passes it to DetailActivity. We need to make one more change, which is to pass the ID from DetailActivity to WorkoutDetailActivity.
Here’s the updated code for DetailActivity that does this. Update your version of DetailActivity.java to reflect our changes:
Over the next couple of pages we’ll examine what happens when the code runs.
What happens when the code runs
Here’s a runthrough of what happens when we run the app.
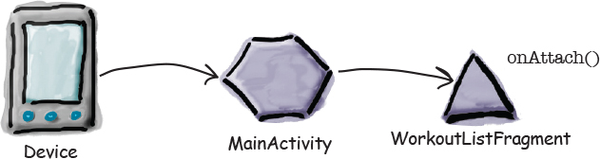
When the app is launched, MainActivity gets created.
WorkoutListFragment is attached to MainActivity, and WorkoutListFragment’s onAttach() method runs.
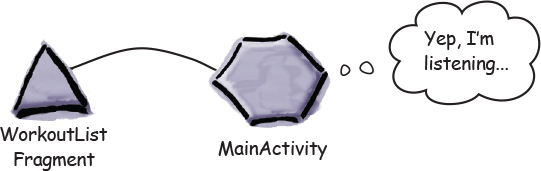
WorkoutListFragment registers MainActivity as a Listener.
When an item is clicked in WorkoutListFragment, the fragment’s onListItemClick() method is called.
This calls MainActivity’s itemClicked() method, passing it the ID of the workout that was clicked, in this example 1.
MainActivity’s itemClicked() method starts DetailActivity, passing it the value of the workout ID in an intent.
The story continues...
DetailActivity calls WorkoutDetailFragment’s setWorkout() method, passing it the value of the workout ID.
WorkoutDetailFragment uses the workout ID, in this case 1, to display the workout title and description in its views.
Test drive the app
When we run the app, MainActivity gets launched. It displays a list of workouts in its fragment, WorkoutListFragment.
When you click on one of the workouts, DetailActivity is displayed. It shows details of the workout that we selected.
That’s everything we need to do to use the fragments we’ve created in a user interface for a phone. In the next chapter, you’ll see how to reuse the fragments, and create a different user interface that will work better for tablets.
Chapter 9 Your Android Toolbox
You’ve got Chapter 9 under your belt and now you’ve added fragments to your toolbox.