
Chapter 10. Fragments for Larger Interfaces: Different Size, Different Interface

So far we’ve only run our apps on devices with a small screen.
But what if your users have tablets? In this chapter you’ll see how to create flexible user interfaces by making your app look and behave differently depending on the device it’s running on. We’ll show you how to control the behavior of your app when you press the Back button by introducing you to the back stack and fragment transactions. Finally, you’ll find out how to save and restore the state of your fragment.
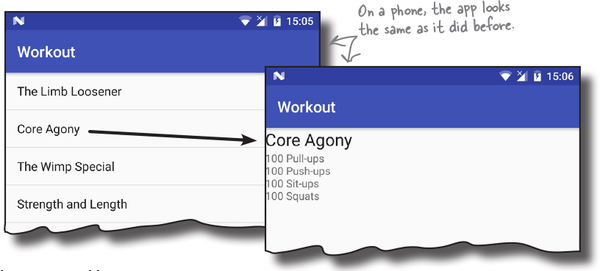
The Workout app looks the same on a phone and a tablet
In the previous chapter, we created a version of the Workout app designed to work on a phone.
As a reminder, when the app launches, it displays MainActivity. This contains a fragment, WorkoutListFragment, that displays a list of workouts. When the user clicks on one of the workouts, DetailActivity starts, and displays details of the workout in its fragment, WorkoutDetailFragment.

When we run the app on a tablet, the app works in exactly the same way. As the screen size is larger, however, there’s lots of empty space in the user interface that we could make better use of.

Designing for larger interfaces
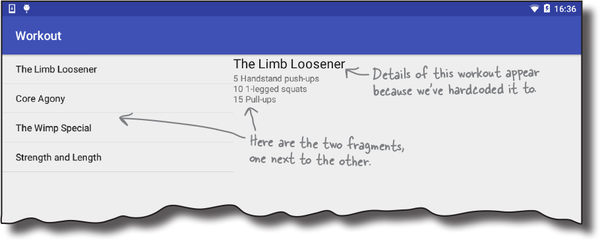
One way in which we could better use the empty space is to display details of the workout to the right of the list of workouts. When the user clicks on one of the workouts, details of that workout could be displayed on the same screen without us having to start a second activity:
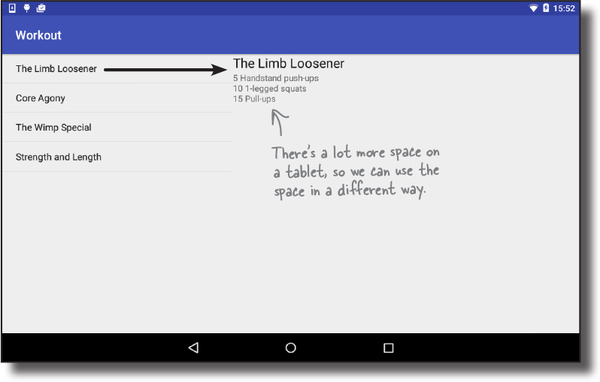
We don’t want to change our app completely though. We still want our app to work as it does currently if it’s running on a phone.
We’re going to get our app to adapt to the type of device it’s running on. If the app’s running on a phone, we’ll display details of the workout in a separate activity (this is the app’s current behavior). If the app’s running on a tablet, we’ll display details of the workout next to the list of workouts.
Before we get started, let’s remind ourselves how the app’s currently structured.
The phone version of the app
The phone version of the app we built in Chapter 9 works in the following way:
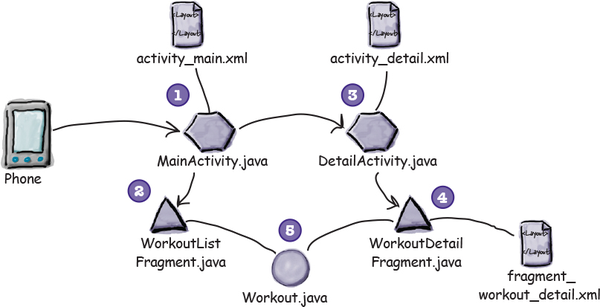
When the app gets launched, it starts MainActivity.
MainActivityuses activity_main.xml for its layout, and contains a fragment calledWorkoutListFragment.WorkoutListFragment displays a list of workouts.
When the user clicks on one of the workouts, DetailActivity starts.
DetailActivityuses activity_detail.xml for its layout, and contains a fragment calledWorkoutDetailFragment.WorkoutDetailFragment uses fragment_workout_detail.xml for its layout.
It displays the details of the workout the user has selected.
So how does it need to work differently on a tablet?
The tablet version of the app
Here’s how the app will work when it runs on a tablet:
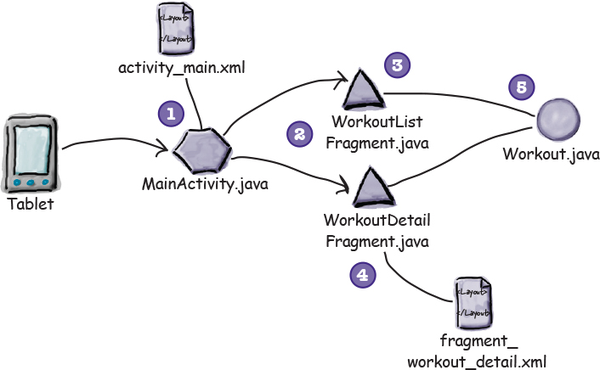
When the app gets launched, it starts MainActivity as before.
MainActivityuses activity_main.xml for its layout.MainActivity’s layout displays two fragments, WorkoutListFragment and WorkoutDetailFragment.
WorkoutListFragment displays a list of workouts.
It’s a list fragment, so it has no extra layout file.
When the user clicks on one of the workouts, its details are displayed in WorkoutDetailFragment.
WorkoutDetailFragmentuses fragment_workout_detail.xml for its layout.Both fragments get their workout data from Workout.java as before.
There are two key differences.
The first is that MainActivity’s layout needs to display both fragments, not just WorkoutListFragment.
The second difference is that we no longer need to start DetailActivity when the user clicks on one of the workouts. Instead, we need to display WorkoutDetailFragment in MainActivity.
We’ll go through the steps for how to change the app on the next page.
Here’s what we’re going to do
There are a number of steps we’ll go through to change the app:
Create a tablet AVD (Android Virtual Device).
We’re going to create a new UI for a tablet, so we’ll create a new tablet AVD to run it on. This will allow us to check how the app looks and behaves on a device with a larger screen.
Create a new tablet layout.
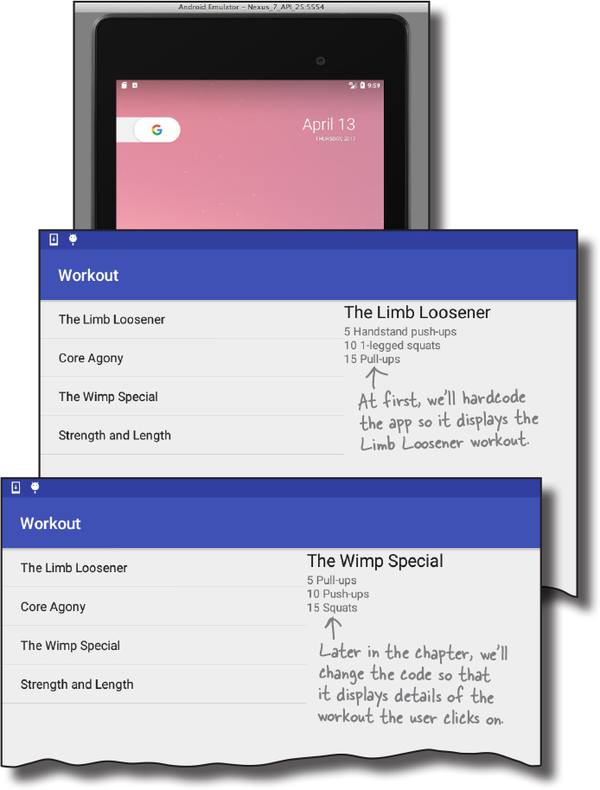
We’ll reuse the fragments we’ve already created in a new layout that’s designed to work on devices with larger screens. We’ll display details of the first workout in the first instance so that we can see the fragments side by side.
Display details of the workout the user selects.
We’ll update the app so that when the user clicks on one of the workouts, we’ll display the details of the workout the user selected.
Do this!
We’re going to update the Workout app in this chapter, so open your original Workout project from Chapter 9 in Android Studio.
Create a tablet AVD
Before we get into changing the app, we’re going to create a new Nexus 7 AVD running API level 25 so that you can see how the app looks and behaves when it’s running on a tablet. The steps are nearly the same as when you created a Nexus 5X AVD back in Chapter 1.
Open the Android Virtual Device Manager
You create AVDs using the AVD Manager. Open the AVD Manager by selecting Android on the Tools menu and choosing AVD Manager.
You’ll be presented with a screen showing you a list of the AVDs you’ve already set up. Click on the Create Virtual Device button at the bottom of the screen.

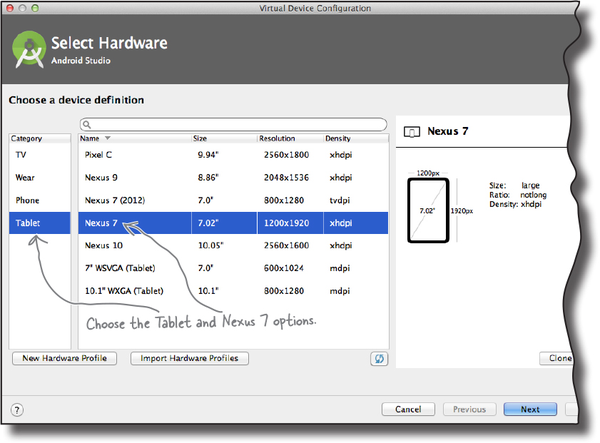
Select the hardware
On the next screen, you’ll be prompted to choose a device definition, the type of device your AVD will emulate.
We’re going to see what our app looks like running on a Nexus 7 tablet. Choose Tablet from the Category menu and Nexus 7 from the list. Then click the Next button.
Creating a tablet AVD (continued)
Select a system image
Next, you need to select a system image. The system image gives you an installed version of the Android operating system. You can choose the version of Android you want to be on your AVD.
You need to choose a system image for an API level that’s compatible with the app you’re building. As an example, if you want your app to work on a minimum of API level 19, choose a system image for at least API level 19. As in Chapter 1, we want our AVD to run API level 25, so choose the system image with a release name of Nougat and a target of Android 7.1.1, the version number of API level 25. Then click on the Next button.

Creating a tablet AVD (continued)

Verify the AVD configuration
On the next screen, you’ll be asked to verify the AVD configuration. This screen summarizes the options you chose over the last few screens, and gives you the option of changing them. Change the screen startup orientation to Landscape, then click on the Finish button.
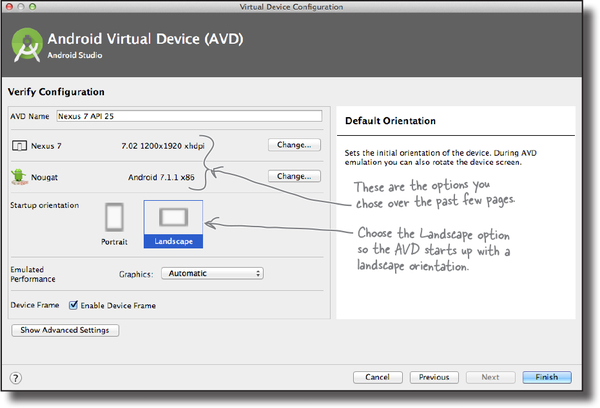
The AVD Manager will create the Nexus 7 AVD for you, and when it’s done, display it in its list of devices. You may now close the AVD Manager.
Now that we’ve created our tablet AVD, we can get to work on updating the Workout app. We want to change the app so that MainActivity uses one layout when it’s running on a phone, and another layout when it’s running on a tablet. But how can we do this?
Put screen-specific resources in screen-specific folders

Earlier in the book, you saw how you could get different devices to use image resources appropriate to their screen size by putting different-sized images in the different drawable* folders. As an example, you put images intended for devices with high-density screens in the drawable-hdpi folder.
You can do something similar with other resources such as layouts, menus, and values. If you want to create multiple versions of the same resource for different screen specs, you need to create multiple resource folders with an appropriate name, then add the resource to that folder. The device will then load the resource at runtime from the folder that’s the closest match to its screen spec.
If you want to have one layout for large screen devices such as tablets, and another layout for smaller devices such as phones, you put the layout for the tablet in the app/src/main/res/layout-large folder, and the layout for the phone in the app/src/main/res/layout folder. When the app runs on a phone, it will use the layout in the layout folder. If it’s run on a tablet, it will use the layout in the layout-large folder instead.
Android uses the names of your resource folders to decide which resources it should use at runtime.
Layouts in the layout folder can be used by any device, but layouts in the layout-large folder will only be used by devices with a large screen.

On the next page, we’ll show you all the different options you can use for your resource folder names.
The different folder options

You can put all kinds of resources (drawables or images, layouts, menus, and values) in different folders to specify which types of device they should be used with. The screen-specific folder name can include screen size, density, orientation and aspect ratio, with each part separated by hyphens. As an example, if you want to create a layout that will only be used by very large tablets in landscape mode, you would create a folder called layout-xlarge-land and put the layout file in that folder. Here are the different options you can use for the folder names:
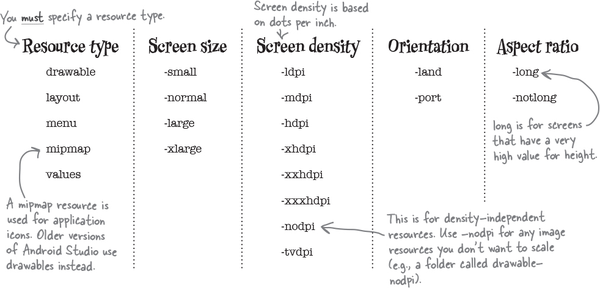
Android decides at runtime which resources to use by checking the spec of the device and looking for the best match. If there’s no exact match, it will use resources designed for a smaller screen than the current one. If resources are only available for screens larger than the current one, Android won’t use them and the app will crash.
If you only want your app to work on devices with particular screen sizes, you can specify this in AndroidManifest.xml using the <supports-screens> attribute. As an example, if you don’t want your app to run on devices with small screens, you’d use:
Note
For more information on the settings on this page, see:
https://developer.android.com/guide/practices/screens_support.html
<supports-screens android:smallScreens="false"/>
Using the different folder names above, you can create layouts that are tailored for phones and tablets.
Tablets use layouts in the layout-large folder
To get the tablet version of our app up and running, we need to copy our existing activity layout file activity_main.xml into the app/src/main/res/layout-large folder and then update that version of the file. This layout will then only be used by devices with a large screen.
If the app/src/main/res/layout-large folder doesn’t exist in your Android Studio project, you’ll need to create it. To do this, switch to the Project view of Android Studio’s explorer, highlight the app/src/main/res folder, and choose File→New...→Directory. When prompted, give the folder a name of “layout-large”. When you click on the OK button, Android Studio will create the new app/src/main/res/layout-large folder.

To copy the activity_main.xml layout file, highlight the file in the explorer, and choose the Copy command from the Edit menu. Then highlight the new layout-large folder, and choose the Paste command from the Edit menu. Android Studio will copy the activity_main.xml file into the app/src/main/res/layout-large folder.
If you open the file you just pasted, it should look like this:

This is exactly the same layout that we had before. It contains a single fragment, WorkoutListFragment, that displays a list of workouts. The next thing we need to do is update the layout so that it displays two fragments side by side,
The layout-large version of the layout needs to display two fragments
We’re going to change the version of activity_main.xml in the layout-large folder so that it contains the two fragments. To do this, we’ll add the fragments to a linear layout with the orientation set to horizontal. We’ll adjust the width of the fragments so that WorkoutListFragment takes up two-fifths of the available space, and WorkoutDetailFragment takes up three-fifths.
Our version of activity_main.xml is below. Update your code to reflect our changes. Make sure that you only edit the tablet version of the layout that’s in the layout-large folder.

We’ll run through what happens when the code runs on the next page.
What the updated code does

Before we take the app for a test drive, let’s go through what happens when the code runs.
When the app is launched, MainActivity gets created.
MainActivity’sonCreate()method runs. This specifies that activity_main.xml should be used forMainActivity’s layout.
If the app’s running on a tablet, it uses the version of activity_main.xml that’s in the layout-large folder.
The layout displays
WorkoutListFragmentandWorkoutDetailFragmentside by side.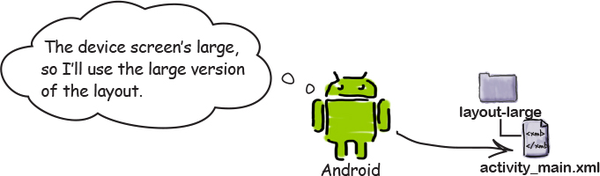
If the app’s running on a device with a smaller screen, it uses the version of activity_main.xml that’s in the layout folder.
The layout displays
WorkoutListFragmenton its own.
Test drive the app


When you run the app on a phone, the app looks just as it did before. MainActivity displays a list of workout names, and when you click on one of the workouts, DetailActivity starts and displays its details.
When you run the app on a tablet, MainActivity displays a list of workout names on the left, and details of the first workout appear next to it.
When you click on one of the workouts, DetailActivity still gets displayed. We need to change our code so that if the app’s running on a tablet, DetailActivity no longer starts. Instead, we need to display details of the workout the user selects in MainActivity, and not just the first workout.
We need to change the itemClicked() code
We need to change the code that decides what to do when items in WorkoutListFragment are clicked. This means that we need to change the itemClicked() method in MainActivity. Here’s the current code:
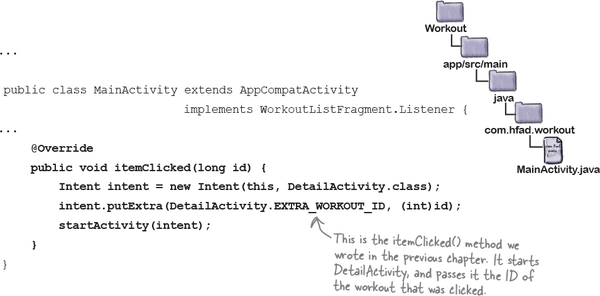
The current code starts DetailActivity whenever the user clicks on one of the workouts. We need to change the code so that this only happens if the app’s running on a device with a small screen such as a phone. If the app’s running on a device with a large screen, when the user picks a workout we need to display the details of the workout shown to the right of the list of workouts in WorkoutDetailFragment.
But how do we update the workout details?
The WorkoutDetailFragment updates its views when it is started. But once the fragment is displayed onscreen, how do we get the fragment to update the details?
You might be thinking that we could play with the fragment’s lifecycle so that we get it to update. Instead, we’ll replace the detail fragment with a brand-new detail fragment, each time we want its text to change.
There’s a really good reason why...
You want fragments to work with the Back button
Suppose you have a user that runs the app on a phone. When they click on a workout, details of that workout are displayed in a separate activity. If the user clicks on the Back button, they’re returned to the list of workouts:
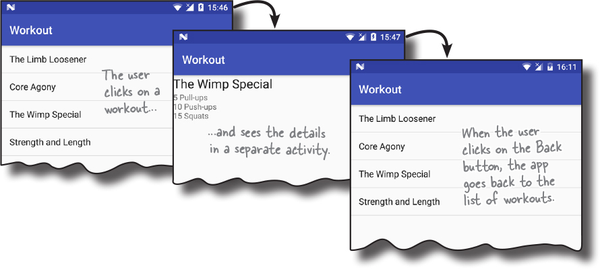
Then suppose the user runs the app on a tablet, and clicks on one workout, followed by a second workout. If they click on the Back button, they’re probably going to expect to be returned to the first workout they chose:
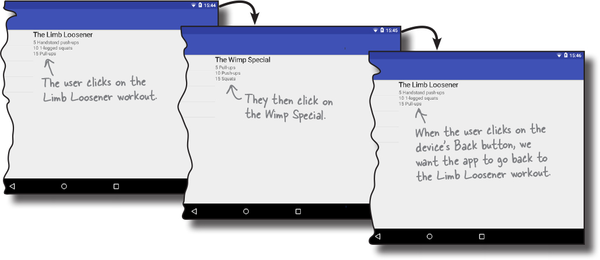
In every app we’ve built so far, when we’ve clicked on the Back button, we’ve been returned to the previous activity. This is standard Android behavior, and something that Android has handled for us automatically. If we’re running this particular app on a tablet, however, we don’t want the Back button to return us to the previous activity. We want it to return us to the previous fragment state.
Welcome to the back stack

When you go from activity to activity in your app, Android keeps track of each activity you’ve visited by adding it to the back stack. The back stack is a log of the places you’ve visited on the device, each place recorded as a separate transaction.
A back stack scenario
Suppose you start by visiting a fictitious activity in your app,
Activity1. Android records your visit toActivity1on the back stack as a transaction.
You then go to
Activity2. Your visit toActivity2is added to the top of the back stack as a separate transaction.
You then go to
Activity3.Activity3is added to the top of the back stack.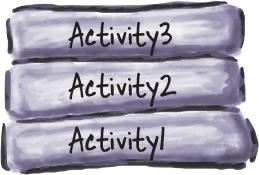
When you click on the Back button,
Activity3pops off the top of the back stack. Android displaysActivity2, as this activity is now at the top of the back stack.
If you click on the Back button again,
Activity2pops off the top of the back stack, andActivity1is displayed.
Back stack transactions don’t have to be activities

We’ve shown you how the back stack works with activities, but the truth is, it doesn’t just apply to activities. It applies to any sort of transaction, including changes to fragments.

This means that fragment changes can be reversed when you click on the Back button, just like activity changes can.

So how can we record changes to fragments as separate transactions on the back stack?
Don’t update—instead, replace
We’re going to replace the entire WorkoutDetailFragment with a new instance of it each time the user selects a different workout. Each new instance of WorkoutDetailFragment will be set up to display details of the workout the user selects. That way, we can add each fragment replacement to the back stack as a separate transaction. Each time the user clicks on the Back button, the most recent transaction will be popped off the top of the stack, and the user will see details of the previous workout they selected.
To do this, we first need to know how to replace one fragment with another. We’ll look at this on the next page.
Android builds the back stack as you navigate from one activity to another. Each activity is recorded in a separate transaction.
Use a frame layout to replace fragments programmatically

To replace one fragment with another in MainActivity’s tablet user interface, we need to begin by making a change to the activity_main.xml layout file in the layout-large folder. Instead of inserting WorkoutDetailFragment directly using the <fragment> element, we’ll use a frame layout.
Note
We covered frame layouts in Chapter 5.
We’ll add the fragment to the frame layout programmatically. Whenever an item in the WorkoutListFragment list view gets clicked, we’ll replace the contents of the frame layout with a new instance of WorkoutDetailFragment that displays details of the correct workout.
Add a fragment using a <FrameLayout> whenever you need to replace fragments programmatically, such as when you need to add fragment changes to the back stack.
Here’s our new version of the code for activity_main.xml in the layout-large folder. Update your code to include our changes.

Use layout differences to tell which layout the device is using

We want MainActivity to perform different actions when the user clicks on a workout depending on whether the device is running on a phone or a tablet. We can tell which version of the layout’s being used by checking whether or not the layout includes the frame layout we added on the previous page.
If the app is running on a tablet, the device will be using the version of activity_main.xml that’s in the layout-large folder. This layout includes a frame layout with an ID of fragment_container. When the user clicks on a workout, we want to display a new instance of WorkoutDetailFragment in the frame layout.

If the app’s running on a phone, the device will be using activity_main.xml in the layout folder. This layout doesn’t include the frame layout. If the user clicks on a workout, we want MainActivity to start DetailActivity as it does currently.

If we can get our MainActivity code to check for the existence of a view with an ID of fragment_container, we can get MainActivity to behave differently depending on whether the app’s running on a phone or a tablet.
The revised MainActivity code

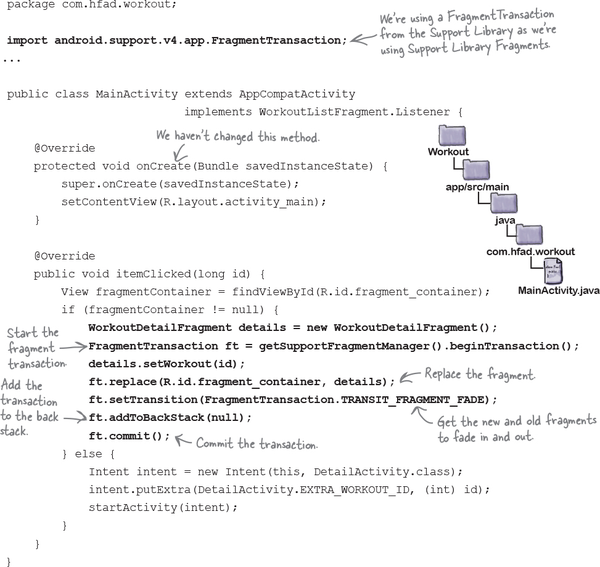
We’ve updated MainActivity so that the itemClicked() method looks for a view with an ID of fragment_container. We can then perform different actions depending on whether or not the view is found.
Here’s our full code for MainActivity.java; update your version of the code to match ours:
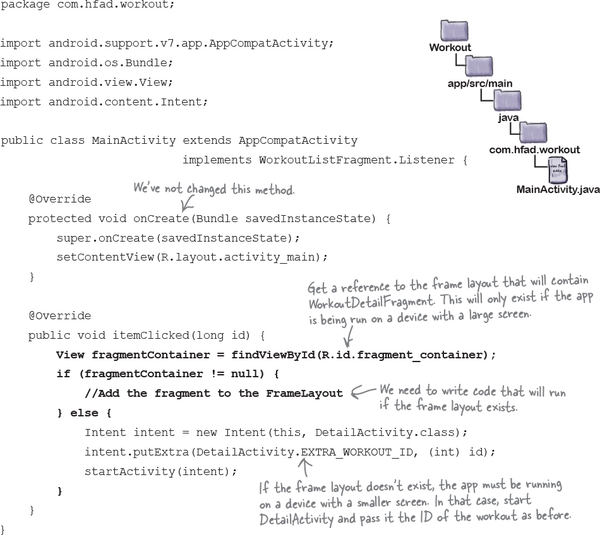
The next thing we need to do is see how we can add WorkoutDetailFragment to the frame layout programmatically.
Using fragment transactions
You can programmatically add a fragment to an activity’s layout so long as the activity’s running. All you need is a view group in which to place the fragment, such as a frame layout.
You add, replace, or remove fragments at runtime using a fragment transaction. A fragment transaction is a set of changes relating to the fragment that you want to apply, all at the same time.
When you create a fragment transaction, you need to do three things:
Begin the transaction.
This tells Android that you’re starting a series of changes that you want to record in the transaction.
Specify the changes.
These are all the actions you want to group together in the transaction. This can include adding, replacing, or removing a fragment, updating its data, and adding it to the back stack.
Commit the transaction.
This finishes the transaction and applies the changes.
1. Begin the transaction
You begin the transaction by first getting a reference to the activity’s fragment manager. As you may remember from the previous chapter, the fragment manager is used to manage any fragments used by the activity. If you’re using fragments from the Support Library as we are here, you get a reference to the fragment manager using the following method:

Once you have a reference to the fragment manager, you call its beginTransaction() method to begin the transaction:

That’s all you need to do to begin the transaction. On the next page we’ll look at how you specify the changes you want to make.
2. Specify the changes

After beginning the transaction, you need to say what changes the transaction should include.
If you want to add a fragment to your activity’s layout, you call the fragment transaction’s add() method. This takes two parameters, the resource ID of the view group you want to add the fragment to, and the fragment you want to add. The code looks like this:

To replace the fragment, you use the replace() method:

To remove the fragment completely, you use the remove() method:

You can optionally use the setTransition() method to say what sort of transition animation you want for this transaction:

transition is the type of animation. Options for this are TRANSIT_FRAGMENT_CLOSE (a fragment is being removed from the stack), TRANSIT_FRAGMENT_OPEN (a fragment is being added), TRANSIT_FRAGMENT_FADE (the fragment should fade in and out), and TRANSIT_NONE (no animation). By default, there are no animations.
Once you’ve specified all the actions you want to take as part of the transaction, you can use the addToBackStack() method to add the transaction to the back stack. This method takes one parameter, a String name you can use to label the transaction. This parameter is needed if you need to programmatically retrieve the transaction. Most of the time you won’t need to do this, so you can pass in a null value like this:

3. Commit the transaction

Finally, you need to commit the transaction. This finishes the transaction, and applies the changes you specified. You commit the transaction by calling the transaction’s commit() method like this:
transaction.commit();
That’s everything we need to know in order to create fragment transactions, so let’s put it into practice by getting our MainActivity code to display an updated version of WorkoutDetailFragment every time the user clicks on a workout.
The updated MainActivity code

We’re going to get a new instance of WorkoutDetailFragment (one that displays the correct workout), display the fragment in the activity, and then add the transaction to the back stack. Here’s the full code. Update your version of MainActivity.java to reflect our changes:
On the next page we’ll see what happens when the code runs.
What happens when the code runs

Here’s a runthrough of what happens when we run the app.
The app is launched on a tablet and MainActivity starts.
WorkoutListFragmentis attached toMainActivity, andMainActivityis registered as a listener onWorkoutListFragment.
When an item is clicked in WorkoutListFragment, the fragment’s onListItemClick() method is called.
This calls
MainActivity’sitemClicked()method, passing it the ID of the workout that was clicked; in this example, the ID is1.
MainActivity’s itemClicked() method sees that the app is running on a tablet.
It creates a new instance of
WorkoutDetailFragment, and begins a new fragment transaction.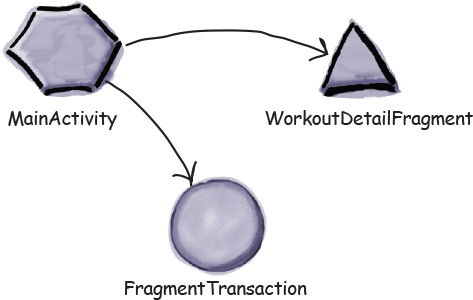
The story continues...

As part of the transaction, WorkoutDetailFragment’s views are updated with details of the workout that was selected, in this case the one with ID 1.
The fragment is added to the
FrameLayout fragment_containerinMainActivity’s layout, and the whole transaction is added to the back stack.
MainActivity commits the transaction.
All of the changes specified in the transaction take effect, and the

Let’s take the app for a test drive.
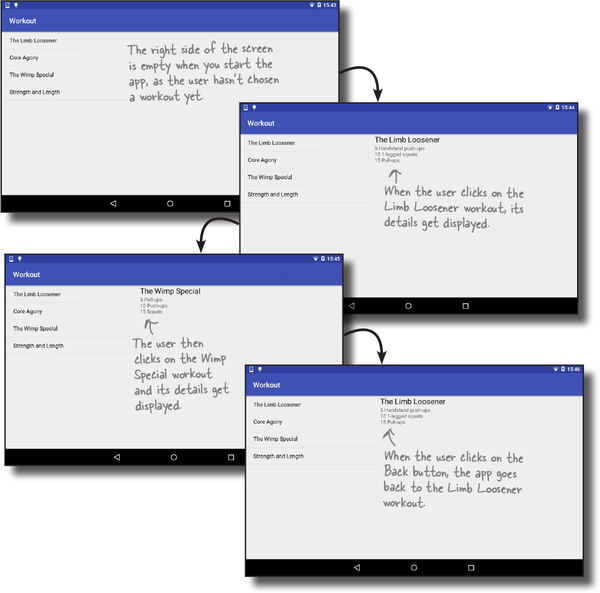
Test drive the app
When we run the app, a list of the workouts appears on the left side of the screen. When we click on one of the workouts, details of that workout appear on the right. If we click on another workout and then click on the Back button, details of the workout we chose previously appear on the screen.
The app seems to be working fine as long as we don’t rotate the screen. If we change the screen orientation, there’s a problem. Let’s see what happens.
Rotating the tablet breaks the app
When you run the app on a phone and rotate the device, the app works as you’d expect. Details of the workout the user selected continue to be displayed on the screen:

But when you run the app on a tablet, there’s a problem. Regardless of which workout you’ve chosen, when you rotate the device, the app displays details of the first workout in the list:

Why does the app do this? Give this some thought before turning the page. Hint: you saw behavior similar to this back in Chapter 4 when we looked at the activity lifecycle.
Saving an activity’s state (revisited)
When we first looked at the activity lifecycle back in Chapter 4, you saw how when you rotate the device, Android destroys and recreates the activity. When this happens, local variables used by the activity can get lost. To prevent this from happening, we saved the state of our local variables in the activity’s

We then restored the state of the variables in the activity’s onCreate() method:

So what does this have to do with our current problem?
Fragments can lose state too
If the activity uses a fragment, the fragment gets destroyed and recreated along with the activity. This means that any local variables used by the fragment can also lose their state.
In our WorkoutDetailFragment code, we use a local variable called workoutId to store the ID of the workout the user clicks on in the WorkoutListFragment list view. When the user rotates the device, workoutId loses its current value and it’s set to 0 by default. The fragment then displays details of the workout with an ID of 0—the first workout in the list.

Save the fragment’s state...
You deal with this problem in a fragment in a similar way to how you deal with it in an activity.
You first override the fragment’s onSaveInstanceState() method. This method works in a similar way to an activity’s onSaveInstanceState() method. It gets called before the fragment gets destroyed, and it has one parameter: a Bundle. You use the Bundle to save the values of any variables whose state you need to keep.
In our case, we want to save the state of our workoutId variable, so we’d use code like this:

Once you’ve saved the state of any variables, you can restore it when the fragment is recreated.
... then use onCreate() to restore the state
Just like an activity, a fragment has an onCreate() method that has one parameter, a Bundle. This is the Bundle to which you saved the state of your variables in the fragment’s onSaveInstanceState() method, so you can use it to restore the state of those variables in your fragment’s onCreate() method.
In our case, we want to restore the state of the workoutId variable, so we can use code like this:

We’ll show you the full code on the next page.
The updated code for WorkoutDetailFragment.java
We’ve updated our code for WorkoutDetailFragment.java to save the state of the workoutId variable before the fragment is destroyed, and restore it if the fragment is recreated. Here’s our code; update your version of WorkoutDetailFragment.java to reflect our changes.

The code continues on the next page.
WorkoutDetailFragment.java (continued)


Chapter 10 Your Android Toolbox

You’ve got Chapter 10 under your belt and now you’ve added fragments for larger interfaces to your toolbox.
Note
You can download the full code for the chapter from https://tinyurl.com/HeadFirstAndroid.