
Chapter 11. Dynamic Fragments: Nesting Fragments

So far you’ve seen how to create and use static fragments. But what if you want your fragments to be more dynamic? Dynamic fragments have a lot in common with dynamic activities, but there are crucial differences you need to be able to deal with. In this chapter you’ll see how to convert dynamic activities into working dynamic fragments. You’ll find out how to use fragment transactions to help maintain your fragment state. Finally, you’ll discover how to nest one fragment inside another, and how the child fragment manager helps you control unruly back stack behavior.
Adding dynamic fragments
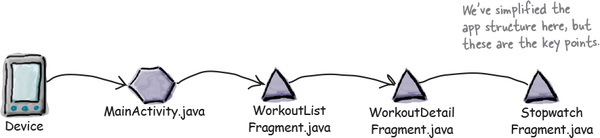
In Chapter 9 and Chapter 10, you saw how to create fragments, how to include them in activities, and how to connect them together. To do this, we created a list fragment displaying a list of workouts, and a fragment displaying details of a single workout.
These fragments we’ve created so far have both been static. Once the fragments are displayed, their contents don’t change. We may completely replace the fragment that’s displayed with a new instance, but we can’t update the contents of the fragment itself.
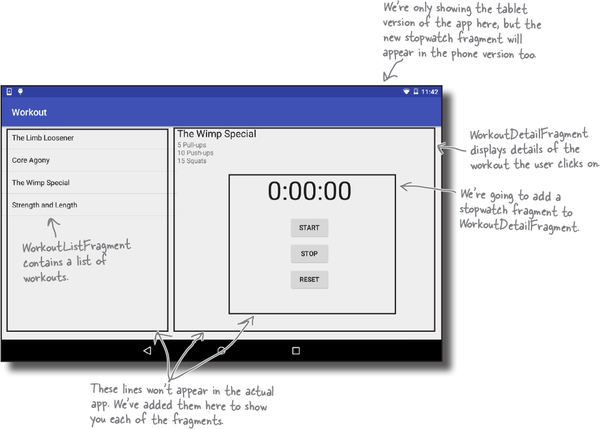
In this chapter we’re going to look at how you deal with a fragment that’s more dynamic. By this, we mean a fragment whose views gets updated after the fragment is displayed. To learn how to do, we’re going to change the stopwatch activity we created in Chapter 4 into a stopwatch fragment. We’re going to add our new stopwatch fragment to WorkoutDetailFragment so that it’s displayed underneath the details of the workout.
Here’s what we’re going to do
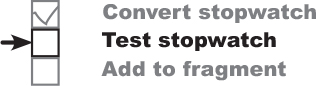
There are a number of steps we’ll go through to change the app to display the stopwatch:
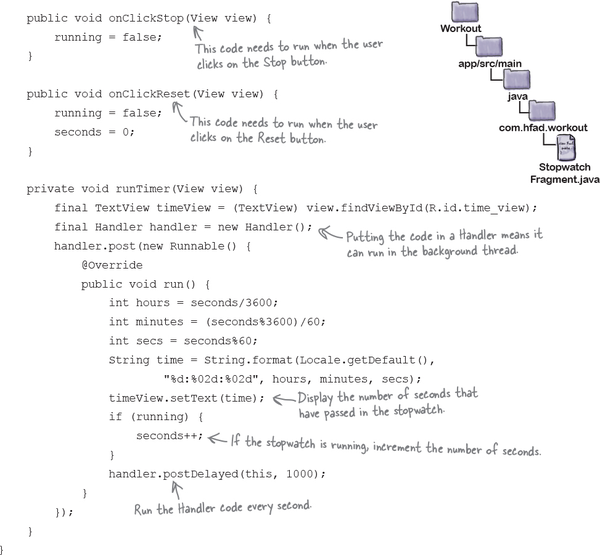
Convert StopwatchActivity into StopwatchFragment.
We’ll take the
StopwatchActivitycode we created in Chapter 4, and change it into fragment code. We’ll also display it in a new temporary activity calledTempActivityso that we can check that it works. We’ll temporarily change the app so thatTempActivitystarts when the app gets launched.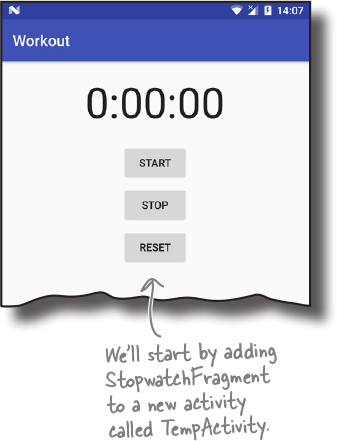
Test StopwatchFragment.
The
StopwatchActivityincluded Start, Stop, and Reset buttons.We need to check that these still work when the stopwatch code is in a fragment.We also need to test what happens to
StopwatchFragmentwhen the user rotates the device.Add StopwatchFragment to WorkoutDetailFragment.
Once we’re satisfied that
StopwatchFragmentworks, we’ll add it toWorkoutDetailFragment.
Let’s get started.
Do this!
We’re going to update the Workout app in this chapter, so open your original Workout project from Chapter 9 in Android Studio.
The new version of the app

We’re going to change our app to get StopwatchFragment working in a new temporary activity called TempActivity. This will emable us to confirm that StopwatchFragment works before we add it to WorkoutDetailFragment later in the chapter.
Here’s how the new version of the app will work:
When the app gets launched, it starts TempActivity.
TempActivityuses activity_temp.xml for its layout, and contains a fragment,StopwatchFragment.StopwatchFragment displays a stopwatch with Start, Stop, and Reset buttons.

All of the other activities and fragments we created in Chapter 9 and Chapter 10 will still exist in the project, but we’re not going to do anything with them until later in the chapter.
Create TempActivity
We’ll start by creating TempActivity. Create a new empty activity by switching to the Project view of Android Studio’s explorer, highlighting the com.hfad.workout package in the app/src/main/java folder, going to the File menu and choosing New...→Activity→Empty Activity. Name the activity “TempActivity”, name the layout “activity_temp”, make sure the package name is com.hfad.workout, and check the Backwards Compatibility (AppCompat) checkbox.
Note
If prompted for the activity’s source language, select the option for Java.
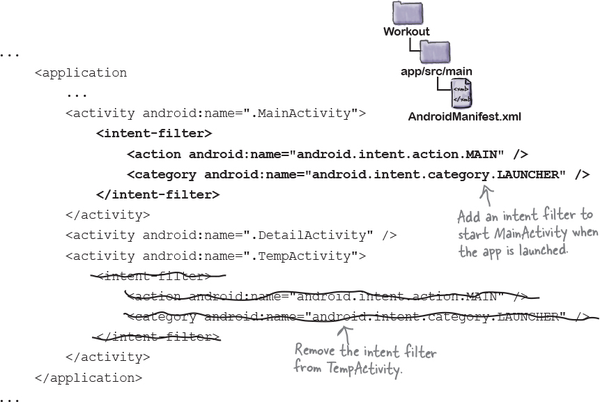
We’re going to change our app so that, when it’s launched, it starts TempActivity instead of MainActivity. To do this, we need to move MainActivity’s launcher intent filter to TempActivity instead. Open the file AndroidManifest.xml in the app/src/main folder, then make the following changes:

We’ll update TempActivity on the next page.
TempActivity needs to extend AppCompatActivity

All of the fragments we’re using in this app come from the Support Library. As we said back in Chapter 9, all activities that use Support Library fragments must extend the FragmentActivity class or one of its subclasses such as AppCompatActivity. If they don’t, the code will break.
All of the other activities we’ve created in this app extend AppCompatActivity, so we’ll make TempActivity extend this class too. Here’s our code for TempActivity.java. Update your version of the code so that it matches ours below:

We’ll add a new stopwatch fragment
We’re going to add a new stopwatch fragment called StopwatchFragment.java that uses a layout called fragment_stopwatch.xml. We’re going to base the fragment on the stopwatch activity we created back in Chapter 4.
We already know that activities and fragments behave in similar ways, but we also know that a fragment is a distinct type of object—a fragment is not a subclass of activity. Is there some way we could rewrite that stopwatch activity code so that it works like a fragment?
Fragments and activities have similar lifecycles...
To understand how to rewrite an activity as a fragment, we need to think a little about the similarities and differences between them. If we look at the lifecycles of fragments and activities, we’ll see that they’re very similar:
| Lifecycle method | Activity | Fragment |
|---|---|---|
| ✓ | |
| ✓ | ✓ |
| ✓ | |
| ✓ | |
| ✓ | ✓ |
| ✓ | ✓ |
| ✓ | ✓ |
| ✓ | ✓ |
| ✓ | |
| ✓ | |
| ✓ | ✓ |
| ✓ |
... but the methods are slightly different
Fragment lifecycle methods are almost the same as activity lifecycle methods, but there’s one major difference: activity lifecycle methods are protected and fragment lifecycle methods are public. And we’ve already seen that the ways that activities and fragments create a layout from a layout resource file are different.
Also, in a fragment, we can’t call methods like findViewById() directly. Instead, we need to find a reference to a View object, and then call the view’s findViewById() method.
With these similarities and differences in mind, it’s time you started to write some code...
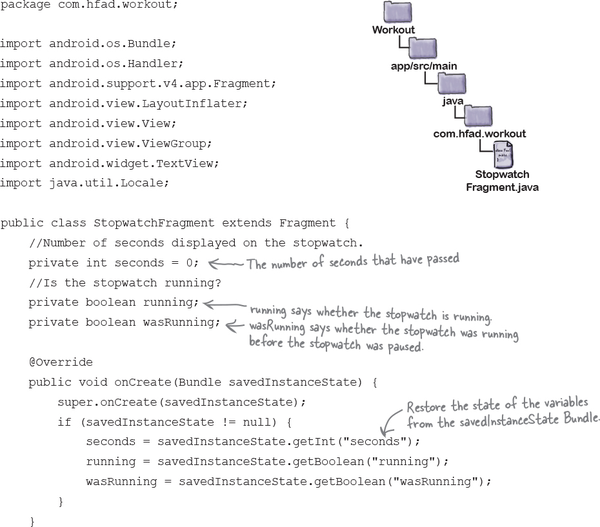
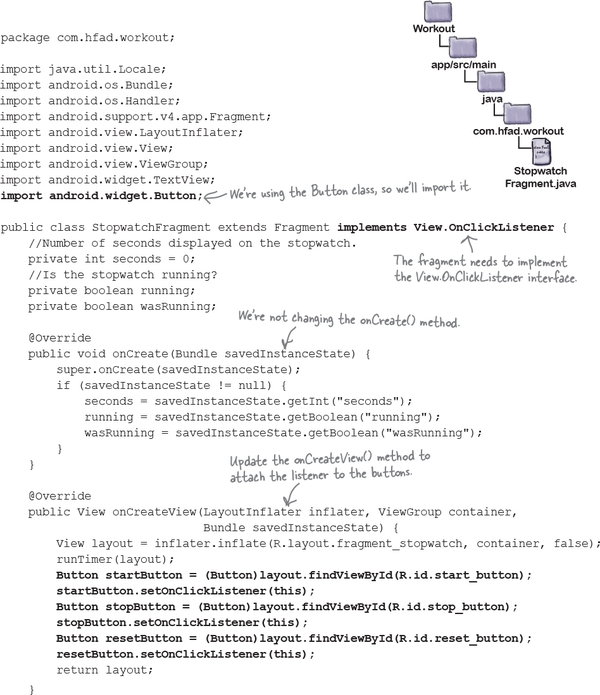
The StopwatchFragment.java code

We’ll add StopwatchFragment to our Workout project so that we can use it in our app. You do this in the same way you did in Chapter 9. Highlight the com.hfad.workout package in the app/src/main/java folder, then go to File→New...→Fragment→Fragment (Blank). Give the fragment a name of “StopwatchFragment”, give it a layout name of “fragment_stopwatch”, and uncheck the options for including fragment factory methods and interface callbacks.
Note
If prompted for the fragment’s source language, select the option for Java.
When you click on the Finish button, Android Studio creates a new fragment for you in a file called StopwatchFragment.java in the app/src/main/java folder. Replace the fragment code Android Studio gives you with the following code (this is the code you updated in the exercise on the previous page):
The code continues on the next page.
StopwatchFragment.java (continued)


StopwatchFragment.java (continued)

That’s all the Java code we need for our StopwatchFragment. The next thing we need to do is say what the fragment should look like by updating the layout code Android Studio gave us.


The StopwatchFragment layout (continued)

The StopwatchFragment layout uses String values
The XML code in fragment_stopwatch.xml uses string values for the text on the Start, Stop, and Reset buttons. We need to add these to strings.xml:

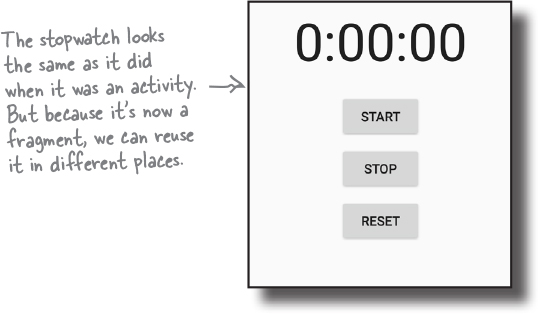
The Stopwatch fragment looks just like it did when it was an activity. The difference is that we can now use it in other activities and fragments.
The next thing we need to do is display it in TempActivity’s layout.
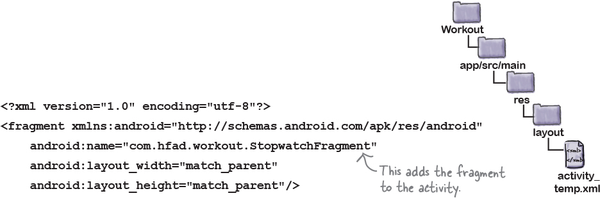
Add StopwatchFragment to TempActivity’s layout

The simplest way of adding StopwatchFragment to TempActivity’s layout is to use the <fragment> element. Using the <fragment> element means that we can add the fragment directly into the layout instead of writing fragment transaction code.
Here’s our code for activity_temp.xml. Replace the code that’s currently in that file with this updated code:
That’s everything we need to see StopwatchFragment running. Let’s take it for a test drive.
Test drive the app

When we run the app, TempActivity is displayed. It contains StopwatchFragment. The stopwatch is set to 0.
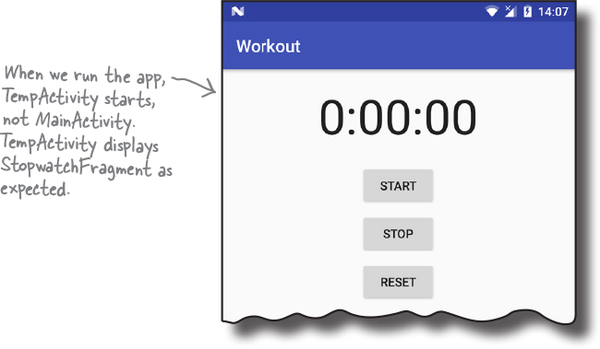
The next thing we’ll do is check that StopwatchFragment’s buttons work OK.
The app crashes if you click on a button

When you click on any one of the buttons in the Workout app’s new stopwatch, the app crashes:

When we converted the stopwatch activity into a fragment, we didn’t change any of the code relating to the buttons. We know this code worked great when the stopwatch was in an activity, so why should it cause the app to crash in a fragment?
Here’s the error output from Android Studio. Can you see what may have caused the problem?

Let’s look at the StopwatchFragment layout code
In the layout code for the StopwatchFragment, we’re binding the buttons to methods in the same way that we did for an activity, by using the android:onClick attribute to say which method should be called when each button is clicked:

This worked OK when we were using an activity, so why should we have a problem now that we’re using a fragment?
The onClick attribute calls methods in the activity, not the fragment

There’s a big problem with using the android:onClick attribute to say which method should be called when a view is clicked. The attribute specifies which method should be called in the current activity. This is fine when the views are in an activity’s layout. But when the views are in a fragment, this leads to problems. Instead of calling methods in the fragment, Android calls methods in the parent activity. If it can’t find the methods in this activity, the app crashes. That’s what Android Studio’s error message was trying to tell us.
It’s not just buttons that have this problem. The android:onClick attribute can be used with any views that are subclasses of the Button class. This includes checkboxes, radio buttons, switches, and toggle buttons.

Now we could move the methods out of the fragment and into the activity, but that approach has a major disadvantage. It would mean that the fragment is no longer self-contained—if we wanted to reuse the fragment in another activity, we’d need to include the code in that activity too. Instead, we’ll deal with it in the fragment.
How to make button clicks call methods in the fragment
There are three things you need to do in order to get buttons in a fragment to call methods in the fragment instead of the activity:
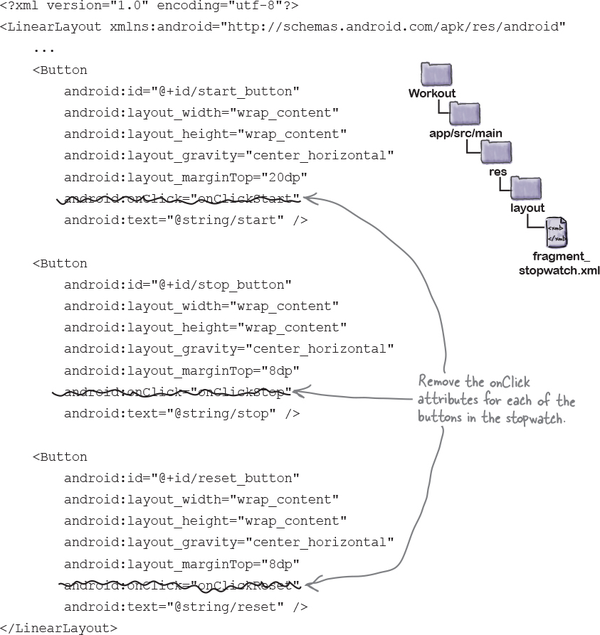
Remove references to android:onClick in the fragment layout.
Buttons attempt to call methods in the activity when the
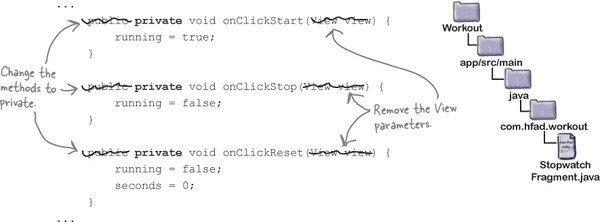
onClickattribute is used, so these need to be removed from the fragment layout.Optionally, change the onClick method signatures.
When we created our
onClickStart(),onClickStop(), andonClickReset()methods, we made them public and gave them a singleViewparameter. This was so they’d get called when the user clicked on a button. As we’re no longer using theandroid:onClickattribute in our layout, we can set our methods to private and remove theViewparameter.Note
This step’s optional, but it’s a good opportunity to tidy up our code.
Bind the buttons to methods in the fragment by implementing an OnClickListener.
This will ensure that the right methods are called when the buttons are clicked.
Let’s do this now in our StopwatchFragment.
1. Remove the onClick attributes from the fragment’s layout

The first thing we’ll do is remove the android:onClick lines of code from the fragment’s layout. This will stop Android from trying to call methods in the activity when the buttons are clicked:
The next thing we’ll do is tidy up our onClickStart(), onClickStop(), and onClickReset() code.
2. Change the onClick... method signatures

Back in Chapter 4, when we created our onClickStart(), onClickStop(), and onClickReset() methods in StopwatchActivity, we had to give them a specific method signature like this:

The methods had to take this form so that they’d respond when the user clicked on a button. Behind the scenes, when you use the android:onClick attribute, Android looks for a public method with a void return value, and with a name that matches the method specified in the layout XML.
Now that our code is in a fragment and we’re no longer using the android:onClick attribute in our layout code, we can change our method signatures like this:

So let’s update our fragment code. Change the onClickStart(), onClickStop(), and onClickReset() methods in StopwatchFragment.java to match ours:
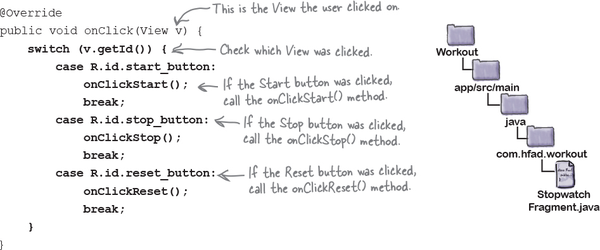
3. Make the fragment implement OnClickListener
To make the buttons call methods in StopwatchFragment when they are clicked, we’ll make the fragment implement the View.OnClickListener interface like this:

This turns StopwatchFragment into a type of View.OnClickListener so that it can respond when views are clicked.
You tell the fragment how to respond to clicks by implementing the View.OnClickListener onClick() method. This method gets called whenever a view in the fragment is clicked.

The onClick() method has a single View parameter. This is the view that the user clicks on. You can use the view’s getId() method to find out which view the user clicked on, and then decide how to react.
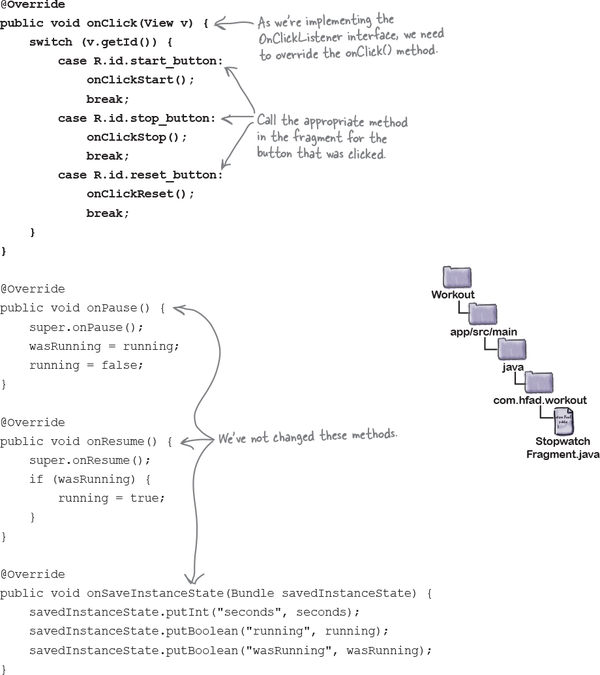
The StopwatchFragment onClick() method
We need to make a few changes to StopwatchFragment.java; we’ll show you the changes one at a time, then the fully updated code a couple of pages ahead.
Here’s the code to implement the StopwatchFragment onClick() method so that the correct method gets called when each button is clicked:
There’s just one more thing we need to do to get our buttons working: attach the listener to the buttons in the fragment.
Attach the OnClickListener to the buttons

To make views respond to clicks, you need to call each view’s setOnClickListener() method. The setOnClickListener() method takes an OnClickListener object as a parameter. Because StopwatchFragment implements the OnClickListener interface, we can use the keyword this to pass the fragment as the OnClickListener in the setOnClickListener() method.
As an example, here’s how you attach the OnClickListener to the Start button:

The call to each view’s setOnClickListener() method needs to be made after the fragment’s views have been created. This means they need to go in the StopwatchFragment onCreateView() method like this:

We’ll show you the full StopwatchFragment code on the next page.

The StopwatchFragment code (continued)

The code continues on the next page.
The StopwatchFragment code (continued)


Those are all the code changes needed for StopwatchFragment.java. Let’s see what happens when we run the app.
Test drive the app
When we run the app, the stopwatch is displayed as before. This time, however, the Start, Stop, and Reset buttons work.
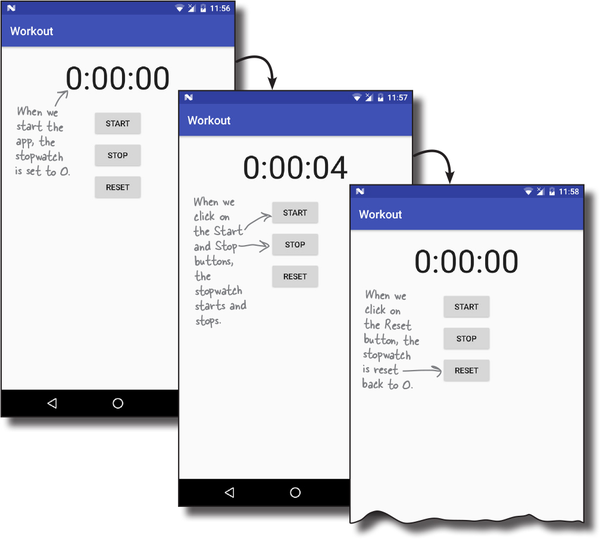
Now that we’ve got the buttons working, the next thing we need to test is what happens when we rotate the device.
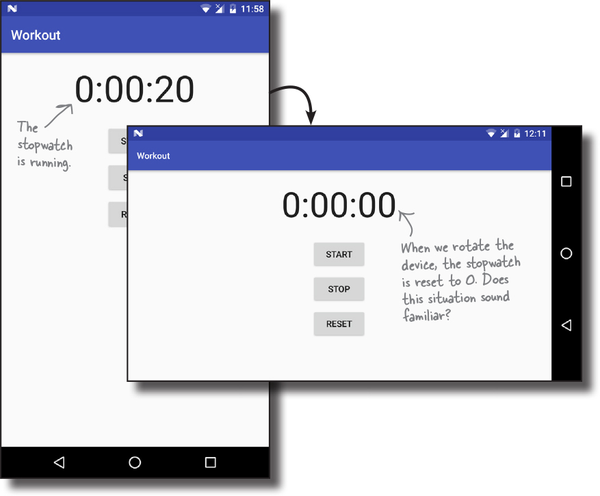
Rotating the device resets the stopwatch
There’s still one more problem we need to sort out. When we rotate our device, the stopwatch gets reset back to 0.
We encountered a similar problem when we first created StopwatchActivity back in Chapter 4. StopwatchActivity lost the state of any instance variables when it was rotated because activities are destroyed and recreated when the device is rotated. We solved this problem by saving and restoring the state of any instance variables used by the stopwatch.
This time, the problem isn’t due to the code in StopwatchFragment. Instead, it’s because of how we’re adding StopwatchFragment to TempActivity.
Use <fragment> for static fragments...

When we added StopwatchFragment to TempActivity, we did it by adding a <fragment> element to its layout like this:

We did this because it was the simplest way to display our fragment in an activity and see it working.
As we said back in Chapter 9, the <fragment> element is a placeholder for where the fragment’s layout should be inserted. When Android creates the activity’s layout, it replaces the <fragment> element with the fragment’s user interface.
When you rotate the device, Android recreates the activity. If your activity contains a <fragment> element, it reinserts a new version of the fragment each time the activity is recreated. The old fragment is discarded, and any instance variables are set back to their original values. In this particular example, this means that the stopwatch is set back to 0.
... but dynamic fragments need a fragment transaction
The <fragment> element works well for fragments that display static data. If you have a fragment that’s dynamic, like our stopwatch, you need to add the fragment using a fragment transaction instead.
We’re going to change TempActivity so that we no longer display StopwatchFragment using a <fragment>. Instead, we’ll use a fragment transaction. To do this, we need to make changes to activity_temp.xml and TempActivity.java.
Change activity_temp.xml to use a FrameLayout

As you learned back in Chapter 10, when you want to add a fragment to an activity using a fragment transaction, you first need to add a placeholder for the fragment in the activity’s layout. We did this in Chapter 10 by adding a frame layout to the layout, and giving it an ID so we could refer to it in our Java code.
We need to do the same thing with activity_temp.xml. We’ll replace the <fragment> element with a frame layout, and give the frame layout an ID of stopwatch_container. Update your version of activity_temp.xml so that it reflects ours:

Add a fragment transaction to TempActivity.java
Once you’ve added the frame layout to your activity’s layout, you can create the fragment transaction that will add the fragment to the frame layout.
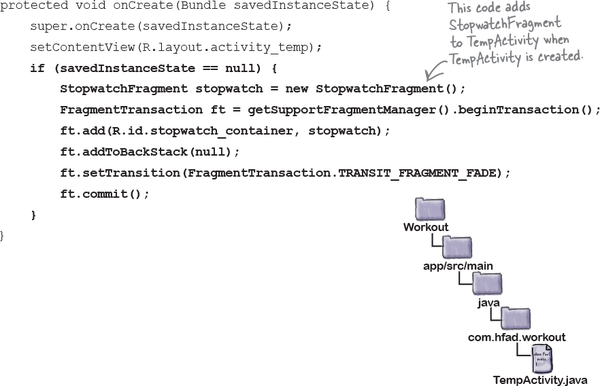
We want to add StopwatchFragment to TempActivity as soon as TempActivity gets created. We only want to add a new fragment, however, if one hasn’t previously been added to it. We don’t want to override any existing fragment.
To do this, we’ll add code to TempActivity’s onCreate() method that checks whether the savedInstanceState Bundle parameter is null.
If savedInstanceState is null, this means that TempActivity is being created for the first time. In that case, we need to add StopwatchFragment to the activity.
If savedInstanceState is not null, that means that TempActivity is being recreated after having been destroyed. In that situation, we don’t want to add a new instance of StopwatchFragment to the activity, as it would overwrite an existing fragment.
The full code for TempActivity.java

We’ve added a fragment transaction to TempActivity.java that adds StopwatchFragment to TempActivity. Our full code is below. Update your version of TempActivity.java so that it matches ours.

Those are all the code changes we need to add StopwatchFragment to TempActivity using a fragment transaction. Let’s see what happens when we run the code.
Test drive the app

When we run the app, the stopwatch is displayed as before. The Start, Stop, and Reset buttons all work, and when we rotate the app, the stopwatch keeps running.

At the beginning of the chapter, we said we’d first focus on getting StopwatchFragment working in a new temporary activity so that we could confirm it works OK. Now that we’ve achieved that, we can reuse it in WorkoutDetailFragment.
Add the stopwatch to WorkoutDetailFragment
We’re going to add StopwatchFragment to WorkoutDetailFragment so that a stopwatch is displayed underneath details of the workout. The stopwatch will appear along with the workout details whenever the user chooses one of the workouts.

Here’s how the app will work:
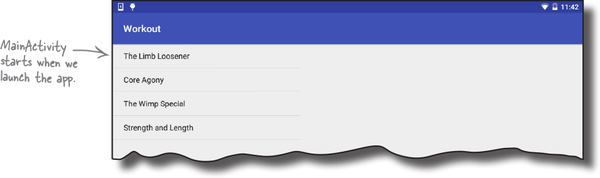
When the app gets launched, it starts MainActivity.
MainActivityincludesWorkoutListFragment, which displays a list of workouts.The user clicks on a workout and WorkoutDetailFragment is displayed.
WorkoutDetailFragmentdisplays details of the workout, and containsStopwatchFragment.StopwatchFragment displays a stopwatch.
We’ll go through the steps on the next page.
What we’re going to do

There are just a couple of steps we need to go through in order to get the new version of the app up and running.
Make the app start MainActivity when it launches.
Earlier in the chapter, we temporarily changed the app so that it would start
TempActivity. We need to change the app so that it startsMainActivityagain.Add StopwatchFragment to WorkoutDetailFragment.
We’ll do this using a fragment transaction.
Let’s get started.
Start MainActivity when the app launches
Earlier in the chapter, we updated AndroidManifest.xml to make the app start TempActivity. This was so that we could get StopwatchFragment working before adding it to WorkoutDetailFragment.
Now that StopwatchFragment is working, we need to start MainActivity again when the app launches. To do this, update AndroidManifest.xml with the following changes:
Add a FrameLayout where the fragment should appear

Next we need to add StopwatchFragment to WorkoutDetailFragment. We’ll do this by adding a frame layout to fragment_workout_detail.xml, just as we did in activity_temp.xml. We’ll then be able to add StopwatchFragment to WorkoutDetailFragment using a fragment transaction.
Here’s our code for fragment_workout_detail.xml; update your code so that it matches ours:

All that’s left to do is to add the fragment transaction to WorkoutDetailFragment.
So far, we’ve only used fragment transactions in activities

Earlier in the chapter, we added the following code to TempActivity to add StopwatchFragment to its layout:
The above code worked well when we wanted to add StopwatchFragment to an activity. How will it need to change now that we want to add StopwatchFragment to a fragment?
Using fragment transactions in fragments uses most of the same code
The good news is that you can use nearly all of the same code when you want to use a fragment transaction inside a fragment. There’s just one key difference: fragments don’t have a method called getSupportFragmentManager(), so we need to edit this line of code:
FragmentTransaction ft = getSupportFragmentManager().beginTransaction();
In order to create the fragment transaction, we need to get a reference to a fragment manager. Fragments have two methods you can use for this purpose: getFragmentManager() and getChildFragmentManager(). So what’s the difference between these two methods, and which one should we use in our app?
Using getFragmentManager() creates extra transactions on the back stack

The getFragmentManager() method gets the fragment manager associated with the fragment’s parent activity. Any fragment transaction you create using this fragment manager is added to the back stack as a separate transaction.
In our case, when someone clicks on a workout, we want the app to display the details of the workout and the stopwatch. MainActivity creates a transaction that displays WorkoutDetailFragment. If we use getFragmentManager() to create a transaction to display StopwatchFragment, this will be added to the back stack as a separate transaction.
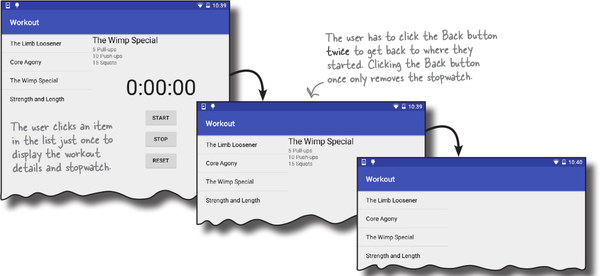
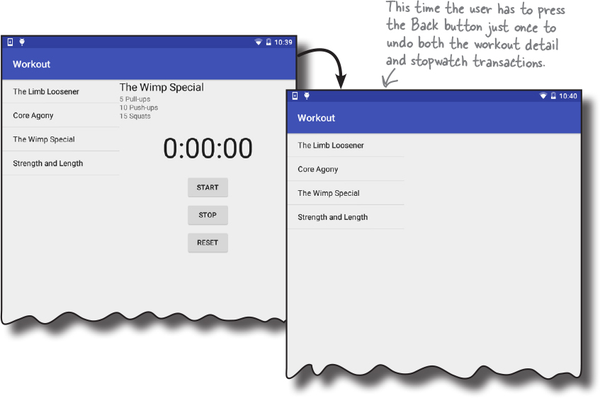
The problem with using two transactions to display the workout and stopwatch is what happens when the user presses the Back button.

Suppose the user clicks on a workout. Details of the workout will be displayed, along with the stopwatch. If the user then clicks on the Back button, they will expect the screen to go back to how it looked before they selected a workout. But the Back button simply pops the last transaction on the back stack. That means if we create two transactions to add the workout detail and the stopwatch, when the user clicks the Back button, only the stopwatch will be removed. They have to click the Back button again to remove the workout details.
Clearly this behavior is less than ideal. So what about getChildFragmentManager()?
Using getChildFragmentManager() creates nested transactions instead
The getChildFragmentManager() method gets the fragment manager associated with the fragment’s parent fragment. Any fragment transaction you create using this fragment manager is added to the back stack inside the parent fragment transaction, not as a separate transaction.
In our particular case, this means that the fragment transaction that displays WorkoutDetailFragment contains a second transaction that displays StopwatchFragment.
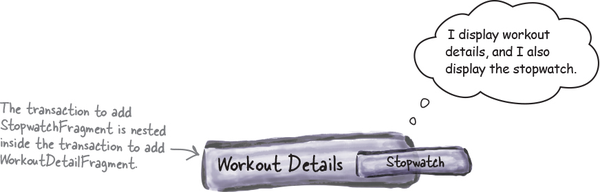
WorkoutDetailFragment and StopwatchFragment are still displayed when the user clicks on a workout, but the behavior is different when the user clicks on the Back button. As the two transactions are nested, both transactions are popped off the back stack when the user presses the Back button. The workout details and the stopwatch are both removed if the user presses the Back button once. That’s what we want, so we’ll use this method in our app.
What getChildFragmentManager() fragment transaction code looks like

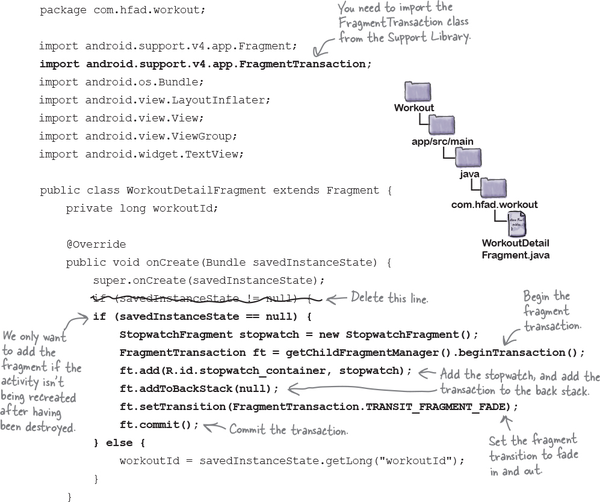
We’ve written code that will add StopwatchFragment to WorkoutDetailFragment. It creates a fragment transaction using the fragment manager returned by getChildFragmentManager(). Here’s the code:

We need to add this code to WorkoutDetailFragment.java. We’ll show you the full code on the next page.
The full WorkoutDetailFragment.java code

Here’s the full code for WorkoutDetailFragment.java. Update your version of the code to include our changes.
The code continues on the next page.
The full code (continued)

That’s everything we need for our app. Let’s take it for a test drive and check that it works OK.
Test drive the app
We’ll start by testing the app on a tablet.
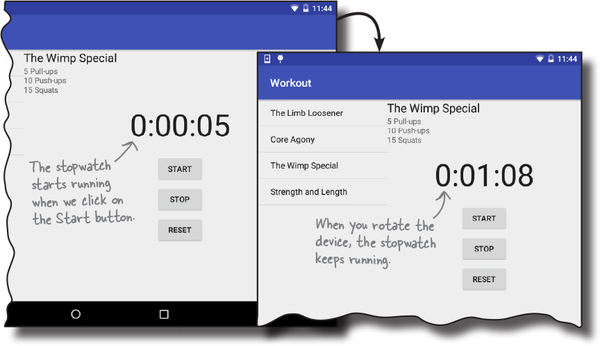
When we start the app, MainActivity is displayed.
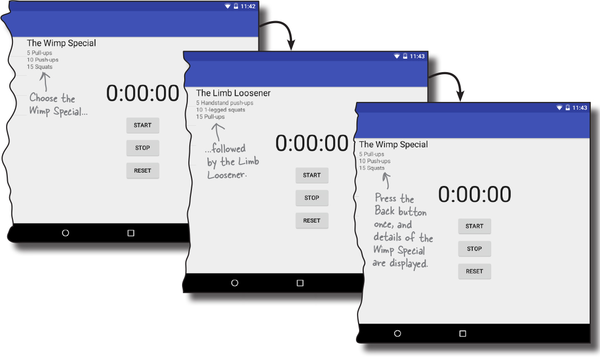
When we click on one of the workouts, details of that workout are displayed along with a stopwatch. If we click on a second workout and then click on the Back button, details of the first workout are displayed.
Test drive (continued)

When we click on the stopwatch buttons, they all work as expected. When we rotate the app, the stopwatch maintains its state.
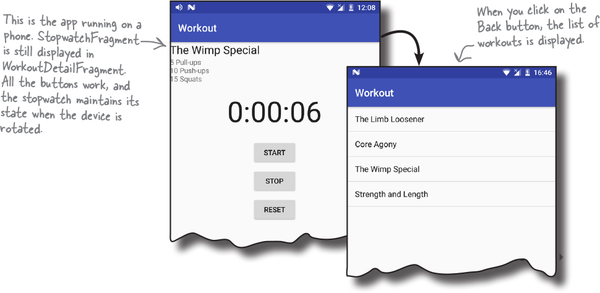
When we run the app on a phone, WorkoutDetailFragment is displayed inside a separate activity, DetailActivity. The stopwatch is still displayed underneath the workout details, and functions as expected.
Chapter 11 Your Android Toolbox

You’ve got Chapter 11 under your belt and now you’ve added dynamic fragments to your toolbox.
Note
You can download the full code for the chapter from https://tinyurl.com/HeadFirstAndroid.