
Chapter 3. Multiple Activities and Intents: State Your Intent

Most apps need more than one activity.
So far we’ve just looked at single-activity apps, which is fine for simple apps. But when things get more complicated, just having the one activity won’t cut it. We’re going to show you how to build apps with multiple activities, and how you can get your activities talking to each other using intents. We’ll also look at how you can use intents to go beyond the boundaries of your app and make activities in other apps on your device perform actions. Things are about to get a whole lot more powerful...
Apps can contain more than one activity
Earlier in the book, we said that an activity is a single, defined thing that your user can do, such as displaying a list of recipes. If your app is simple, this may be all that’s needed.
But a lot of the time, you’ll want users to do more than just one thing—for example, adding recipes as well as displaying a list of them. If this is the case, you’ll need to use multiple activities: one for displaying the list of recipes and another for adding a single recipe.
An activity is a single focused thing your user can do. If you chain multiple activities together to do something more complex, it’s called a task.
The best way of understanding how this works is to see it in action. You’re going to build an app containing two activities. The first activity will allow you to type a message. When you click on a button in the first activity, it will launch the second activity and pass it the message. The second activity will then display the message.

Here’s what we’re going to do in this chapter
Create an app with a single activity and layout.
Add a second activity and layout.
Get the first activity to call the second activity.
Get the first activity to pass data to the second activity.
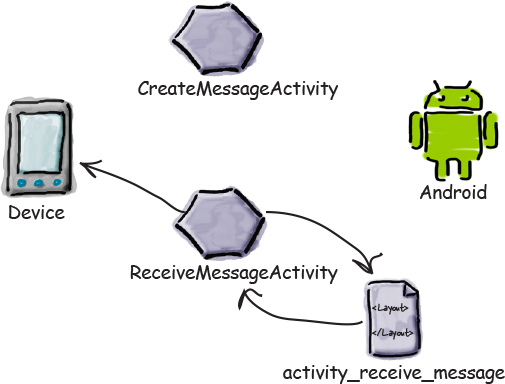
Here’s the app structure
The app contains two activities and two layouts.
When the app gets launched, it starts activity CreateMessageActivity.
This activity uses the layout activity_create_message.xml.
When the user clicks a button in CreateMessageActivity, ReceiveMessageActivity is launched.
This activity uses layout activity_receive_message.xml.

Get started: create the project

You create a project for the app in exactly the same way you did in previous chapters. Create a new Android Studio project for an application named “My Messenger” with a company domain of “hfad.com”, making the package name com.hfad.mymessenger. The minimum SDK should be API 19 so that it will work on most devices. You’ll need an empty activity named “CreateMessageActivity” with a layout named “activity_create_message” so that your code matches ours. Make sure that you untick the Backwards Compatibility (AppCompat) option when you create the activity.
On the next page, we’ll update the activity’s layout.
Update the layout
Here’s the XML for the activity_create_message.xml file. We’re using a <LinearLayout> to display components in a single column, and we’ve added <Button> and <EditText> elements to it. The <EditText> element gives you an editable text field you can use to enter data.

Change your activity_create_message.xml file to match the XML here:

The <EditText> element defines an editable text field for entering text. It inherits from the same Android View class as the other GUI components we’ve seen so far.
Update strings.xml...

We used two String resources in our layout on the previous page. The button has a text value of @string/send that appears on the button, and the editable text field has a hint value of @string/hint that tells the user what to enter in the field. This means we need to add Strings called "send" and "hint" to strings.xml and give them values. Do this now:

... and add the method to the activity
This line in the <Button> element:
android:onClick="onSendMessage"
means that the onSendMessage() method in the activity will fire when the button is clicked. Let’s add this method to the activity now.
Open up the CreateMessageActivity.java file and replace the code Android Studio created for you with the following:

Now that you’ve created the first activity, let’s move on to the second.
Create the second activity and layout

Android Studio has a wizard that lets you add extra activities and layouts to your apps. It’s like a scaled-down version of the wizard you use to create an app, and you use it whenever you want to create a new activity.
To create the new activity, switch to the Project view of Android Studio’s explorer, click on the com.hfad.mymessenger package in the app/src/main/java folder, choose File → New → Activity, and choose the option for Empty Activity. You will be presented with a new screen where you can choose options for your new activity.
Every time you create a new activity and layout, you need to name them. Name the new activity “ReceiveMessageActivity” and the layout “activity_receive_message”. Make sure that the option to generate a layout is checked, and the Launcher Activity and Backwards Compatibility (AppCompat) options are unchecked. Finally, confirm that the package name is com.hfad.mymessenger, and when you’re done, click on the Finish button.
Note
Some versions of Android Studio may ask you what the source language of your activity should be. If prompted, select the option for Java.

What just happened?

When you clicked on the Finish button, Android Studio created a shiny new activity file for you, along with a new layout. If you look in the explorer, you should see that a new file called ReceiveMessageActivity.java has appeared in the app/src/main/java folder, and a file called activity_receive_message. xml has appeared under app/src/main/res/layout.

Each activity uses a different layout. CreateMessageActivity uses the layout activity_create_message.xml, and ReceiveMessageActivity uses the layout activity_receive_message.xml:

Behind the scenes, Android Studio also made a configuration change to the app in a file called AndroidManifest.xml. Let’s take a closer look.
Welcome to the Android manifest file

Every Android app must include a file called AndroidManifest.xml. You can find it in the app/src/main folder of your project. The AndroidManifest.xml file contains essential information about your app, such as what activities it contains, required libraries, and other declarations. Android creates the file for you when you create the app. If you think back to the settings you chose when you created the project, some of the file contents should look familiar.

Here’s what our copy of AndroidManifest.xml looks like:

Watch it!

If you develop Android apps without an IDE, you’ll need to create this file manually.
Every activity needs to be declared
All activities need to be declared in AndroidManifest.xml. If an activity isn’t declared in the file, the system won’t know it exists. And if the system doesn’t know it exists, the activity will never run.

You declare an activity in the manifest by including an <activity> element inside the <application> element. In fact, every activity in your app needs a corresponding <activity> element. Here’s the general format:

The following line is mandatory and is used to specify the class name of the activity, in this example "MyActivityClassName":
android:name=".MyActivityClassName"
MyActivityClassName is the name of the class. It’s prefixed with a “.” because Android combines the class name with the name of the package to derive the fully qualified class name.
The activity declaration may include other properties too, such as security permissions, and whether it can be used by activities in other apps.
Watch it!
The second activity in our app was automatically declared because we added it using the Android Studio wizard.
If you add extra activities manually, you’ll need to edit AndroidManifest.xml yourself. The same may be true if you use another IDE besides Android Studio.
An intent is a type of message 

So far we’ve created an app with two activities in it, and each activity has its own layout. When the app is launched, our first activity, CreateMessageActivity, will run. What we need to do next is get CreateMessageActivity to call ReceiveMessageActivity when the user clicks the Send Message button.
Whenever you want an activity to start a second activity, you use an intent. You can think of an intent as an “intent to do something.” It’s a type of message that allows you to bind separate objects (such as activities) together at runtime. If one activity wants to start a second activity, it does it by sending an intent to Android. Android will then start the second activity and pass it the intent.
You start an activity by creating an intent and using it in the startActivity() method.
You can create and send an intent using just a couple of lines of code. You start by creating the intent like this:

The first parameter tells Android which object the intent is from: you can use the word this to refer to the current activity. The second parameter is the class name of the activity that needs to receive the intent.
Once you’ve created the intent, you pass it to Android like this:

This tells Android to start the activity specified by the intent.
Once Android receives the intent, it checks that everything’s OK and tells the activity to start. If it can’t find the activity, it throws an

Use an intent to start the second activity

Let’s put this into practice and use an intent to call ReceiveMessageActivity. We want to launch the activity when the user clicks on the Send Message button, so we’ll add the two lines of code we discussed on the previous page to our onSendMessage() method.
Make the changes highlighted below:

So what happens now when we run the app?
What happens when you run the app

Before we take the app out for a test drive, let’s go over how the app we’ve developed so far will function:
When the app gets launched, the main activity, CreateMessageActivity, starts.
When it starts, the activity specifies that it uses layout activity_create_message.xml. This layout gets displayed in a new window.

The user types in a message and then clicks on the button.
The
onSendMessage()method inCreateMessageActivityresponds to the click.
The onSendMessage() method uses an intent to tell Android to start activity ReceiveMessageActivity.
Android checks that the intent is valid, and then it tells

The story continues...
When ReceiveMessageActivity starts, it specifies that it uses layout activity_receive_message.xml and this layout gets displayed in a new window.
Test drive the app


Save your changes, and then run the app. CreateMessageActivity starts, and when you click on the Send Message button, it launches ReceiveMessageActivity.

Pass text to a second activity

So far we’ve coded CreateMessageActivity to start ReceiveMessageActivity when the Send Message button is pressed. Next, we’ll get CreateMessageActivity to pass text to ReceiveMessageActivity so that ReceiveMessageActivity can display it. In order to accomplish this, we’ll do three things:
Tweak the layout activity_receive_message.xml so that it can display the text. At the moment it’s simply the default layout the wizard gave us.
Update CreateMessageActivity.java so that it gets the text the user inputs, and then adds the text to the intent before it sends it.
Update ReceiveMessageActivity.java so that it displays the text sent in the intent.

Let’s start with the layout
We’ll begin by changing the activity_receive_message.xml code Android Studio created for us so that it uses a <LinearLayout>. Update your version of the code so that it matches ours:

Update the text view properties

We need to add a <TextView> element to the layout, and give it an ID of “message.” This is because you have to add an ID to any GUI components you need to reference in your activity code, and we need to reference the text view so that we can update the text it displays.
We’ve updated our code so that it includes a new text view. Update your activity_receive_message.xml code so that it reflects ours (we’ve bolded our changes):

We’ve not specified default text for the text view, as the only text we’ll ever want to display in the text view is the message passed to it by CreateMessageActivity.
Now that we’ve updated the layout, we can get to work on the activities. Let’s start by looking at how we can use an intent to pass a message to ReceiveMessageActivity.
putExtra() puts extra info in an intent

You’ve seen how you can create a new intent using:
Intent intent = new Intent(this, Target.class);
You can add extra information to this intent that can be picked up by the activity you’re targeting so it can react in some way. To do this, you use the putExtra() method like so:
intent.putExtra("message", value);where message is a String name for the value you’re passing in, and value is the value. The putExtra() method is overloaded so value has many possible types. As an example, it can be a primitive such as a boolean or int, an array of primitives, or a String. You can use putExtra() repeatedly to add numerous extra data to the intent. If you do this, make sure you give each one a unique name.
Note
There are many different options for the type of value. You can see them all in the Google Android documentation. Android Studio will also give you a list as you type code in.

How to retrieve extra information from an intent
The story doesn’t end there. When Android tells ReceiveMessageActivity to start, ReceiveMessageActivity needs some way of retrieving the extra information that CreateMessageActivity sent to Android in the intent.
There are a couple of useful methods that can help with this. The first of these is:
getIntent();
getIntent() returns the intent that started the activity, and you can use this to retrieve any extra information that was sent along with it. How you do this depends on the type of information that was sent. As an example, if you know the intent includes a String value named

You’re not just limited to retrieving String values. As an example, you can use:
int intNum = intent.getIntExtra("name", default_value);to retrieve an int with a name of name. default_value specifies what int value you should use as a default.
Update the CreateMessageActivity code

We updated our code for CreateMessageActivity.java so that it takes the text the user enters on the screen and adds it to the intent. Here’s the full code (make sure you update your code to include these changes, shown in bold):

Now that CreateMessageActivity has added extra information to the intent, we need to retrieve that information and use it.
Get ReceiveMessageActivity to use the information in the intent

Now that we’ve changed CreateMessageActivity to add text to the intent, we’ll update ReceiveMessageActivity so that it uses that text.
We’re going to get ReceiveMessageActivity to display the message in its text view when the activity gets created. Because the activity’s onCreate() method gets called as soon as the activity is created, we’ll add the code to this method.

To get the message from the intent, we’ll first get the intent using the getIntent() method, then get the value of the message using getStringExtra().
Here’s the full code for ReceiveMessageActivity.java (replace the code that Android Studio generated for you with this code, and then save all your changes):

Before we take the app for a test drive, let’s run through what the current code does.
What happens when the user clicks the Send Message button
When the user clicks on the button, the onSendMessage() method is called.
Code within the
onSendMessage()method creates an intent to start activityReceiveMessageActivity, adds a message to the intent, and passes it to Android with an instruction to start the activity.
Android checks that the intent is OK, and then tells ReceiveMessageActivity to start.

When ReceiveMessageActivity starts, it specifies that it uses layout activity_receive_message. xml, and this gets displayed on the device.
The activity also updates the layout so that it displays the extra text included in the intent.

Test drive the app

Make sure you’ve updated the two activities, save your changes, and then run the app. CreateMessageActivity starts, and when you enter some text and then click on the Send Message button, it launches ReceiveMessageActivity. The text you entered is displayed in the text view.

We can change the app to send messages to other people
Now that we have an app that sends a message to another activity, we can change it so that it can send messages to other people. We can do this by integrating with the message sending apps already on the device. Depending on what apps the user has, we can get our app to send messages via Gmail, Google+, Facebook, Twitter...

It’s not as hard as it sounds thanks to the way Android is designed to work.
Remember right at the beginning of the chapter when we said that tasks are multiple activities chained together? Well, you’re not just limited to using the activities within your app. You can go beyond the boundaries of your app to use activities within other apps as well.
How Android apps work

As you’ve seen, all Android apps are composed of one or more activities, along with other components such as layouts. Each activity is a single defined focused thing the user can do. As an example, apps such as Gmail, Google+, Facebook, and Twitter all have activities that enable you to send messages, even though they may achieve this in different ways.

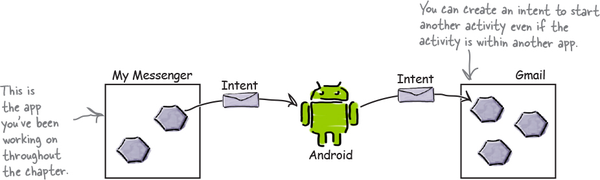
Intents can start activities in other apps
You’ve already seen how you can use an intent to start a second activity within the same app. The first activity passes an intent to Android, Android checks it, and then Android tells the second activity to start.
The same principle applies to activities in other apps. You get an activity in your app to pass an intent to Android, Android checks it, and then Android tells the second activity to start even though it’s in another app. As an example, we can use an intent to start the activity in Gmail that sends messages, and pass it the text we want to send. That means that instead of writing our own activities to send emails, we can use the existing Gmail app.
This means that you can build apps that perform powerful tasks by chaining together activities across the device.
But we don’t know what apps are on the user’s device
There are three questions we need answers to before we can call activities in other apps:
How do we know which activities are available on the user’s device?
How do we know which of these activities are appropriate for what we want to do?
How do we know how to use these activities?
The great news is that we can solve all of these problems using actions. Actions are a way of telling Android what standard operations activities can perfom. As an example, Android knows that all activities registered for a send action are capable of sending messages.
Let’s explore how to create intents that use actions to return a set of activities that you can use in a standard way—for example, to send messages.
Here’s what you’re going to do
Create an intent that specifies an action.
The intent will tell Android you want to use an activity that can send a message. The intent will include the text of the message.
Allow the user to choose which app to use.
Chances are, there’ll be more than one app on the user’s device capable of sending messages, so the user will need to pick one. We want the user to be able to choose one every time they click on the Send Message button.

Create an intent that specifies an action

So far you’ve seen how to create an intent that launches a specific activity using:

This intent is an example of an explicit intent; you explicitly tell Android which class you want it to run.
If there’s an action you want done but you don’t care which activity does it, you create an implicit intent. You tell Android what sort of action you want it to perform, and you leave the details of which activity performs it to Android.
How to create the intent
You create an intent that specifies an action using the following syntax:
Intent intent = new Intent(action);
where action is the type of activity action you want to perform. Android provides you with a number of standard actions you can use. As an example, you can use Intent.ACTION_DIAL to dial a number, Intent.ACTION_WEB_SEARCH to perform a web search, and Intent.ACTION_SEND to send a message. So, if you want to create an intent that specifies you want to send a message, you use:
Intent intent = new Intent(Intent.ACTION_SEND);
You can find out more about the sorts of activity actions you can use and the extra information they support in the Android developer reference material: http://tinyurl.com/n57qb5.
Adding extra information
Once you’ve specified the action you want to use, you can add extra information to it. We want to pass some text with the intent that will form the body of the message we’re sending. To do this, you use the following lines of code:

where messageText is the text you want to send. This tells Android that you want the activity to be able to handle data with a MIME data-type of text/plain, and also tells it what the text is.
You can make extra calls to the putExtra() method if there’s additional information you want to add. As an example, if you want to specify the subject of the message, you can use:

where subject is the subject of the message.
Change the intent to use an action

We’ll update CreateMessageActivity.java so that we create an implicit intent that uses a send action. Make the changes highlighted below, and save your work:

Now that you’ve updated your code, let’s break down what happens when the user clicks on the Send Message button.
What happens when the code runs

When the onSendMessage() method is called, an intent gets created. The startActivity() method passes this intent to Android.
The intent specifies an action of
ACTION_SEND, and a MIME type oftext/plain.
Android sees that the intent can only be passed to activities able to handle ACTION_SEND and text/plain data. Android checks all the activities on the user’s device, looking for ones that are able to receive the intent.
If no actions are able to handle the intent, an
ActivityNotFoundExceptionis thrown.
3a If just one activity is able to receive the intent, Android tells that activity to start and passes it the intent.

The story continues...

3b If more than one activity is able to receive the intent, Android displays an activity chooser dialog and asks the user which one to use.

4 When the user chooses the activity she wants to use, Android tells the activity to start and passes it the intent.
The activity displays the extra text contained in the intent in the body of a new message.

In order to pass the intent to an activity, Android must first know which activities are capable of receiving the intent. On the next couple of pages we’ll look at how it does this.
The intent filter tells Android which activities can handle which actions

When Android is given an intent, it has to figure out which activity, or activities, can handle it. This process is known as intent resolution.
When you use an explicit intent, intent resolution is straightforward. The intent explicitly says which component the intent is directed at, so Android has clear instructions about what to do. As an example, the following code explicitly tells Android to start ReceiveMessageActivity:
Intent intent = new Intent(this, ReceiveMessageActivity.class);
startActivity(intent);
When you use an implicit intent, Android uses the information in the intent to figure out which components are able to receive it. It does this by checking the intent filters in every app’s copy of AndroidManifest.xml.
An intent filter specifies what types of intent each component can receive. As an example, here’s the entry for an activity that can handle an action of ACTION_SEND. The activity is able to accept data with MIME types of text/plain or image:

The intent filter also specifies a category. The category supplies extra information about the activity such as whether it can be started by a web browser, or whether it’s the main entry point of the app. An intent filter must include a category of android.intent.category.DEFAULT if it’s to receive implicit intents. If an activity has no intent filter, or it doesn’t include a category name of android.intent.category.DEFAULT, it means that the activity can’t be started with an implicit intent. It can only be started with an explicit intent using the full name (including the package) of the component.
How Android uses the intent filter
When you use an implicit intent, Android compares the information given in the intent with the information given in the intent filters specified in every app’s AndroidManifest.xml file.
Android first considers intent filters that include a category of android.intent.category.DEFAULT:
<intent-filter>
    <category android:name="android.intent.category.DEFAULT"/>
    ...
</intent-filter>
Intent filters without this category will be omitted, as they can’t receive implicit intents.
Android then matches intents to intent filters by comparing the action and MIME type contained in the intent with those of the intent filters. As an example, if an intent specifies an action of Intent.ACTION_SEND using:
Intent intent = new Intent(Intent.ACTION_SEND);
Note
It will also look at the category of the intent filter if one is supplied by the intent. However, this feature isn’t used very often, so we don’t cover how to add categories to intents.
Android will only consider activities that specify an intent filter with an action of android.intent.action.SEND like this:
<intent-filter>
    <action android:name="android.intent.action.SEND"/>
    ...
</intent-filter>
Similarly, if the intent MIME type is set to text/plain using:
intent.setType("text/plain");Android will only consider activities that can accommodate this type of data:
<intent-filter>
    <data android:mimeType="text/plain"/>
    ...
</intent-filter>
If the MIME type is left out of the intent, Android tries to infer the type based on the data the intent contains.
Once Android has finished comparing the intent to the component’s intent filters, it sees how many matches it finds. If Android finds a single match, it starts the component (in our case, the activity) and passes it the intent. If it finds multiple matches, it asks the user to pick one.
You need to run your app on a REAL device

So far we’ve been running our apps using the emulator. The emulator only includes a small number of apps, and there may well be just one app that can handle ACTION_SEND. In order to test our app properly, we need to run it on a physical device where we know there’ll be more than one app that can support our action—for example, an app that can send emails and an app that can send text messages.
Here’s how you go about getting your app to run on a physical device.
1. Enable USB debugging on your device
On your device, open “Developer options” (in Android 4.0 onward, this is hidden by default). To enable “Developer options,” go to Settings → About Phone and tap the build number seven times. When you return to the previous screen, you should now be able to see “Developer options.”
Note
Yep, seriously.
Within “Developer options,” turn on USB debugging.

2. Set up your system to detect your device
If you’re using a Mac, you can skip this step.
If you’re using Windows, you need to install a USB driver. You can find the latest instructions here:
http://developer.android.com/tools/extras/oem-usb.html
If you’re using Ubuntu Linux, you need to create a udev rules file. You can find the latest instructions on how to do this here:
3. Plug your device into your computer with a USB cable
Your device may ask you if you want to accept an RSA key that allows USB debugging with your computer. If it does, you can check the “Always allow from this computer” option and choose OK to enable this.
Running your app on a real device (continued)

4. Stop your app running on the emulator
Before you can run your app on a different device, you need to stop it running on the current one (in this case the emulator). To do this, choose Run → “Stop ‘app’”, or click on the “Stop ‘app’” button in the toolbar.

5. Run your app on the physical device
Run the app by choosing Run → “Run ‘app’”. Android Studio will ask you to choose which device you want to run your app on, so select your device from the list of available devices and click OK. Android Studio will install the app on your device and launch it.

And here’s the app running on the physical device
You should find that your app looks about the same as when you ran it through the emulator. You’ll probably find that your app installs and runs quicker too.
Now that you know how to run the apps you create on your own device, you’re all set to test the latest changes to your app.

Test drive the app
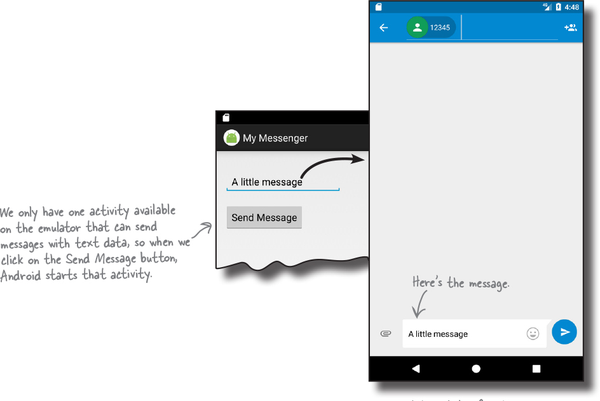
Try running the app using the emulator, and then using your own device. The results you get will depend on how many activities you have on each that support using the Send action with text data.
If you have one activity
Clicking on the Send Message button will take you straight to that app.
If you have more than one activity
Android displays a chooser and asks you to pick which one you want to use. It also asks you whether you want to use this activity just once or always. If you choose always, the next time you click on the Send Message button it uses the same activity by default.

What if you ALWAYS want your users to choose an activity?
You’ve just seen that if there’s more than one activity on your device that’s capable of receiving your intent, Android automatically asks you to choose which activity you want to use. It even asks you whether you want to use this activity all the time or just on this occasion.
createChooser() allows you to specify a title for the chooser dialog, and doesn’t give the user the option of selecting an activity to use by default. It also lets the user know if there are no matching activities by displaying a message.
There’s just one problem with this default behavior: what if you want to guarantee that users can choose an activity every time they click on the Send Message button? If they’ve chosen the option to always use Gmail, for instance, they won’t be asked if they want to use Twitter next time.
Fortunately, there’s a way around this. You can create a chooser that asks users to pick an activity without giving them the option to always use that activity.
Intent.createChooser() displays a chooser dialog
You can achieve this using the Intent.createChooser() method, which takes the intent you’ve already created and wraps it in a chooser dialog. When you use this method, the user isn’t given the option of choosing a default activity—they get asked to choose one every time.
You call the createChooser() method like this:

The method takes two parameters: an intent and an optional String title for the chooser dialog window. The Intent parameter needs to describe the types of activity you want the chooser to display. You can use the same intent we created earlier, as this specifies that we want to use ACTION_SEND with textual data.
The createChooser() method returns a brand-new Intent. This is a new explicit intent that’s targeted at the activity chosen by the user. It includes any extra information supplied by the original intent, including any text.
To start the activity the user chose, you need to call:
startActivity(chosenIntent);
Over the next couple of pages we’ll take a closer look at what happens when you call the createChooser() method.
What happens when you call createChooser()

Here’s what happens when you run the following two lines of code:
Intent chosenIntent = Intent.createChooser(intent, "Send message via...");
startActivity(chosenIntent);
The createChooser() method gets called.
The method includes an intent that specifies the action and MIME type that’s required.

Android checks which activities are able to receive the intent by looking at their intent filters.
It matches on the actions, type of data, and categories they can support.

If more than one activity is able to receive the intent, Android displays an activity chooser dialog and asks the user which one to use.
It doesn’t give the user the option of always using a particular activity, and it displays “Send message via...” in the title.
If no activities are found, Android still displays the chooser but shows a message telling the user there are no apps that can perform the action.

The story continues...

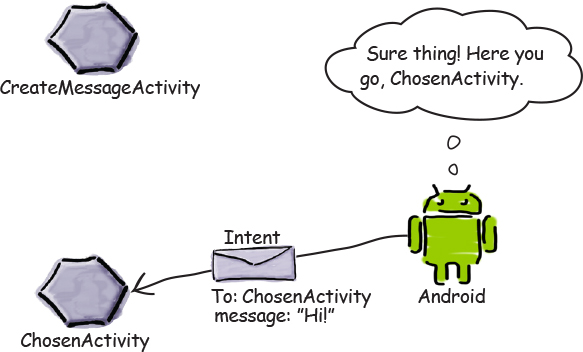
When the user chooses which activity she wants to use, Android returns a new explicit intent describing the chosen activity.
The new intent includes any extra information that was included in the original intent, such as any text.

The activity asks Android to start the activity specified in the intent.

Android starts the activity specified by the intent, and then passes it the intent.
Change the code to create a chooser

Let’s change the code so that the user gets asked which activity they want to use to send a message every time they click on the Send Message button. We’ll add a String resource to strings.xml for the chooser dialog title, and we’ll update the onSendMessage() method in CreateMessageActivity.java so that it calls the createChooser() method.
Update strings.xml...
We want the chooser dialog to have a title of “Send message via...”. Add a String called "chooser" to strings.xml, and give it the value Send message via... (make sure to save your changes):

... and update the onSendMessage() method
We need to change the onSendMessage() method so that it retrieves the value of the chooser String resource in strings.xml, calls the createChooser() method, and then starts the activity the user chooses. Update your code as follows:

The getString() method is used to get the value of a String resource. It takes one parameter, the ID of the resource (in our case, this is R.string.chooser):

Now that we’ve updated the app, let’s run the app to see our chooser in action.
Test drive the app

Save your changes, then try running the app again on the device or the emulator.
If you have one activity
Clicking on the Send Message button will take you straight to that activity just like before.

If you have more than one activity
Android displays a chooser, but this time it doesn’t ask us if we always want to use the same activity. It also displays the value of the chooser String resource in the title.


Chapter 3 Your Android Toolbox

You’ve got Chapter 3 under your belt and now you’ve added multi-activity apps and intents to your toolbox.
Note
You can download the full code for the chapter from https://tinyurl.com/HeadFirstAndroid.