Appendix F. Leftovers: The Top Ten Things (we didn’t cover)

Even after all that, there’s still a little more.
There are just a few more things we think you need to know. We wouldn’t feel right about ignoring them, and we really wanted to give you a book you’d be able to lift without extensive training at the local gym. Before you put down the book, read through these tidbits.
1. Distributing your app
Once you’ve developed your app, you’ll probably want to make it available to other users. You’ll likely want to do this by releasing your app through an app marketplace such as Google Play.
There are two stages to this process: preparing your app for release, and then releasing it.
Preparing your app for release
Before you can release your app, you need to configure, build, and test a release version of it. This includes tasks such as deciding on an icon for your app and modifying AndroidManifest.xml so that only devices that are able to run your app are able to download it.
Before you release your app, make sure that you test it on at least one tablet and one phone to check that it looks the way you expect and its performance is acceptable.
You can find further details of how to prepare your app for release here:
http://developer.android.com/tools/publishing/preparing.html
Releasing your app
This stage includes publicizing your app, selling it, and distributing it.
To release your app on the Play Store, you need to register for a publisher account and use the Developer Console to publish your app. You can find further details here:
http://developer.android.com/distribute/googleplay/start.html
For ideas on how to best target your app to your users and build a buzz about it, we suggest you explore the documents here:
2. Content providers
You’ve seen how to use intents to start activities in other apps. As an example, you can start the Messaging app to send the text you pass to it. But what if you want to use another app’s data in your own app? For example, what if you want to use Contacts data in your app to perform some task, or insert a new Calendar event?
You can’t access another app’s data by interrogating its database, Instead, you use a content provider, which is an interface that allows apps to share data in a controlled way. It allows you to perform queries to read the data, insert new records, and update or delete existing records.

If you want other apps to use your data, you can create your own content provider.
You can find out more about the concept of content providers here:
http://developer.android.com/guide/topics/providers/content-providers.html
Here’s a guide on using Contacts data in your app:
http://developer.android.com/guide/topics/providers/contacts-provider.html
And here’s a guide on using Calendar data:
http://developer.android.com/guide/topics/providers/calendar-provider.html
3. Loaders
If you do a lot of work with databases or content providers, sooner or later you’ll encounter loaders. A loader helps you load data so that it can be displayed in an activity or fragment.
Loaders run on separate threads in the background, and make it easier to manage threads by providing callback methods. They persist and cache data across configuration changes so that if, for example, the user rotates their device, the app doesn’t create duplicate queries. You can also get them to notify your app when the underlying data changes so that you can deal with the change in your views.
The Loader API includes a generic Loader class, which is the base class for all loaders. You can create your own loader by extending this class, or you can use one of the built-in subclasses: AsyncTaskLoader or CursorLoader. AsyncTaskLoader uses an AsyncTask, and CursorLoader loads data from a content provider.
You can find out more about loaders here: https://developer.android.com/guide/components/loaders.html
4. Sync adapters
Sync adapters allow you to synchronize data between an Android device and a web server. This allows you to do things like back up the user’s data to a web server, for instance, or transfer data to a device so that it can be used offline.
Sync adapters have a number of advantages over designing your own data transfer mechanism.
They allow you to automate data transfer based on specific criteria—for example, time of day or data changes.
They automatically check for network connectivity, and only run when the device has a network connection.
Sync adapter–based data transfers run in batches, which helps improve battery performance.
They let you add user credentials or a server login to the data transfer.
You can find out how to use sync adapters here:
https://developer.android.com/training/sync-adapters/index.html
5. Broadcasts
Suppose you want your app to react in some way when a system event occurs. You may, for example, have built a music app, and you want it to stop playing music if the headphones are removed. How can your app tell when these events occur?
Android broadcasts system events when they occur, including things like the device running low on power, a new incoming phone call, or the system getting booted. You can listen for these events by creating a broadcast receiver. Broadcast receivers allow you to subscribe to particular broadcast messages so that your app can respond to particular system events.

Your app can also send custom broadcast messages to notify other apps of events.
You can find out more about broadcasts here:
https://developer.android.com/guide/components/broadcasts.html
6. The WebView class
If you want to provide your users with access to web content, you have two options. The first option is to open the web content with an external app like Chrome or Firefox. The second option is to display the content inside your app using the WebView class.
The WebView class allows you to display the contents of a web page inside your activity’s layout. You can use it to deliver an entire web app as a client application, or to deliver individual web pages. This approach is useful if there’s content in your app you might need to update, such as an end-user agreement or user guide.
You add a WebView to your app by including it in your layout:
<WebView xmlns:android="http://schemas.android.com/apk/res/android"
    android:id="@+id/webview"
    android:layout_width="match_parent"
    android:layout_height="match_parent" />
You then tell it which web page it should load by calling its loadUrl() method:
WebView webView = (WebView) findViewById(R.id.webview);
webView.loadUrl("http://www.oreilly.com/");
You also need to specify that the app must have Internet access by adding the INTERNET permission to AndroidManifest.xml:
<manifest ... >
     <uses-permission android:name="android.permission.INTERNET" />
...
</manifest>
You can find out more about using web content in your apps here:
7. Settings
Many apps include a settings screen so that the user can record their preferences. As an example, an email app may allow the user to specify whether they want to see a confirmation dialog before sending an email:
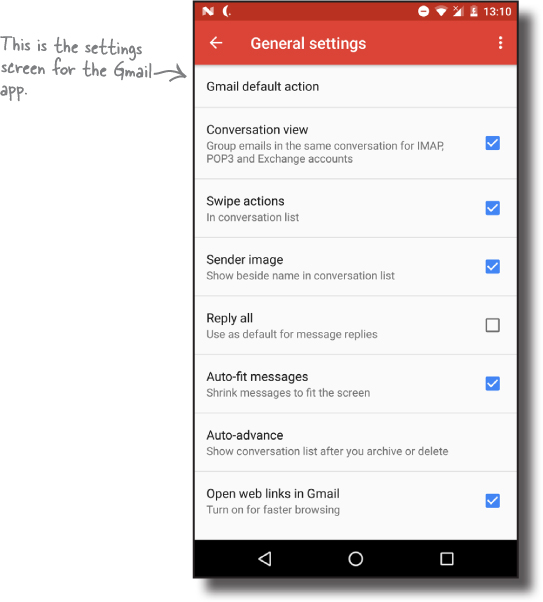
You build a settings screen for your app using the Preferences API. This allows you to add individual preferences, and record a value for each preference. These values are recorded in a shared preferences file for your app.
You can find out more about creating settings screens here:
8. Animation
As Android devices increasingly take advantage of the power of their built-in graphics hardware, animation is being used more and more to improve the user’s app experience.
There are several types of animation that you can perform in Android:
Property animation
Property animation relies on the fact that the visual components in an Android app use a lot of numeric properties to describe their appearance. If you change the value of a property like the height or the width of a view, you can make it animate. That’s what property animation is: smoothly animating the properties of visual components over time.
View animations
A lot of animations can be created declaratively as XML resources. So you can have XML files that use a standard set of animations (like scaling, translation, and rotation) to create effects that you can call from your code. The wonderful thing about declarative view animations is that they are decoupled from your Java code, so they are very easy to port from one app project to another.
Activity transitions
Let’s say you write an app that displays a list of items with names and images. You click on an item and you’re taken to a detail view of it. The activity that shows you more detail will probably use the same image that appeared in the previous list activity.
Activity transitions allow you to animate a view from one activity that will also appear in the next activity. So you can make an image from a list smoothly animate across the screen to the position it takes in the next activity. This will give your app a more seamless feel.
To learn more about Android animations see:
https://developer.android.com/guide/topics/graphics/index.html
To learn about activity transitions and material design, see:
https://developer.android.com/training/material/animations.html
9. App widgets
An app widget is a small application view that you can add to other apps or your home screen. It gives you direct access to an app’s core content or functionality from your home screen without you having to launch the app.
Here’s an example of an app widget:

To find out how you create your own app widgets, look here:
http://developer.android.com/guide/topics/appwidgets/index.html
10. Automated testing
All modern development relies heavily on automated testing. If you create an app that’s intended to be used by thousands or even millions of people, you will quickly lose users if it’s flaky or keeps crashing.
There are many ways to automatically test your app, but they generally fall into two categories: unit testing and on-device testing (sometimes called instrumentation testing).
Unit tests
Unit tests run on your development machine, and they check the individual pieces—or units—of your code. The most popular unit testing framework is JUnit, and Android Studio will probably bundle JUnit into your project. Unit tests live in the app/src/test folder of your project, and a typical test method looks something like this:
@Test
public void returnsTheCorrectAmberBeers() {
    BeerExpert beerExpert = new BeerExpert();
    assertArrayEquals(new String[]{"Jack Amber", "Red Moose"},
            beerExpert.getBrands("amber").toArray());
}
You can find more out about JUnit here:
On-device tests
On-device tests run inside an emulator or physical device and check the fully assembled app. They work by installing a separate package alongside your app that uses a software layer called instrumentation to interact with your app in the same way as a user. An increasingly popular framework for on-device testing is called Espresso, and Android Studio will probably bundle it in to your project. On-device tests live in the app/src/androidTest folder, and Espresso tests look something like this:
@Test
public void ifYouDoNotChangeTheColorThenYouGetAmber() {
    onView(withId(R.id.find_beer)).perform(click());
    onView(withId(R.id.brands)).check(matches(withText(
            "Jail Pale Ale
Gout Stout
")));
}
When you run an on-device test, you will see the app running on your phone or tablet and responding to keypresses and gestures just as if a person were using it.
You can find out more about Espresso testing here:
https://developer.android.com/training/testing/ui-testing/espresso-testing.html