
Design and programming are human activities; forget that and all is lost. | ||
| --Bjarne Stroustrup | ||
One of the most important issues facing developers building reusable frameworks and tools is how the architecture is structured and the dependencies that are required by each modular component. Not all tools have the luxury of a solid design, but if at least the core functionality is separated from the tool into external components, then the initial design helps promote reusability.
Another issue facing developers is designing an architecture that allows for multiple entry points into the application, such as console support for batch processing, and a Windows interface for usability. Building two separate applications is a waste of time, and one of the two won’t do in a situation like this. This chapter shows a great way to decouple the core functionality of a tool into reusable components, and build a stackable architecture that easily promotes multiple entry points. Keep in mind that supporting all the entry points discussed in this chapter is generally overkill for a tool, but they are presented together to portray the “big picture.” Mix and match the modules shown in this chapter, designing your solution with modularity in mind.
The .NET platform encourages the design of distributed architectures, and it is extremely advisable to build any applications or components with that in mind.
The architecture presented in Figure 8.1 is not for every tool, but should be used when possible to promote enhanced reusability and easier maintenance. On another note, this architecture is one that can be built upon over time, and if the design remains loosely coupled, new layers can be added as the tool matures, and more entry points can be defined as needed.
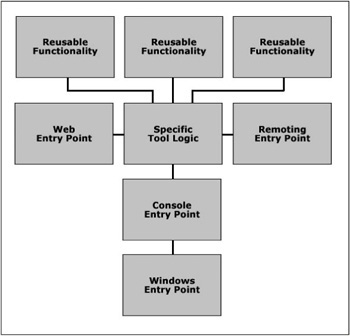
Core components, labeled “Reusable Functionality” in Figure 8.1, are the core libraries that all your tools can reference when needed and are designed to be loosely coupled and modular. Such functionality can include regular or virtual file system access, user security, data compression and encryption, string parsing, image processing, and other common code that can be useful to a variety of tools in your projects.
The core components should try to avoid external dependencies to other assemblies at all costs, unless linking to another core component that contains required functionality. Core components should also never contain any application entry points.
Optionally, you can also expose a COM interface from these core components if your design warrants it, though I do present an alternative in the specific tool logic.
It is advisable that you assign a strong name key to the core component assemblies. The only time you cannot do so is when the assembly references unsafe code, such as an ActiveX object.
This module should contain all the logic that is unique to the tool you are building. There is generally no code here that would be reused anywhere else, and typically just the driver functions are implemented in this module. The specific tool logic references whatever core components are needed for the tool, yet it does not implement any entry points. This module can export a COM interface quite easily to be called from unmanaged legacy applications.
Users prefer a rich GUI interface over a simple console one, but activities like batch processing generally feed commands and parameters into command line tools in an automated fashion. For that reason, it is important to support command line access for a tool that could be used with batch processing later. Obviously, the interface does not have to be fancy, but it should be clean enough that a user could launch the console entry point manually and easily use the tool. Proper menu descriptions and selection logic help out greatly in this regard.
This entry point is relatively easy to construct if a decent console entry point has been made. There are two main ways this entry point could be developed, but I personally prefer the stackable method where the standard input, output, and error streams are redirected from the console entry point. This method requires less code, in that we are basically slapping a rich GUI interface on top of the console entry point.
The other approach for designing this entry point is through bypassing the console entry point and implementing similar logic that interfaces directly with the specific tool logic.
The nature of this architecture promotes loosely coupled design and distributed services or entry points. This architecture could be extended to provide its functionality to other technologies in many ways, but I will briefly mention three of the more common ones.
Many different entry points could be added to this architecture, and the design promotes both maintainability and reusability. There is nothing very complicated about this architecture, yet the benefits make it a worthwhile design idea to adopt into your development practices.
There are a number of excellent reasons for supporting a remoting entry point. The biggest advantage is that the tool logic resides on a server machine and clients request a proxy object to it, greatly simplifying deployment and versioning. Changing the specific tool logic on the server would be instantly reflected by all client applications accessing it, completely avoiding the need to update the client applications.
Later in this chapter, an alternate architecture is presented that uses remoting as a bridge between entry points and the specific tool logic to promote simple push deployment to users.
There are a couple of worthwhile possibilities with this entry point in regards to reporting and statistics. Functionality could be added to the specific tool logic that can return a report of the files affected by the tool, the user who accessed the tool last, total size of files modified, and any other information that would be useful to record for the tool.
A web entry point could also be useful for launching processes remotely, without requiring an application installed on the client machine to do so. For example, imagine a tool that would back up a certain directory to another server when run. A tool like this would normally need to be installed on all client machines that needed to use it, but with a web entry point, the backup could be launched remotely through a normal web browser.
Migrating components to the .NET platform will take some time, and definitely won’t take place overnight. The ability to migrate each component one at a time and have them interface with legacy components is fairly important, and one way to do so is by exposing a COM interface for your .NET components so that legacy applications can use them.
Later in this chapter, an example is discussed that covers exposing a COM interface for a .NET component so that legacy applications can access its functionality. The discussion is relatively brief though, since COM interoperability is covered in much greater detail in Chapter 32, “Using .NET Assemblies as COM Objects.”
Now that the overall design of the architecture has been discussed, it is also important that an example be presented to offer a tangible reference point for properly designing a distributed componential architecture.
As an example, we will build a very simple solution that contains a few object definitions, some functionality to process the objects, and a variety of entry points to access the tool using an assortment of different technologies.
Most systems define objects that represent business entities in the system, and these objects are typically used throughout an application in a variety of contexts and locations. To promote strong design, it is important that these business entities exist alone in an independent library away from processing functionality.
This example assembly contains a single object named SimpleObject, and contains a single string property that describes the name of the object.
Here is the code for the SimpleObject entity definition:
public class SimpleObject
{
    private string _name = "";

    public string Name
    {
        get { return _name; }
        set { _name = value; }
    }

    public SimpleObject(string name)
    {
    this._name = name;
    }
}
As you will notice when viewing the solution files on the Companion Web site, the entity definitions reside in an independent library, completely isolated from any processing functionality that uses these entities.
This module fits into the “Reusable Functionality” category in Figure 8.1.
Almost every system defines objects that represent business entities, and almost every system provides functionality that performs processing on these entities. This is one area where it is important that future reusability be taken into consideration. All functionality placed in this module should have the potential for applicability towards multiple projects. It is essential that you refrain from placing specific tool logic in this module.
This example assembly contains a single static method that inputs a SimpleObject and builds an alert message based on its name.
Here is the code for the simple object processing method for this example:
using ObjectDefinitions;
public class Library
{
    public static string FormatOutput(SimpleObject simpleObject)
    {
        return String.Format("The name of this SimpleObject is {0}!",
                      simpleObject.Name);
    }
}
Notice how this assembly references the other class library containing the entity object definitions.
This module fits into the “Reusable Functionality” category in Figure 8.1.
Now that our simple framework has been created, it is time to build our tool! In order to facilitate either a COM or remoting entry point, we must define a public interface that our tool implements. That is what this module is for.
Another gotcha when using remoting is that it is ideal for the interface to exist in its own assembly, away from the classes that provide implementation. The beauty of remoting is that you can give each client machine an assembly containing only the public interface of the tool, and each machine can build a proxy object to access the actual implementation remotely. If you keep the interface and implementation together in the same file, however, it defeats the purpose of remoting because clients have access to a local copy of the implementation.
There is one problem with keeping the interface in a separate assembly from the implementation, and that is when also exposing a COM interface. In order for COM to work, it must know what both the interface and the implementation are defined as. When paired together in the same assembly, COM has no trouble finding either the interface or the implementation, but when the interface exists by itself in a separate assembly, COM will not register output for that interface, complaining that it cannot find any suitable types to generate COM output for. This error will cause registration to fail for the implementation output because the interface will be unknown, even when the interface library is referenced correctly. One method of fixing this error is to create a dummy class that implements the interface and place it in the interface assembly. By setting the ClassInterface attribute to ClassInterfaceType.None, no class interface will be generated and the dummy class will only be visible through late-binding. The purpose of the dummy class is to force COM output registration for the interface assembly so that it is available to the implementation assembly when it registers for COM output.
If you do not wish to support remoting, you can pair the interface and implementation together, but keep in mind that you need to be committed to the architecture you choose. Going back to separate the interface into a separate assembly would be much more difficult than doing it right from the get-go.
Here is the interface for the tool-specific code, along with attributes for COM interoperability:
[Guid("D64A81A4-FF0C-4916-B92C-47BA3D2EC05D")]
[InterfaceType(ComInterfaceType.InterfaceIsDual)]
public interface IAlertObjectToolLogic
{
    string GetFirstAlertObjectName();
    string GetSecondAlertObjectName();
    string GetThirdAlertObjectName();
}
[Guid("6E789399-D074-407a-8715-6C72A3C70D7F")]
[ClassInterface(ClassInterfaceType.None)]
[ProgId("AlertObjectToolInterface.IgnoreMe")]
public class AlertObjectToolBase : IAlertObjectToolLogic
{
    public string GetFirstAlertObjectName()
    {
        return String.Empty;
    }

    public string GetSecondAlertObjectName()
    {
        return String.Empty;
    }

    public string GetThirdAlertObjectName()
    {
        return String.Empty;
    }
}
This module fits into the “Specific Tool Logic” category in Figure 8.1.
It is fairly obvious that an interface alone will not offer any useful functionality to users, so the next step is to build the tool implementation. This module can be considered the meat of the tool, because all logic specific to the tool in question resides within this module. Just like the interface, this assembly can be registered for COM Interop if desired.
This module references the entity definitions and processing assemblies, as well as the interface definition it needs to implement. The example provided is very simple, with three methods that each returns a different formatted alert string. Each method instantiates a SimpleObject entity definition with the name specified, and then passes the entity off for processing, returning the alert string.
Here is the code for the specific tool logic:
using ObjectDefinitions;
using ObjectProcessing;
using AlertObjectToolInterface;

[Guid("F6D5AB09-E2C1-4ff3-B023-01A94CC7C276")]
[ClassInterface(ClassInterfaceType.AutoDual)]
[ProgId("AlertObjectTool.AlertObjectToolLogic")]
public class AlertObjectToolLogic : MarshalByRefObject, IAlertObjectToolLogic
{
    public string GetFirstAlertObjectName()
    {
        SimpleObject simpleObject = new SimpleObject("Test1");
        return Library.FormatOutput(simpleObject);
    }

    public string GetSecondAlertObjectName()
    {
        SimpleObject simpleObject = new SimpleObject("Test2");
        return Library.FormatOutput(simpleObject);
    }

    public string GetThirdAlertObjectName()
    {
        SimpleObject simpleObject = new SimpleObject("Test3");
        return Library.FormatOutput(simpleObject);
    }

    [ComVisible(false)]
    public override object InitializeLifetimeService()
    {
        return null;
    }
}
For remoting support, you will notice that the class inherits from MarshalByRefObject, which is important because doing so allows remoting to create a proxy object out of this object to pass to clients. Also, you will notice the method InitializeLifetime Service, which allows us to explicitly handle the lifetime of proxy objects. By returning null, we are telling remoting services to keep the allocated object in memory indefinitely until explicitly told to release it. Be aware of the ComVisible(false) attribute that is set on the method, so as to not be exported with the COM interface.
For COM support, you will again notice the COM attributes set on the class. Also, make sure that the project Configuration Properties has the Register for COM Interop flag enabled.
This module fits into the “Specific Tool Logic” category in Figure 8.1.
We can begin discussing entry points now that the specific tool logic has been developed. The first entry point covered will be the command line console, which is widely used for automated build processes or batch processes. Some developers also have a personal preference for using console applications over GUI applications.
This example is quite simple; it takes in a 1, 2, or 3 and spits out the formatted alert message from the associated call to the tool logic.
Here is the code for the console entry point:
using AlertObjectTool;

[STAThread]
static void Main(string[] args)
{
    // Very simple input parameter.
    // Either 1, 2, or 3
    // 1: GetFirstAlertObjectName()
    // 2: GetSecondAlertObjectName()
    // 3: GetThirdAlertObjectName()

    if (args.Length >= 1)
    {
        AlertObjectToolLogic logic = new AlertObjectToolLogic();

        switch (args[0].Trim())
        {
            case "1":
            {
                Console.Write(logic.GetFirstAlertObjectName());
                break;
            }
            case "2":
            {
                Console.Write(logic.GetSecondAlertObjectName());
                break;
            }

            case "3":
            {
                Console.Write(logic.GetThirdAlertObjectName());
                break;
            }
        }
    }
}The first method for a WinForms-based entry point is the direct approach, where you reference and call the specific tool logic in the same way you would do in the console entry point.
Here is the code for the WinForms entry point using the direct approach:
using AlertObjectTool;

private void FirstTestDirectButtonClick(object sender, System.EventArgs e)
{
    AlertObjectToolLogic logic = new AlertObjectToolLogic();
    MessageBox.Show(logic.GetFirstAlertObjectName());
}

private void SecondTestDirectButtonClick(object sender, System.EventArgs e)
{
    AlertObjectToolLogic logic = new AlertObjectToolLogic();
    MessageBox.Show(logic.GetSecondAlertObjectName());
}

private void ThirdTestDirectButtonClick(object sender, System.EventArgs e)
{
    AlertObjectToolLogic logic = new AlertObjectToolLogic();
    MessageBox.Show(logic.GetThirdAlertObjectName());
}The second method for a WinForms-based entry point is the wrapper approach, where the WinForms application layers on top of the console entry point and redirects all standard input and output through itself.
This approach is beneficial in the sense that there is less to code, since the majority of the entry point code exists within the console entry point. Another benefit is that this project does not require any references to the underlying framework or specific tool logic.
Using this method also reduces the chances for bugs since one code base is maintained, and fixing a bug affects both entry points.
Here is the code for the WinForms entry point using the wrapper approach:
private void FirstTestWrapperButtonClick(object sender, System.EventArgs e)
{
    LaunchConsoleWrapper("1");
}

private void SecondTestWrapperButtonClick(object sender, System.EventArgs e)
{
    LaunchConsoleWrapper("2");
}

private void ThirdTestWrapperButtonClick(object sender, System.EventArgs e)
{
    LaunchConsoleWrapper("3");
}

private void LaunchConsoleWrapper(string parameter)
{
    Process process = new Process();
    process.StartInfo.UseShellExecute = false;
    process.StartInfo.RedirectStandardOutput = true;
    process.StartInfo.CreateNoWindow = true;
    process.StartInfo.Arguments = parameter;
    process.StartInfo.FileName = Application.StartupPath +
                         @"AlertObjectConsole.exe";

    if (process.Start())
    {
        MessageBox.Show(process.StandardOutput.ReadToEnd());
        process.WaitForExit();
    }
    else
    {
        MessageBox.Show("Error launching console application");
    }
}
The function LaunchConsoleWrapper takes in the argument string to pass to the console entry point, and launches the console entry point with redirected standard output.
A great feature of the .NET platform is the ability to invoke remote procedure calls (RPC) from proxy objects published by a server machine. remoting solves a number of deployment concerns and allows for a variety of distributed architectures. Clients can have a local copy of the tool interface, except the implementation itself exists on a remote machine. A client would connect to the remote machine, request a proxy object of a certain type, and use the proxy object as if it were a local system variable.
In order to support Remoting, the first thing to do (aside from building an object that inherits from MarshalByRefObject) is to open a remoting channel and publish an object on it that clients will use.
Here is the code to open a remoting channel on a specific port number and publish an object on it:
// The Tcp channel to publish the proxy on
private TcpChannel _channel = null;

// A reference to the remoted proxy object
private AlertObjectTool.AlertObjectToolLogic _remotedLogic = null;

// A reference to the proxy information
private ObjRef _remotedLogicRef = null;

private void ActionButton_Click(object sender, System.EventArgs e)
{
    if (ActionButton.Text.Equals("Start Listening"))
    {
        ActionButton.Text = "Stop Listening";
        _channel = new TcpChannel((int)PortField.Value);
        ChannelServices.RegisterChannel(_channel);

        _remotedLogic = new AlertObjectTool.AlertObjectToolLogic();
        _remotedLogicRef = RemotingServices.Marshal(_remotedLogic,
                                 "AlertObjectToolLogic");
    }
    else
    {
        ActionButton.Text = "Start Listening";

        RemotingServices.Disconnect(_remotedLogic);

        _remotedLogicRef = null;
        _remotedLogic = null;

        ChannelServices.UnregisterChannel(_channel);
    }
}With the specific tool logic published on a remoting channel, we can now request a reference to the proxy object and begin invoking calls.
Here is the code for a remoting entry point that invokes the specific tool logic using a proxy object:
// A reference to the tool logic
proxy private IAlertObjectToolLogic _logicProxy = null;
private void ActionButtonClick(object sender, System.EventArgs e)
{
    if (ActionButton.Text.Equals("Connect to Proxy"))
    {
        ActionButton.Text = "Release Proxy";

        _logicProxy =
(IAlertObjectToolLogic)Activator.GetObject(typeof(IAlertObjectToolLogic),
"tcp://localhost:" + ((int)PortField.Value).ToString() + "/AlertObjectToolLogic");

        TestFirstButton.Enabled = true;
        TestSecondButton.Enabled = true;
        TestThirdButton.Enabled = true;
        PortField.Enabled = false;
    }
    else
    {
        ActionButton.Text = "Connect to Proxy";
        _logicProxy = null;

        TestFirstButton.Enabled = false;
        TestSecondButton.Enabled = false;
        TestThirdButton.Enabled = false;
        PortField.Enabled = true;
    }
}

private void TestFirstButtonClick(object sender, System.EventArgs e)
{
    try
    {
        if (_logicProxy != null)
        {
            MessageBox.Show(_logicProxy.GetFirstAlertObjectName());
        }
        else
        {
            MessageBox.Show("Proxy Object not Created");
        }
    }
    catch (System.Runtime.Remoting.RemotingException)
    {
        MessageBox.Show("remoting Endpoint not Bound");
    }
    catch (System.Net.Sockets.SocketException)
    {
        MessageBox.Show("remoting Endpoint not Bound");
    }
}

private void TestSecondButtonClick(object sender, System.EventArgs e)
{
    try
    {
        if (_logicProxy != null)
        {
            MessageBox.Show(_logicProxy.GetSecondAlertObjectName());
        }
        else
        {
            MessageBox.Show("Proxy Object not Created");
        }
    }
    catch (System.Runtime.Remoting.RemotingException)
    {
        MessageBox.Show("remoting Endpoint not Bound");
    }
    catch (System.Net.Sockets.SocketException)
    {
        MessageBox.Show("remoting Endpoint not Bound");
    }
}

private void TestThirdButtonClick(object sender, System.EventArgs e)
{
    try
    {
        if (_logicProxy != null)
        {
            MessageBox.Show(_logicProxy.GetThirdAlertObjectName());
        }
        else
        {
            MessageBox.Show("Proxy Object not Created");
        }
    }
    catch (System.Runtime.Remoting.RemotingException)
    {
        MessageBox.Show("remoting Endpoint not Bound");
    }
    catch (System.Net.Sockets.SocketException)
    {
        MessageBox.Show("remoting Endpoint not Bound");
    }
}As discussed earlier, sometimes it is important to slowly migrate individual components in a legacy environment over to the .NET platform. Doing so requires the ability for .NET and legacy components to communicate with each other. This is made possible by exposing a COM interface that legacy components can invoke. We already discussed how to export a COM interface for the specific tool logic, so now it is time to show the manner in which a legacy component invokes a .NET component.
When a .NET project is marked with Register for COM Interop, a .tlb file is generated that contains the exported symbols registered with COM. You can import this file in an unmanaged application and have all the necessary information to invoke the COM object.
Here is the code for an unmanaged application invoking the specific tool logic assembly via COM:
#include <windows.h>
#include <atlbase.h>
#include <atlcom.h>
#include <comutil.h>

// Import the IAlertObjectToolLogic interface type library
#import "..\AlertObjectToolInterface\bin\Debug\AlertObjectToolInterface.tlb"
raw_interfaces_only

// Import the AlertObjectToolLogic type library
#import "..\AlertObjectTool\bin\Debug\AlertObjectTool.tlb" raw_interfaces_only

WINAPI WinMain(HINSTANCE instance, HINSTANCE prevInstance, LPSTR commandLine, int show)
{
    ::CoInitialize(NULL);

    // Define an interface pointer suitable for the COM class
    CComPtr<AlertObjectToolInterface::IAlertObjectToolLogic> toolLogic;

    // Determine the Guid of the COM class to instantiate
    CLSID alertObjectToolClassID = __uuidof(AlertObjectTool::AlertObjectToolLogic);

    // Attempt to instantiate the COM class
    if (SUCCEEDED(toolLogic.CoCreateInstance(alertObjectToolClassID,
                                             0,
                                             CLSCTX_ALL)))
    {
        CComBSTR firstObjectNameProxy;
        CComBSTR secondObjectNameProxy;
        CComBSTR thirdObjectNameProxy;

        HRESULT hr;

        // Call the first test logic method
        hr = toolLogic ->GetFirstAlertObjectName(&firstObjectNameProxy.m_str);

        // Call the second test logic method
        hr = toolLogic ->GetSecondAlertObjectName(&secondObjectNameProxy.m_str);

        // Call the third test logic method
        hr = toolLogic ->GetThirdAlertObjectName(&thirdObjectNameProxy.m_str);

        _bstr_t firstObjectName = firstObjectNameProxy;
        _bstr_t secondObjectName = secondObjectNameProxy;
        _bstr_t thirdObjectName = thirdObjectNameProxy;

        MessageBox(0, (char*)firstObjectName, "First Object", 0);
        MessageBox(0, (char*)secondObjectName, "Second Object", 0);
        MessageBox(0, (char*)thirdObjectName, "Third Object", 0);
    }
    else
    {
        MessageBox(0, "Could not instantiate COM object", "Error", 0);
    }

    ::CoUninitialize();
    return S_OK;
}An alternative to the proposed architecture is removing the remoting entry point and placing it as a bridge between the specific tool logic and all other entry points. Doing so would convert the architecture into something like a client and server environment, storing a single copy of the specific tool logic on the server. The clients would not require the tool logic, just an interface definition they can cast to a Remoted proxy wrapper.
This architecture would work great in environments where numerous machines need to use a particular tool, but issues and concerns with deployment and versioning present problems. Aside from the first client application and interface definition installation, the only time the client machines would ever need an update would be if the interface changed. If the interface definition were stored in a separate assembly, a simple push technology could be used to force all client machines to remain up to date.
This topic discussed a certain way to design your .NET applications and libraries so reusability and maintainability are promoted as much as possible.
There is really only one spot that cannot be independently developed at any time. The Windows entry point in the example on the companion web site typically just redirects standard input and output streams from the console entry point, helping to reduce the amount of code to maintain both types of entry points. Because of this, the Windows entry point cannot be developed before the console entry point unless both are developed independently of each other. Thanks to the tool logic residing in a separate module, no matter how you structure the entry points, you only need to change the code in one spot to affect how the tool works everywhere. A single module for the logic also helps with maintenance, versioning, and deployment.
As touched on with the alternative architecture described in this chapter, remoting can be used as a barrier between all the entry points and the specific tool logic to convert the architecture into a client and server design. The tool logic can reside on one development server, and all client machines using the tool can access it through a Remoted proxy object. Clients would just need the interface definition the Remoted object implements, and the actual code can stay on the server. This type of architecture would greatly improve deployment by only requiring a change to the server code, and all clients would instantly start accessing the latest version.
Not all types of tools would benefit from this architecture, most notably any tool that intensively accesses the local file system. However, if the server had share access to each client, the tool could be designed to accommodate file system access over the network.
The example overviewed in this topic is also available on the Companion Web site; it shows how to structure an application with this architecture, and even how to export a COM interface and register with Remoting. Keep in mind that these topics are covered in much greater depth later in this book, so no time will be spent describing what the code is doing. If you are lost regarding how things are working, please revisit this chapter later, when you are more comfortable with the technology and services used.