
Many years ago, installing applications was as easy as copying an executable to a floppy disk and either copying it to a user’s computer or running it directly off the disk. Computers and software development have advanced to an era where complex logic and tasks can be evaluated and performed, but this advancement has introduced a new magnitude of installation complexity. Instead of a single executable, we now have to install hundreds of files, and even installations spanning multiple machines in the case of distributed architectures. Some applications even depend on the registration of shared dependencies and components like COM objects, MDAC, or the .NET Framework. Some applications have a lot of complex dependencies on shared components, which many times results in the deployment nightmare known as “DLL Hell.”
A number of deployment strategies and technologies have been developed to try and address these concerns. Each approach has a place, because some approaches are better at deploying certain applications than others. A common approach, and a relatively straightforward one, is XCOPY deployment. This method of deployment is most suitable for .NET applications, because assemblies almost never rely on registry entries created during installation. Deploying an application with XCOPY deployment entails copying the relevant assemblies to the client computer. These applications can launch immediately because of the self-describing nature of .NET assemblies. Assemblies contain all the information necessary to load themselves, along with locating and loading all required dependencies. The XCOPY approach is known as zero-impact deployment because the target computer will not break with varying configurations of the registry or component. You can also uninstall the application simply by deleting the relevant files without worrying about any negative side effects. XCOPY deployment is ideal for situations where the application is relatively self-contained and can be executed manually. Other situations invite an alternative approach.
For situations that require a more robust deployment solution, Windows Installer is the best choice. Windows Installer technology produces installer files with .msi and .exe extensions that execute an installation process that installs files to specific location, and performs system configuration and registration, and does so through a user interface that is simple enough for most users to understand. By wrapping a complex installation into a user-friendly process, you reduce the total cost of ownership (TCO) by allowing the users to correctly install and configure your applications. Windows Installer can even provide a mechanism to repair corrupted installations if the need arises, making maintenance and support easier than ever. Corrupted installations using the XCOPY approach require that you manually replace the bad files or the application in its entirety. Windows Installer also provides an automatic rollback feature, ensuring that all installed files are cleanly uninstalled if an installation fails. This feature goes one step further by bringing the machine back to the state it was in before the installation was initiated.
Visual Studio Installer (VSI) is a technology integrated into Visual Studio 2005 that utilizes the Windows Installer engine. Because MSI installers depend on the existence of the Windows Installer engine, this dependency can also be installed by VSI before installation continues.
Note
The MSI format resembles a database structure, where setup information is stored along with compressed data files.
In addition to utilizing the Windows Installer engine and manipulating the Windows file system, Visual Studio Installer also provides a number of additional features to support complex installations. Installers can read and write keys within the Windows registry, including an automated mechanism to register both COM components and .NET components (within the Global Assembly Cache). Launch conditions can be used to ensure that all requirements are satisfied before installation can continue. Launch conditions can check information like the user and computer name, operating system, presence of the .NET Common Language Runtime, and if a registry entry or another application exists. Installers can also prompt the user for different pieces of information, allowing for a customizable installation process. Custom setup programs or scripts can also be initiated when the installation completes successfully.
Note
A third deployment approach, covered in Chapter 44, “Deployment and Versioning with ClickOnce,” describes a new technology introduced by Microsoft in .NET 2.0. I recommend that you read this chapter if you are concerned about automatic updates, smart client installation, and isolation under a least privilege account. For robust installations, I recommend that you stick with Windows Installer.
This chapter will cover how to create and configure a Visual Studio Installer, along with showing how to develop custom installer actions for any fancy tasks your application needs to perform during installation.
Visual Studio 2005 provides five types of project templates that can be used to handle the setup and deployment of .NET applications. These templates are available from the same New Project menu that you create new applications from. Figure 46.1 shows the New Project dialog for the deployment project templates.
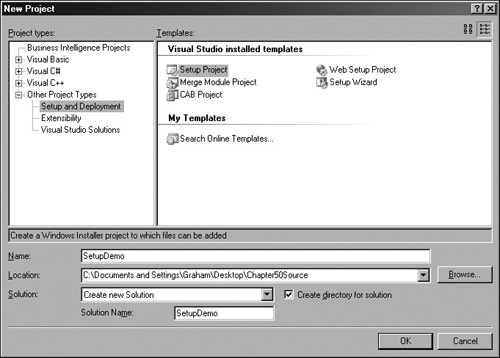
The Setup Project template is used to create a Windows Installer for your applications. This is the project type that will be covered in this chapter.
The Web Setup Project template is used to create a Windows Installer that can install a web application to a virtual directory on a web server.
The Merge Module Project template is used to package shared files and components into a module that can be shared between multiple setup projects. Merge modules are only installed during an installation if the files in the merge module have not yet been installed on the target machine.
The Setup Wizard template is a wizard that helps guide you through the creation of one of the project templates.
The Cab Project template is used to package files without any installation logic. This project type is generally used to package files into a single file that can be deployed onto a web server, so that web browsers can download these components onto their local machines before installation.
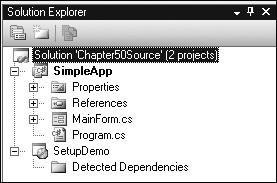
We will start off with an existing Windows Forms application and solution that will be named SimpleApp. Create a new project in this solution with the Setup Project template. You will see the new project added to the current solution, as shown in Figure 46.2.
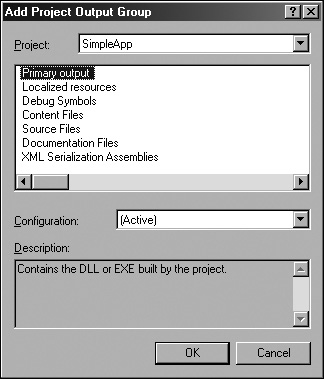
With our new deployment project, we need to include the compiled executable from SimpleApp into the installer. This can be done by right-clicking on the setup project and selecting Project Output from the Add menu. A dialog will be presented, like the one shown in Figure 46.3, that prompts you to select what output you want to package with the installer. Select the primary output option; this will package the built assembly.
As it stands right now, you can build the setup project to produce an installer for the SimpleApp project, but we will press on to configuration and customization.
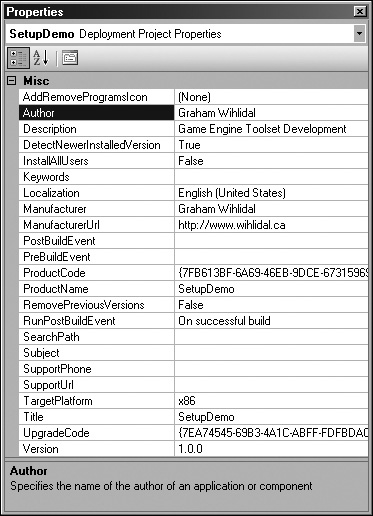
There are all sorts of customizations that can be done on the installer, but the first area to customize is the properties section for the project. Figure 48.4 shows the properties section for the SetupDemo project that can be accessed by right-clicking on the setup project and selecting Properties. There are a number of properties that you can set; you can see what each property is for by clicking in one of the property fields and reading the description that appears on the bottom panel.
Once you have tweaked the project properties, you can move on to the various editors that are available for the installer. The editors are available through the View menu when you right-click on the setup project.
The first editor to cover is the file system editor that allows you to add files and shortcuts to the installer, such as Start menu items. Figure 46.5 shows the file system editor. By default you are presented with three special folders: Application Folder, User’s Desktop, and User’s Programs Menu. All the executables, libraries, text files, images, and all other supporting files needed by your application must reside in the Application Folder. This folder can contain any number of files or directories in any hierarchy that you want. You can also create shortcuts to files or executables in the User’s Desktop and User’s Programs Menu folders. Additional special folders can be created by right-clicking on the parent file system node and selecting Add Special Folder.

Note
Visual Studio Installer reads project dependencies, so you do not need to add components or system files to your installer, except for ones that cannot be read from the source project, such as databases.
For our installer, we want to create a shortcut to the SimpleApp application on the desktop. Navigate into the User’s Desktop folder, right-click, and select Create New Shortcut. This action is shown in Figure 46.5.
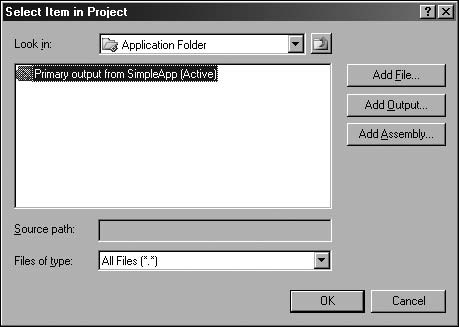
We need to specify where the file within our installation package is located so that a shortcut can be created. Navigate to the Application Folder, select the primary output from the SimpleApp project, and click OK (as shown in Figure 46.6). Doing so will create a shortcut to the SimpleApp executable on the user’s desktop after installation has completed.
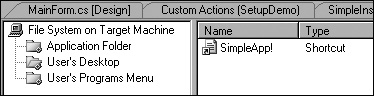
You can see the new shortcut we just created show up in the file system editor, as shown in Figure 46.7.
The next editor we can use is the file types editor, which is used to associate file extensions with an application. This editor allows you to register file extensions so that you do not have to worry about this step programmatically when you launch your application for the first time. The file types editor is shown in Figure 46.8.
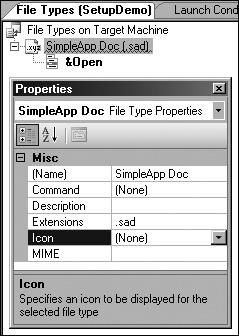
The Name property is used to describe the file type within the file types editor. The Command property specifies what application is launched when this file type is opened from the file system. The Description property is just what it says, a description of the file type within the file types editor. The Extensions property is the most important because it describes which extensions are associated with this file type registration. The Icon property is used to specify which icon is given to applications sporting the registered extensions. Finally, the MIME property is used to describe which mime type is associated with the file mapping. A file mapping has actions (Open is the action used in this example) which represent verbs that are passed into the opening arguments along with the file path so that the application can handle the file appropriately.
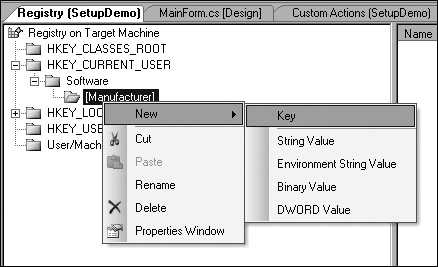
Another useful editor is the registry editor that allows you to manipulate registry entries on the target computer. This editor can add entries into the Windows registry from directly within the installer.
To add a key, simply right-click on the node you want to create under and select New>Key. You can add values such as strings, environment strings, binary values, and DWORDs.
Caution
Beware of what you manipulate within the Windows registry; this can be very dangerous. Make sure you give your keys a distinct grouping and naming.
The registry editor is shown in Figure 46.9.
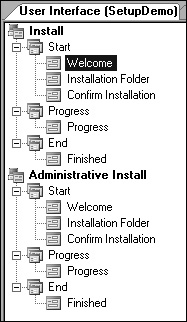
One of the key features of Windows Installer is the ability to display user-friendly interfaces that make deployment easier and more appealing to the average user. By default, you are given a standard template for how the user interface looks and flows, but this can all be modified through the user interface editor, as shown in Figure 46.10. The user interface editor configures the dialogs that are shown during the installation, and it can add new dialogs like user registration.
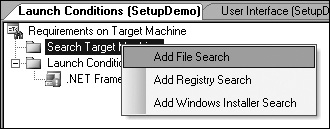
Finally, the launch conditions editor is used to specify the requirements that must be satisfied in order for your application to be installed on the target computer. Searches can be executed against the file system, registry, or previously installed applications to validate that certain dependencies exist (outside of dependencies that the installer automatically picks up on). By default, all .NET installations have a requirement that the .NET Framework be installed. This condition ensures that you have everything installed correctly to run .NET applications, and if not, a bootstrapper can be configured to install the .NET Framework before your installation is continued. Figure 46.11 shows the launch conditions editor.
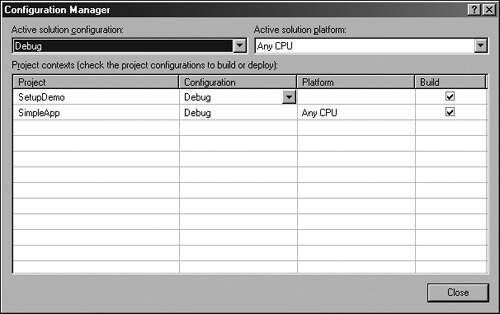
With project configuration taken care of, we can move on to deployment configuration. Start by opening the Configuration Manager dialog by right-clicking on the setup project and selecting Properties, and then clicking on the Configuration Manager button in the top-right corner of the property page. This dialog allows you to manage multiple build configurations, each with a different group of settings. By default, the Setup Project template creates a configuration for Debug and a configuration for Release. The Debug mode creates debugging symbols that make runtime debugging a lot easier, except this mode is not optimized for performance. The Release mode is the opposite; debugging symbols are not created, and the code is optimized for performance. Be sure to change your active solution configuration to Release mode before you begin deploying your application. The Configuration Manager dialog is shown in Figure 46.12.
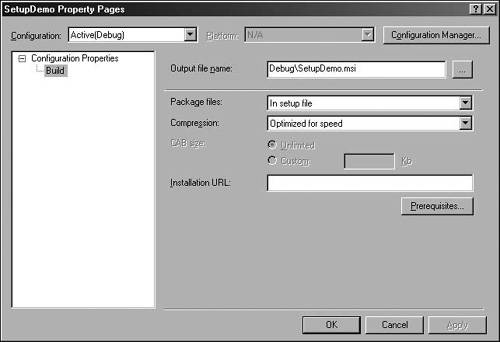
The files in your deployment project can be packaged in a selection of ways. The first format is to store loose uncompressed files, which basically means that no compression takes place and the files are stored as they are. This is an ideal approach because installation speed is important to you. Having uncompressed files takes a lot less time to install rather than having decompression operations that have to happen before files can be installed. This solution is ideal for local computer or network environments where you are not concerned with bandwidth or download issues. The next approach is to store your files in the setup file, which means that your files are compressed and stored within the MSI file. This approach is great for situations where you are concerned with network traffic or user competence; the fewer files you can give users with limited technical ability, the better. Lastly, you can store your files in Cabinet files (.cab). Basically, files are stored in external Cabinet files that are referenced by entries in the MSI file. At runtime, the installer uses these entries to decompress and install the Cabinet files. Cabinet files are stored alongside the MSI file in the same directory. This solution is ideal for web deployments or deployments that require interchangeable components for a variety of configurations.
You have the option of tweaking the compression level to favor different scenarios. You can select Optimized for Speed, Optimized for Size, or None. Optimizing for Speed means that files are roughly compressed, resulting in faster compression, sacrificing a reduction with the amount of compression applied. Optimizing for Size means that a more intensive compression algorithm is used to shrink the files as much as possible, resulting in an excellent level of compression at the cost of additional performance overhead. Lastly, selecting None for the compression mode will result in files being stored uncompressed within a package (if applicable). You can use this mode with a setup file if you want a fast install with a small number of files to work with.
Figure 46.13 shows the property page for the setup project configuration.
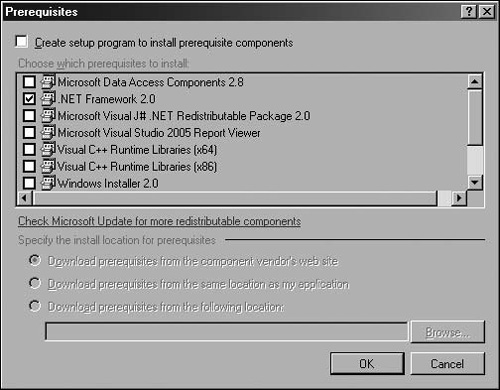
Many applications rely on the existence of shared components or frameworks before installation can occur. A solid example of this relationship is the installation and usage of any .NET application. Client machines must have the .NET runtime and supporting framework installed, or .NET applications cannot execute. Visual Studio Installer has a mechanism known as a bootstrapper that executes and completes successfully before actual installation occurs. This bootstrapper can be configured to make sure that certain key dependencies exist, and to offer methods to acquire these dependencies if they are not found. Visual Studio Installer requires Windows Installer 1.5 to be installed on the target computer in order to function. Windows XP was the first operating system that came bundled with Windows Installer 1.5. Earlier operating systems required that you package a bootstrapper with your installer to account for the older or nonexistent versions. Including the bootstrapper increases your installer size by roughly 3MB. You can specify the Web bootstrapper, which means that the bootstrapper can be downloaded from the Internet if needed. The benefit of this approach is that the bootstrapper does not have to be packaged with the installer, thereby reducing the overall size of the installation package. The bootstrapper is accessed by clicking on the Prerequisites button in the setup project configuration page, and you will be presented with the dialog shown in Figure 46.14.
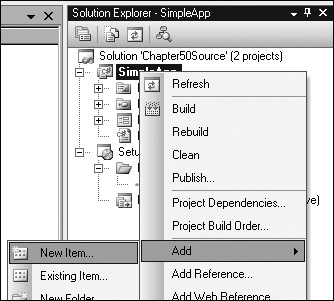
Using the boilerplate setup templates is fine and dandy, but applications with any sort of complexity often require that custom steps be performed during installation, such as the creation of databases, publishing of reports, user personalization, product license key evaluation, and so forth. These steps can be performed through the use of custom installation actions, which are code classes that you can compile within your solution, and then point the installation process at them. To start, we will add a new item to the application project, as shown in Figure 46.15.
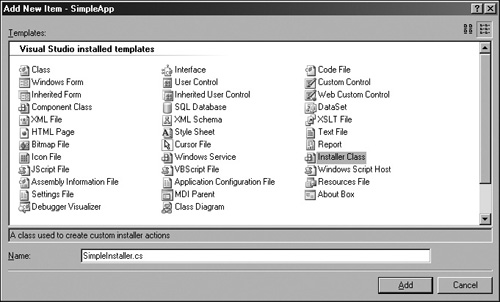
The item we are adding is an Installer Class (shown in Figure 46.16), which is a class that is decorated for processing by the Visual Studio Installer. This class inherits from Installer, which exists in the System.Configuration.Install namespace.
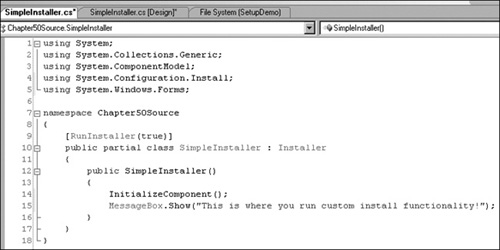
This class provides four methods (Install, Commit, Rollback, and Uninstall), which can be overridden to run custom functionality at the appropriate state in the installer. The example provided with this chapter simply displays a message box in the constructor; although in a real world implementation you would override the four methods appropriately.
Note
The four override methods of Installer are not always called on the same instance of the class. Therefore, it is important that each method can run independently of the other methods or class instances in terms of data persistence and state.
Figure 46.17 shows the simple Installer class implementation provided with the example for this chapter.
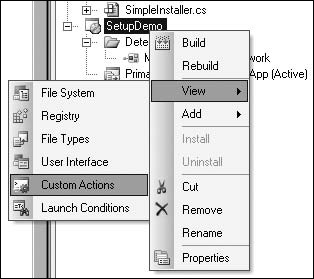
With our simple custom installer logic built, we need to link it into the setup project. This is done through the custom actions editor, which is available from the View context menu item where the other editors are located (as shown in Figure 46.18).
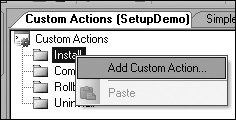
The custom actions editor contains groupings for the four methods of the Installer class. We are just going to add an action for the Install state, which can be done by right-clicking on the Install node and selecting Add Custom Action... as shown in Figure 46.19.
You will be prompted with a dialog that will ask you to select where the custom installer class resides. Since we just added the class to the main application, you can navigate into the Application Folder and select the primary output. This is shown in Figure 46.20.

The custom action is now linked into the installer and ready to fire when installation is initiated.
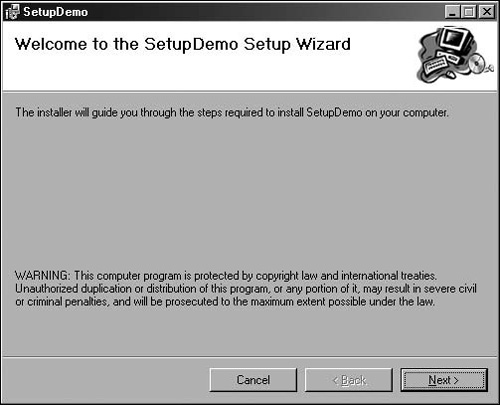
You can build the installer by right-clicking on the setup project and selecting build. The bin directory of the setup project on the file system now contains the MSI and exe files, along with any supporting files used by the installer. This whole directory can be zipped up and distributed for users to run. Figure 46.21 shows the welcome screen shown to users running our new installer.
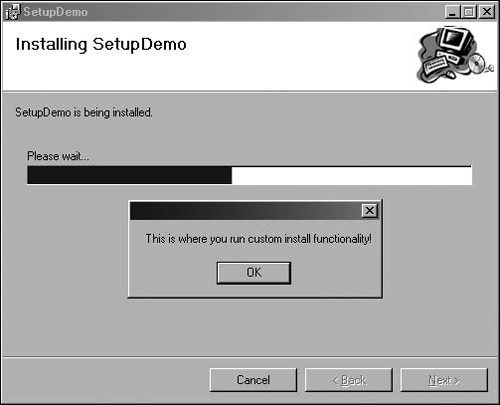
During installation, our custom installer action will execute and display the message box, as shown in Figure 46.22.
This chapter discussed the need for deployment strategies and technologies that reduce the total cost of ownership, and some approaches with .NET application deployment. The bulk of the chapter focused on a walkthrough of the construction of a fairly simple MSI setup project sporting a custom installer action. Visual Studio Installer can be leveraged to provide professional-looking installation packages that perform a lot of complex installation and registration activities behind the scenes, enabling users with limited technical ability to install your software.
Although this chapter only covered the rudiments of Visual Studio Installer, you should now have enough of a foundation to pursue additional information if necessary on harnessing the robust functionality of MSI packages and the Windows Installer engine.