Although not necessarily required at this time, we recommend that you install the Webstorm IDE, as we'll use it throughout the book.
Note that we are using the Webstorm IDE with an integrated environment with terminal, GitHub version control, and Grunt to ease our development. However, you are absolutely free to choose your own environment.
Webstorm is very useful when you are using a Windows environment, because Windows Command Prompt does not have the facility to copy and paste like Mac OS X on the terminal window.
Follow the steps to initiate the JSON file:
- Create a blank folder and name it as
conference-api, open your terminal, and place the command:npm initThis command will walk you through creating a
package.jsonfile with the baseline configuration for our application. Also, this file is the heart of our application; we can control all the dependencies' versions and other important things like author, GitHub repositories, development dependencies, type of license, testing commands, and much more. - Almost all commands are questions that guide you to the final process, so when we are done, we'll have a
package.jsonfile very similar to this:{ "name": "conference-api", "version": "0.0.1", "description": "Sample Conference Web Application", "main": "server.js", "scripts": { "test": "test" }, "keywords": [ "api" ], "author": "your name here", "license": "MIT" }
- Now, we need to add the necessary dependencies, such as Node modules, which we will use in our process. You can do this in two ways, either directly via terminal as we did here, or by editing the
package.jsonfile. Let's see how it works on the terminal first; let's start with the Express framework. Open your terminal in theapifolder and type the following command:npm install [email protected] –-saveThis command installs the Express module, in this case, Express Version 4, and updates the
package.jsonfile and also creates dependencies automatically, as we can see:{ "name": "conference-api", "version": "0.0.1", "description": "Sample Conference Web Application", "main": "server.js", "scripts": { "test": "test" }, "keywords": [ "api" ], "author": "your name here", "license": "MIT", "dependencies": { "express": "^4.0.0" } }
- Now, let's add more dependencies directly in the
package.jsonfile. Open the file in your editor and add the following lines:{ "name": "conference-api", "version": "0.0.1", "description": "Sample Conference Web Application", "main": "server.js", "scripts": { "test": "test" }, "keywords": [ "api" ], "author": "your name here", "license": "MIT", "engines": { "node": "0.8.4", "npm": "1.1.49" }, "dependencies": { "body-parser": "^1.0.1", "express": "^4.0.0", "method-override": "^1.0.0", "mongoose": "^3.6.13", "morgan": "^1.0.0", "nodemon": "^1.2.0" }, }
- Open the terminal again and type the command:
npm install
You can actually install the dependencies in two different ways, either directly into the directory of your application or globally with the -g command. This way, you will have the modules installed to use them in any application.
When using this option, make sure that you are the administrator of the user machine, as this command requires special permissions to write to the root directory of the user.
At the end of the process, we'll have all Node modules that we need for this project; we just need one more action.
Let's place our code over a version control, in our case Git.
Note
More information about the Git can be found at http://git-scm.com/; however, you can use any version control as subversion or another.
We recommend using Git, as we will need it later to deploy our application in the cloud, more specificly, on Heroku cloud hosting.
At this time, our project folder must have the same structure as that of the example shown here:
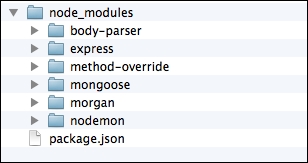
We must point out the utilization of an important module called the Nodemon module. Whenever a file changes it restarts the server automatically; otherwise, you will have to restart the server manually every time you make a change to a file, especially in a development environment that is extremely useful, as it constantly updates our files.