MongoDB, also known as NoSQL database, is a document-oriented database; this means that all the data is stored like a JSON file.
Instead of storing your data in tables and rows as you would do with a relational database, MongoDB stores this data in the key-value format, using binary JSON (BSON); developers can easily map to modern object-oriented languages, without a complicated ORM layer. This new data model simplifies coding significantly and also improves the performance of the grouping of the relevant data together internally.
MongoDB is not limited to a two-dimensional approach to a relational database where we have rows and columns; it can represent objects in the real world as complex and unique as they are. Imagine that in your relational database, you must enter a new attribute to a record; for this, your changes in this model should be applied to the entire database.
In the case of MongoDB, you can apply them only where it is necessary and not in all cases, as in the relational model, where normally it creates a new column in the related table, as we can see in the following screenshot:
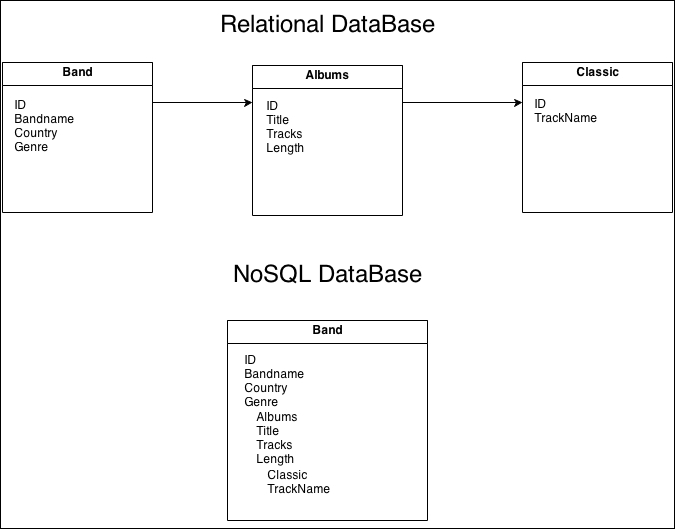
The basic idea here is that a document should be self-contained with all the information in the same place. Why is this? Simply, because instead of performing a query with multiple joins such as the relational model, MongoDB executes a single query, which returns the entire document. The result is more performance. MongoDB is a document-based NoSQL database without transactions and joins.
Another important fact about relational databases is that they require that schemas be defined before inserting data; in MongoDB, you don't need a predefined schema to insert the data.
You can find more about the advantages of NoSQL at http://www.mongodb.com/nosql-explained.
For a better understanding, let's take a look at some SQL commands against MongoDB commands.
|
MongoDB |
SQL |
|---|---|
|
db.name.insert({ A:1, B:2 })
|
INSERT INTO NAME VALUES(A, B)
|
db.users.find()
|
SELECT * FROM users
|
db.bands.find({ name: "Metallica" })
|
SELECT * FROM bands WHERE name = "Metallica"
|
db.bands.find().limit(5).skip(10)
|
SELECT * FROM bands LIMIT 5 SKIP 10
|
Here's a table to exemplify more differences:
|
MongoDB terminology |
SQL terminology |
|---|---|
|
database |
database |
|
collection |
table |
|
document/BSON document |
row |
|
field |
column |
|
index |
index |
|
embedded document/linking |
table joins |
|
primary key is _id field |
column or column combination as primary key |
|
aggregation pipeline |
aggregation: group by |
Now that we have a brief idea of the power and simplicity of MongoDB, let's learn how to interact using the terminal. This book assumes that you already have MongoDB installed on your machine. Go straight to the terminal and type mongo.
Once you start the MongoDB shell, you will come across a message similar to this:
MongoDB shell version: 2.4.6
connecting to: test
> _
As we haven't specified any database yet, note that the shell starts in a MongoDB database called test. You can use it for these basic examples; however, we will create a new database using the following steps so that we can get some familiarity with MongoDB shell commands:
- Type
use exampledbin the terminal, and you will get the following message:> use exampledb switched to db exampledb > _
This message indicates that MongoDB created and switched to the new database named
exampledb. Note that no extra command was used beyond the keyword uses to create the new database, so only one command is necessary to create and switch from test toexampledb. - Now, we can create our collections easily using the simple JSON format with the insert command:
db.bands.insert({
  name: "Metallica",
  album: "Master of Puppets",
  tracks: 9,
  year: "1996"
})
All commands in MongoDB are extremely simple and very easy to memorize; moreover, when any questions arise, we have the
help()command, where we can perform our search quickly. - We can apply this on databases and collections, for example,
db.collection-name.help().
The following screenshot illustrates the output when we apply the help() command to the speakers collection:

Don't worry about what is inside the speakers collection; later in the book, we'll create the collection together.
Besides the shell that comes by default with the installation of MongoDB, we have some third-party software facilitators that assist us with the graphical interface rather than the administration of our databases in MongoDB. A good option is UMongo and you can download it for free at http://www.edgytech.com/umongo/; they have different versions for Windows, Linux, and Mac OS X. It is very similar to SQL Manager and can help us a lot in getting a full view of all our databases.
Note
More administrative interface tools can be found at http://docs.mongodb.org/ecosystem/tools/administration-interfaces/.
As we are talking about a database, a common question is how to connect the database with our application?
In the Node ecosystem, everything is planned. We have many options in hand to deal with all kind of projects, as we will see in another powerful tool to handle connections and schemes.
Mongoose is a Node library solution that provides a schema-based model to the data of our application. It has type conversion, validation, creating queries, and business logic hooks to system, and thanks to MongoDB, it also has a flexible schema.
Mongoose provides a mapping of objects similar to MongoDB Object Relational Mapping (ORM) or Object Data Mapping (ODM) in the case of Mongoose. This means that Mongoose translates data from the database to JavaScript objects that can be used by our application. It was born to work in an asynchronous environment.
Furthermore, as we saw earlier, we can install it easily using NPM with the simple command: npm install mongoose. Mongoose will be available to the entire application; you just need add it to the application file, as shown in the following example:
var mongoose = require('mongoose'), mongoose.connect('mongodb://localhost/test'),
var db = mongoose.connection;
db.on('error', console.error.bind(console, 'connection error:')); db.once('open', function callback () { // Hello Mongoose });
Note that our string connection points to http://localhost/databasename and the name after the slash is our database name. In a real-world application or on a production environment, we need to pass the username and password for the database user.
All we need is a schema and a model for us to work with the data to be persisted on our MongoDB database. Schemas define the structure of documents within a collection and models are used to create instances of data to be stored in documents.
- String
- Number
- Date
- Buffer
- Boolean
- Mixed
- ObjectId
- Array
When thinking about it, we imagine how we can represent our collection of bands from the previous example using models and schema. The following code shows bandSchema and the Band model:
var bandSchema = new Mongoose.Schema({
  name:  { type: String },
  album: { type: String },
  track: { type: Number },
  year:  { type: Number }
});

var Band = Mongoose.model('Band', bandSchema);
The last line of the code compiles the Band model using bandSchema as the structure. Mongoose also creates a collection called Band for these documents. You might notice that the Band model is capitalized, as when a model is compiled, it returns a constructor function that will be used to create one or more instances of the model.
This model's instances are the documents that will be persisted by MongoDB using the save function. So, to create a new document, Band can be used, as it is easier now that we have defined the model. We just instantiate the Band model and save this instance on the database, as shown in the following code:
var slayer = new Band({
  name: "Slayer",
  album: Show no Mercy,
  track: "10",
  year: 1984
});

slayer.save(function(err) {
  if (err) return console.error(err);
  console.dir(slayer);
});
Note that we use a string instead of a number in the track property. Mongoose will be responsible for converting the data type specified in bandSchema.
When we add these two code to the database and execute our application, we see that the save function will provide a newly created document; look at the console:
{ __v: 0,
  name: 'Slayer',
  album: 'Show no Mercy',
  track: 10,
  year: 1984,
  _id: 8334012cb65dfgf003000002 }
Collections in MongoDB have a flexible schema; this means that collections do not impose the structure of the documents. In practice, this means that documents from the same collection need not have the same set of fields or structure and that common fields in a collection of documents can carry different types of data.
As seen in our example, using Mongoose to map our database standardizes the documents of the same schema. This ensures that instances of the model that compiled the schema will always have the same data type attributes specified in the schema.