Let's see how we can create both tasks at the same time with the help of the subgenerator CRUD module:
- In the terminal, type the following command:
yo meanjs:crud-module speakersNote that the last word is the name we give to the module that will be created.
Tip
More information about the MEAN.JS generator and sub-generator CRUD can be found at http://meanjs.org/generator.html#crud-module.
After the process, we have the following information on the terminal window:
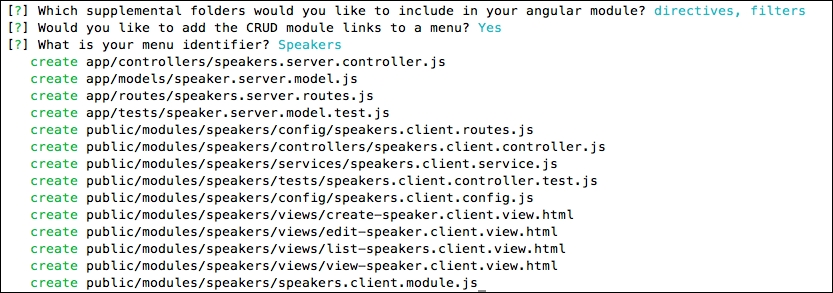
Note that we respond to the three optional questions while creating the new module: whether we want to include a folder for CSS and images and two directories for Angular, directives and filters. For the purpose of this example, we chose not to include the directories of CSS and images; we will see why later.
- Now, let's test what we created. Open the browser and type
localhost:3000. If you are using the Version 0.1.5 of the MEAN.JS generator, you will probably receive the following error:Error: Menu does not exists
http://localhost:3000/modules/core/services/menus.client.service.js:35&host=localhost:3000
Surely this little bug will be fixed in the next release; however, now we will solve this manually.
- Open the
speaker.client.config.jsfile.// Configuring the Articles module and replace thefollowing code: angular.module('speakers').run(['Menus', function(Menus) { // Set top bar menu items Menus.addMenuItem('Speakers', 'Speakers', 'speakers','dropdown', '/speakers(/create)?'), Menus.addSubMenuItem('Speakers', 'speakers', 'ListSpeakers', 'speakers'), Menus.addSubMenuItem('Speakers', 'speakers', 'NewSpeaker', 'speakers/create'), } ]); - Replace the preceding code with the following code:
// Configuring the Speakers module
angular.module('speakers').run(['Menus',
function(Menus) {
  // Set top bar menu items
  Menus.addMenuItem('topbar', 'Speakers', 'speakers','dropdown', '/speakers(/create)?'),
  Menus.addSubMenuItem('topbar', 'speakers', 'ListSpeakers', 'speakers'),
  Menus.addSubMenuItem('topbar', 'speakers', 'New Speaker','speakers/create'),
}
]);
We changed the first parameter from the
Menusfunction fromSpeakerstotopbar, pretty simple. - Go back to the terminal and type the
node servercommand again. Open the browser and typelocalhost:3000, and then log in or register a new user.
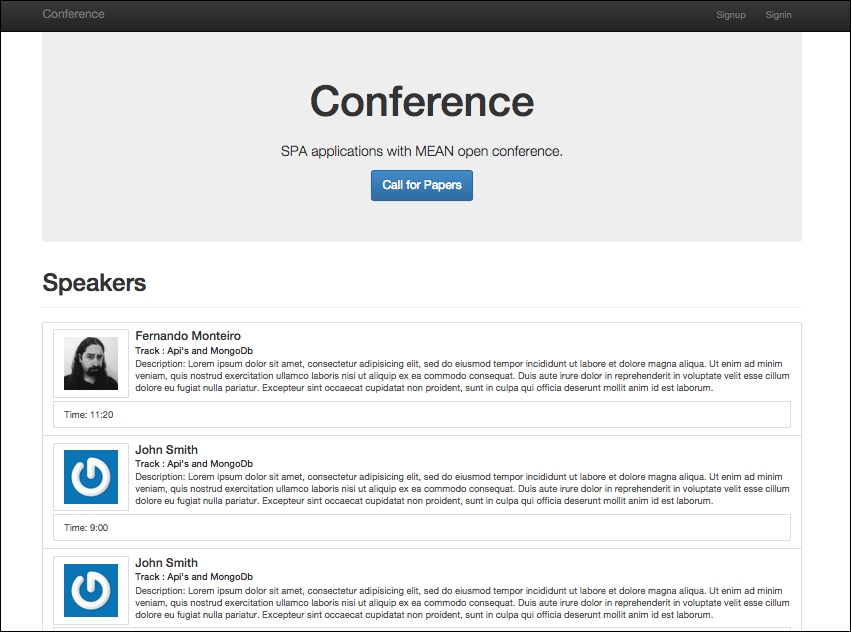
Finally, we can see our speakers menu item created, along with two submenus to list and add the speakers. This subgenerator is very similar to the Ruby on Rails scaffold, and even though we use it to create the necessary CRUD operations, we still have much work ahead.
We will make some simple alterations in the layout; the important parts will be highlighted:
- Edit the home view template file located at
public/core/views/home.client.view.html. - Open the file and delete all the content. After this, place the following code. Pay attention to the comments in the code; they indicate important areas of our application:
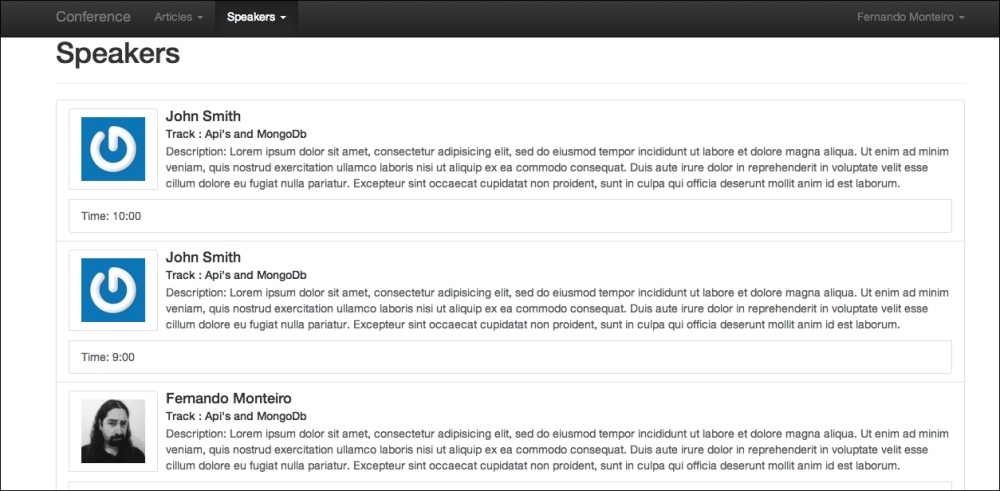
<section data-ng-controller="HomeController" data-ng-init="find()"> <div class="jumbotron text-center"> <div class="row"> <div class="col-md-6 col-md-offset-3 col-sm-6 col-sm-offset-3 col-xs-12"> <h1>Conference</h1> </div> </div> <br> <div class="row"> <p class="lead"> SPA applications with MEAN open conference. </p> </div> <div class="row"> <p> <a class="btn btn-primary btn-lg" href="#!/signup">Call for Papers</a> </p> </div> </div> <section> <div class="page-header"> <h1>Speakers</h1> </div> <div class="list-group"> <!-- Add filter to list speakers by created date --> <a data-ng-repeat="speaker in speakers | filter:query| orderBy: 'created'" data-ng-href="#!/speakers/{{speaker._id}}" class="list-group-item"> <img gravatar-src-once="speaker.email" class="list-group-item" style="float:left; margin-right: 10px;"> <h4 class="list-group-item-heading"> <span data-ng-bind="speaker.name"></span></h4> <h5 class="list-group-item-heading text-primary">Track : <span data-ng-bind="speaker.title"></span></h5> <p> Description: <span data-ng-bind="speaker.description"></span></p> <p class="list-group-item"> Time: <span data-ng-bind="speaker.schedule"></span></p> </a> </div> <!-- Add a simple message if don't have any speaker yet--> <div class="alert alert-warning text-center" data-ng-hide="!speakers.$resolved || speakers.length"> No Speakers yet, why don't you <a href="/#!/speakers/create">create one</a>? </div> </section> </section> <footer> <p class="text-center">Conference © 2014</p> </footer>
Let's check what happened in the preceding code:
- The first line with
data-ng-init="find()"can beng-init="find()"; thedataattribute is very useful for some HTML5 validators - The
find()function insideng-initis just a function to list all the speakers - The
ng-repeatdirective has another AngularJS keyword, thefilterfeature, which we saw in Chapter 5, Starting with AngularJS - The
img gravatar-src-once="speaker.email"directive is theangular-gravatardirective, which we will see in the next section - The
data-ng-hide="!speakers.$resolved || speakers.length"directive activates an error message if there isn't any registered speaker
- The first line with
- Edit the authentication redirection. So, open the
authentication.client.controller.jsfile located atpublic/modules/users/controllers/authentication.client.controller.jsand go to the$scope.signfunction and add the following line right after$scope.authentication.user = response;://And redirect to the index page $location.path('/speakers'), - With this alteration, after the login page, we are directed to the speakers' page instead of the index page. The complete function looks like this:
$scope.signin = function() { $http.post('/auth/signin',$scope.credentials).success(function(response) { //If successful we assign the response to the globaluser model $scope.authentication.user = response; //And redirect to the index page $location.path('/speakers'), }).error(function(response) { $scope.error = response.message; }); }; - Edit the home controller. So, open the
home.client.controller.jsfile atpublic/modules/core/controllers/home.client.controller.js - Add the following lines, just after
$scope.authentication = Authentication;:// Find a list of Speakers $scope.find = function() { $scope.speakers = Speakers.query(); }; - Add the
speakersmodule to the controller parameters:angular.module('core').controller('HomeController', ['$scope', 'Authentication', 'Speakers', function($scope, Authentication, Speakers) {}
The whole module looks like this:
angular.module('core').controller('HomeController', ['$scope', 'Authentication', 'Speakers',
function($scope, Authentication, Speakers) {
// This provides Authentication context.
$scope.authentication = Authentication;
// Find a list of Speakers
$scope.find = function() {
  $scope.speakers = Speakers.query();
};
}
]);With this, we can list all the speakers in the index page.
The last action necessary to conclude this step is the installation of a module called angular-gravatar. We open a parenthesis here to describe in a few lines what this module is.
The result we hope to get is shown in the following screenshot:
Don't worry about the data; we will see how to place the data later in next topics.
Imagine an application receiving hundreds of inscriptions to call for papers, and consequently we can use the application for long-duration events, making it a monthly event with 10 speakers per day for 30 days with an average of 300 entries, each with a photo of your speaker.
Our server must be prepared to receive and handle this amount of images. For this, we use the known service called Gravatar (http://en.gravatar.com/), where you can register an image (Avatar) and an e-mail account and use their API for integration with blogs and other systems.
Tip
More information about angular-gravatar can be found at https://github.com/wallin/angular-gravatar.
Here, we will use angular-gravatar; so this way, the speaker must enter your e-mail address and the module takes care of the rest.
Let's see how this works in practice:
- Open your terminal and type:
bower install angular-gravatar --save - Add
md5.jsandangular-gravatar.jsto the application inconfig/env/all.jsthe file, right at the end of AngularJS dependencies:'public/lib/angular-gravatar/build/md5.min.js', 'public/lib/angular-gravatar/build/angular-gravatar.min.js'
- In
public/config.js, add the following code to thevar applicationModuleVendorDependenciesarray:ui.gravatar
- Edit the
list-speakers.client.view.htmlfile located atpublic/modules/speakers/views/list-speakers.client.view.html - Replace the code with the following code:
<section data-ng-controller="SpeakersController" data-ng-init="find()">
  <div class="page-header">
    <h1>Speakers</h1>
  </div>
  <div class="list-group">
    <a data-ng-repeat="speaker in speakers" data-ng-href="#!/speakers/{{speaker._id}}/edit" class="list-group-item">
    <img gravatar-src-once="speaker.email" class="list-group-item" style="float:left; margin-right: 10px;">
    <h4 class="list-group-item-heading"><span data-ng-bind="speaker.name"></span></h4>
    <h5 class="list-group-item-heading">Track : <span data-ng-bind="speaker.title"></span></h5>
    <p> Description: <span data-ng-bind="speaker.description"></span></p>
    <p class="list-group-item"> Time: <span data-ng-bind="speaker.schedule"></span></p>
    </a>
  </div>
  <div class="alert alert-warning text-center" data-ng-hide="!speakers.$resolved || speakers.length">
    No Speakers yet, why don't you <a href="/#!/speakers/create">create one</a>?
  </div>
</section>
Note the
imgtag withgravatar-src-once="speaker.email"with the source binding to the e-mail field. This is where the magic happens. - Edit the
edit-speakers.client.view.htmlfile located atpublic/modules/speakers/views/edit-speakers.client.view.htmland replace the code with the following code:<section data-ng-controller="SpeakersController" data-ng-init="findOne()"> <div class="page-header"> <h1>Edit Speaker</h1> </div> <div class="col-md-12"> <div class="thumbnail"> <img gravatar-src-once="speaker.email" alt="{{speaker.name}}"> </div> <form class="form-horizontal" data-ng-submit="update()"novalidate> <fieldset> <div class="form-group"> <label class="control-label"for="name">Name</label> <div class="controls"> <input type="text" data-ng-model="speaker.name"id="name" class="form-control" placeholder="Name" required> </div> </div> <div class="form-group"> <label class="control-label"for="name">Title</label> <div class="controls"> <input type="text" data-ng-model="speaker.title"id="title" class="form-control" placeholder="Titulo" required> </div> </div> <div class="form-group"> <label class="control-label" for="description">Description</label> <div class="controls"> <textarea data-ng-model="speaker.description" id="description" class="form-control" placeholder="Description" required></textarea> </div> </div> <div class="form-group"> <label class="control-label" for="email">Email</label> <div class="controls"> <input type="text" data-ng-model="speaker.email" id="email" class="form-control" placeholder="Email" required> </div> </div> <div class="form-group"> <label class="control-label" for="schedule">Schedule</label> <div class="controls"> <input type="text" data-ng-model="speaker.schedule" id="schedule" class="form-control" placeholder="Schedule" required> </div> </div> <div class="form-group"> <input type="submit" value="Update" class="btn btn-success"> <a class="btn btn-danger" data-ng-click="remove();">Delete</a> </div> <div data-ng-show="error" class="text-danger"> <strong data-ng-bind="error"></strong> </div> </fieldset> </form> </div> </section>Here, we use the Angular expression,
<img gravatar-src-once="speaker.email" alt="{{speaker.name}}">, to insert the speaker's name inside thealtimage attribute. - Edit the
create-speakers.client.view.htmlfile located atpublic/modules/speakers/views/create-speakers.client.view.htmland replace the code with the following code:<section data-ng-controller="SpeakersController"> <div class="page-header"> <h1>New Speaker</h1> </div> <div class="col-md-12"> <img gravatar-src-once="email" alt="{{name}}"> <form class="form-horizontal" data-ng-submit="create()" novalidate> <fieldset> <div class="form-group"> <label class="control-label" for="name">Name</label> <div class="controls"> <input type="text" data-ng-model="name" id="name" class="form-control" placeholder="Name" required> </div> </div> <div class="form-group"> <label class="control-label" for="title">Title</label> <div class="controls"> <input type="text" data-ng-model="title" id="title" class="form-control" placeholder="Title" required> </div> </div> <div class="form-group"> <label class="control-label" for="description">Description</label> <div class="controls"> <textarea data-ng-model="description" id="description" class="form-control" placeholder="description" required></textarea> </div> </div> <div class="form-group"> <label class="control-label" for="email">Email</label> <div class="controls"> <input type="text" data-ng-model="email" id="email" class="form-control" placeholder="email" required> </div> </div> <div class="form-group"> <label class="control-label" for="schedule">Schedule</label> <div class="controls"> <input type="text" data-ng-model="schedule" id="schedule" class="form-control" placeholder="schedule" required> </div> </div> <div class="form-group"> <input type="submit" class="btn btn-default"> </div> <div data-ng-show="error" class="text-danger"> <strong data-ng-bind="error"></strong> </div> </fieldset> </form> </div> </section>The create form is different from the list form in
<img gravatar-src-once="email" alt="{{name}}">, because here we don't have the speaker yet; so the{{name}}expression is fromdata-ng-model="name". - Edit the
view-speakers.client.view.htmlfile located atpublic/modules/speakers/views/view-speakers.client.view.htmland replace the code with the following code:<section data-ng-controller="SpeakersController" data-ng-init="findOne()"> <div class="page-header"> <div class="row"> <div class="col-md-12"> <div class="thumbnail"> <img gravatar-src-once="speaker.email" alt="{{speaker.name}}"> <div class="caption"> <h3 class="text-center" data-ng-bind="speaker.name"></h3> <h4 class="text-center" data-ng-bind="speaker.title"></h4> <p class="text-center" data-ng-bind="speaker.schedule"></p> <p class="text-justify" data-ng-bind="speaker.description"></p> </div> <small> <em class="text-muted">Posted on <span data-ng-bind="speaker.created | date:'mediumDate'"></span> by <span data-ng-bind="speaker.user.displayName"></span> </em> </small> </div> <div class="btn-group btn-group-justified" data-ng-show="authentication.user._id == speaker.user._id"> <div class="btn-group"> <a class="btn btn-default" href="/#!/speakers/{{speaker._id}}/edit"> <i class="glyphicon glyphicon-edit"></i> Edit </a> </div> <div class="btn-group"> <a class="btn btn-default" data-ng-click="remove();"> <i class="glyphicon glyphicon-trash"></i>Delete </a> </div> </div> </div> </div> </div> </section>The highlighted code checks whether the user is logged in; if so, show the Edit and Delete buttons, and if not, just show the speaker page.
- Edit the speaker model file
app/models/speaker/speaker.server.model.htmland replace the code with the following code:'use strict'; /** * Module dependencies. */ var mongoose = require('mongoose'), Schema = mongoose.Schema; /** * Speaker Schema */ var SpeakerSchema = new Schema({ name: { type: String, default: '', trim: true, required: 'Name cannot be blank' }, title: { type: String, default: '' }, description: { type: String, default: '' }, schedule: { type: String, default:'' }, email: { type: String, default:'' }, created: { type: Date, default: Date.now }, user: { type: Schema.ObjectId, ref: 'User' } }); mongoose.model('Speaker', SpeakerSchema);The last highlighted field stores the actual user on speaker creation, as we can see in MongoDB:
{
  __v: 0,
  _id: ObjectId("54036bfff14a90fd02213d37"),
  created: ISODate("2014-08-31T18:39:59.444Z"),
  description: "Lorem ipsum dolor sit amet, consectetur adipiscing elit...",
  email: "",
  name: "John Master",
  schedule: "10:00",
  title: "MongoDB in depth",
  user: ObjectId("54034f440c486ebb02859637")
}
Our refactoring here was massive, but we do this because even though we use the CRUD generator, we still have much work to do, as mentioned earlier.
- Lastly, insert the necessary fields to the speaker model that will be stored in the database with the Mongoose schema.
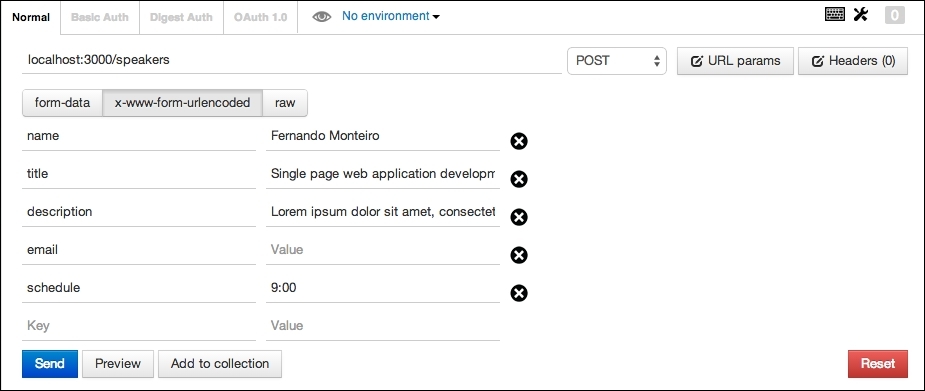
Now, let's insert some data in our API using Postman again.
Follow the steps to insert data in our API:
- You can enter any data in the fields on the right, but the fields on the left-hand side must keep the same names as the fields in the speakers' schema:
- Open your browser and type
http://localhost:3000/.After the login, you can see the speakers page and the thumbnail image from the
speakersmodule imported from the Gravatar website. When you fill the e-mail field with a valid e-mail address, we have a speaker picture. When it is left blank, they assume the default Gravatar icon, as shown in the following screenshot: