
As already mentioned before, we use as tools as possible that streamline our development process of web applications.
We will start from scratch, using a Yeoman generator called MEAN.JS.
Let's begin; remember that you can download the sample files and follow our evolution. However, I strongly recommend that you follow refactoring step by step for a better understanding.
- Create a folder called
meanjs-generator, open the terminal inside it, and type:npm install -g generator-meanjsThe
-gkey means general, and you'll need to be the administrator of your machine. Now, we have what we need: the generator. - Type the
yo meanjscommand and follow the instructions and fill in the answers; the text in light blue is the answer that you must complete, as shown in the following screenshot: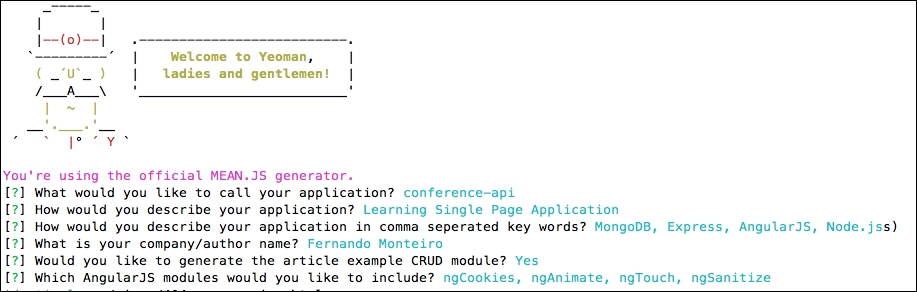
If you accompany the process on your terminal, you can see that the Bower also already executed these commands and installed all the AngularJS scripts.
- The next step is to run the
node servercommand. Probably, you should receive an error message on your terminal, with some URLs pointing to MongoDB folders. In fact, it is predictable because it indicates that MongoDB is not running. - Then, open the
server.jsfile on the application root and add a treatment for this error. - Include the following lines directly after the
var db = mongoose.connect(config.db);line:// Add a warning message if MongoDB don't running mongoose.connection.on('error', function() { console.error('MongoDB Connection Error. Make sure MongoDB is running.'), });As shown in the following screenshot:

- Now, run the
node server.jscommand again. We can clearly see what happened:MEAN.JS application started on port 3000
MongoDB Connection Error. Make sure MongoDB is running.
- Start MongoDB. Run the command again and open your browser in the
localhost:3000URL.
The application is ready to be refactored; if everything went well so far, you can see the welcome message. On this page, it is even possible to access the links for each technology used and also the MEAN.JS documentation.
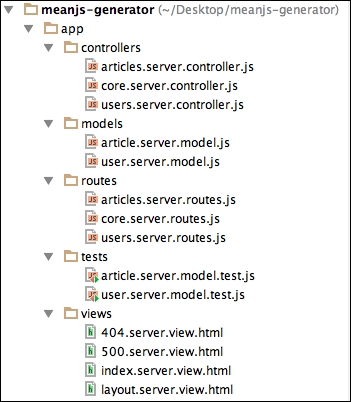
This generator has a very important peculiarity. Usually, when we work with web applications using AngularJS, by default all application files reside in the app directory. However, in this case, this directory stores files regarding our API, for example, server files, which are usually stored in the server folder.
We can clearly see the separation and organization of our code in folders such as controllers, models, routes, tests, and views. There is nothing new up to now because we have already used this same structure in previous chapters; the only difference is the addition of the tests directory, as shown in the following screenshot:
Note that the suffix, server, is present in the naming of all the files; it greatly facilitates the work of the team and became highly scalable. The public folder contains all files related to the frontend application. Note that each module has its own folder, in addition to all AngularJS files that are housed in the lib folder. Each module has its own internal structure to their respective folders: config, controllers, services, tests, views, and a file in the root that registers the module in the application, as shown in the following screenshot:

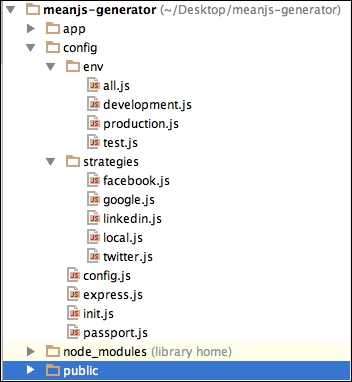
We cannot say that this is a simple structure. On the contrary, it is a complex but very well-divided structure. Finally, we have the config folder and two other folders inside it, env and strategy; the latter contains the configuration files of the Passport module to deal with authentication and user's control over Facebook, Google, LinkedIn, Twitter, and local access with a username and password.
The env directory holds settings, access to static files, template rendering, and session control in the all.js file. The other files store the connection string to the database and also the access keys for social networking APIs.
We shall now see briefly what each file's root folder is:
.bowerrec: As we saw before setup, this is a file to receive Bower components.gitignore: This file doesn't track files on the control versionbower.json: This file sets up the dependencies for the frontend side, such as Angular, jQuery, and Bootstrapgruntfile.js: This file is a task runner for building, testing, development, and other common taskskarma.conf.js: This file sets up the testing environmentlicense.md: This file shows which license is usedpackage.json: This sets up the application dependencies for server side, such as Express and Passportprocfile: This sets up an environment for cloud deploymentreadme.md: This has information about the applicationserver.js: As we saw before, this is the heart of the Node server for the application
We note that in this way, we can scale the application in a practical way. As we saw in the previous examples, we are ready to proceed with the refactoring. We will divide it into two stages: the first to the API, including a service for inclusion of speakers, and the second to create the frontend itself with AngularJS.
However, we can choose to create everything from scratch, including file-by-file directories in the backend and the frontend too. However, once you have already used the generator to create all this structure, use a subgenerator for creation of two steps (backend files and frontend files) simultaneously. This way, we save time and become more productive.