
Karma is configured with a file called karma.conf.js.
Tip
You can find more information about Karma at http://karma-runner.github.io/0.12/index.html.
The easiest way to create this file is to use the karma-cli tool. This way, you will have the init command available in your terminal. This is a standard procedure used in many tools available for Node.js environments, such as Grunt, Bower, and some others.
Command line interface (CLI) helps us to create files and settings in a simple and fast way using the terminal. As we already have the karma.conf.js file, we don't need to perform the init command.
Open the project folder. Now, let's review the karma.conf.js file to understand it line by line:
'use strict';

/**
 * Module dependencies.
 */
var applicationConfiguration = require('./config/config'),

// Karma configuration
module.exports = function(config) {
  config.set({
    // Frameworks to use

frameworks: ['jasmine'],

    // List of files / patterns to load in the browser
    files: applicationConfiguration.assets.lib.js.concat(applicationConfiguration.assets.js, applicationConfiguration.assets.tests),

    // Test results reporter to use
    // Possible values: 'dots', 'progress', 'junit', 'growl','coverage'
    //reporters: ['progress'],
    reporters: ['progress'],

    // Web server port
    port: 9876,

    // Enable / disable colors in the output (reporters and logs)
    colors: true,

    // Level of logging
    // Possible values: config.LOG_DISABLE || config.LOG_ERROR ||config.LOG_WARN || config.LOG_INFO || config.LOG_DEBUG
    logLevel: config.LOG_INFO,

    // Enable / disable watching file and executing tests wheneverany file changes
    autoWatch: true,

    // Start these browsers, currently available:
    // - Chrome
    // - ChromeCanary
    // - Firefox
    // - Opera
    // - Safari (only Mac)
    // - PhantomJS
    // - IE (only Windows)
    browsers: ['PhantomJS'],

    // If browser does not capture in given timeout [ms], kill it
    captureTimeout: 60000,

    // Continuous Integration mode
    // If true, it capture browsers, run tests and exit
    singleRun: true
  });
};
The highlighted code tells Karma about the location of the test files and whether it is the same as the following code:
    // list of files / patterns to load in the browser
    files: [
      'public/**/*.test.js'
    ],
The applicationConfiguration variable was set up before the Karma function with the following code:
var applicationConfiguration = require('./config/config'),Note that we are using the Jasmine framework as we mentioned before. At this point, we already have the necessary baseline to start writing tests.
We might notice that all modules already have their respective folders called tests. This is because when we use the Yeoman generator, it already creates these configurations. All the necessary files for the controllers, services, directives, and tests are already stored, as seen previously. So we already have our boilerplate ready to test.
Then, we will review it so that we can fix the procedure we have performed. Open the file speakers.client.controller.test.js in public/modules/speakers/tests/.
We will discuss some blocks of code for a better understanding of what is happening step-by-step. Then, we will insert some additional comments that are not present in the original file to understand what is happening with each part of the code. Further, we will be using the same concepts that we saw earlier in the introductory section of Jasmine. The describe() function receives the test name and a function parameter with the test itself, as shown in the following code:
(function() {
  // Speakers Controller Spec
  describe('Speakers Controller Tests', function() {
    // Initialize global variables
    var SpeakersController,
    scope,
    $httpBackend,
    $stateParams,
    $location;
  });
});
In this function, we initialize some global variables. Note that we use the $ sign to set AngularJS features (such as $httpBackend, $stateParams, and $location). The $resource service augments the response object with methods to update and delete the resource. If we were to use the standard toEqual matcher, our tests would fail because the test values will not exactly match the responses. To solve this problem, we define a new toEqualData Jasmine matcher. When the toEqualData matcher compares two objects, it takes only object properties into account and ignores methods, as shown in the following code:
beforeEach(function() {
      jasmine.addMatchers({
        toEqualData: function(util, customEqualityTesters) {
          return {
            compare: function(actual, expected) {
              return {
                pass: angular.equals(actual, expected)
              };
            }
          };
        }
      });
    });

    // Then we can start by loading the main application module

beforeEach(module(ApplicationConfiguration.applicationModuleName));

    // The injector ignores leading and trailing underscores here (i.e. _$httpBackend_).
    // This allows us to inject a service but then attach it to a variable
    // with the same name as the service.

beforeEach(inject(function($controller, $rootScope,_$location_, _$stateParams_, _$httpBackend_) {
      // Set a new global scope
      scope = $rootScope.$new();

      // Point global variables to injected services
      $stateParams = _$stateParams_;
      $httpBackend = _$httpBackend_;
      $location = _$location_;

      // Initialize the Speakers controller.
      SpeakersController = $controller('SpeakersController', {
        $scope: scope
      });
    }));
Here, note the use of the beforeEach() function. The name is very intuitive; we use this function to start some procedure before each test. The first use of the beforeEach() function on the code sample is to add the new matcher toEqualData, the second use is to load the application configuration, and the third use is to inject the AngularJS directives.
Now, we use the it() function to describe what we expect from the test; the highlighted string shows this:
  it('$scope.find() should create an array with at least one Speaker object fetched from XHR', inject(function(Speakers) {
    // Create sample Speaker using the Speakers service
    var sampleSpeaker = new Speakers({
      name: 'New Speaker',
      title: '',
      description: '',
      email: '',
      schedule: ''
    });
Note that we add the highlighted properties to the sampleSpeaker object. Do the same in your file by performing the following steps:
- Add the properties, namely,
title,description,email, andscheduleto thesampleSpeakerobject using the following code:// Create a sample Speakers array that includes the new Speaker var sampleSpeakers = [sampleSpeaker]; // Set GET response $httpBackend.expectGET('speakers').respond(sampleSpeakers); // Run controller functionality scope.find(); $httpBackend.flush(); // Test scope value expect(scope.speakers).toEqualData(sampleSpeakers); })); - The second
it()function is used to find a specific speaker usingspeakerId:it('$scope.findOne() should create an array with oneSpeaker The object fetched from XHR using a speakerId URLparameter', inject(function(Speakers) { // Define a sample Speaker object var sampleSpeaker = new Speakers({ name: 'New Speaker', title: '', description: '', email: '', schedule: '' }); - Add the properties, namely,
title,description,email, andscheduleto the previoussampleSpeakerobject using the following code:// Set the URL parameter $stateParams.speakerId = '525a8422f6d0f87f0e407a33'; // Set GET response $httpBackend.expectGET(/speakers/([0-9a-fA-F]{24})$/).respond(sampleSpeaker); // Run controller functionality scope.findOne(); $httpBackend.flush(); // Test scope value expect(scope.speaker).toEqualData(sampleSpeaker); })); - The third
it()function is used to create a speaker:it('$scope.create() with valid form data should send a POST request with the form input values and then locate to new object URL', inject(function(Speakers) { // Create a sample Speaker object var sampleSpeakerPostData = new Speakers({ name: 'New Speaker', title: 'Title Test', description: 'Description Test', email: '[email protected]', schedule: '11:00' }); // Create a sample Speaker response var sampleSpeakerResponse = new Speakers({ _id: '525cf20451979dea2c000001', name: 'New Speaker', title: 'Title Test', description: 'Description Test', email: '[email protected]', schedule: '11:00' }); - Add the properties, namely,
title,description,email, andscheduleto thesampleSpeakerPostDataobject andsampleSpeakerResponseobject like the previous highlighted code:// Fixture mock form input values scope.name = 'New Speaker'; scope.title = 'Title Test'; scope.description = 'Description Test'; scope.email = '[email protected]'; scope.schedule = '11:00'
- Add the properties, namely,
title,description,email, andscheduleto the fixture mock form like the previous highlighted code:// Set POST response $httpBackend.expectPOST('speakers', sampleSpeakerPostData).respond(sampleSpeakerResponse); // Run controller functionality scope.create(); $httpBackend.flush(); // Test form inputs are reset expect(scope.name).toEqual(''), // Test URL redirection after the Speaker was created expect($location.path()).toBe('/speakers/' + sampleSpeakerResponse._id); }));
Until now, we have configured three it() functions to test speakers to get speakers, get speakers by id, and create methods to perform the CRUD operations. We need one function to test update a speaker, and another function to remove a speaker. Let's continue with the following steps:
- The next test is to update an user, using the following code:
it('$scope.update() should update a valid Speaker', inject(function(Speakers) { // Define a sample Speaker put data var sampleSpeakerPutData = new Speakers({ _id: '525cf20451979dea2c000001', name: 'New Speaker', title: 'Update the Text', description: 'Update the Description', email: '[email protected]', schedule: '10:00' }); - Add the properties, namely,
title,description,email, andscheduleto thesampleSpeakerPutDataobject like the previous highlighted code:// Mock Speaker in scope scope.speaker = sampleSpeakerPutData; // Set PUT response $httpBackend.expectPUT(/speakers/([0-9a-fA-F]{24})$/).respond(); // Run controller functionality scope.update(); $httpBackend.flush(); // Test URL location to new object expect($location.path()).toBe('/speakers/' + sampleSpeakerPutData._id); })); - The last
it()function is used to remove a speaker:it('$scope.remove() should send a DELETE request with a valid speakerId and remove the Speaker from the scope', inject(function(Speakers) { // Create new Speaker object var sampleSpeaker = new Speakers({ _id: '525a8422f6d0f87f0e407a33' }); // Create new Speakers array and include the Speaker scope.speakers = [sampleSpeaker]; // Set expected DELETE response $httpBackend.expectDELETE(/speakers/([0-9a-fA-F]{24})$/).respond(204); // Run controller functionality scope.remove(sampleSpeaker); $httpBackend.flush(); // Test array after successful delete expect(scope.speakers.length).toBe(0); }));
At this point, we have already reviewed all the necessary functions to test the CRUD operations from the speaker controller. Also, we added the missing code to test all the properties that were added in the previous chapter, where we created the new speaker controller.
As we are using the MEAN.JS generator, we don't need to write the tests to the other controllers: articles, core, and users. Don't worry; the procedure applied to the speaker controller is the same as these files. Now, let's see how to run these tests with Karma.
Again, note that due to the use of the MEAN.JS generator, we do not need to configure the task to run Karma; we just need to trigger the Grunt.js task to do the job for us. Perform the following steps:
- Open your terminal in the project root folder and type the following command:
grunt test - As we are using the
grunt-karmaplugin, we just need the following code to write the Karma task onGruntfile:karma: { unit: { configFile: 'karma.conf.js' } }, - You should run the command line to start MongoDB. Although we are using the Compose.io platform to run the test, we need a local instance of the database since we are testing the sample application. Here is a screenshot from the terminal after all the tests pass:
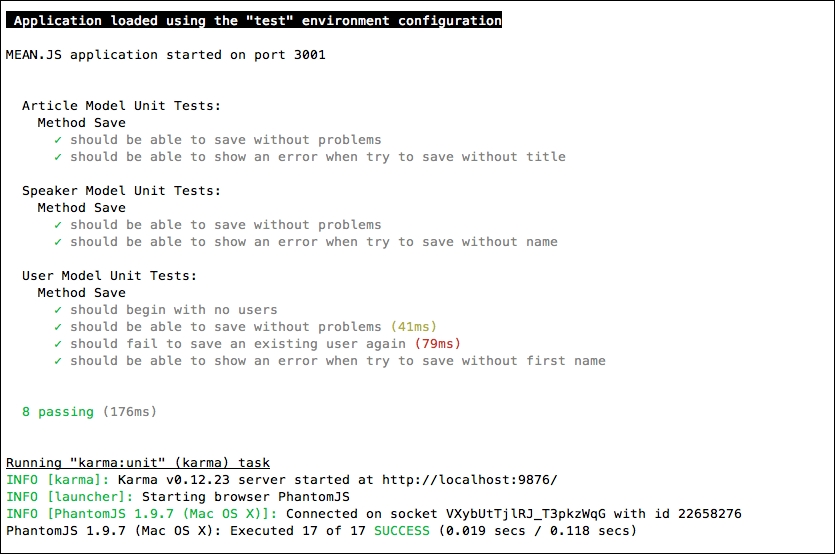
We can see that all the tests were successful, but we also note that eight tests that were successfully performed are on the API, and our tests are executed in the karma task: unit.
This is because the Grunt.js task performs all the tests configured in the Gruntfile.js file. So, let's see what we need to accomplish the unit tests on the speaker model.
Add the following lines of code to perform the model tests:
- Open the file
speaker.server.model.test.jsin theapp/tests/folder. Let's review the existing code and add some necessary lines of code to perform the tests:'use strict'; /** * Module dependencies. */ var should = require('should'), mongoose = require('mongoose'), User = mongoose.model('User'), Speaker = mongoose.model('Speaker'), /** * Globals */ var user, speaker; /** * Unit tests */As we discussed before, the
describe()function receives the test name as the first parameter, and the test itself is the second parameter. Here, we have abeforeEachfunction to create a user object and assign some default values in the following code:describe('Speaker Model Unit Tests:', function() { beforeEach(function(done) { user = new User({ firstName: 'Full', lastName: 'Name', displayName: 'Full Name', email: '[email protected]', username: 'username', password: 'password' }); user.save(function() { speaker = new Speaker({ name: 'Speaker Name', title: 'Track Title', decription: 'description of the speaker track', email: '[email protected]', schedule: '9:10', user: user }); done(); }); }); - Add the previous highlighted properties to the
save()function, as shown in the following code:describe('Method Save', function() { it('should be able to save without problems', function(done) { return speaker.save(function(err) { should.not.exist(err); done(); }); }); it('should be able to show an error when try to save without name', function(done) { speaker.name = ''; return speaker.save(function(err) { should.exist(err); done(); }); }); }); afterEach(function(done) { Speaker.remove().exec(); User.remove().exec(); done(); }); });
Note that we continue using the same Jasmine syntax as the previous tests to write the API tests. So, when we test the speakers' controller, we are inside the public folder, and when we test the speakers' model, we are inside the app folder, which covers tests in the frontend and backend code.
You can find the grunt-mocha test in the following code, which is extracted from the gruntfile.js file on the root application folder:
mochaTest: {
  src: watchFiles.mochaTests,
  options: {
    reporter: 'spec',
    require: 'server.js'
  }
},
The watchFiles.mochaTests property is the path to app/tests/**/*.js.
Tip
More information about Mocha can be found at http://mochajs.org/.
For information about grunt-mocha, refer to https://github.com/kmiyashiro/grunt-mocha.
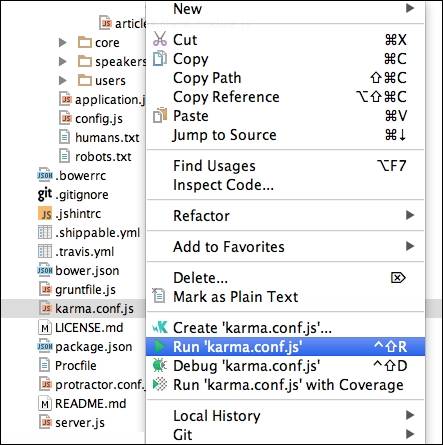
As we mentioned earlier, the WebStorm IDE provides support for several programming languages and frameworks, including tests that uses the Karma framework. To use this feature, simply right-click on the file karma.conf.js, and then select Run 'karma.conf.js' from the context menu, as shown in the following screenshot:
As we can see in the preceding screenshot, it is possible to run the tests using a Coverage option. Therefore, we need to make a small change in the Karma configuration file. Perform the following steps:
- Open the
karma.conf.jsfile from the root project folder. - Change the following highlighted code to use
coverageinstead ofprogress:// Test results reporter to use // Possible values: 'dots', 'progress', 'junit', 'growl', 'coverage' //reporters: ['progress'], reporters: ['coverage'],
- Right-click on karma.conf.js and select Run 'karma.conf.js' with Coverage.
The result of the tests can be found in the following screenshot:
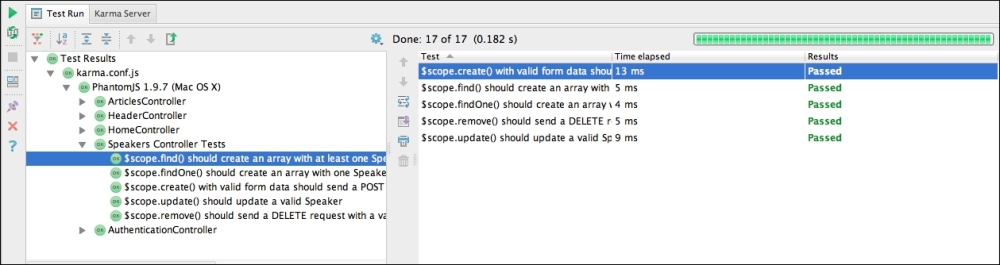
On the left panel, we can see the test cases for each controller, whereas on the right panel, we can see the test progress.
Talking about testing as a subject will require another book, since the scope of this book does not allow us to get into the details about the different frameworks for testing. However, what is described in this chapter is sufficient to begin the tests on SPA.