
This chapter will devote time and attention to refactoring and building the web application.
Nowadays, the workflow for a frontend developer can be very tricky if you do not use the right tools, and here in this book we will use some of the most important modern tools for fast and simple development.
At first glance, everything seems too complicated; we must remember that our choices lead us to different paths and that there is more than one way to develop an application. Nothing is better than practicing in order to choose the best way that will be useful to you.
In this chapter, we'll see some very interesting stuff such as the frontend dependencies manager known as Bower, how to start an application from scratch using the Express generator, adding secure authentication with Passport, and much, much more. The topics we will cover are:
- Rebuilding the API
- Adding the Passport middleware
- Dealing with routes
- Templates with Embedded JavaScript
- Bower leading frontend dependencies
- Pure CSS and Responsive Boilerplate for the frontend style
The rebuilding process is divided into two parts: the first to have a solid base structure of directories and the second to add some more folders and files with the purpose of making our application as modular and scalable as possible.
To start with, we will create a new folder called conference-api. Going forward, we will refer to this folder only as the root folder. So, you already know that we are referring to the application root directory. The first thing to do is start the Express scaffold generator; to do this open the terminal on the root folder and type:
express --ejs
The ejs option stands for Embedded JavaScript (EJS), and with this command, we change the standard library Jade to ejs for the views' templates.
Tip
You can read more about Embedded JavaScript at http://www.embeddedjs.com/.
At this stage, you must have the following default scaffold, as shown in the following screenshot:
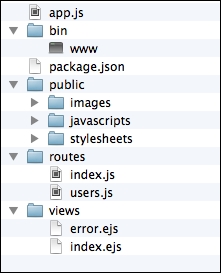
As we saw in the previous chapter and in the previous screenshot, the generator creates a bin folder. In this folder, we have a file called www; this file is responsible for running the server for the application. However, instead of using the default command, npm start, on each time we need to execute the server to test and develop the application. We will make some changes on how to start the server. To do this, follow these steps:
- Delete the
binfolder. - Open the
app.jsfile on the root folder and place the following code at the end of the file:app.set('port', process.env.PORT || 3000); var server = app.listen(app.get('port'), function() { console.log('Express server listening on port ' + server.address().port); }); - Rename the file
app.jstoserver.js.
Now, let's check the result of these changes and start the server using the following command on your terminal:
node server
You will see the Express server listening on port 3000 message on your terminal. This means that if you open your browser and type http: // localhost: 3000, you will see a welcome message from the Express framework.
The node server command is the most common command to initialize a Node.js application.
To stop the server, press Ctrl + C.
Now, let's make some changes in the directory structure. Our aim is to prepare the application for a division of responsibilities, creating a directory named server that will contain all the application backend code; to be more specific, the API code.
Let's use the following steps to change the directory structure:
- In the root folder, create a new folder and name it
server. - Move the
routesandviewsfolders to the newly createdserverfolder. We still need to accomplish an important task. When changing directories, it also is necessary to change some paths for theviewsandroutesfolders within theserver.jsfile. - Open the
server.jsfile, and update the route path inside therequire()function from theroutesandusersvariables; your code must look like this:// Setup Routes var routes = require('./server/routes/index'), var users = require('./server/routes/users'), - Open the
server.jsfile, go to theview engine setupcommented line, and change to the following code:// view engine setup app.set('views', path.join(__dirname, 'server/views')); - Now, let's check whether everything went as expected up to here; type the following command:
node server.js - Open your browser and go to
http://localhost:3000.
If successful, we will see the home page of our application with the welcome message from the Express framework again.
One of the advantages of using the Express generator is that it comes with all the basic modules configured to run our application, avoiding writing many lines of code. With only this small change, you already have in hand a solid scaffold to start developing applications with Node and the Express framework.
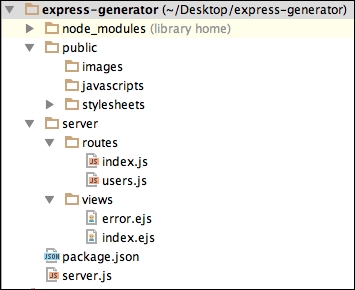
Our folder will look like the following screenshot:
Let's perform a few more steps to accomplish the modularization of our application. Here, we will create two directories; one to store the configuration file and another to store the application's models for the backend by performing the following steps:
- Add a new folder called
configto theserverfolder. - Add a new folder called
modelsto theserverfolder. - Right now, we need to add the
speaker.jsmodel file to themodelsfolders andspeakers routeto theroutesfolder. As we have already created these files in the previous chapter, you can just copy them and insert them into each folder. Thespeaker.jsmodel file looks like the following:var mongoose = require('mongoose'), var Schema = mongoose.Schema; var SpeakerSchema = new Schema({ name: { type: String, default: '' }, company: { type: String, default: '' }, title: { type: String, default: '' }, description: { type: String, default: '' }, picture: { type: String, default: '' }, schedule: { type: String, default: '' }, createdOn: { type: Date, default: Date.now} }); module.exports = mongoose.model('Speaker', SpeakerSchema); The speakers.js route code: var express = require('express'), var router = express.Router(); // Import Speakers Model var Speaker = require('../models/speaker'), /* GET all users. */ router.get('/', function(req, res) { //res.json({ message: 'Hello SPA, the API is working!' }); Speaker.find(function(err, speakers) { if (err) res.send(err); res.json(speakers); }); }); /* GET specific users by id. */ router.get('/:speaker_id', function(req, res) { Speaker.findById(req.params.speaker_id, function(err, speaker) { if (err) res.send(err); res.json(speaker); }); }); /* PUT users */ router.post('/', function(req, res) { // create a new instance of the Speaker model var speaker = new Speaker(); // set the speakers properties (comes from the request) speaker.name = req.body.name; speaker.company = req.body.company; speaker.title = req.body.title; speaker.description = req.body.description; speaker.picture = req.body.picture; speaker.schedule = req.body.schedule; // save the data received speaker.save(function(err) { if (err) res.send(err); // give some success message res.json({ message: 'speaker successfully created!' }); }); }); /* UPDATE specific users by id. */ router.put('/:speaker_id', function(req, res) { Speaker.findById(req.params.speaker_id, function(err,speaker) { if (err) res.send(err); // set the speakers properties (comes from the request) speaker.name = req.body.name; speaker.company = req.body.company; speaker.title = req.body.title; speaker.description = req.body.description; speaker.picture = req.body.picture; speaker.schedule = req.body.schedule; // save the data received speaker.save(function(err) { if (err) res.send(err); // give some success message res.json({ message: 'speaker successfullyupdated!' }); }); }); }); /* DELETE specific users by id. */ router.delete('/:speaker_id', function(req, res) { Speaker.remove({ _id: req.params.speaker_id }, function(err, speaker) { if (err) res.send(err); // give some success message res.json({ message: 'speaker successfullydeleted!'}); }); }); // Exports all the routes to router variable module.exports = router;Remember, every time you add a new route file, you must set up the routes on the
server.jsfile. - Add the path to the
speakers.jsroute on theserver.jsfile after the routes setup, as shown here:// Setup Routes var routes = require('./server/routes/index'), var users = require('./server/routes/users'), var speakers = require('./server/routes/speakers'),Without this action, the application won't initialize the route and we won't be able to use it later. Now, the last action to perform in this section is to tell the application to use the route.
- Add the highlighted code to the end of the
app.use()function, as shown in the following code:app.use('/', routes); app.use('/users', users); app.use('/api/speakers', speakers);
In this section, we will add a database configuration to the server.js file.
- Create a new file inside the
configfolder and name itconfig.js. - Place the following code in the
config.jsfile:// Database URL module.exports = { // Uncomment to connect with MongoDB on Cloud // 'url' : 'mongodb://username:[email protected]:10073/node-api' 'url' : 'localhost/conferenceDB' }; - Open the
server.jsfile and add the database connection after the routes setup:// Database configuration var config = require('./server/config/config.js'), // connect to our database mongoose.connect(config.url);Another important step is to add some friendly warning message if the connection fails for some reason.
- Add the following code right after
mongoose.connect(config.url):// Check if MongoDB is running mongoose.connection.on('error', function() { console.error('MongoDB Connection Error. Make sureMongoDB is running.'), });Note that we have a
mongoose.connectfunction already used in the previous chapter. However, here we need to install this dependency and add it to theserver.jsfile, as we are starting from scratch using the Express generator. - Open your terminal and type the following command:
npm install mongoose --saveThe
--saveoption will add the Mongoose dependency to ourpackage.jsonfile.To use the Mongoose middleware, we need to import it to the
server.jsfile. - Add the following highlighted code to the
server.jsfile.var express = require('express'), var path = require('path'), var favicon = require('static-favicon'), var logger = require('morgan'), var cookieParser = require('cookie-parser'), var bodyParser = require('body-parser'), var mongoose = require('mongoose'),
Now, the first stage is complete using the Express generator. To check whether everything went well, let's start the server and check the http://localhost:3000/api/speakers URL on the browser.
As you can see, we get an empty page; this is because we didn't add any data to MongoDB at this stage. However, if you check your terminal window, you will have the GET /api/speakers 200 xxms - 2b message. This indicates that the request was successful.