
The first thing we notice when we look at the previous example is the presence of the np-app tag; this is known as directives, and in this specific example, it serves to tell AngularJS that all code contained within the body tag is an AngularJS application, as we mentioned before.
After this, we have ng-controller; as the name mentions, here we declare which controller will act on a certain region of HTML, and ng-repeat is something like a built-in loop over arrays. For simplicity, the tags, ng-app, ng-controller, and ng-repeat, are the AngularJS directives; there are many others as well.
To simplify, ng-atributtes (such as ng-app, ng-bind, ng-show, and ng-hide) are built-in directives of the framework; we can also create custom directives.
Tip
More information about Angular directives can be found at https://docs.angularjs.org/api/ng/directive.
Directives serve to extend the grammar of HTML and are simple statements but have powerful and flexible features. In addition to the existing directives, we can create four types of directives:
The following are the four ways to create a custom directive:
|
Restrict |
Markup |
|---|---|
|
|
<span ng-directivename></span> |
|
|
<ng-directivename></ng-directivename> |
|
|
<span class="ng-directivename"></span> |
|
|
<!-- directive: ng- directivename--> |
The base code for a custom directive is as follows:
app.directive('ngDirectivename', function() {
  return {
    restrict: 'A',
    // Doing your Directive code here
  }
});
Note that we created an element directive with the keyword 'A' and invoke/use it in HTML as follows:
<div ng-Directivename></div>
Here's an example in practice, a basic element directive:
myAngularApp = angular.module("myAngularApp", []);

myAngularApp.directive('div', function() {
  var directive = {};

  // Restrict directive to html elements
  directive.restrict = 'E';

  // Set a basic template
  directive.template = "My Angular directive: {{ someTextGoesHere}}";

  return directive;
});
The first parameter to the directive() function is the directive name. This name will use the HTML template to activate the directive. The second parameter passed to the directive() function is a factory function. This function returns the directive definition when invoked.
The directive.template property will replace the {{ someTextGoesHere }} expression for the controller property, $scope.someTextGoesHere, as shown in the following example:
<div ng-controller="MyAngularController" >
  <directivename >This will be replaced for the Controllers $scopecontent</directivename>
</div>

<script>
  myAngularApp = angular.module("myAngularApp", []);
  // Creating the Directive
  myAngularApp.directive('directivename', function() {
    var directive = {};

    // Applying only to HTML elements
    directive.restrict = 'E';

    // Set a basic template
    directive.template = "My Angular directive: {{someTextGoesHere }}";

    return directive;
  });

  // Setup a Controller
  myAngularApp.controller("MyAngularController", function($scope) {
    $scope.someTextGoesHere = "My first Directive is working";

  });
</script>
Finally, when the code is rendered, we will have the My first Directive is working string.
As mentioned before, the double brackets in {{ someTextGoesHere }} are AngularJS expressions, and finally in our MyAngularController directive, we can see the scope again.
$scope is a kind of link between Controller and View, and each controller has its own scope. Note that we used $scope in two ways: directly in the variable, as we saw in the previous example, and assigning to a variable. The most common way is $scope.name = {}. Here is a diagram to illustrate the Angular diagram of scope:
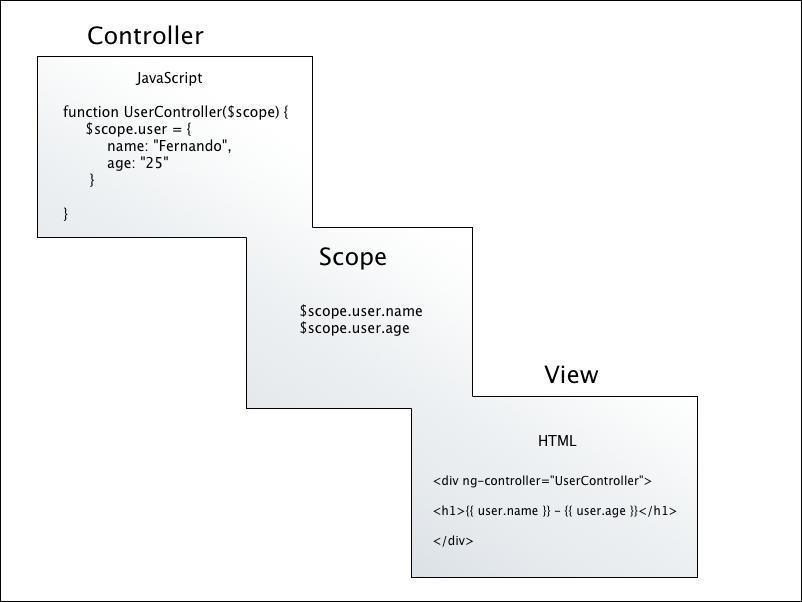
In the preceding figure, we note that the behavior of $scope interacts between the Controller and the View, acting like a ViewModel.