
Protractor is a framework of functional tests for AngularJS applications. It serves as an integrated solution that combines powerful tools and technologies, such as Node.js, Selenium WebDriver, Jasmine, Cucumber, and Mocha.
Tip
You can find more information about Protractor at https://github.com/angular/protractor. Jasmine is also compatible with Protractor because all the resources that are extracted from the browser to perform the tests are promises. Also, the expect() function of Jasmine internally handles these promises and makes it seem transparent validations tests.
However, the MEAN.JS generator does not have Protractor in its default installation. So, let's add the necessary dependencies to begin the test with this powerful framework. Perform the following steps:
- Open your terminal in the root project folder and type the following command:
npm install protractor –save-dev - In the
grunt-protractor-runnerfolder, open thenode_modules/protractor/bin/webdriver-managerfile in your terminal and type the following command:update
Now, let's create a Protractor configuration file in the root project folder using the following steps:
- Add the
protractor.conf.jsfile and place the following code; this is a good boilerplate to start working with Protractor on your AngularJS projects:// Protractor configuration // https://github.com/angular/protractor/blob/master/referenceConf.js 'use strict'; exports.config = { // The timeout for each script run on the browser.This should be longer // than the maximum time your application needs to stabilize between tasks. allScriptsTimeout: 110000, /** * Use `seleniumAddress` for faster startup; run `./node_modules/.bin/webdriver-manager start` to launch the Selenium server. * Use `seleniumPort` to let Protractor manage its own Selenium server instance (using the server JAR in its default location). */ seleniumAddress: 'http://localhost:4444/wd/hub', // seleniumPort: 4444, // A base URL for your application under test. Calls toprotractor.get() // with relative paths will be prepended with this. baseUrl: 'http://localhost:' + (process.env.PORT || '3000'), // If true, only chromedriver will be started, not a standalone selenium. // Tests for browsers other than chrome will not run. chromeOnly: false, //chromeDriver: 'node_modules/grunt-protractor-runner/node_modules/protractor/node_modules/selenium-webdriver/chromedriver', // list of files / patterns to load in the browser specs: [ 'e2e/**/*.spec.js' ], // Patterns to exclude. exclude: [], // ----- Capabilities to be passed to the webdriver instance ---- // // For a full list of available capabilities, see // https://code.google.com/p/selenium/wiki/DesiredCapabilities // and // https://code.google.com/p/selenium/source/browse/javascript/webdriver/capabilities.js capabilities: { 'browserName': 'chrome' }, // ----- The test framework ----- // // Jasmine and Cucumber are fully supported as a test and assertion framework. // Mocha has limited beta support. You will need to include your own // assertion framework if working with mocha. framework: 'jasmine', // ----- Options to be passed to minijasminenode ----- // // See the full list at https://github.com/juliemr/minijasminenode jasmineNodeOpts: { defaultTimeoutInterval: 30000 } };As a very well-documented file, we don't need deep analysis of every line, but the highlighted code has some important information about the
SeleniumAddressinstance generated, when we run thewebdrivermanager later in the chapter. - Let's add the
protractortask to ourGruntfile; just add the following line right after the Karma task:protractor: { options: { configFile: 'protractor.conf.js' }, chrome: { options: { args: { browser: 'chrome' } } } } - Add the following code right after the build task at the end in the
Gruntfile.jsfile:// Test task. grunt.registerTask('test', ['env:test', 'mochaTest','karma:unit', 'protractor']);
The initial setup is done, but we need to create the test files. Let's see what we need to do now.
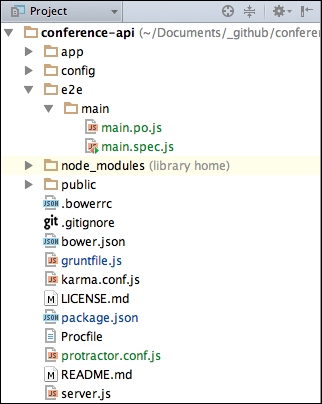
Let's add the e2e test folder to the root project. Perform the following steps:
- Add an
e2efolder to the root application folder. - Add a
mainfolder inside thee2efolder. - Add a blank file called
main.po.js. - Add another blank file called
main.spec.js.
The e2e directory tests should be similar to the following screenshot:
Now, let's add content to the main.po.js and main.spec.js files using the following steps:
- Open the
main.po.jsfile from thee2e/mainfolder and add the following lines of code:'use strict'; var MainPage = function() { // Get UI elements to test this.heroEl = element(by.css('.jumbotron')); this.h1El = this.heroEl.element(by.css('h1')); this.anchorEl = this.heroEl.element(by.css('a')); this.repeater = by.repeater('speaker in speakers'), this.speakerListCount = element.all(this.repeater).count(); }; module.exports = new MainPage();Here, we just get some UI elements and a loop on the speaker object using the
repeaterfeature.Tip
More information about the Protractor API and the repeater method can be found at http://angular.github.io/protractor/#/api?view=ProtractorBy.prototype.repeater.
- Now, let's add content to
main.spec.jsfrom thee2e/mainfolder. Copy the following code and place it in themain.spec.jsfile:'use strict'; describe('Main View', function() { var page; beforeEach(function() { browser.get('/'), page = require('./main.po'), }); // First test it('should include conference name with call to action', function() { // First Assertion - expect a text equal Conference expect(page.h1El.getText()).toBe('Conference'), // Second Assertion - expect a anchor tag with Call for Papers text expect(page.anchorEl.getText()).toBe('Call for Papers'), // Third Assertion - expect the url from Call for Papers link expect(page.anchorEl.getAttribute('href')).toBe('http://localhost:3000/#!/signup'), }); // Second test it('should render speakerList', function() { // First Assertion - expect a speaker list with 6 speakers page.speakerListCount.then(function(count) { expect(count).toBe(6); }); }); });
Again, the code comments provide a necessary understanding for us to proceed with testing. Note that the UI elements captured in main.po.js are present here and each one has an expected behavior. The tests are simple and have enough information for large-scale SPA testing.
Well, we have already seen all the necessary steps to configure the Protractor test environment. Let's just start with the Selenium server and run tests. Perform the following steps:
- Open the terminal and go to the path:
grunt-protractor-runner/node_modules/protractor/bin/and type the following command:webdriver-manager startThe command will start the Selenium server, and we are ready to start the tests. It's very important to run the application before proceeding with e2e testing! Don't forget to run the server.
- Open the terminal in the root folder and type the following code:
node server - In the terminal, type the following command to start the tests:
grunt protractor
After running the tests, we can see the result on the terminal:
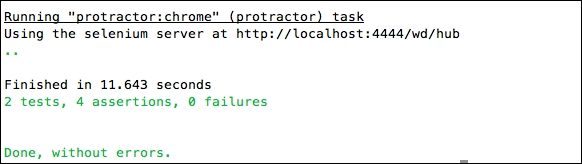
Note that the tests were performed in the Chrome browser, as we configured the Grunt task in Chrome.
Let's add another browser to Gruntfile.js using the following steps:
- Add the following highlighted code to the
protractortask ingruntfile.js:protractor: { options: { configFile: 'protractor.conf.js' }, chrome: { options: { args: { browser: 'chrome' } } }, safari: { options: { args: { browser: 'safari' } } } } - Run the test again and let's see the result.
- In the terminal, type the following command to start the tests:
grunt protractor
The following screenshot illustrates the final result that runs the tests on two browsers:
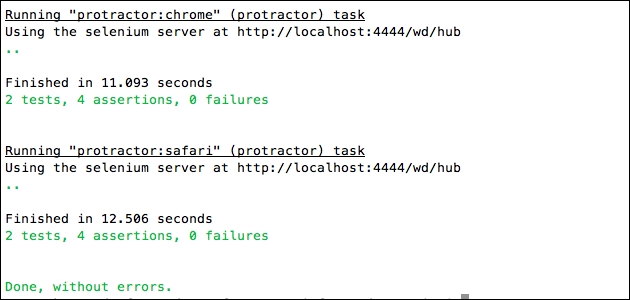
The framework will test each browser configured in the Gruntfile.js file. However, remember that you need to have the browser installed on your workstation to perform the tests.
As you can see, the browser opens quickly, runs the test, and closes.