
We now have a working Android development environment, and we have built and deployed our first app. It is obvious, however, that autogenerated code by Android Studio is not going to make the next top-selling app on Google Play. We need to explore this autogenerated code in order to understand Android and then begin to build on this useful template. With this aim in mind, in this chapter, we will do the following:
First, let's see how to find out whether things are going wrong.
In the previous chapter, we mentioned that our app was running in a debug mode so we could monitor it and get feedback when things go wrong. So, where is all this feedback then?
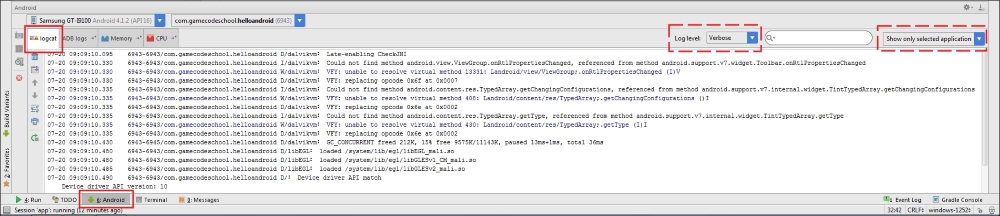
You might have noticed a whole load of scrolling text at the bottom of the Android Studio window. If not, click on the Android tab at the bottom-left corner of the screen and then make sure that the logcat tab is selected as well, as indicated by the areas highlighted in solid red in the next figure (the dashed red areas will be discussed in a moment):
You can drag the window to make it taller, just like you can in most other Windows applications.
This is called the logcat or sometimes, it is referred to as the console. It is our app's way of telling us what is going on underneath what the user sees. If the app crashes, the reason or clues about the reason will appear here. If we need to output debugging information, we can do so here as well.
You might have noticed that most, if not all, of the contents is fairly unintelligible. That's OK. At the moment, we are only interested in the errors that will be highlighted in red and the debugging information, which you will learn about next. If we want to see less unneeded text in our logcat window, we can turn on a filter.
In the previous figure, I highlighted two areas with dashed red lines. One of them is the drop-down list that controls this filter. Click on it now and change it from Verbose to Info. We have cut down the text output significantly. We will see how this is useful when we have made some changes to our app and redeployed it. We will do this after we have explored the code and the assets that make up our project. Also, double-check the second red-dashed highlighted area if it says Show only the selected application. If it doesn't, click on it and change it to this now.
Now, we can take a look at what Android Studio automatically generated for us, and then, we can set about changing it to personalize it beyond what we got from the project creation phase.
We are going to take a look at the resource files that contain the code that defines our simple UI layout, and the file that contains our Java code. At this stage, we will not attempt to understand it all, as you need to learn more before it makes sense to do so. What we will see, however, is the basic content and structure of both the files so that we can reconcile it with what we already know about Android resources and Java.
Let's look at the Java code first. You can see this code for real by clicking on the MyActivity.java tab, which is shown in the next figure:

As we are not looking at the details of the code, an annotated screenshot is probably more useful than reproducing the actual code in the text form. Refer to the next figure while reading on. I've labeled key parts of the code here to explain it further:
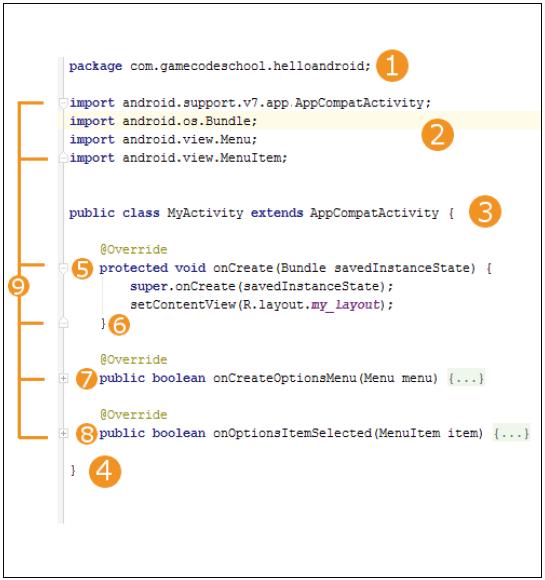
Let's get to understand this code a bit better. The first thing to point out is the part labeled as 9. This points to all the little + and - buttons in the editor that can collapse and expand parts of the code. I have indeed collapsed two parts of the code: parts 7 and 8. I have done so because they are not of interest to us at the moment and provide none of the functionality we are discussing. So, what you can see here is probably slightly different than what you will see when you look at the code in Android Studio directly.
The part labeled as 1 is called the package declaration, and as you can see, it contains the package name that we chose when we created the project. Every Java file will have a package declaration at the top of the code.
The part labeled as 2 is four lines of code that all begin with the word import. After the word import, we can see that there are various dot-separated words. The last word of each line is the name of the class that the line imports into our project, and all the previous words are the packages and subpackages that contain these classes. This means that in our project, we will have access to AppCompatActivity, Bundle, Menu, and MenuItem. We will not discuss all of these classes immediately, just the concept of importing, which is important right now. Note that we can add extra classes from any package at any time, and we will when we improve upon our app shortly.
The part labeled as 3 of our code is called the class declaration. Here is that line in full. I have highlighted one part of it here:
public class MyActivity extends AppCompatActivity {The class declaration is the start of a class. Take a note of the highlighted part. Here, MyActivity is the name we've chosen when we created the project, and it is also the same as the MyActivity.java filename, as we would expect it to be, having discussed Java classes previously. The extends keyword means that our class called MyActivity will be of the type AppCompatActivity. We can, and will, use some classes without this extends part.
We use extends here because we want to use all the code that went into the AppCompatActivity class as well as add our own code to it as well. So we extend it. All this and more will become clear in Chapter 9, Object-Oriented Programming.
Finally, for the part labeled as 2, look at the opening curly brace at the end of the line: {. Now look at the bottom of the figure at the part labeled as 4 of our code. This closing curly brace } denotes the end of the class. Everything in between the opening and closing curly braces, {...}, is part of the class.
Now look at the part labeled as 5 of the code. Here is that line of code in full, including the key part for our discussion at the moment, which is highlighted as shown:
protected void onCreate(Bundle savedInstanceState) {This is a method
signature. The highlighted part, onCreate, is the method name. We make a method execute its code by using its name. We say we are calling a method when we do this. Although we will not concern ourselves at the moment with the parts of the code on either side of the method name, you might have noticed Bundle, one of the classes we import at the part labeled as 2 of our code. If we remove this import line, Android Studio would not know what Bundle was, and it would be unusable and indicated in a red underline as an error. Our code would not compile and run. Note that the very last thing in the line of the preceding code is an opening curly brace {. This denotes the start of the code that is contained within the onCreate method. Now, jump to the part labeled as 6 of our code and you will see a closing curly brace }. You can probably guess this is the end of the method.
The parts labeled as 7 and 8 are also methods that I have collapsed to make the figure and this discussion more straightforward. Their names are onCreateOptionsMenu and onOptionsItemSelected.
We know enough about our Java code to make some progress. We will see this code for real and change it in the Improving our app and deploying again section.
Now we will look at just one of the many .xml files. The following is the my_layout.xml file that contains the XML code that defines the UI design of our app. If you want to view this code for real, just click on the my_layout.xml tab next to the MyActivity.java tab that we clicked on to find the Java code:
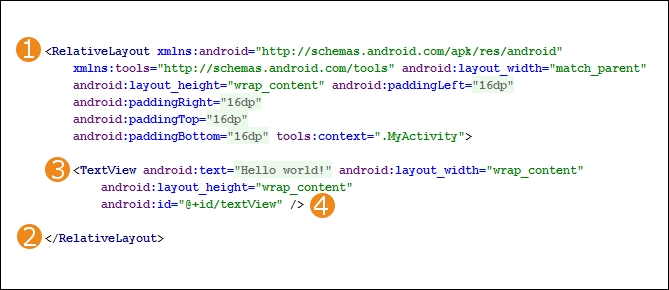
If we first look at the part of the code labeled as 1, we can see that the very first thing is <RelativeLayout.... A RelativeLayout tag is a UI element that is used to wrap other parts of the UI.
When we add a new element to a UI in Android, we always start with < followed by the element's name. The code that follows defines the properties that this element will have. This can include dozens of different things depending upon the type of UI element it is. Here, among a bit of other XML code, we can see properties such as layout_height, paddingRight, paddingTop, and paddingBottom. All these properties define how RelativeLayout will appear on the user's screen. The properties for RelativeLayout end at the first > symbol.
If we look at the bottom of our XML figure, we will see the code labeled as 2. This code, </RelativeLayout>, marks the end of RelativeLayout. Anything in between the closing > symbol of the element's properties and </RelativeLayout>, which defines its end, is considered a
child of the element. So, we can see that RelativeLayout has/contains a child. Let's look at that child now.
Using what you just learned, we can devise that the UI element that starts at the position labeled as 3 in the figure is called TextView. Just like its parent, the tag starts with < and its name is <TextView.... If we look further at TextView, we can see that it has a number of properties. It has a text property that is set to "Hello world!". This, of course, is the exact text that our app shows to the user. It also has the layout_width and layout_height properties that are both set to "wrap_content". This tells TextView that it can take up as much space as the content it contains needs. As we will see throughout the book, there are many more properties available for this and other UI elements. The final property in TextView is id, and we will see how we and Android use the id property in the next section when we improve our first app.
Note that the code at the part labeled as 4 in our XML figure is />. This marks the end of the TextView element. This is slightly different to how the end of RelativeLayout was written. When an element in XML contains no children, we can just end it like this />. When the element contains children and its end comes further on in the code from where its properties are defined, it is much clearer to end the element by repeating its name, as </RelativeLayout>.
We will see this code for real in the next section and learn more about the properties, as well as see a totally new type of UI element: Button.