
In this chapter, we will indeed see that everything's a class. By the end of this chapter, the missing link between Java and our XML layouts will be fully revealed, leaving us with the power to add all kinds of widgets to our apps.
Here, you will learn about the following topics:
- Android UI elements as classes
- Garbage collection
- Our UI on the heap
- Special types of a class that includes inner and anonymous
So, what do I mean by everything's a class?
When our app is run and the setContentView method is called from onCreate, the layout is inflated from XML UI classes and loaded into memory as usable objects. They are stored in a part of the DVM memory called the heap.
However, where are all these UI objects/classes? We certainly can't see them in our code. And how on earth do we get our hands on them?
The DVM inside every Android device takes care of memory allocation to our apps. In addition, it stores different types of variables in different places.
Variables that we declare and initialize in methods are stored in the area of memory that is known as the stack. We can stick to our existing warehouse analogy when talking about the stack—almost. We already know how we can manipulate variables on the stack. So, let's talk about the heap and what is stored there.
Think of the heap as a separate area of the same warehouse. The heap has lots of floor space for odd-shaped objects, racks for smaller objects, lots of long rows with small-sized cubby holes, and so on. This is where objects are stored. The problem is we have no direct access to the heap. Let's look at what exactly a reference variable is.
It is a variable that we refer to and use via a reference. A reference can be loosely, but usefully, defined as an address or a location. The reference (address or location) of the object is on the stack. So, when we use the dot operator, we are asking Dalvik to perform a task at a specific location, a location that is stored in the reference.
Why, oh why would we ever want a system like this? Just give me my objects on the Stack already. Here is why.
This is what the whole stack and heap thing does for us. As we know, the DVM keeps track of all our objects for us and stores them in a special area of our warehouse called the heap. Regularly, while our app is running, the DVM will scan the stack, the regular racks of our warehouse, and match up references to objects that are on the heap. And it destroys any objects that it finds without a matching reference. Or in Java terminology, it collects garbage.
Think of a very discriminating refuse vehicle driving through the middle of our heap, scanning objects to match up references (on the stack). No reference, you're garbage now. After all, if an object has no reference variable, we can't possibly do anything with it anyway because we have no way to access it. This system of garbage collection helps our apps run more efficiently by freeing up unused memory.
If this task was left to us, our apps would be much more complicated to code.
So, the variables declared in a method are local, on the stack, and only visible within the method they were declared in. A member variable (in an object) is on the heap and can be referenced from anywhere there is a reference to it and from anywhere that the access specification (encapsulation) allows.
Let's take a quick look at what you learned about a stack and heap:
- You don't delete objects, but the VM sends the garbage collector when it thinks it's appropriate. This is usually when there is no active reference to the object.
- Local variables and methods are on the stack, and the local variables are local to the specific method within which they were declared.
- Instance/class variables are on the heap (with their objects), but the reference to the object, the address, is a local variable on the stack.
- We control what goes onto the stack. We can use the objects on the heap, but only by referencing them.
- The heap is maintained by the garbage collector.
- An object is garbage collected when there is no longer a valid reference to it. So, when a reference variable, either local or instance, is removed from the stack, then its related object becomes viable for garbage collection. And when the DVM decides the time is right (usually very promptly), it will free up the RAM memory to avoid running out of memory.
- If we try to reference an object that doesn't exist, we will get a
NullPointerExceptionerror and the app will crash.
Any UI element that has its id property set can have its reference retrieved from the heap using the findViewById method, which is part of the Activity, the AppCompatActivity class. As it is part of the class that we extend, we have access to it:
myButton = (Button) findViewById(R.id.myButton);
The preceding code assumes that myButton has been declared previously to an appropriate type; in this case, Button. Also, the preceding code assumes that within the XML layout, there is a button with an ID property set to myButton.
Note that findViewById is also polymorphic. We know this because we use a cast, (Button), to be explicit about making the returned object Button from its View parent type, just like we did with our object of the type Elephant with the feed method in the last chapter.
This is quite exciting because it implies that we can grab a reference to a whole bunch of stuff from our layout. We can then start using all the methods that these objects have. Here are some examples of the methods we can use for Button objects:
myButton.setText
myButton.setHeight
myButton.setOnCLickListener
myButton.setVisibility
Remember that Button alone has around 50 methods! If you think that after nearly 10 chapters we are finally going to start doing some really neat stuff with Android, you would be right!
To follow along with this mini project, create a new Android Studio project, call it Java Meet UI, and leave all the other options at their default values. As usual, you can find the Java code and the XML layout code in the Chapter 10/Java Meet UI folder.
First, let's build a simple UI:
- Delete the autogenerated TextView widget, the one that reads "Hello world!".
- Add a Large Text widget on the top and at the center of the layout.
- Set its text property to
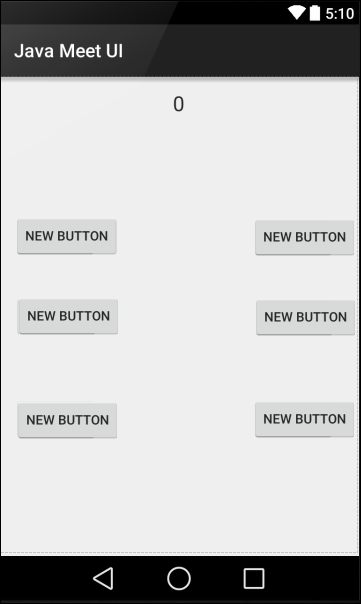
0and its id property totxtValue. Pay careful attention to the case of the ID. It has an uppercaseV. - Now, drag-and-drop six buttons on the layout so that it looks fairly similar to this next screenshot. The exact layout isn't important:
- Double-click on each button in turn (left to right and then top to bottom) and set the
textandidproperties as shown in the next table. When you see the pop-up message as shown in the next figure, choose Yes each time: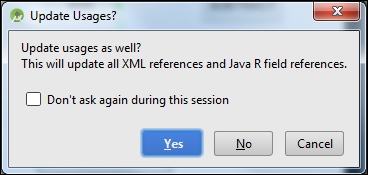
The text property
The id property
addbtnAddtakebtnTakegrowbtnGrowshrinkbtnShrinkHidebtnHideResetbtnReset
When you're done, your layout should look as shown in the next screenshot:
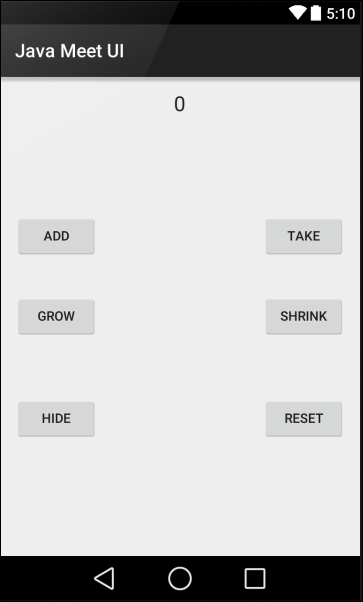
The precise position and text on the buttons is not very important, but the values given to the id properties must be exactly the same. The reason for this is we will be using these IDs to get a reference to the buttons and TextView in this layout from our Java code.
Switch to the MainActivity.java tab in the editor and find the following code:
public class MainActivity extends AppCompatActivity{Amend the preceding line to:
public class MainActivity extends AppCompatActivity implements View.OnClickListener{Note that the entire line we just amended is underlined in red, indicating an error. Now, because we have made MainActivity into OnClickListener by adding it as an interface, we must implement the abstract method of OnClickListener. The method is called onClick. When we add the method, the error will be gone.
We can get Android Studio to add it for us by clicking anywhere on the line with an error and then using the keyboard combination Alt + Enter. After this, click on the Implement methods option, as shown in the next figure:
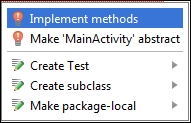
Now, click on OK to confirm that we want Android Studio to add the onClick method. The error goes away and we can carry on with adding code. We also have an onClick method, and we will soon see what we will do with that.
Now, we will declare a int variable called value and initialize it to 0. We will also declare six Button objects and a TextView object. We will give them the same names that we gave the id property values in our UI layout. This name association is not required, but it is useful to keep track of which Button in our Java code will be holding a reference to which Button from our UI.
Furthermore, we are declaring them all with the private access specification because we know that they will not be needed outside of this class.
Before you go ahead and type the code, note that all these variables are members of the MainActivity class. This means that we enter all the code that is shown next immediately after the class declaration that we amended in the previous step.
Making all these variables into members/fields means that they have a class scope, and we can access them from anywhere within the MainActivity class. This will be essential for this project because we will need to use them all in onCreate and in our new onClick method.
Enter this next code that we just discussed after the opening curly brace, {, of the MainActivity class and before the onCreate method:
// An int variable to hold a value
private int value = 0;

// A bunch of Buttons and a TextView
private Button btnAdd;
private Button btnTake;
private TextView txtValue;
private Button btnGrow;
private Button btnShrink;
private Button btnReset;
private Button btnHide;
Next, we want to prepare all our variables ready for action. The best place for this to happen is in the onCreate method because we know that will be called by Android just before the app is shown to the user. This code uses the findViewById method to associate each of our Java objects with a widget from our UI.
It does so by returning a reference to the object that is associated with the UI widget on the heap. It knows which one we are after because we use the appropriate id as an argument. For example, ...(R.id.btnAdd) will return Button with the ADD text that we created in our layout.
As a reminder, we use the odd-looking = (Button) syntax because the method is polymorphic and could potentially return any object type that is a subclass of the View class. This is called casting.
Enter the following code just after the call to setContentView in the onCreate method:
// Get a reference to all the buttons in our UI
// Match them up to all our Button objects we declared earlier
btnAdd = (Button) findViewById(R.id.btnAdd);
btnTake = (Button) findViewById(R.id.btnTake);
txtValue = (TextView) findViewById(R.id.txtValue);
btnGrow = (Button) findViewById(R.id.btnGrow);
btnShrink = (Button) findViewById(R.id.btnShrink);
btnReset = (Button) findViewById(R.id.btnReset);
btnHide = (Button) findViewById(R.id.btnHide);
Now that we have a reference to all of our Button objects and TextView, we can start using their methods. In the code that follows, we use the setOnClickListener method on each of the Button references to make Android pass any clicks from the user onto our onClick method.
This works because when we implemented the View.OnClickListener interface, our MainActivity class effectively became an OnClickListener.
So, all we have to do is call setOnClickListener on each button in turn. As a reminder, the this argument is a reference to MainActivity. So, the method call says, "hey Android, I want an OnClickListener and I want it to be the MainActivity class". Android now knows which class to call onClick on. This next code wouldn't work if we hadn't implemented the interface first. Also, we must set up these listeners before the Activity starts, which is why we do it in onCreate.
We will add code to onClick to actually handle what happens soon.
Add this code after the previous code inside the onCreate method:
// Listen for all the button clicks
btnAdd.setOnClickListener(this);
btnTake.setOnClickListener(this);
txtValue.setOnClickListener(this);
btnGrow.setOnClickListener(this);
btnShrink.setOnClickListener(this);
btnReset.setOnClickListener(this);
btnHide.setOnClickListener(this);
Now, scroll down to the onClick method that Android Studio added for us after we implemented the OnClickListener interface. Add the float size; variable declaration and an empty switch block inside it so that it looks like this next code. The new code to be added is highlighted here:
public void onClick(View v)

  // A local variable to use later
  float size;

  switch(v.getId()){


  }
}
Remember that switch will check for case to match the condition inside the switch statement.
In the previous code, the switch condition is v.getId(). Let's step through and understand this. The v variable is a reference to an object of the type View, which was passed into the onClick method by Android:
public void onClick(View v)
View is the parent class for Button, TextView, and more. So, perhaps, as we might expect, calling v.getId() will return the ID property of the UI widget that has been clicked, the widget that triggered the call to onClick in the first place.
All we need to do then is provide a case statement (and appropriate action) for each of the Button references we want to respond to.
We will see that this next code has the first three case statements. They handle R.id.btnAdd, R.id.btnTake, and R.id.btnReset.
The code in the R.id.btnAdd case simply increments the value variable, and then it does something new. It calls the setText method on the txtValue object. Here is the argument (""+ value). This argument uses an empty string and adds (concatenates) whatever value is stored in value to it. This has the effect of causing our TextView txtValue widget to display whatever value is stored in value.
The TAKE button (R.id.btnTake) does exactly the same, but subtracts 1 from value instead of adding 1.
The third case statement handles the RESET button, sets value to 0, and again updates the text property of txtValue.
Then, at the end of each case, there is a break statement. At this point, the switch block exits, the onClick method returns, and life returns to normal—until the user's next click.
Enter this code that we just discussed inside the switch block after the opening curly brace, {:
case R.id.btnAdd:
  value ++;
  txtValue.setText(""+ value);

  break;

case R.id.btnTake:
  value--;
  txtValue.setText(""+ value);

  break;

case R.id.btnReset:
  value = 0;
  txtValue.setText(""+ value);

  break;
The next two case statements handle the SHRINK and GROW buttons from our UI. We can confirm this from the R.id.btnGrow and R.id.btnShrink IDs. What is new and more interesting are the two new methods that are used.
The getTextScaleX method returns the horizontal scale of the text within the object it is used on. We can see that the object it is used on is our TextView txtValue. The size = at the start of the line of code assigns the returned value to our float variable, size.
The next line of code in each case statement changes the horizontal scale of the text using setTextScaleX. When the GROW button is pressed, the scale is set to size + 1, and when the SHRINK button is pressed, the scale is set to size - 1.
The overall effect is to allow these two buttons to grow and shrink the text in txtValue by a scale of 1 on each click.
Enter the next two case statements that we just discussed below the previous code:
case R.id.btnGrow:
  size = txtValue.getTextScaleX();
  txtValue.setTextScaleX(size + 1);

  break;

case R.id.btnShrink:
  size = txtValue.getTextScaleX();
  txtValue.setTextScaleX(size - 1);

  break;
In our last case statement, which we will code next, we have an if-else block. The condition takes a little bit of explaining. Here it goes.
The condition to be evaluated is txtValue.getVisibility() == View.VISIBLE. The first part of this condition before the == operator returns the visibility property of txtValue TextView. The return value will be one of the three possible constant values defined in the View class. They are View.VISIBLE, View.INVISIBLE, and View.GONE.
If TextView is visible to the user on the UI, the method returns View.VISIBLE, the condition is evaluated as true, and the if block is executed.
Inside the if block, we use the setVisibility method on txtValue and make it invisible to the user with the View.INVISIBLE argument.
In addition to this, we change the text on btnHide to SHOW using the setText method.
After the if block is executed, txtValue becomes invisible, and we have a button on our UI that says SHOW. When the user clicks on it in this state, the if statement will be false and the else block will be executed. In the else block, we reverse the situation. We set txtValue back to View.VISIBLE and the text property on btnHide back to HIDE.
If this is in anyway unclear, just enter the code, run the app, and revisit this last code and explanation once you have seen it in action:
case R.id.btnHide:
  if(txtValue.getVisibility() == View.VISIBLE)
  {
    // Currently visible so hide it
    txtValue.setVisibility(View.INVISIBLE);

    // Change text on the button
    btnHide.setText("SHOW");

  }else{
    // Currently hidden so show it
    txtValue.setVisibility(View.VISIBLE);

    // Change text on the button
    btnHide.setText("HIDE");
  }


  break;
We have the UI and the code in place, so it is time to run the app. Try out all the buttons. Note that the ADD and TAKE buttons change the value of value by 1 in either direction and then display the result in TextView. Also note that the SHRINK and GROW buttons decrease and increase the width of the text and RESET sets the value variable to 0 and displays it on TextView. Finally, the HIDE button not only hides TextView, but also changes its own text to SHOW, and it will indeed reshow TextView if it is tapped again.
Note that there was no need for Log or Toast in this app, as we are finally manipulating the UI using our Java code.
Before we proceed to the next chapter and build apps with loads of different widgets, which will put into practice and reinforce everything you have learned in this chapter, we will have a very brief introduction to anonymous and inner classes.
When we implemented our Basic Classes demo app in the last chapter, we declared and implemented the class in a separate file to our MainActivity class. That file had to have the same name as the class.
We can also declare and implement classes within a class. The only question remaining, of course, is why would we do this? When we implement an inner class, the inner class can access the member variables of the enclosing class, and the enclosing class can access the members of the inner class. This often makes the structure of our code more straightforward. So, inner classes are sometimes the way to go.
In addition, we can also declare and implement an entire class within a method of one of our classes. When we do so, we use a slightly different syntax and do not use a name with the class. This is an anonymous class.
We will see both inner and anonymous classes in action throughout the rest of the book, and we will thoroughly discuss them when we use them.