
In this recipe, you will learn how to make a floating UI element. This is a nice effect to use within every kind of user interface. If you are going to use a very slow movement with a small amplitude, you can use this effect even on menus to give them more life and a professional look. A floating element can add yet another type of dynamic element to the UI, ultimately breaking the usually rigid nature that UI elements tend to have.
- First of all, we need to create an UI element. In this example, we will create a panel that can be the background of a menu. To do this, right-click on the Hierarchy panel and then navigate to UI | Panel. Finally, rename it Floating Panel. Of course, it is possible to resize and place the panel as we wish.
- Next, we need a script that moves our panel on the screen in such a way that it seems to float. Thus, navigate to Add Component | New Script and name it FloatingUIScript. Then, click on Create and Add.
- Now, double-click on the script in order to edit it. Since we are going to use only the
RectTransformclass, we don't need to add theusing UnityEngine.UI;statement at the beginning of the script this time. Before the beginning of the class, we can add this line:[RequireComponent(typeof(RectTransform))](without the semicolon at the end). By doing this, we are saying that to use this script, it requires a Rect Transform component that is attached to the same game object of this script. - We need only a
privatevariable to keep track of the Rect Transform component, without seeking it every time we have to update its position. Then we also need four public variables. These will be set in the Inspector. There are two variables for the speed, one for each axis, and two variables for the amplitude of the floating movement, again, one for each axis. So, we can write this:private RectTransform rectTransform; public float xspeed,xAmplitude, yspeed, yAmplitude;
- As usual, in the
Start()function, we store the reference of the game elements inside our variables; in this case, it is onlyrectTransform. By calling theGetComponent<RectTransform>()function, we take the Rect Transform attached to the same game object in which this script is placed:void Start () { rectTransform = GetComponent<RectTransform> (); } - In the
Update()function, we need to implement our logic. We change the local position ofrectTransformto newVector3wherein thezcomponent is zero. Thexandycomponents depend onSin, themathfunction that creates the floating movement for us. We can control this function through our four public variables. Therefore, we can adjust the amplitude and speed for each axis:void Update () { rectTransform.localPosition = new Vector3(xAmplitude*Mathf.Sin(Time.time*xspeed), yAmplitude*Mathf.Sin(Time.time*yspeed), 0); } - Save the script and come back to Unity from MonoDevelop. The next step is to tweak the values of our variables in the Inspector. We can create different effects with them, but for a nice floating effect, we can set them in the following way:
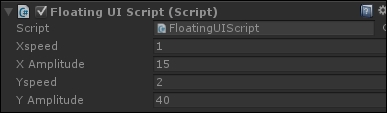
- Finally, we can press the play button and see if everything works as expected.
We use the Mathf.Sin() function to create a soft and natural movement over time. In fact, it is a periodic function and is continuous. More information about it can be found in the previous recipe, or in any general textbook about trigonometry. We use one of them on each axis, and through our variables we can set the parameters of the movement. In particular, we can change the amplitude of the movement and its speed.
By setting the parameters of this script properly, it is possible to create many different effects. So that we will have an idea of these effects, we will see some of them in the following sections.
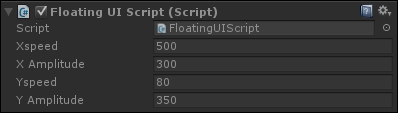
From this script, we can create a shaking effect. We only need to move the image faster than our eyes can notice. In order to do this, let's set Xspeed to 500, XAmplitude to 300, Yspeed to 80, and YAmplitude to 350. In the end, the component should look like the following settings:
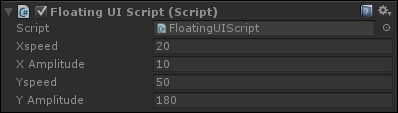
We can also create a sparkle effect, and again the trick is to move the image faster than our eyes can notice, although this time it should be along both axes and not just one. Therefore let's set Xspeed to 20, X Amplitude to 10, Yspeed to 50, and Y Amplitude to 180. Finally, the component should look like this:
After creating a butterfly in the Creating an extendable and rotating element with a final fade effect recipe, we can improve it using the float script. By doing this, we can give the butterfly the illusion that it is moving around our UI.
To do this, we need to modify ExtendableElementWithRotationScript. Of course, we need to start from the version of the script created in the Having control over each axis section. In fact, we need to remove the fade effect along with the destruction of the object.
Therefore, from the Start() function, remove these two functions:
GetComponent<Image>().CrossFadeAlpha(0f, surviveTime, false);
GameObject.Destroy(gameObject, surviveTime);
As a result, the object will not change its alpha, and also it will not be destroyed. Furthermore, we can remove the surviveTime variable and the using UnityEngine.UI; statement, since they are no longer required.
Now let's save the script and create new Image. Right-click on the Hierarchy panel and then select UI | Image. Rename it Butterfly. Of course, it is possible to resize it and place the butterfly as we wish. Finally, change the Source Image to an image of a butterfly, but remember that it has to be symmetric.
The next step is to add this new script to our Butterfly. As in the Having control over each axis section of the Creating extendable and rotating elements with a final fade effect recipe, we need to set both rotationSpeedX and rotationSpeedZ to 0, and assign a positive number to rotationSpeedY, maybe a high value (around 300). Keep in mind that the higher the value, the faster the butterfly's wings will be.
Moreover, add the FloatingUIScript as well and set XAmplitude and YAmplitude both to 100, Xspeed to 1, and Yspeed to 2.
The last step is simply to test the scene by clicking on play and to make sure that our butterfly comes to life.
- If you are looking for more information about the
Mathf.Sin()function, you should check out the official documentation on Unity at http://docs.unity3d.com/ScriptReference/Mathf.Sin.html. - If you are looking for more information about the sin function from a mathematical point of view, any book about trigonometry should be fine. In addition, we have a brief explanation of why this function is used with time. It is in the previous recipe, in the How it works... section.