
In this recipe, you will learn how to animate a button when the cursor is over it. You will also learn how to use an Animator controller to handle generated animations from the Button (Script) component and how to change these animations.
- First of all, we have to create a UI button. Right-click on the Hierarchy panel, then go to UI | Button, and rename it Animated Button. Of course, it is possible to resize, change Source Image, the text, and place it as we wish.
- Now, we need to change the Transition mode in order to use a controller to animate it. In the Button (Script) component, click on Transition and select Animation. If you don't want to create a controller from scratch, click on the Auto Generate Animation button that has just appeared in the Inspector, as shown here:

- Now, Unity will ask us where to save the new controller, and we have to give it a name. Let's choose a folder in our Project, rename it AnimatedButton.controller and then click on Save.
- We should notice that an Animator component has just been added and the Controller variable is set with the controller that we just saved. In order to open it, double-click on AnimatedButton inside the Controller variable.
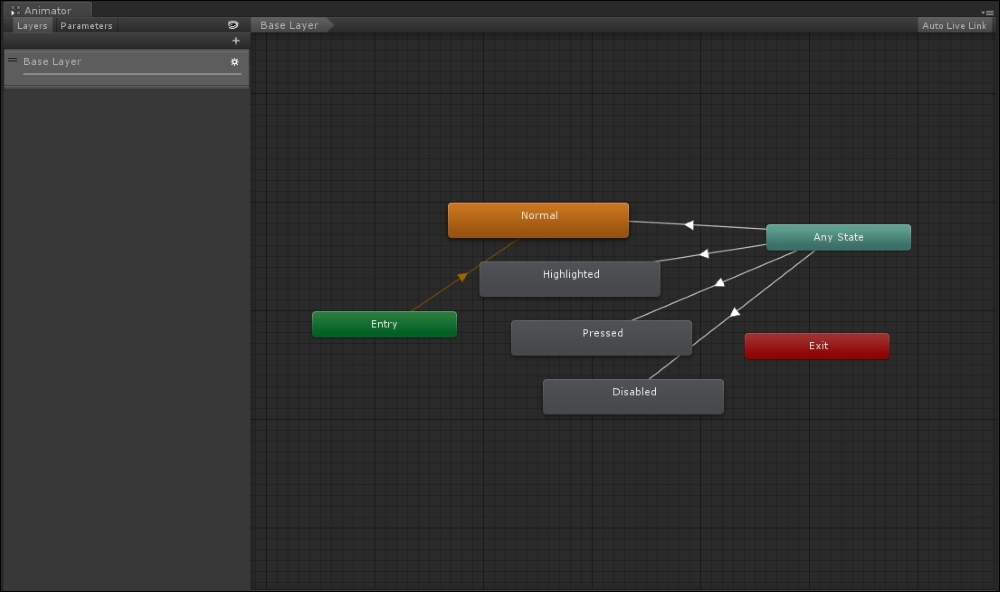
- Unity opens the Animator window, as shown in the following screenshot. If some nodes are overlapping, we can just drag them around to make the graph clearer. The four nodes emanating from the Any State node denote the different states that our button can be in: Normal, Highlighted, Pressed, or Disabled. The others, including the Any State node, are special nodes, and they need to handle some transition:
- The next step is to select the Animation window. Click on Normal and a drop-down menu will appear. Let's select Highlighted, since we are going to animate the button when the mouse is over it. Finally, click on the Rec button in the top-left corner (the one with a circle), as shown in the following screenshot:

- Now, navigate to Add Property | Rect Transform | Size Delta, and should appear on the windows with a couple of key frames, one at the zeroth frame and another one at the sixtieth frame.
- We move the red line of the time to 60 frames, where we have the second key frame, and in the Inspector, we increase the width of RectTranform of Animated Button from 160 to 200.
- If we click on play and move the mouse arrow onto the button, it becomes larger, and then suddenly smaller, before it becomes larger again in a kind of pulsating motion. This happens because the animation is set as a loop. In order to set it properly, go through the Project panel to find the AnimatedButton.controller that you saved before, and then click on the small arrow at the beginning of its name. Now the four animations should appear. Let's click on Highlighted.
- In the Inspector, just uncheck the Loop Time variable.
- Click on the play button, and now everything should work as planned.
Here, we used an Animator with a controller to handle the animation. In fact, when the mouse is over it, the controller triggers the Highlighted animation. As a result, the button is stretched. When the mouse moves away, it triggers the Normal animation, that is, just the button in its original state without a proper animation. However, since Unity handles the transition smoothly by default, the button is then stretched back to its original state.
The following section teaches us how to slightly tweak the animation that we have created. By doing this, it helps to improve the quality of the animation.
When the mouse arrow is moved away, the button is stretched back very fast — 10 times the speed of the animation that we created. This is because Transition Duration is set to 0.1, which means that the animation will be played 10 times faster. Let's see how to change this parameter.
Open the Animator window, and select the arrow that goes from Any State (the blue node) to the Normal node (the orange one). Now expand the Settings menu in the Inspector by clicking on the small triangle at the beginning of its name. Finally, change the Transition Duration variable to 1. However, you are free to change this to any other value. If we want the animation faster, we just need to insert a number between 0 and 1. If we want it slower, we insert a number larger than 1.