
In this recipe, you will learn how to create a bar that goes up and down. This decorative UI element is often used in sci-fi HUDs. In fact, it gives a touch of life to our UI. Bars that go up and down can be a nice addition when we are trying to provide the player with an atmosphere in which many different things are dynamic and are being measured, such as a character gaining or even losing an ability over time during a battle, as if monitoring various statistics of a player to demonstrate a dynamic and quite living atmosphere.
- First of all, we have to create a UI image that should be like a decorative bar for a sci-fi HUD. In this recipe, we are going to use the bar that we used in Chapter 2, Implementing Counters and Health Bars. To start, right-click on the Hierarchy panel, then navigate to UI | Image, and finally rename it HUDBar. Of course, it is possible to resize it and place the image as we wish. Lastly, we change Source Image with the bar that we created in the second chapter, or design one.
- After we have changed Source Image, we need to change Image Type to Filled.
Tip
If we have a vertical bar as the graphic, we have to set Fill Method to Vertical and Fill Origin to Bottom. Otherwise, if we have a horizontal bar, like the one that we are using for this example, we have to rotate it. In the Rect Transform component, change the rotation along the z axis to 90. Then, change Fill Method to Horizontal and Fill Origin to Left.
- Then, we need a script that controls the movement of the image and changes its
fillAmountvariable. Thus, let's navigate to Add Component | New Script, name it HUDBarScript, and then click on Create and Add. - Now, double-click on the script in order to edit it. Since we are going to use the
Imageclass again, we need to add theusing UnityEngine.UI;statement at the beginning of the script. Before the beginning of the class, we can add this line:[RequireComponent(typeof(Image))](without the semicolon at the end). By doing this, we are saying that to use this script, it requires that an Image component be attached to the same game object as that of this script. - We don't need any
publicvariable, but we need oneprivatevariable. This is for storing the reference to the Image (Script) component. We can write the following line:public Image uiImage;
- As usual, in the
Start()function, we store the reference of the game elements inside our variables, in this case only theuiImagevariable. By calling theGetComponent<Image> ()function, we take the Image(Script) component attached to the same game object in which this script is placed. Therefore, we can code the following:uiImage = GetComponent<Image> ();
- Next, in the
Update()function, we have to change thefillAmountvariable of our Image(Script) component . Let's add this code:uiImage.fillAmount = ((Mathf.Sin (Time.time) + 1f) / 2f);
- Save the script, and click on the play button to verify that everything works as it should. Here, you can see a screenshot of the effect:

The Mathf.Sin() function returns a value between -1 and +1, and this depends on upon the parameter.
If we plot the function, we get the following graph:

As we can see from the graph, by increasing x, which is also a parameter of the Mathf.Sin() function, the value of y goes up and down. Therefore, if we pass Time.time as the parameter, the output will be a value that changes over time. Since the function has a value between -1 and 1, we have to crop its returning value. To do so, we added 1f; thus, its value was now between 0 and 2. Finally, we divided it by 2f, so its value was between 0 and 1, as we wanted.
This decoration is quite nice when used multiple times in the same screen. But to make the effect pleasant for the player, we need to add a phase or some bounds.
In many sci-fi HUDs, there is often more than one bar. If we duplicate the one that we created in this recipe, all of them will appear the same. For this reason, we need to introduce a displacement phase in our script.
To do so, let's add a new public variable so that we can set it in the Inspector:
public floatphase;
Now modify the code line in the Update() function in the following way:
uiImage.fillAmount = ((Mathf.Sin (phase + Time.time) + 1f) / 2f);
In fact, if we set different values for each bar in the Inspector, they will be displaced.
In the following screenshot, we can see the final effect:

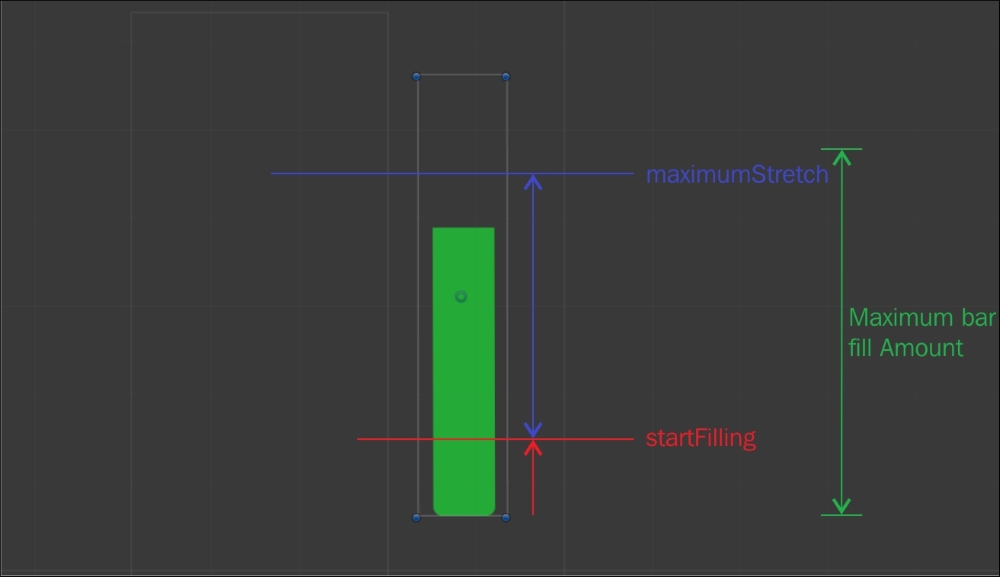
We may want to limit the bar movement, so that we can try different aesthetic variations within our UI. We can do so by adding a couple of variables to our script:
public float startFilling;
public float maximumStretch;
In fact, as the name suggests, one stores the initial point and the other stores the amount by which the bar is stretched. So, when we set these in the Inspector, we need to pay attention to the fact that the sum of their values should be less than 1.
In the Update() function, we need to modify our code to include these two variables in the Sin() function, like this:
uiImage.fillAmount = startFilling + ((Mathf.Sin (Time.time) + 1f) / 2f) * maximumStretch;
Now, the minimum value that can be assigned to uiImage.fillAmount is startFilling, and the maximum is startFilling summed to maximumStretch.
In this screenshot, there is a visual explanation of the effect of our variables on the bar:
To gain more control over our bars, we can combine the effects of the two previous sections. This is particularly useful when we are designing a complex sci-fi HUD in order to customize it to better suit our needs.
After we have added all the variables from both sections, we can write this line in the Update() function:
uiImage.fillAmount = startFilling + ((Mathf.Sin (phase + Time.time) + 1f) / 2f) * maximumStretch;
As a result, we are able to create different decorative bars for our UI.
- If you are looking for more information about the
Mathf.Sin()function in Unity, you should refer to the official Unity documentation at http://docs.unity3d.com/ScriptReference/Mathf.Sin.html. - Other than this, if you want to understand the sin function from a mathematical point of view, any book about trigonometry should be fine.