
Sometimes, a password cannot be shorter than a lower bound character limit. This happens for a lot of reasons, including security. In Unity, we can easily set an upper bound limit for characters by specifying it in the Input Field (Script) component inside the Character Limit variable. In this recipe, what we are going to achieve is the checking of lower bound limits for characters in input fields. So, you will learn how to write a short script to handle this, and as a consequence, the input field will also be reset. This means an empty string is assigned to the text variable.
- To begin, we need to create our input field, right-click on the Hierarchy panel, then go to UI | Input Field, and rename it myInputField. Finally, place it wherever you want.
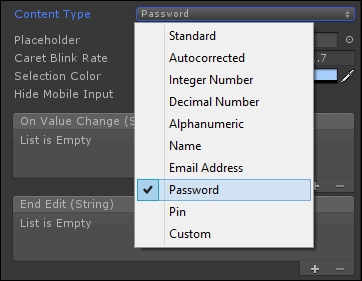
- As we discussed in the introduction to this recipe, we are going to create a password input field. We should also select Password in the drop-down menu of the Content Type variable, as shown in this screenshot:
- In this way, only asterisks are shown on the screen, as shown in the following screenshot:

- Select it and, in the Inspector, navigate to Add Component | New Script. Name it LowerBoundLimitForCharactersScript, and then click on Create and Add.
- In order to edit the script, double-click on it. Again, because we are dealing with the UI, we have to add the
using UnityEngine.UI;statement at the beginning of the script. This is also because we are going to use theInputFieldclass. As we did in the previous recipe, we can add this line before the beginning of the class:[RequireComponent(typeof(InputField))](without the semicolon at the end). Thus, the script requires an InputField component attached to the same game object of it. - We need just one
privatevariable to store the reference to our Input Field (Script) component. And we need apublicvariable so that we can decide in the Inspector which is the lower bound limit. Therefore, let's write the following:private InputField inputField; public int characterLimit;
- In the
Start()function, we are going to assign the Input Field (Script) component to ourprivatevariable. We can get the reference by calling theGetComponent<InputField> ()function. Thus, we can write the function in this way:void Start () { inputField = GetComponent<InputField> (); } - Now, we need to create a function that performs the check at the end of editing. So, it takes a string as a parameter and checks whether its length — the number of its characters — is less than
characterLimit. If so, it empties the input field. Here is the function:public void Check (string newText) { if(newText.Length < characterLimit){ inputField.text = ""; } } - After saving the script, the next step is to give the
stringthat the player has written to our script. Thus, we need an event to achieve this. In particular, if we look inside the Input Field (Script) component, we can see that there are two event tabs. Let's click on the small + sign on the End Edit (String) event tab in the bottom-right corner. - Drag the script inside the object variable, and in the drop-down menu, navigate to LowerBoundLimitForCharactersScript | Check. Ensure that the Check in the first set of functions is selected in Dynamic String, as shown in the following screenshot, and not the Check (string) in the second set, called Static Parameters:

- Don't forget to set the Character Limit value in the Inspector. In this example, we will set it to 3. As a result, we should get something that looks like what is shown below:

- Now, everything is ready to be tested. Click on the play button to test. When the player finishes typing something in our input field, it should reset if the number of characters is less than
characterLimit.
Like in the previous recipe, we have written a function that takes a string as a parameter. In fact, its role is to check whether the string length is less than characterLimit, a variable that we can set in the Inspector. Then, in order to trigger this function, we created an event in the Input Field (Script) component. So, every time the player finishes typing, the check is performed, and if it fails, it means that the string is invalid. Then, the text of the input field is restored to an empty string. In fact, the event passes the string typed in the Input Field (Script) component to our function. It is possible to change the action that our function takes after the check (by changing our script), and we can also adapt it to our needs.
Giving feedback to the player is very important to let the player know what is happening and also to provide a response to his interaction within the game, albeit good or bad.
Even though there is a clear statement that reads this input field has a lower bound limit for the amount of characters that can be entered, which is well indicated to the player, it could still be confusing for the player if the text that he has just written disappears after he presses Enter.
One of the options that we have is giving an error message to the player. Since this recipe is similar to the previous one, you can refer to the There's more... section of the Making an input field with personal text validation at runtime recipe.