
Here, you are going to learn another type of customization that the player can perform at runtime. With this, the player has more power on how he can customize his own UI to fit suit his needs. In fact, the player will be able to switch between two colors, as in the previous chapter, but gradually and through a slider. We will handle this with a script and, as usual, using the events that are inside the Slider (Script) component.
- First of all, we need to create our slider. This can be done easily by right-clicking on the Hierarchy panel, then going to UI | Slider, and renaming it to GraduallyColorSlider. Of course, it is possible to resize the slider, change Source Image, or change the text inside. Finally, place it as you wish, in Canvas.
- Next, we can write a script to handle the entire process. To do this, select GraduallyColorSlider. In the Inspector, navigate to Add Component | New Script, rename it GraduallyColorSliderScript, and then click on Create and Add.
- Double-click on the script in order to edit it. As usual, when we deal with the UI, we have to add the
using UnityEngine.UI;statement at the beginning of the script, since we are going to use theImageclass. - We need three
publicvariables. One is used to store the Image (Script) component that we want to change, and the other two store the two colors that we want our slider to lerp between. To do this, let's write the following code:public Image img; public Color firstColor; public Color secondColor;
- We don't need the
Update()function or theStart()one. Instead, we need a function that can be triggered by some events, for instance, when our slider is changing. Therefore, it has to bepublic, and we can name itchange(). It also takes afloatparameter that will be passed by the event. Moreover, it will contain the value of the slider. Here is what we will write:public void change(float value){ } - Then, we only need one line to change the color of the image. We can assign the new color in this way:
img.color = Color.Lerp(firstColor, secondColor, value);
- Now our script is done. We save it and come back to Unity. As in the previous recipe, we have to trigger our script through an event, and so we select GraduallyColorSlider, look inside the Slider (Script) component, and click on the small + sign on the On Change () event tab in the bottom-right corner.
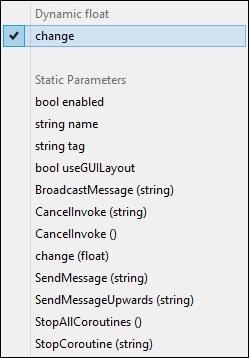
- Drag the script inside the object variable, and from the drop-down menu, navigate to GraduallyColorSliderScript | change. Also, be sure to select change in the first set of functions, labeled Dynamic Float, as shown in the following screenshot:
- At the end, the event tab should be like this:

- Next, we need to set our Img variable. In this recipe, let's create a panel to assign to it. To do this, right-click on the Hierarchy panel and navigate to UI | Panel. We can rename this to GraduallyColorPanel. Keep in mind that this can be any object in the scene, as long as it has an Image (Script) component attached to itself. Thus, we can drag and drop it into the Img variable.
- As a final step, we can ensure that both the color variables in our script have been set. Finally, click on play and use the slider to see how the panel changes color gradually.
Unlike the previous recipe, where we had to switch between two colors, here we had to make this transition occur gradually. So, as we have done previously, we used the On Change() event of the slider in a dynamic way to give its value to our script. In it, we simply used the Color.Lerp() function to interpolate the two colors set in the Inspector along value.
- If you don't require a gradual change, you can look at the previous recipe, Creating a button that changes color.
- In addition, more information about the Color.Lerp() function can be found in the official documentation, which is located at http://docs.unity3d.com/ScriptReference/Color.Lerp.html.
- Finally, in the last recipe of this chapter, there is another way to call events without touching the events in the Inspector. In fact, this can be achieved using the handlers inside the script. More information is available in the Changing the cursor at runtime recipe.