
In this recipe, you will learn how to create a distance displayer, which can be a very useful feature. For instance, when we want to display the proximity of an object or a character, a visual displayer or even an auditory distance displayer can give us a better indication of how far or close we are from a particular thing. This is done in order to assist us during gameplay, for example, to avoid a particular enemy, or not enter a dangerous region of a game.
- To begin, we have to create a UI image that will be our distance displayer. Right-click on the Hierarchy panel, then go to UI | Image, and rename it DistanceDisplayer. Of course, it is possible to resize the image, change Source Image, and then place it as we wish in Canvas.
Tip
We are going to change the color of the Image (Script) component. However, in order to avoid color distortion on our HUD component, we should make Source Image completely white, with the form of the part we want to change color. In other images, we construct all the decorations around the component. In this recipe, for the sake of simplicity, we will keep the square image as default.
- Now, we need to create the UI text that will display the distance as a number to the player. Again, right-click on the Hierarchy panel, then go to UI | Text, and rename it DistanceDisplayerText. Resize to fit the image, tweak all the parameters that deal with the font as you like, change Color to white, and finally place it in the middle of DistanceDisplayer. It doesn't matter if the text cannot be seen, since the background has the same color. This is because it will change at runtime.
- Select DistanceDisplayer. In the Inspector, navigate to Add Component | New Script and name it DistanceDisplayerScript. Finally, click on Create and Add.
- Double-click on the script in order to edit it. Every time that we deal with the UI, because we are going to use the Image class, we have to add the
using UnityEngine.UI;statement at the beginning of the script. Before the beginning of the class, we can also add this line:[RequireComponent(typeof(Image))](without the semicolon at the end). As a result, this script requires an Image (Script) component that is attached to the same game object of the script. - The first variables that we need are used to store both DistanceDisplayer and DistanceDisplayerScript. Since we can easily assign them through the script, we can make them private:
  private Image img;
  private Text txt;
- Then, we need a couple of variables to store the Transform component of the player and the target of this distance displayer. They have to be
publicin order to be set in the Inspector:public Transform player; public Transform target;
- Furthermore, we want to have the possibility of setting two colors. As such, DistanceDisplayer lerps between them in the Inspector. So again, the variables have to be
public:public Color firstColor; public Color secondColor;
- We need one more
publicvariable. Hence, we can set it from the Inspector, which is used to calculate the color lerp that will be implemented later on. Therefore, let's add this line:public float farthestDistance;
- The next step is to write the
Start()function in which we will store the initial values for ourprivatevariables. So let's take the reference to the Image (Script) component using theGetComponent<Image>()function. Then, we will also use theGetComponentInChildren<Text>()function to get the Text (Script) component that is attached to DistanceDisplayerText in the child of DistanceDisplayer. Thus, we can write the following:void Start () { img = GetComponent<Image> (); txt = GetComponentInChildren<Text>(); } - Since DistanceDisplayer has to be updated often, we can do it in every frame by implementing the logic inside the
Update()function. Here is its structure:void Update () { } - The first operation that we need to do is calculate the distance between the player and the target. This can be done easily using the
default Distance()function in theVector3class. Add this line in theUpdate()function:float distance = Vector3.Distance (player.position, target.position);
- Next, we can update the text of DistanceDisplayerText by assigning to it the distance transformed into a string. We will also need to shorten the value of the float. To do this, we will need to pass the
F2string as a parameter:txt.text = distance.ToString ("F2"); - The last thing that we need to do in the
Update()function is assign a color toimgusing theLerp:img.color = Color.Lerp (firstColor, secondColor, 1 - (distance / farestDistance));
- After we have completed all the previous steps, our script will be ready to run. Save it and then come back to Unity.
- Then, we need to assign the
publicvariables. Depending on how our game is structured, the way in which we assign them will change. However, in the There's more... section, you can find out how to test the script that we have just written. - Now we can run the game. Once the game is running, the Distance Displayer should look like this:
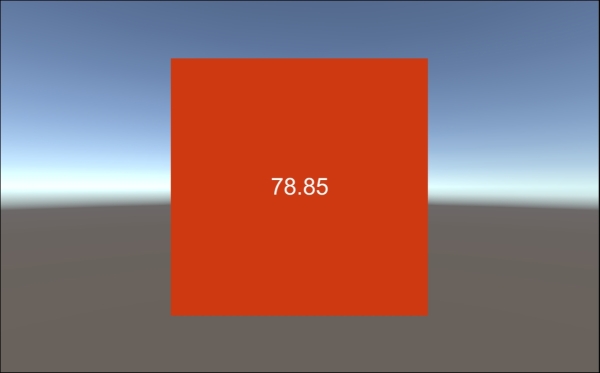
Here, we created a distance displayer that shows the distance from the player and the target, and it also changes color according to the linear interpolation between the two colors.
Since the distance could be between zero and infinity, we need to set a scale to perform the lerping of the color. In this case, the farthestDistance variable will specify the farthest distance when the lerp is complete. Therefore, we divide the distance by farthestDistance so that we can obtain the percentage of the distance normalized between zero and farthestDistance. In fact, if the distance is greater than farthestDistance, the lerp is considered to be completed. If so, since there is a -1 that makes the value of the lerp smaller than zero, firstColor is shown. Otherwise, the resulting value controls the lerp.
We can improve our distance displayer by integrating some new features. These will be explained by the following sections.
Since this script is intended to work when it is integrated inside a game, we need to ensure that it works the way it is supposed to, given this context. To do this, we need to construct a test scene. A simple way of doing this is by creating an entire scene inside the canvas using 2D UI elements. However, we must keep in mind that this script also works for a 3D environment.
Let's begin to create our test scene by creating a couple of images inside the canvas. To do this, right-click on Canvas and then go to UI | Image. So that we don't get confused, we can name them TargetObject and PlayerObject respectively. Once we have done this, the next step is to allow the player to move inside the scene. We can easily do this by attaching the drag script that we created in the Making a draggable panel recipe in Chapter 4, Creating Panels for Menus, to the player. Remember that we also need to attach the Event Trigger (Script) component as specified in that recipe to make it work. Once we have completed these steps, we should have something like this:
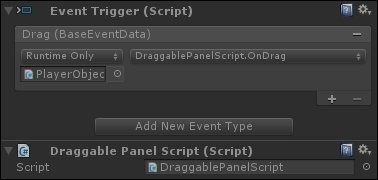
An interesting alternative is to modify the script by adding handlers. We did this in the Changing the cursor at runtime recipe in the previous chapter. By adding handlers to the script, we can achieve the same result in a more user-friendly way, since it avoids the need to add the Event Trigger (Script) component. After we have done this, we are able to move the PlayerObject by dragging it on the screen.
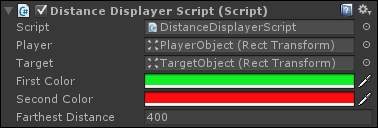
Now it's time to set the parameters of DistanceDisplayerScript in the Inspector. Drag PlayerObject inside the Player variable and TargetObject inside the Target variable. Next, we need to set the colors so that we can identify the proximity of an object. For instance, if it is not ideal for the player to be close to an object, we should assign a positive color, such as green, to firstColor when the player is significantly distant from the object. In contrast, if the player is too close to the object, we can assign a more negative color, such as red, to secondColor. Otherwise, we can reverse them, or adapt them for our game.
The last parameter that we want to set is Farthest Distance. This depends on the spatial scale of our game. However, the meaning of this parameter is as follows: it is the farthest distance at which the player must be from the target object for the color of the displayer to not change anymore. To set it properly, we should experiment with different values in our game in order to achieve the desired results. In this example scene, just try setting it to 400.
In the end, we should see something like this in the Inspector, which reflects the parameters and colors that we identified within our script:
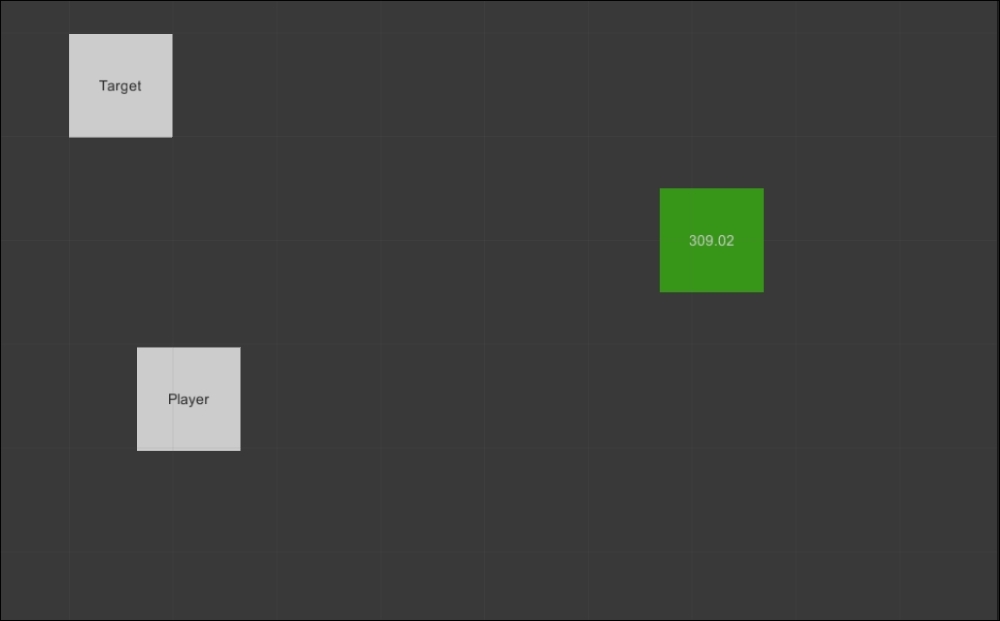
Next, we can click on play and drag PlayerObject around to see how the distance displayer changes its color based on the location of PlayerObject with respect to the target. We can also get an idea of the distance by seeing it expressed as a number in DistanceDisplayerText. Furthermore, if it is required, we can tweak the farthestDistance variable using this information.
Here is a screenshot of the scene:
It could be computationally expensive to update DistanceDisplayer for every frame. As a result, we can use coroutines to optimize our code.
To do this, let's create a new public variable to set the amount of time that we want to wait for before the UI element is updated. As the default, we can choose 0.8f as its value. Hence, we use this line:
public float updateTime = 0.8f;
Moreover, we need to create a new function that returns an IEnumerator type, and we can call it updateDistanceDisplayer(), as follows:
  IEnumerator updateDistanceDisplayer(){
  }
Since this is a coroutine and it has a behavior similar that of to the Update() function, we need to place an infinite cycle in it by adding the following code:
  while (true) {
  }
Before you erase the Update() function, cut its body by pressing Ctrl + X, and paste the code in the while statement by pressing Ctrl + V.
Finally, we have to wait until a certain amount of time has elapsed before the cycle repeats. It should be noted that in general, this amount is greater than the time that Unity takes to render a frame. As a result, this is a more efficient solution than the previous one. It works because we don't need to constantly change Distance Displayer. Furthermore, it can simulate more realistic Distance Detector that has a delay. Also, the coroutine structure allows us to implement other types of functionality, such as sound. Therefore, we need a yield statement along with calling the WaitForSeconds() function to wait as many seconds we want. After incorporating this into the script, we should have the following:
  float distance = Vector3.Distance (player.position, target.position);
  txt.text = distance.ToString ("F2");
  img.color = Color.Lerp (firstColor, secondColor, 1 - (distance / farthestDistance));
  yield return new WaitForSeconds(updateTime);
Even if we cannot notice any difference, the code is more optimized and is ready to incorporate new functionality (for example, multitarget detecting or sound), as described in the following sections.
In some games, it could be useful if our Distance Displayer could detect more than one target. For example, consider a shooter game in which we want to show the location of the closest enemy, or a platform game in which we want to show where the closest treasure is located. In these examples, we have to change our Distance Displayer to detect multiple targets. In order to do this, we have to convert the target variable into an array so that we can override its definition with this one:
public Transform[] targets;
It is worth noting that we have also changed the name of the variable from target to targets. This has been done to maintain consistency and indicate that we are now detecting more than one target. If you have followed the previous section, you will notice that we cannot calculate the distance within our coroutine with just one line of code anymore. In fact, we have to iterate over all the targets that we have set in the Inspector and then pick the closest one. So let's fix this issue by replacing the distance calculation with these lines:
float distance = float.MaxValue; //Or Vector3.Distance (player.position, targets[0].position);
foreach(Transform t in targets){
  if (distance > Vector3.Distance (player.position, t.position)){
    distance = Vector3.Distance (player.position, t.position);
  }
}
In the first line, we set the distance to the maximum float. This is because every time the foreach cycle selects a target in our array, it checks whether the distance with this one is less than the lowest distance it has found so far. We can also change this value, the initial distance, to the distance between the player and the first target of the array.
Tip
Since the targets variable is public, we have to be sure that the array contains at least one element. So, if we are not sure of this, we should add a control to check whether the array contains at least one element. Furthermore, this control should go in the coroutine and not in the Start() function. This is because its value could change over time.
Then, we actually use the foreach statement to cycle over the array. Next, using an if statement, we can check whether the new element picked from the array is closer to the player or not.
Tip
We can take advantage of the fact that the targets array is public. What this means is that we can add and remove elements dynamically. For instance, we can remove dead enemies or add new ones when they are spawned. Lastly, we should also convert the array into List<T> to handle the dynamic nature of a set of objects more easily.
Something to keep in mind regarding performance is that until we make the element count in the array relatively small, this script should not have any problem running from a computational standpoint. However, if the array becomes very large, it could take a while to render a frame, especially if our game is already full of heavy scripts. In this case, we have the option of handling the dimension of the array dynamically to remove futile objects (such as enemies that we already know are too far, maybe because they are in another room of the level). It could solve the problem and add them back in a second moment.
If we want to add a beep sound to Distance Displayer to make the player aware when it has been updated (using a sound), we can achieve this by adding another public variable. We do this so that we can set the sound from the Inspector:
public AudioClip beep;
Finally, to reproduce the sound through each cycle of our coroutine, let's add this line before the yield statement:
AudioSource.PlayClipAtPoint (beep, Input.mousePosition);
Since the sound comes from the user interface, we have chosen to play it to Input.mousePosition. As a result, we do not need to instantiate an AudioSource.
There are many ways by which we can indicate distances of objects or characters during gameplay. In this recipe, we used color as a way to indicate the proximity of the player to an object. However, what can also be a nice way to indicate distance to a player is through the use of audio. For example, a player may be trying to avoid being seen by an enemy, which encourages the player to use a great degree of stealth as he navigates throughout the level. So, in order to indicate to the player that he is coming in the view of an enemy, we may use a beep sound. It can be heard once the player begins to get closer to the enemy. This may start with quite a large amount of time between each beep, and as the player gets closer, the time between two beeps is reduced. This can create a more dramatic atmosphere, which a change in color may not be able to achieve. So, let's see how to do it.
Every time the updateTime changes, we don't need this variable anymore. So, we can remove it and change the argument of the WaitForSeconds() function to this:
Mathf.Clamp01(distance/farthestDistance)
By doing this, we calculate the ratio between the distance from the target and farthestDistance, and clamp its value between 0 and 1. In this way, we can obtain a percentage of how far the target is, where 0% means the same point as that of the player (distance is zero) and 100% means that the target is farther than farthestDistance. Then we use this percentage, converted into a decimal, for the time to wait until the next update of Distance Displayer.
We can also decide to keep the updateTime variable in order to still control how much time to wait, by multiplying it with our new argument in this way:
Mathf.Clamp01(distance/farthestDistance)*updateTime
If we do, the percentage will be on updateTime. For example, if the distance is half of farthestDistance, the next update will be in half of updateTime.
- If you want to get a better understanding of how to change colors gradually, you can refer to the previous chapter in the Creating a slider that changes colors gradually recipe, or consult the official documentation about the
Lerpfunction at http://docs.unity3d.com/ScriptReference/Color.Lerp.html. - Furthermore, in order to test the script as described in the There's more... section, we can refer to the Making a draggable panel and Changing the cursor at runtime recipes contained in chapters 4, 5, and 7 respectively. In Chapter 4, Creating Panels for Menus, we have taken the drag script; whereas, in Chapter 7, Applying Runtime Customizations, you can refer to use handlers and therefore also have another point of view to solving problems.
- Finally, if you want to better understand how you can shorten the float number with the
ToString()function, you can refer to the Implementing a numeric timer recipe from Chapter 3, Implementing Timers. - In addition, if we want more control over the number of digits, we can implement the structure that is explained in the Change the number of decimal digits shown section contained in the same chapter, inside the There's more... section of the Creating a mixed timer recipe.