
Finally, you're probably saying to yourself right now. Yes, it's been a journey just to start creating our game. But hopefully, all of this prologue has helped you understand that preparation is a key ingredient to a good game. Let's begin with the Creator window in Buildbox. Open Buildbox and click the Create New button:
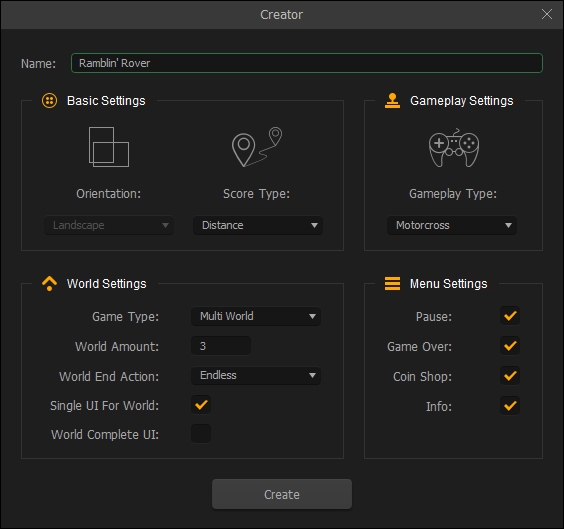
The preceding image shows what you should set the creator to. Let's take a look at these settings one by one.
We could get by using all the default settings. But using the Creator screen to set up the template will let the software do most of the hard work of creating the game and save a ton of time.
Of course, first we're going to name our game in a simple English way. As this has no bearing on filenames or even the final text for the app, it is just a way to help you later, so we'll use plain English (rather than our naming conventions).
Ramblin' Rover is going to be a driving game, and the direction will go from left to right. Therefore, it's going to be easiest for gameplay if the screen is set to an orientation of Landscape. This will help us rotate the screen on the devices and the game itself will look wider compared to a portrait orientation. Also, as most people have their computer displays oriented this way, it will lead to better gameplay on computers and even televisions.
This game will also have leaderboards that are web-enabled so that players can compete with each other on who went furthest. So this game will be endless, and the scoring will be based on distance. So first, let's set the Score Type to Distance. We'll worry about the endless part soon, but let's cross that bridge later.
The next setting is crucial. In the Gameplay Settings area, select Motocross from the Gameplay Type drop-down menu. This will set up our character as three objects, the main body of our vehicle and two wheels. These wheels will have their own physics so that they will have motors and collisions with the ground while the body of the vehicle will have collisions that will destroy the character if it comes in contact with an obstacle (such as landing on its roof on the ground). We'll go over these connections later so that you know how they work and can recreate them yourself. But for now, why not let the software do as much work for us as possible?
Ramblin' Rover's premise is being able to drive the rover on multiple planets... or really... worlds. So in the World Settings pane, let's set the Game Type to Multi World. Now you should see another set of options pop up in this area. Here is where we can set up the general settings for our worlds. Let's set the World Amount to 3. Of course, this makes our game have three worlds. Each world is another game in itself, with its own rules for physics, its own backgrounds, and even, unique scales for character.
Remember how we said our game would be endless? An endless game is one where there simply is no end to the level. Generally, they get progressively harder but can be games where they're filled with difficult obstacles that repeat in random orders, giving the player a repetitive but unique experience as the game progresses. I know, those two things are diametrically opposed. However, if you think of it like a bag of trail mix it may be easier to understand. Trail mix is filled with peanuts, raisins, and chocolate. Think of each obstacle as one of these items. When you eat this trail mix in general, the order you get pieces is random. While eating, you get different flavors depending on that order. Similarly, while playing an endless game, you get a different experience by changing up the order of the obstacles.
Endless games are also more resource-efficient. The player can play a longer game without the need for more scenes in the game. Typically, an endless game can be anywhere from 5-15 scenes per world, where a goal-oriented game (completing a level) may have many more. Both types of game are definitely worthwhile. However, as we're having three worlds and our limitation on mobile is 100 MB, we need to stay as light on resources as possible. Let's make sure our World End Action is set to Endless.
Let's also make sure that the checkbox for Single UI for World is ticked. This will make it so that our controls, sensors, and score indicators are the same across all worlds. Again, this will make things a bit lighter. Since our worlds will never end, leave the World Complete UI unticked.
Finally, let's tick every checkbox in the Menu Settings. This will create menu UIs so we can have Informational, Pause, Game Over, and Coin Shop screens within the game.
Alrighty, let's move on. Once you click on the Create button, you'll go to the first world of your game. It should look like the following screenshot:
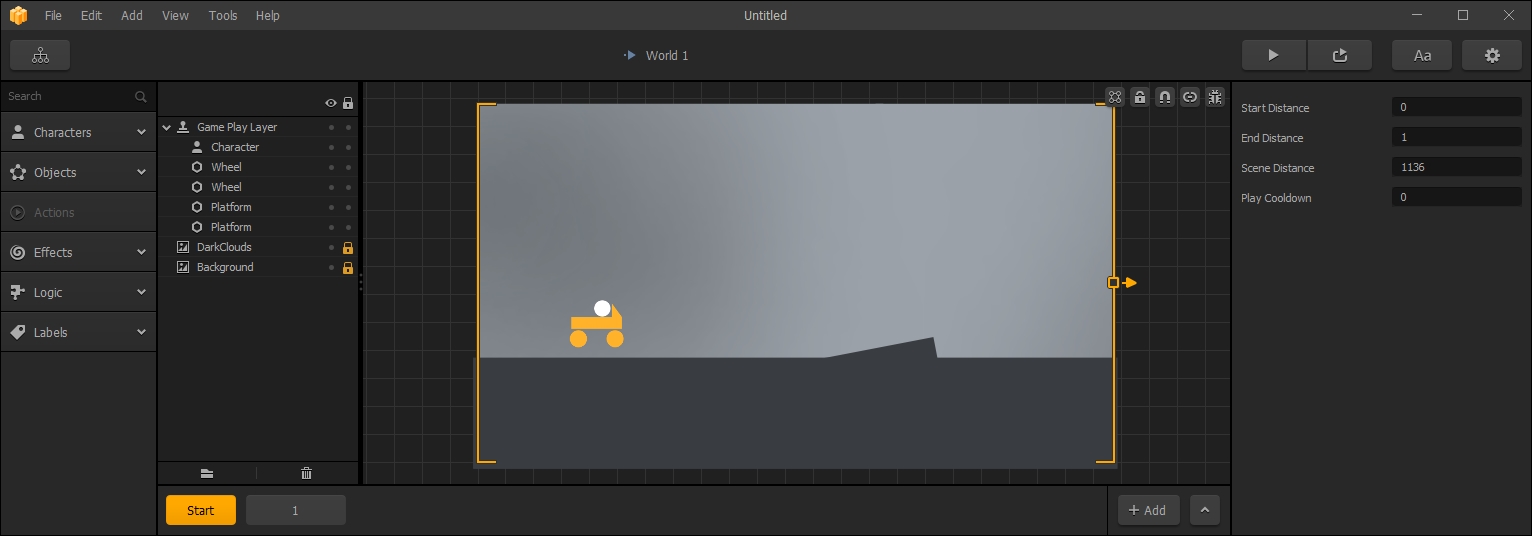
This is the initial template for our game set with characters, pre-defined physics and even some obstacles. All are set on the stage as primitives for us to replace and adjust
Cool, right? We now have a full template for our Ramblin' Rover game. Now, we just need to do some tweaks, add some menus and music, and set up our physics. Before we dive too deep into our new game, let's take a look at the Game Mind Map that our Create menu settings have made.