
Google Cloud Dataprep is a serverless service used to format and transform your raw data before importing it into BigQuery or storing it as a new file. The file used for the demo is a Wikipedia log. You can download one of the files from https://dumps.wikimedia.org/other/pageviews/2017/2017-12/.
Open the Cloud Console screen in the browser and choose the project you want to use for Cloud Dataprep. Open Cloud Shell by clicking on the ![]() icon, as shown in this screenshot:
icon, as shown in this screenshot:

Run the following command to download a file from the URL given previously:
wget https://dumps.wikimedia.org/other/pageviews/2017/2017-12/pageviews-20171201-120000.gz
Run the following command to extract the gzip file and store it in the same directory:
gunzip pageviews-20171201-120000.gz
Run the following command to rename the file with a user-friendly name for this demo:
mv pageviews-20171201-120000 wikipediadata.csv
Upload the file to the Google Cloud Storage bucket using the following command from Google Cloud SDK. Replace bucketname with the bucket name from your project:
gsutil cp wikipediadata.csv gs://bucketname/
To start using Cloud Dataprep, navigate to the BIG DATA menu in the Cloud Console, as shown in this screenshot:

Accept the terms to use Cloud Dataprep. You will be redirected to the following screen. Click on the Create Flow button and enter the Flow Name and Flow Description for your sample data preparation task:

Once the flow is created, click on the Add Datasets button on the next screen. Choose the GCS option as the source and select the bucket and the file to be imported, as shown in the following screenshot. Click on Import Datasets once the file is selected. You can add more than one file to be simultaneously processed by Dataprep:

Click on Add new Recipe to add a new task to transform the data loaded in the Dataprep dataset. Click on Edit Recipe after the new recipe is added:

The Edit Recipe button, when clicked, will navigate the user to the following screen, where the data is shown in a tabular format for modifications. For each column, make sure that Dataprep has mapped it to the right data types. In the following example, columns 2 and 3 are mapped as string and columns 4 and 5 are mapped as integer. If the data type for a column is not correct, choose the correct data type by clicking on Data type, located to the left of the column heading:

The following screenshot shows the list of data types available to choose from. Make use of specific types, such as Email Address and Phone Number. Rename the columns to more meaningful names by clicking on the column header:

To apply any transformation to a column, click on the drop-down menu in the column heading and choose the Filter option, as shown in this screenshot:

Enter the value for column2 as commons.m, as shown in the following screenshot, and click on the Add button to refresh the screen to see only the filtered data. Click on Run Job to run the filtering, and in the next screen, click on the Add Publishing Action button:

Choose the destination for Dataprep to load the data. Choose BigQuery and select the dataset. Specify a new table name for loading this data into the table, as shown in the following screenshot. Click on the Save Settings button:

Once redirected to the following screen, click on the Run Job button and wait for the job to finish; it will import the data into the new table in BigQuery. It takes a few minutes for the job to finish, so don't click on the Run Job button too many times:

You will be redirected to the main screen for the job and can track the status of the job, as shown in this screenshot:

Once the job is complete, the summary is displayed as shown in the following screenshot. Click on the View Results button to see the full statistics about the job:

The following screenshot shows the full statistics of the job. Verify that all the rows that meet the filter criteria are imported successfully:
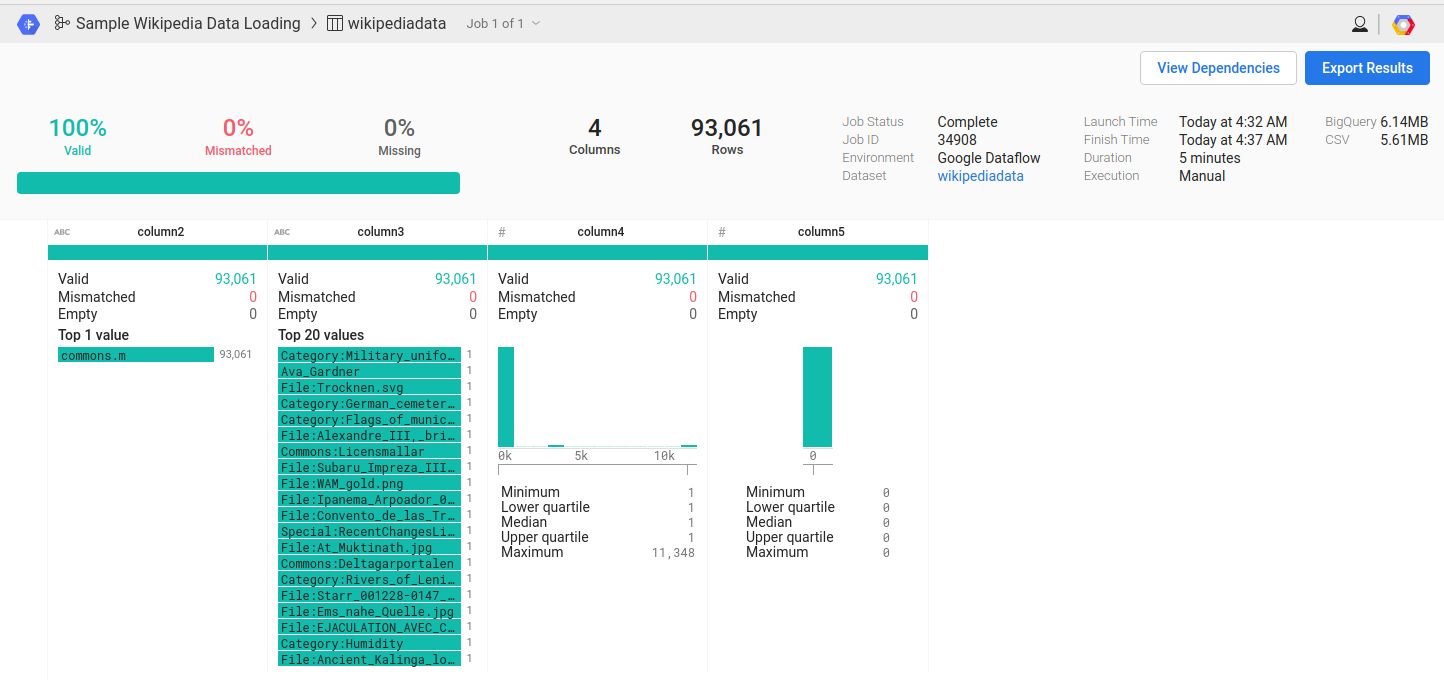
Open the BigQuery console and make sure that the records are inserted into the destination table. The number of rows in the table should match the rows specified in the job statistics:


Use Cloud Dataprep to sanitize the data, filter it, and transform it for importing into BigQuery. The transformed data can be written to a file in Google Cloud Storage. The jobs can also be scheduled to run automatically in Cloud Dataprep.