15
Introduction to Kubernetes
In this chapter, we will start to learn about Kubernetes, the most popular and widely used container orchestrator at the time of writing this book. Since the subjects on container orchestrators in general and Kubernetes itself are too big to be covered in one chapter, I will focus on introducing the areas that I have found to be the most important in my use of Kubernetes over the last few years.
The following topics will be covered in this chapter:
- Introducing Kubernetes concepts
- Introducing Kubernetes API objects
- Introducing Kubernetes runtime components
- Creating a local Kubernetes cluster
- Trying out a sample deployment and getting used to the
kubectlKubernetes CLI tool - Managing a local Kubernetes cluster
Technical requirements
For instructions on how to install the tools used in this book and how to access the source code for this book, see:
- Chapter 21 for macOS
- Chapter 22 for Windows
The code examples in this chapter all come from the source code in $BOOK_HOME/Chapter15. The source code for the sample deployment on Kubernetes that will be performed in this chapter can be found in the folder $BOOK_HOME/Chapter15/kubernetes/first-attempts.
Introducing Kubernetes concepts
At a high level, as a container orchestrator, Kubernetes makes a cluster of (physical or virtual) servers that run containers appear as one big logical server running containers. As an operator, we declare a desired state to the Kubernetes cluster by creating objects using the Kubernetes API. Kubernetes continuously compares the desired state with the current state. If it detects differences, it takes action to ensure that the current state is the same as the desired state.
One of the main purposes of a Kubernetes cluster is to deploy and run containers, but also to support zero-downtime rolling upgrades using techniques such as green/blue and canary deployments. Kubernetes can schedule containers, that is, Pods that contain one or more co-located containers, to the available nodes in the cluster. To be able to monitor the health of running containers, Kubernetes assumes that containers implement a liveness probe. If a liveness probe reports an unhealthy container, Kubernetes will restart the container. Containers can be scaled in the cluster manually or automatically using a horizontal autoscaler. To optimize the use of the available hardware resources in a cluster, for example, memory and CPU, containers can be configured with quotas that specify the amount of resources a container needs. On the other hand, limits regarding how much a container is allowed to consume can be specified on the Pod or for a group of Pods on the namespace level. Namespaces will be introduced as we proceed through this chapter. This is of extra importance if several teams share a common Kubernetes cluster.
Another main purpose of Kubernetes is to provide service discovery of the running Pods and their containers. Kubernetes Service objects can be defined for service discovery and will also load balance incoming requests over the available Pods. Service objects can be exposed to the outside of a Kubernetes cluster. However, as we will see, an Ingress object is, in many cases, better suited to handling externally incoming traffic to a group of services. To help Kubernetes find out whether a container is ready to accept incoming requests, a container can implement a readiness probe.
Internally, a Kubernetes cluster provides one big flat IP network where each Pod gets its own IP address and can reach all the other Pods, independent of which node they run on. To support multiple network vendors, Kubernetes allows the use of network plugins that comply with the Container Network Interface (CNI) specification (https://github.com/containernetworking/cni). Pods are not isolated by default; they accept all incoming requests. CNI plugins that support the use of network policy definitions can be used to lock down access to Pods, for example, only allowing traffic from Pods in the same namespace.
To allow multiple teams to work on the same Kubernetes cluster in a safe way, Role-Based Access Control (RBAC, https://kubernetes.io/docs/reference/access-authn-authz/rbac/) can be applied. For example, administrators can be authorized to access resources on a cluster level, while the access of team members can be locked down to resources that are created in a namespace owned by the teams.
In total, these concepts provide a platform for running containers that is scalable, secure, highly available, and resilient.
Let's look a bit more into API objects that are available in Kubernetes and, after that, the runtime components that make up a Kubernetes cluster.
Introducing Kubernetes API objects
Kubernetes defines an API that is used to manage different types of objects or resources, as they are also known. Some of the most commonly used types, or kinds, as referred to in the API, are as follows:
- Node: A node represents a server, virtual or physical, in the cluster.
- Pod: A Pod represents the smallest possible deployable component in Kubernetes, consisting of one or more co-located containers. The containers share the same IP address and port range. This means that containers in the same Pod instance can talk to each other over localhost, but need to be aware of potential port collisions. Typically, a Pod consists of one container, but there are use cases for extending the functionality of the main container by running the second container in a Pod. In Chapter 18, Using a Service Mesh to Improve Observability and Management, a second container will be used in the Pods, running a sidecar that makes the main container join the service mesh.
- Deployment: A Deployment is used to deploy and upgrade Pods. The Deployment objects hand over the responsibility of creating and monitoring the Pods to a ReplicaSet. When creating a Deployment for the first time, the work performed by the Deployment object is not much more than creating the ReplicaSet object. When performing a rolling upgrade of a Deployment, the role of the Deployment object is more involved.
- ReplicaSet: A ReplicaSet is used to ensure that a specified number of Pods are running at all times. If a Pod is deleted, it will be replaced with a new Pod by the ReplicaSet.
- Service: A Service is a stable network endpoint that you can use to connect to one or multiple Pods. A Service is assigned an IP address and a DNS name in the internal network of the Kubernetes cluster. The IP address of the Service will stay the same for the lifetime of the Service. Requests that are sent to a Service will be forwarded to one of the available Pods using round robin-based load balancing. By default, a Service is only exposed inside the cluster using a cluster IP address. It is also possible to expose a Service outside the cluster, either on a dedicated port on each node in the cluster or – even better – through an external load balancer that is aware of Kubernetes; that is, it can automatically provision a public IP address and/or DNS name for the Service. Cloud providers that offer Kubernetes as a service, in general, support this type of load balancer.
- Ingress: Ingress can manage external access to Services in a Kubernetes cluster, typically using HTTP or HTTPS. For example, it can route traffic to the underlying Services based on URL paths or HTTP headers such as the hostname. Instead of exposing a number of Services externally, either using node ports or through load balancers, it is, in general, more convenient to set up an Ingress in front of the Services. To handle the actual communication defined by the Ingress objects, an Ingress controller must be running in the cluster. We will see an example of an Ingress controller as we proceed.
- Namespace: A namespace is used to group and, on some levels, isolate resources in a Kubernetes cluster. The names of resources must be unique in their namespaces, but not between namespaces.
- ConfigMap: A ConfigMap is used to store configuration that's used by containers. ConfigMaps can be mapped into a running container as environment variables or files.
- Secret: This is used to store sensitive data used by containers, such as credentials. Secrets can be made available to containers in the same way as ConfigMaps. Anyone with full read access to the API server can access the values of created secrets, so they are not as safe as the name might imply.
- DaemonSet: This ensures that one Pod is running on each node in a set of nodes in the cluster. In Chapter 19, Centralized Logging with the EFK Stack, we will see an example of a log collector, Fluentd, that will run on each worker node as a DaemonSet.
For a full list of resource objects that the Kubernetes API covers in v1.20, see https://kubernetes.io/docs/reference/generated/kubernetes-api/v1.20/.
The following diagram summarizes the Kubernetes resources that are involved in handling incoming requests:

Figure 15.1: Overview of Kubernetes resources
In the preceding diagram, we can see the following:
- Two deployments, Deployment A and Deployment B, have been deployed to a cluster with two nodes, Node 1 and Node 2
- Deployment A contains two Pods, Pod A1 and Pod A2
- Deployment B contains one Pod, Pod B1
- Pod A1 is scheduled to Node 1
- Pod A2 and Pod B1 are scheduled to Node 2
- Each Deployment has a corresponding Service deployed, Service A and Service B, and they are available on all nodes
- An Ingress is defined to route incoming requests to the two Services
- A client typically sends requests to the cluster via an External Load Balancer
These objects are not, by themselves, running components; instead, they are definitions of different types of desired states. To reflect the desired state in the cluster's current state, Kubernetes comes with an architecture consisting of a number of runtime components, as described in the next section.
Introducing Kubernetes runtime components
A Kubernetes cluster contains two types of nodes: master nodes and worker nodes. Master nodes manage the cluster, while the main purpose of worker nodes is to run the actual workload, for example, the containers we deploy in the cluster. Kubernetes is built up by a number of runtime components. The most important components are as follows:
- There are components that run on master nodes, constituting the control plane:
- api-server, the entry point to the control plane. This exposes a RESTful API, which, for example, the Kubernetes CLI tool known as kubectl uses.
- etcd, a highly available and distributed key/value store, used as a database for all cluster data.
- A controller manager, which contains a number of controllers that continuously evaluate the desired state versus the current state for the objects defined in the etcd database.
Whenever the desired or current state changes, a controller that's responsible for that type of state takes actions to move the current state to the desired state. For example, a replication controller that's responsible for managing Pods will react if a new Pod is added through the API server or a running Pod is deleted and ensures that new pods are started. Another example of a controller is the node controller. It is responsible for acting if a node becomes unavailable, ensuring that Pods running on a failing node are rescheduled on other nodes in the cluster.
- A scheduler, which is responsible for assigning newly created Pods to a node with available capacity, for example, in terms of memory and CPU. Affinity rules can be used to control how Pods are assigned to nodes. For example, Pods that perform a lot of disk I/O operations can be assigned to a group of worker nodes that have fast SSD disks. Anti-affinity rules can be defined to separate Pods, for example, to avoid scheduling Pods from the same Deployment to the same worker node.
- Components that run on all the nodes, constituting the data plane:
- kubelet, a node agent that executes as a process directly in the nodes' operating system and not as a container. A kubelet ensures that the Pods that are scheduled to its node have their containers up and running and that they are healthy. It acts as a conduit between the api-server and the container runtime on its node.
- kube-proxy, a network proxy that enables the Service concept in Kubernetes and is capable of forwarding requests to the appropriate Pods, typically in a round-robin fashion if more than one Pod is available for the specific Service. kube-proxy is deployed as a DaemonSet.
- Container runtime, which is the software that runs the containers on a node. Historically, Kubernetes used Docker, but today any implementation of the Kubernetes Container Runtime Interface (CRI) can be used, for example, cri-o (https://cri-o.io) and containerd (https://containerd.io/).
The following diagram summarizes the Kubernetes runtime components described above:

Figure 15.2: Overview of Kubernetes runtime components
Based on the diagram, we can imagine the following sequence of events:
- An operator uses kubectl to send in a new desired state to Kubernetes, containing manifests declaring a new Deployment, Service, and Ingress object. The Ingress defines a route to the Service object and the Service object is defined to select Pods that are configured by the Deployment object.
- kubectl talks to the api-server and it stores the new desired state as objects in the etcd database.
- Various controllers will react on the creation of the new objects and take the following actions:
- For the Deployment object:
i. New ReplicaSet and Pod objects will be registered in the api-server.
ii. The scheduler will see the new Pod(s) and schedule them to appropriate worker nodes.
iii. On each worker node, the kubelet agent will launch containers as described by the Pods. The kubelet will use the container runtime on the worker node to manage the containers.
- For the Service object:
i. A DNS name will be registered in the internal DNS server for the Service object and the kube-proxies will be able to route requests that use the DNS name to one of the available Pods.
Note that Pods are reachable from any node in the cluster, so the kube-proxy must not run on the same node as the Pod to be able to forward requests to it.
- For the Ingress object:
i. An Ingress controller will set up routes according to the Ingress object and be ready to accept requests from outside of the Kubernetes cluster. External requests that match the routes defined by the Ingress object will be forwarded by the Ingress controller to the Service object. These requests will be forwarded by the kube-proxy to a Pod as described above.
- For the Deployment object:
Now that we understand the Kubernetes runtime components and what they support and run on, let's move on to creating a Kubernetes cluster with Minikube.
Creating a Kubernetes cluster using Minikube
Now, we are ready to create a Kubernetes cluster! We will use Minikube to create a local single-node cluster.
On macOS, we will use HyperKit (https://minikube.sigs.k8s.io/docs/drivers/hyperkit/) to run a lightweight Linux VM. HyperKit uses the macOS built-in Hypervisor framework and is installed by Docker Desktop for Mac, so we don't need to install it separately.
On Windows, we will run Minikube in a Linux server running on WSL 2 (Windows Subsystem for Linux, v2). The easiest way to run Minikube in WSL 2 is to run Minikube as a Docker container.
Docker and its containers are already running in a separate WSL 2 instance; see the Installing Docker Desktop for Windows section in Chapter 22, Installation Instructions for Microsoft Windows with WSL 2 and Ubuntu.
One drawback of running Minikube as a container on Docker is that ports exposed by Minikube are only accessible in the host that runs Docker. To make the ports available to Docker clients, for example the Linux server we will use on WSL 2, we can specify port mappings when creating the Minikube cluster.
Before creating the Kubernetes cluster, we need to learn a bit about Minikube profiles, the Kubernetes CLI tool known as kubectl, and its use of contexts.
Working with Minikube profiles
In order to run multiple Kubernetes clusters locally, Minikube comes with the concept of profiles. For example, if you want to work with multiple versions of Kubernetes, you can create multiple Kubernetes clusters using Minikube. Each cluster will be assigned a separate Minikube profile. Most of the Minikube commands accept a --profile flag (or -p for short) that can be used to specify which of the Kubernetes clusters the command will be applied to. If you plan to work with one specific profile for a while, a more convenient alternative exists, where you specify the current profile with the following command:
minikube profile my-profile
This command will set the my-profile profile as the current profile.
To get the current profile, run the following command:
minikube config get profile
If no profile is specified, either using the minikube profile command or the --profile switch, a default profile named minikube will be used.
Information regarding existing profiles can be found with the command minikube profile list.
Working with the Kubernetes CLI, kubectl
kubectl is the Kubernetes CLI tool. Once a cluster has been set up, this is usually the only tool you need to manage the cluster!
For managing the API objects, as we described earlier in this chapter, the kubectl apply command is the only command you need to know about. It is a declarative command; that is, as an operator, we ask Kubernetes to apply the object definition we give to the command. It is then up to Kubernetes to figure out what actually needs to be done.
Another example of a declarative command that's hopefully familiar to many readers of this book is a SQL SELECT statement, which can join information from several database tables. We only declare the expected result in the SQL query, and it is up to the database query optimizer to figure out in what order the tables should be accessed and what indexes to use to retrieve the data in the most efficient way.
In some cases, imperative statements that explicitly tell Kubernetes what to do are preferred. One example is the kubectl delete command, where we explicitly tell Kubernetes to delete some API objects. Creating a namespace object can also be conveniently done with an explicit kubectl create namespace command.
Repetitive usage of the imperative statements will make them fail, for example, deleting the same API object twice using kubectl delete or creating the same namespace twice using kubectl create. A declarative command, that is, using kubectl apply, will not fail on repetitive usage – it will simply state that there is no change and exit without taking any action.
Some commonly used commands for retrieving information about a Kubernetes cluster are as follows:
kubectl getshows information about the specified API objectkubectl describegives more detail about the specified API objectkubectl logsdisplays log output from containers
We will see a lot of examples of these and other kubectl commands in this and the upcoming chapters!
If in doubt about how to use the kubectl tool, the kubectl help and kubectl <command> --help commands are always available and provide very useful information. Another helpful command is kubectl explain, which can be used to show what fields are available when declaring a Kubernetes object. For example, run the following command if you need to look up the fields available to describe a container in the template of a Deployment object:
kubectl explain deployment.spec.template.spec.containers
Working with kubectl contexts
To be able to work with more than one Kubernetes cluster, using either Minikube locally or Kubernetes clusters set up on on-premises servers or in the cloud, kubectl comes with the concept of contexts. A context is a combination of the following:
- A Kubernetes cluster
- Authentication information for a user
- A default namespace
By default, contexts are saved in the ~/.kube/config file, but the file can be changed using the KUBECONFIG environment variable. In this book, we will use the default location, so we will unset KUBECONFIG using the unset KUBECONFIG command.
When a Kubernetes cluster is created in Minikube, a context is created with the same name as the Minikube profile and is then set as the current context. So, kubectl commands that are issued after the cluster is created in Minikube will be sent to that cluster.
To list the available contexts, run the following command:
kubectl config get-contexts
The following is a sample response:

Figure 15.3: List of kubectl contexts
The wildcard, *, in the first column marks the current context.
You will only see the handson-spring-boot-cloud context in the preceding response once the cluster has been created, the process for which we will describe shortly.
If you want to switch the current context to another context, that is, work with another Kubernetes cluster, run the following command:
kubectl config use-context my-cluster
In this example, the current context will be changed to my-cluster.
To update a context, for example, switching the default namespace used by kubectl, use the kubectl config set-context command.
For example, to change the default namespace of the current context to my-namespace, use the following command:
kubectl config set-context $(kubectl config current-context) --namespace my-namespace
In this command, kubectl config current-context is used to get the name of the current context.
Creating a Kubernetes cluster
To create a Kubernetes cluster using Minikube, we need to run a few commands:
- Unset the
KUBECONFIGenvironment variable to ensure that thekubectlcontext is created in the default config file,~/.kube/config. - Create the cluster using the
minikube startcommand, where we can also specify what version of Kubernetes to use and the amount of hardware resources we want to allocate to the cluster:- To be able to complete the examples in the remaining chapters of this book, allocate 10 GB of memory, that is, 10,240 MB, to the cluster. The samples should also work if only 6 GB (6,144 MB) are allocated to the Minikube cluster, albeit more slowly.
- Allocate the number of CPU cores and disk space you find suitable; 4 CPU cores and 30 GB of disk space are used in the following example.
- Finally, specify what version of Kubernetes will be used. In this book, we will use v1.20.5.
- Specify the Minikube profile to be used for the coming
minikubecommands. We will usehandson-spring-boot-cloudas the profile name. - After the cluster has been created, we will use the add-on manager in Minikube to enable an Ingress controller and a metrics server that comes out of the box with Minikube. The Ingress controller and the metrics server will be used in the next chapters.
Run the following commands to create the Kubernetes cluster on macOS:
unset KUBECONFIG

minikube start
 --profile=handson-spring-boot-cloud
 --memory=10240
 --cpus=4
 --disk-size=30g
 --kubernetes-version=v1.20.5
 --driver=hyperkit

minikube profile handson-spring-boot-cloud

minikube addons enable ingress
minikube addons enable metrics-server
In WSL 2 on Windows, we need to replace the HyperKit driver with the Docker driver and specify the ports we will need access to in the coming chapters. Run the following commands in WSL 2:
unset KUBECONFIG

minikube start
 --profile=handson-spring-boot-cloud
 --memory=10240
 --cpus=4
 --disk-size=30g
 --kubernetes-version=v1.20.5
 --driver=docker
 --ports=8080:80 --ports=8443:443
 --ports=30080:30080 --ports=30443:30443

minikube profile handson-spring-boot-cloud

minikube addons enable ingress
minikube addons enable metrics-server
The ports 8080 and 8443 will be used by the Ingress controller and the ports 30080 and 30443 will be used by Services of type NodePort.
After the preceding commands complete, you should be able to communicate with the cluster. Try the kubectl get nodes command. It should respond with something that looks similar to the following:

Figure 15.4: List of nodes in the Kubernetes cluster
Once created, the cluster will initialize itself in the background, starting up a number of system Pods in the kube-system namespace. We can monitor its progress by issuing the following command:
kubectl get pods --namespace=kube-system
Once the startup is complete, the preceding command should report the status for all Pods as Running and the READY count should be 1/1, meaning that a single container in each Pod is up and running:

Figure 15.5: List of running system Pods
Note that two Pods are reported as Completed, and not Running. They are Pods created by Job objects, used to execute a container a fixed number of times like a batch job. Run the command kubectl get jobs --namespace=kube-system to reveal the two Job objects.
We are now ready for some action!
Trying out a sample deployment
Let's see how we can do the following:
- Deploy a simple web server based on NGINX in our Kubernetes cluster
- Apply some changes to the deployment:
- Change the current state by deleting the Pod and verify that the ReplicaSet creates a new one
- Change the desired state by scaling the web server to three Pods and verify that the ReplicaSet fills the gap by starting up two new Pods
- Route external traffic to the web server using a Service with a node port
First, create a namespace, first-attempts, and update the kubectl context to use this namespace by default:
kubectl create namespace first-attempts
kubectl config set-context $(kubectl config current-context) --namespace=first-attempts
We can now create a deployment of NGINX in the namespace using the kubernetes/first-attempts/nginx-deployment.yaml file. This file looks as follows:
apiVersion: apps/v1
kind: Deployment
metadata:
  name: nginx-deploy
spec:
  replicas: 1
  selector:
    matchLabels:
      app: nginx-app
  template:
    metadata:
      labels:
        app: nginx-app
    spec:
      containers:
      - name: nginx-container
        image: nginx:latest
        ports:
        - containerPort: 80
Let's explain this source code in more detail:
- The
kindandapiVersionattributes are used to specify that we are declaring a Deployment object. - The
metadatasection is used to describe the Deployment object. For example, we give it the namenginx-deploy.Other commonly used metadata for a Kubernetes object include the name of the
namespaceit belongs to,labels, andannotations. We will see them used in this chapter and the following chapters.
- Next comes a
specsection that defines our desired state for the Deployment object:replicas: 1specifies we want to have one Pod up and running.- A
selectorsection that specifies how the Deployment will find the Pods it manages. In this case, the Deployment will look for Pods that have theapplabel set tonginx-app. - The
templatesection is used to specify how Pods will be created: - The
metadatasection specifies thelabel,app: nginx-app, which is used to identify the Pods, thereby matching the selector. - The
specsection specifies details for the creation of the single container in the Pod, that is,name,image, and whatportsit uses.
Create the Deployment with the following commands:
cd $BOOK_HOME/Chapter15
kubectl apply -f kubernetes/first-attempts/nginx-deployment.yaml
Let's see what we got with the kubectl get all command:

Figure 15.6: Kubernetes objects created by the sample deployment
As expected, we got a Deployment, ReplicaSet, and Pod object. After a short while, which mainly depends on the time it takes to download the NGINX Docker image, the Pod will be up and running, reported as 1/1 in the READY column, meaning that the desired state is equal to the current state!
Now, we will change the current state by deleting the Pod. Before deleting the Pod, run the command kubectl get pod --watch in another terminal. The use of the --watch option makes the command hang, waiting for state changes of Pods in the current namespace. Delete the Pod using the following command:
kubectl delete pod --selector app=nginx-app
Since the Pod has a random name (nginx-deploy-59b8c5f7cd-mt6pg in the preceding example), the Pod is selected based on the app label, which is set to nginx-app in the Pod.
Note how kubectl get pod --watch reports how the current Pod is terminated and at the same time a new Pod is started up. It is the ReplicaSet that detects the difference between the desired and current state and almost immediately starts up a new Pod to compensate for the deviation. The reported events should look like the following screenshot:

Figure 15.7: kubectl get pod –watch reporting changes to the Pods
In the screenshot, we can see that the Pod with a name ending with d69ln was stopped by the delete command and that the ReplicaSet immediately started up a new Pod with a name ending with ptbkf.
Change the desired state by setting the number of desired Pods to three replicas in the kubernetes/first-attempts/nginx-deployment.yaml deployment file. Apply the change in the desired state by simply repeating the kubectl apply command, as we mentioned previously.
Again, note that the kubectl get pod --watch command reports new Pods being launched by the ReplicaSet to get the current state equivalent to the new desired state, that is, three Pods. After a few seconds, two new NGINX Pods will be reported as up and running. Stop the command with Ctrl + C.
Run the kubectl get all command and expect a response that looks similar to the following:

Figure 15.8: New Pods started up by Kubernetes to meet the desired state
Note the three Pods and that the Deployment object reports 3/3. This is interpreted as 3 ready and 3 desired Pods, meaning that all desired Pods are ready to be used.
To enable external communication with the web servers, create a Service using the kubernetes/first-attempts/nginx-service.yaml file:
apiVersion: v1
kind: Service
metadata:
  name: nginx-service
spec:
  type: NodePort
  selector:
    app: nginx-app
  ports:
    - targetPort: 80
      port: 80
      nodePort: 30080
The kind and apiVersion attributes are used to specify that we are declaring a Service object.
The metadata section is used to describe the Service object, for example, to give it a name: nginx-service.
Next comes a spec section, which defines the desired state of the Service object:
- With the
typefield, we specify that we wantNodePort, that is, a Service that is accessible externally on a dedicated port on each node in the cluster. This means that an external caller can reach the Pods behind this Service using this port on any of the nodes in the cluster, independent of which nodes the Pods actually run on. - The selector is used by the Service to find available Pods, which, in our case, are Pods labeled with
app: nginx-app. - Finally,
portsare declared as follows:port: 80specifies which port the Service will be accessible on, that is, internally in the cluster.targetPort: 80specifies the port in the Pod where the requests will be forwarded to.nodePort: 30080specifies which port the Service will be externally accessible on using any of the nodes in the cluster. By default, a node port must be in the range of30000to32767.
This port range is used to minimize the risk of colliding with other ports in use. In a production system, a load balancer is typically placed in front of the Kubernetes cluster, shielding the external users both from the knowledge of these ports and the IP numbers of the nodes in the Kubernetes cluster. See Chapter 18, Using a Service Mesh to Improve Observability and Management, specifically the Setting up access to Istio services section, for more on the usage of a LoadBalanced Kubernetes Service.
Create the Service with the following command:
kubectl apply -f kubernetes/first-attempts/nginx-service.yaml
To see what we got, run the kubectl get svc command. Expect a response like the following:

Figure 15.9: NodePort Service for our deployment
kubectl supports short names for many of the API objects as an alternative to their full name. For example, svc was used in the preceding command instead of the full name, service. Run the command kubectl api-resources to see all available short names.
To access the web server through the Service's node port, we need to know the IP address or hostname of the single node in our cluster.
On macOS, where we run the Minikube cluster in a VM managed by HyperKit, we can ask Minikube for the IP address of the VM with the minikube ip command. In my case, it is 192.168.99.116.
On Windows, we run the Minikube cluster as a Docker container. The node port, 30080, is forwarded from the Docker engine to our Linux server in WSL 2 by the –ports option in the minikube start command. See the Creating a Kubernetes cluster section above for details. This means that we can reach the node port using localhost in WSL 2. What is even better is that the same goes for Windows, meaning that we can also reach the node port from a web browser running in Windows using localhost and port 30080.
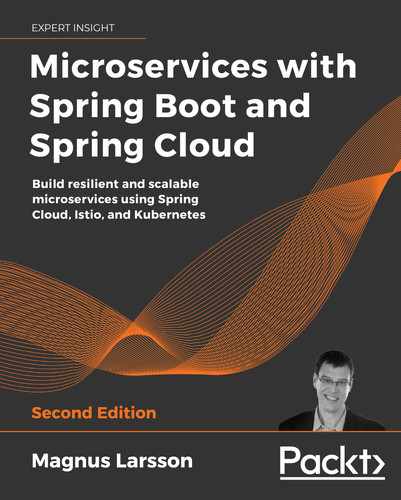
With this information, we can direct our web browser to the deployed web server. On macOS the address is, in my case, http://192.168.99.116:30080. On Windows the address is http://localhost:30080. Expect a response such as the following:
Figure 15.10: NGINX default web page
Great! But what about the internal cluster IP address and port?
One way to verify that the web server is also reachable internally in the cluster is to launch a small Pod that we can use to run curl from the inside. The curl command will use the internal cluster IP address and port. We don't need to use the internal IP address; instead, we can use a DNS name that is created for the Service in the internal DNS server. The short name of the DNS name is the same as the name of the Service, that is, nginx-service.
Run the following command:
kubectl run -i --rm --restart=Never curl-client --image=curlimages/curl --command -- curl -s 'http://nginx-service:80'
The command looks a bit complex, but it will do the following:
- Create a Pod with a small container based on the Docker image
curlimages/curl, which contains thecurlcommand - Run the
curl -s 'http://nginx-service:80'command inside the container and redirect the output to the Terminal using the-ioption - Delete the Pod using the
--rmoption
Expect the output from the preceding command to contain the following information (we are only showing parts of the response here):

Figure 15.11: Accessing NGINX inside the Kubernetes cluster
This means that the web server is also accessible internally in the cluster!
This is basically all we need to know to be able to deploy our system landscape.
Wrap this up by removing the namespace containing the nginx deployment:
kubectl delete namespace first-attempts
Before we end this introductory chapter on Kubernetes, we need to learn how to manage our Kubernetes cluster.
Managing a local Kubernetes cluster
A running Kubernetes cluster consumes a lot of resources, mostly memory. So, when we are done working with a Kubernetes cluster in Minikube, we must be able to hibernate it in order to release the resources allocated to it. We also need to know how to resume the cluster when we want to continue working with it. Eventually, we must also be able to permanently remove the cluster when we don't want to keep it on disk anymore.
Minikube comes with a stop command that can be used to hibernate a Kubernetes cluster. The start command we used to initially create the Kubernetes cluster can also be used to resume the cluster from its hibernated state. To permanently remove a cluster, we can use the delete command from Minikube.
Hibernating and resuming a Kubernetes cluster
Run the following command to hibernate (that is, stop) the Kubernetes cluster:
minikube stop
Run the following command to resume (that is, start) the Kubernetes cluster again:
minikube start
When resuming an already existing cluster, the start command ignores switches that were used when you were creating the cluster.
After resuming the Kubernetes cluster, the kubectl context will be updated to use this cluster with the currently used namespace set to default. If you are working with another namespace, for example, the hands-on namespace that we will use in the upcoming chapter, Chapter 16, Deploying Our Microservices to Kubernetes, you can update the kubectl context with the following command:
kubectl config set-context $(kubectl config current-context) --namespace=hands-on
Subsequent kubectl commands will be applied to the hands-on namespace when applicable.
Minikube also comes with a more lightweight and faster alternative to the stop and start commands: the pause and unpause commands. In this case, the components in the control plane are paused, not stopped, reducing the CPU consumption of the cluster to a minimum. I have, however, seen issues with the these commands when used in the recent chapters, so I recommend using the start and stop commands.
Terminating a Kubernetes cluster
If you later want to terminate the Kubernetes cluster, you can run the following command:
minikube delete --profile handson-spring-boot-cloud
You can actually run the delete command without specifying the profile, but I find it safer to be explicit about the profile. Otherwise, you may accidentally delete the wrong Kubernetes cluster!
We've successfully learned how to manage a Kubernetes cluster that runs in Minikube. We now know how to suspend and resume a cluster and, when no longer needed, we know how to permanently remove it.
Summary
In this chapter, we have been introduced to Kubernetes as a container orchestrator.
Using Kubernetes, we can handle a cluster of servers as one big logical server that runs our containers. We declare a desired state for the Kubernetes cluster, and it ensures that the actual state is the same as the desired state at all times, provided that enough hardware resources are available in the cluster.
The desired state is declared by creating resources using the Kubernetes API server. The controller manager in Kubernetes and its controllers react to the various resources that were created by the API server and take actions to ensure that the current state meets the new desired state. The scheduler assigns nodes to newly created containers, that is, Pods that contain one or more containers. On each node, an agent, a kubelet, runs and ensures that the Pods that were scheduled to its node are up and running. The kube-proxy acts as a network proxy, enabling a Service abstraction by forwarding requests that are sent to the Service to available Pods in the cluster. External requests can be handled either by a Kubernetes-aware load balancer that can provision a public IP address and/or DNS name for the Service, a node port that's available on all of the nodes in the cluster, or through a dedicated Ingress resource.
We have also tried out Kubernetes by creating a local single-node cluster using Minikube. The Minikube cluster runs on macOS using HyperKit and runs as a Docker container in WSL 2 on Windows. Using the Kubernetes CLI tool known as kubectl, we deployed a simple web server based on NGINX. We tried out resilience capabilities by deleting the web server, and we observed it being recreated automatically. We learned how to manually scale it by requesting that three Pods run on the web server. We created a Service with a node port and verified that we could access it both externally and from the inside of the cluster.
Finally, we learned how to manage a Kubernetes cluster running in Minikube in terms of how to hibernate, resume, and terminate the cluster.
We are now ready to deploy our system landscape from the earlier chapters in Kubernetes. Head over to the next chapter to find out how to do this!
Questions
- What happens if you run the same
kubectl createcommand twice? - What happens if you run the same
kubectl applycommand twice? - In terms of questions 1 and 2, why do they act differently the second time they are run?
- What is the purpose of a ReplicaSet, and what other resource creates a ReplicaSet?
- What is the purpose of
etcdin a Kubernetes cluster? - How can a container find out the IP address of another container that runs in the same Pod?
- What happens if you create two Deployments with the same name but in different namespaces?
- What configuration of two Services with the same name can make them fail, even if they are created in two different namespaces?