
23
Native Compiled Java Microservices
In this chapter, we will learn how to compile the Java source code in our microservices into binary executable files, known as native images. A native image starts up significantly faster compared to using a Java VM and is also expected to consume less memory. We will be introduced to the Spring Native and GraalVM projects and the GraalVM native-image compiler and learn how to use them.
We will cover the following topics:
- When to native compile Java source code
- Introducing the Spring Native and GraalVM projects
- Compiling source code to a native image
- Testing with Docker Compose
- Testing with Kubernetes
At the time of writing, the Spring Native project only has beta status and is not ready for production use. As such, certain guidance in this chapter is liable to become outdated as the Spring team improves the project in the future. Native compilation is not required for the microservice landscape we have built in this book, but we intend that this extra chapter gives you an idea about the exciting things it is capable of.
Technical requirements
For instructions on how to install the tools used in this book and how to access the source code for this book, see:
- Chapter 21 for macOS
- Chapter 22 for Windows
The code examples in this chapter all come from the source code in $BOOK_HOME/Chapter23.
If you want to view the changes applied to the source code in this chapter so you can native compile the microservices, you can compare it with the source code for Chapter 20, Monitoring Microservices. You can use your favorite diff tool and compare the two folders $BOOK_HOME/Chapter20 and $BOOK_HOME/Chapter23.
When to native compile Java source code
Java has always been known for its build-once-run-anywhere capability, providing excellent cross-platform support. The Java source code is compiled once into byte code. At runtime, a Java VM transforms the byte code into executable code for the target platform, using a Just in Time compiler, also known as JIT compilation. This takes some time, slowing down the startup for Java programs. Before the era of microservices, Java components typically ran on an application server, like a Java EE server. After being deployed, the Java component ran for a long time, making the longer startup time less of a problem.
With the introduction of microservices, this perspective changed. With microservices, there comes the expectation of being able to upgrade them more frequently and being able to quickly scale instances for a microservice up and down, based on its usage. Another expectation is to be able to scale to zero, meaning that when a microservice is not used, it should not run any instances at all. An unused microservice should not allocate any hardware resources and, even more importantly, should not create any runtime cost, for example, in a cloud deployment. To be able to meet these expectations, it is important that a microservice instance can be started swiftly. Also, with the use of containers, the importance of cross-platform support has faded so it is not so critical (the requirement still exists since containers can run on different platforms, even though the Linux/x86 platform dominates to a large extent).
Given that the startup time for Java programs can be significantly reduced, other use cases also come to mind; for example, developing Java-based Function as a Service (FaaS) solutions using AWS Lambda, Azure Functions, or Google Cloud Function, to mention some of the major platforms. Also, developing CLI tools in Java becomes a feasible option.
Together, these lead to a situation where faster startup becomes a more critical requirement than cross-platform support. This requirement can be achieved by compiling the Java source code into the target platform's binary format at build time, in the same way that C or Go programs are compiled. This is known as Ahead of Time compilation, or AOT compilation. The GraalVM native-image compiler will be used to perform AOT compilation.
As we will see in the next section, the GraalVM native-image compiler comes with a few restrictions, for example, relating to the use of reflection and dynamic proxies. It also takes quite some time to compile Java code to a binary native image. This technology has its strengths and weaknesses.
With a better understanding of when it might be of interest to native compile Java source code, let's learn about the tooling: first, the GraalVM project, and then, the Spring Native project.
Introducing the GraalVM project
Oracle has been working for several years on a high-performance Java VM and associated tools, known together as the GraalVM project (https://www.graalvm.org). It was launched back in April 2018 (https://blogs.oracle.com/developers/announcing-graalvm), but work can be traced back to, for example, a research paper from Oracle Labs in 2013 on the subject: Maxine: An approachable virtual machine for, and in, java; see https://dl.acm.org/doi/10.1145/2400682.2400689.
Fun Fact: The Maxine VM is known as a metacircular Java VM implementation, meaning that it is, itself, written in Java.
GraalVM's virtual machine is polyglot, supporting not only traditional Java VM languages such as Java, Kotlin, and Scala but also languages like JavaScript, C, and C++. The part of GraalVM that we will focus on is its native-image compiler, which can be used to compile Java byte code to a native image containing binary executable code for a specific platform.
The native image can run without a Java VM, and it includes binary compiled application classes and other classes required from the application's dependencies. It also includes a runtime system called Substrate VM that handles garbage collection, thread scheduling, and more.
The native compiler comes with a few restrictions. For instance, since the native compiler is based on static code analysis, it cannot support the use of reflection and dynamic proxies. For more information, see https://www.graalvm.org/reference-manual/native-image/Limitations/.
To overcome these restrictions, the GraalVM project provides configuration options for the native compiler. To simplify the creation of the configuration information, the GraalVM project provides a tool called a tracing agent. It can observe a running Java application's behavior and based on the use of, for example, reflection and dynamic proxies, the tracing agent can create configuration files that help the native compiler generate code that supports the application's use of these features. We will learn how it can be used in the Running the tracing agent section. For more information, see https://www.graalvm.org/reference-manual/native-image/BuildConfiguration/.
Introducing the Spring Native project
The Spring team has also been working on supporting the native compilation of Spring applications. After 18 months of work, the Spring Native project launched a beta release in March 2021; see https://spring.io/blog/2021/03/11/announcing-spring-native-beta.
Note that this is currently a beta release, not yet ready for production use.
Using Spring Native, we can compile our Spring Boot-based microservices to native images. The Spring Native project comes with a build plugin, Spring AOT, that supports both Maven and Gradle, which simplifies the setup required for native compilation. To perform the actual native compilation, Spring Native uses the GraalVM native-image compiler under the hood.
The Spring AOT plugin creates a Docker image that contains the native image. To create the Docker image, an existing Spring Boot feature is used by the plugin. For Gradle, it is implemented as a Gradle task named bootBuildImage. This task uses buildpacks, instead of a Dockerfile, to create the Docker image.
The concept of buildpacks was introduced by Heroku back in 2011. In 2018, the Cloud Native Buildpacks project (https://buildpacks.io) was created by Pivotal and Heroku and later that year, it joined CNCF.
To be a bit more formal, a buildpack creates an OCI image, according to the OCI Image Format Specification: https://github.com/opencontainers/image-spec/blob/master/spec.md. Since the OCI specification is based on Docker's image format, the formats are very similar and are both supported by container engines.
For more information on Spring Boot's usage of buildpacks, see https://docs.spring.io/spring-boot/docs/2.5.2/reference/html/features.html#features.container-images.building.buildpacks. To create the OCI images, Spring Boot uses the Paketo project; for more information, see https://paketo.io/docs/builders.
To simplify the creation of configuration for the GraalVM native compiler, as described above, the Spring AOT plugin generates these configuration files. There are some cases when the Spring AOT plugin can't help, like when serializing JSON documents using reflection and when using a Spring library that is not yet supported by the Spring Native project. In these cases, the Spring Native project provides a set of annotations that can be used for expressing hints to the native compiler. The Spring AOT plugin will use these native hint annotations to refine the configuration it creates for the native compiler. We will see the use of these annotations in the Providing native hints as annotations section.
Many of the libraries and frameworks in Spring's ecosystem can be used with the native image compiler, some can't yet be used, and some can be used after using native hints and/or the tracing agent described above. For information on what is currently supported, see https://docs.spring.io/spring-native/docs/current/reference/htmlsingle/#support.
With the tooling introduced, let's see how we can use it to native compile our microservices.
Compiling source code to a native image
Before we can compile the Java source code in our microservices to native executable images, the source code needs to be updated a bit. The Spring AOT plugin must be added to the build files, and we also need to add some hints for the native compiler to enable it to compile the source code.
We will start by going through the required code changes. Then, we will learn how to run the GraalVM native image tracing agent to create configuration for libraries and frameworks that are not yet supported by the Spring Native project. After that, we will see how to build native executable images.
Changes in the source code
To be able to native compile the microservices, the following changes have been applied to the source code:
- The Gradle build files,
build.gradle, have been updated by adding the Spring AOT plugin and adjusting some dependencies. - Hints to the native compiler regarding our own classes have been added as annotations.
- Configuration to be able to run the GraalVM native image tracing agent has been added.
Let's go through the changes one by one.
Updates to the Gradle build files
The changes described in this section have been applied to the build.gradle files in each microservice project, unless stated otherwise.
To enable Spring Native, its Spring AOT plugin has been added as:
plugins {
    ...
    id 'org.springframework.experimental.aot' version '0.10.1'
}
Since the plugin uses the bootBuildImage task to create the Docker image, it is configured together with it. For the product microservice, the configuration looks like this:
bootBuildImage {
    builder = "paketobuildpacks/builder:tiny"
    imageName = "hands-on/native-product-service"
    environment = [
        "BP_NATIVE_IMAGE" : "true",
        "BP_NATIVE_IMAGE_BUILD_ARGUMENTS" : "--enable-url-protocols=http,https --initialize-at-build-time=sun.instrument.InstrumentationImpl"
    ]
}
The builder and imageName properties are used to configure the bootBuildImage task, while the settings in the environment section configure the Spring AOT plugin. Let's go through each property:
builder: Specifies which of Spring Boot's buildpacks to use. We will use thetinybuilder, which provides a small footprint and reduced attack surface for security attacks.imageName: Specifies the name of the Docker image. We will use the same naming conventions as in earlier chapters, but prefix the name of the image withnative-to separate it from the existing Docker images."BP_NATIVE_IMAGE" : "true": Enables the native image compiler."BP_NATIVE_IMAGE_BUILD_ARGUMENTS" : "...": Gives arguments to the native compiler. For a list of available parameters, see https://www.graalvm.org/reference-manual/native-image/Options/#options-to-native-image-builder.
The specific values used for each microservice's BP_NATIVE_IMAGE_BUILD_ARGUMENTS parameter come from a trial and error exercise, adding parameter values as required by running the native compiled code. As the Spring Native and GraalVM projects mature over time, I hope that the need for trial and error will vanish.
A few of the libraries used in this book cannot currently be used with Spring Native, and are therefore not used in this chapter:
resilience4j: Affects the use of circuit breakers, retries, and time limitersspring-cloud-binder-stream-rabbit: We will only use the Kafka binderspring-cloud-sleuth: We will not be able to create distributed traces
The dependencies on Spring Cloud Sleuth and Spring Cloud Stream's binder for RabbitMQ have been removed from the build files.
Due to the removal of Spring Cloud Stream's binder for RabbitMQ, the default binder property, spring.cloud.stream.defaultBinder, has been updated in the property files and test classes to specify kafka instead of rabbit.
To be able to resolve dependencies for the Spring AOT plugin, the following has been added to the common settings.gradle file:
pluginManagement {
    repositories {
        maven { url 'https://repo.spring.io/release' }
        gradlePluginPortal()
    }
}
These are all the changes required for the build files. In the next section, we will learn about how, in some cases, we need to help the native compiler to compile our source code.
Providing native hints as annotations
There exist a few cases in the source code of this chapter where the GraalVM native compiler needs help from us to be able to compile the source code correctly. The first case is the JSON-based APIs and messages that the microservices use. The JSON parser, Jackson, must be able to create Java objects based on the JSON documents that the microservices receive. Jackson uses reflection to perform this work and we need to tell the native compiler about the classes that Jackson will apply reflection on.
For example, a native hint for the Product class looks like this:
@TypeHint(types = Product.class, fields = {
  @FieldHint(name = "productId", allowWrite = true),
  @FieldHint(name = "name", allowWrite = true),
  @FieldHint(name = "weight", allowWrite = true),
  @FieldHint(name = "serviceAddress", allowWrite = true)
})
To allow the JSON parser to create a Product object from a JSON document, we must explicitly allow write access for each field in the class, as seen in the annotation above.
Another corner case we must provide a hint for is when we inject Spring Bean dependencies as classes instead of interfaces. Spring Native supports the injection of Spring Bean dependencies as interfaces, using method parameters. When classes are injected instead of interfaces, we must provide a ClassProxyHint annotation. In the source code of this book, we only have one use case of class injection. That is in the product-composite microservice, where the class ProductCompositeServiceImpl injects an instance of the ProductCompositeIntegration class in its constructor. The code looks like this:
public ProductCompositeServiceImpl(
  ServiceUtil serviceUtil,
  ProductCompositeIntegration integration) {
To allow Spring Native to create the required proxy at build time, the following ClassProxyHint is provided:
@ClassProxyHint(targetClass = ProductCompositeIntegration.class, interfaces = {
  ProductService.class,
  RecommendationService.class,
  ReviewService.class,
  org.springframework.aop.SpringProxy.class,
  org.springframework.aop.framework.Advised.class,
  org.springframework.core.DecoratingProxy.class
})
All necessary hint annotations have been added to each microservice's main class.
Now that we know how we can provide hints for our own source code, it's time to learn how we can handle cases when libraries we use are not yet supported by the Spring Native project.
When underlying frameworks and libraries don't support native compilation
In the case where frameworks and libraries are not yet supported by the Spring Native project, we can use the GraalVM native image tracing agent. This does not work for all cases, so it must be tested before we're sure it works for a specific use case of a specific library.
As the Spring Native project evolves and begins to support more libraries in the Spring ecosystem, this will become less of a problem.
To enable the tracing agent to observe the execution of JUnit tests, the following jvmArgs can be added to the build.gradle file in the test section:
test {
    useJUnitPlatform()
    jvmArgs '-agentlib:native-image-agent=access-filter-file=src/test/resources/access-filter.json,config-output-dir=native-image-agent-output'
The parameter native-image-agent=access-filter-file specifies a file listing Java packages and classes that should be excluded by the tracing agent, typically test-related classes that we have no use for at runtime. For example, for the product microservice, the file src/test/resources/access-filter.json looks like this:
{ "rules":
  [
    {"excludeClasses": "org.apache.maven.surefire.**"},
    {"excludeClasses": "net.bytebuddy.**"},
    {"excludeClasses": "org.apiguardian.**"},
    {"excludeClasses": "org.junit.**"},
    {"excludeClasses": "org.gradle.**"},
    {"excludeClasses": "org.mockito.**"},
    {"excludeClasses": "org.springframework.test.**"},
    {"excludeClasses": "org.springframework.boot.test.**"},
    {"excludeClasses": "org.testcontainers.**"},
    {"excludeClasses": "se.magnus.microservices.core.product.MapperTests"},
    {"excludeClasses": "se.magnus.microservices.core.product.MongoDbTestBase"},
    {"excludeClasses": "se.magnus.microservices.core.product.PersistenceTests"},
    {"excludeClasses": "se.magnus.microservices.core.product.ProductServiceApplicationTests"}
  ]
}
The folder specified by the config-output-dir parameter will contain the generated configuration files. After reviewing their content, the files should be moved manually to the src/main/resources/META-INF/native-image folder, to be picked up by the GraalVM native compiler.
This has already been performed for the core microservices, so they already contain the required configuration files for the native compiler. The product-composite microservice doesn't need help from the tracing agent. The jvmArgs parameter has therefore been disabled in the build files, retained as a comment like // jvmArgs ....
Installing the tracing agent
If you want to try out the tracing agent, you must first install it together with the GraalVM JDK native image compiler. The following subsections walk through the steps required on macOS and Ubuntu under WSL 2 in Microsoft Windows.
Installing the tracing agent on macOS
Install and configure the tracing agent as follows:
- Install GraalVM JDK using Homebrew with the following command:
brew install –cask graalvm/tap/graalvm-ce-java11The GraalVM JDK is installed in the folder
/Library/Java/JavaVirtualMachines. The installation process will ask for your password to be able to move the files to this folder. At the end, it will report the full path to the GraalVM JDK. In my case, it reported/Library/Java/JavaVirtualMachines/graalvm-ce-java11-21.1.0. - To be able to use the GraalVM JDK, the environment variables
JAVA_HOMEandPATHneed to be configured as (using the folder reported by thebrew installcommand):export JAVA_HOME=/Library/Java/JavaVirtualMachines/graalvm-ce-java11-21.1.0/Contents/Home export PATH=$JAVA_HOME/bin:"$PATH" - Verify that the installation succeeded with the following command:
java -versionExpect it to respond with:
openjdk version "11.0.11" 2021-04-20
OpenJDK Runtime Environment GraalVM CE 21.1.0 (build 11.0.11+8-jvmci-21.1-b05)
OpenJDK 64-Bit Server VM GraalVM CE 21.1.0 (build 11.0.11+8-jvmci-21.1-b05, mixed mode, sharing)
If macOS refuses to run the
javacommand, for example by complaining about a damaged download file or that "the developer cannot be verified", you can tell macOS that you trust the installed JDK by running the following command:sudo xattr -r -d com.apple.quarantine /Library/Java/JavaVirtualMachines/graalvm-ce-java11-21.1.0 - Install the GraalVM native image compiler, including its tracing agent, with the GraalVM updater program,
gu, and check its version number with the commands:gu install native-image native-image --versionExpect a response like this:
GraalVM 21.1.0 Java 11 CE ... - Configure the Bash startup file for GraalVM and its tracing agent.
Gradle runs test tasks in a separate process. To make it possible for these test tasks to find the GraalVM tracing agent, we need to configure the Bash startup file, for example,
~/.bash_profile(depending on what startup file you use in your environment). Add the following to your Bash startup file:export JAVA_HOME=/Library/Java/JavaVirtualMachines/graalvm-ce-java11-21.1.0/Contents/Home export PATH=$JAVA_HOME/bin:"$PATH" - Start a new Terminal window, run the
java -versioncommand again, and verify that you get the same response as in step 3.
The GraalVM tracing agent is now ready to be used by the Gradle test task.
Installing the tracing agent on Ubuntu under WSL 2 in Microsoft Windows
Install and configure the tracing agent as follows:
- Create a folder, with its full path called
<MY_FOLDER_FULL_PATH>, where GraalVM will be installed:mkdir -p <MY_FOLDER_FULL_PATH> cd <MY_FOLDER_FULL_PATH> - Download and install the GraalVM JDK in the folder with the following commands:
graalvm_version=21.1.0 graalvm_archive=graalvm-ce-java11-linux-amd64-${graalvm_version} graalvm_folder=graalvm-ce-java11-${graalvm_version} curl -L https://github.com/graalvm/graalvm-ce-builds/releases/download/vm-${graalvm_version}/${graalvm_archive}.tar.gz > ${graalvm_archive}.tar.gz tar -xvf ${graalvm_archive}.tar.gz rm ${graalvm_archive}.tar.gz - To be able to install the GraalVM native compiler, the environment variables
JAVA_HOMEandPATHneed to be configured as:export JAVA_HOME=$PWD/${graalvm_folder} export PATH=$JAVA_HOME/bin:$PATH - Install the GraalVM native image compiler, including its tracing agent, with the GraalVM updater program,
gu, and check its version number with the following commands:gu install native-image native-image --versionExpect a response like this:
GraalVM 21.1.0 Java 11 CE ... - Configure the Bash startup file for GraalVM and its tracing agent.
Gradle runs test tasks in a separate process. To make it possible for these test tasks to find the GraalVM tracing agent, we need to configure the Bash startup file, for example,
~/.bash_profile(depending on what startup file you use in your environment). Add the following to your Bash startup file:export graalvm_version=21.1.0 export graalvm_folder=graalvm-ce-java11-${graalvm_version} export JAVA_HOME=<MY_FOLDER_FULL_PATH>/${graalvm_folder} export PATH=$JAVA_HOME/bin:$PATH - Start a new Terminal window, run the command
java -version, and verify that the response looks like the following (the output might differ if newer versions are used):openjdk version "11.0.11" 2021-04-20 OpenJDK Runtime Environment GraalVM CE 21.1.0 (build 11.0.11+8-jvmci-21.1-b05) OpenJDK 64-Bit Server VM GraalVM CE 21.1.0 (build 11.0.11+8-jvmci-21.1-b05, mixed mode, sharing)
The GraalVM tracing agent is now ready to be used by the Gradle test task.
Running the tracing agent
If you want to try out the tracing agent, you can do so with the following steps:
- Activate the
jvmArgsparameter in the build file for the selected microservice by removing the preceding comment characters//. - Run a
gradle testcommand, in this case for theproductservice:cd $BOOK_HOME/Chapter23 ./gradlew :microservices:product-service:test --no-daemonThis is a normal
gradle testcommand, but to avoid running out of memory, we disable use of the Gradle daemon. By default, the daemon is limited to use 512 MB for its heap, which is not sufficient for the tracing agent in most cases. - After the tests complete, you should find the following files in the
microservices/product-service/native-image-agent-outputfolder:jni-config.json proxy-config.json reflect-config.json resource-config.json serialization-config.jsonYou can browse through the created files; they should be similar to the files in the folder
microservices/product-service/src/main/resources/META-INF/native-image/.
Wrap up by adding back the comment before the jvmArgs parameter in the build file to disable the tracing agent.
Creating the native images
OK, it is finally time to perform the actual native compilation!
Go through the following steps:
- This is a very resource-demanding process. Therefore, first ensure that Docker Desktop is allowed to consume at least 10 GB of memory to avoid out-of-memory faults.
If a build fails with an error message that looks like
<container-name> exited with code 137, you have run out of memory in Docker. - If your computer has less than 32 GB of memory, it could be a good idea to stop the Minikube instance at this time, to avoid running out of memory in the computer. Use the following command:
minikube stop - Ensure that the Docker client talks to Docker Desktop and not to the Minikube instance:
eval $(minikube docker-env -u) - Run the following command to compile the
productservice:./gradlew :microservices:product-service:bootBuildImage --no-daemonExpect it to take some time. The command will start up a Docker container that will perform the native compile. The first time it runs, it will also download the GraalVM native compiler to be used in Docker, making the compile time even longer. On my MacBook, the first compile takes 20-30 minutes; after that, it takes around 15 minutes.
Expect a lot of output during the compilation, including all sorts of warning and error messages. A successful compile ends with a log output like this:
Successfully built image 'docker.io/hands-on/native-product-service:latest' - Native compile the three remaining microservices with the following commands:
./gradlew :microservices:product-composite-service:bootBuildImage --no-daemon ./gradlew :microservices:recommendation-service:bootBuildImage --no-daemon ./gradlew :microservices:review-service:bootBuildImage --no-daemon - To verify that the Docker images were successfully built, run the following command:
docker images | grep "hands-on/native-.* latest"Expect output like this:
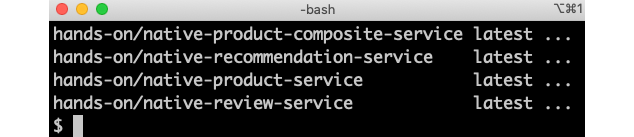
Figure 23.1: Docker images containing the native compiled executables
Now that we've created the Docker images containing the native compiled executables, we are ready to try them out! We will start with Docker Compose and, after that, try them out with Kubernetes.
Testing with Docker Compose
We are ready to try out the native compiled microservices.
To use the Docker images that contain the native compiled microservices, a new Docker Compose file has been created, docker-compose-kafka-native.yml. It is a copy of docker-compose-kafka.yml, where the build option has been removed from the definitions of the microservices.
Also, the names of the Docker images to use have been changed, so the ones we created above are used, with names that start with native-.
The Docker Compose files are configured to use two partitions per Kafka topic, resulting in two instances for each core microservice. Together with the single product-composite instance, this means that seven microservice instances will be started up. For a recap, see Chapter 7, Developing Reactive Microservices, the Running manual tests of the reactive microservice landscape section.
We'll first get a benchmark using the JVM-based microservices, to compare the startup times and initial memory consumption against. Next, we will repeat this procedure but use the Docker images that contain the native compiled microservices. Run through the following commands to test the JVM-based microservices:
- Start by compiling the source code and building the JVM-based Docker images in Docker Desktop:
cd $BOOK_HOME/Chapter23
eval $(minikube docker-env -u)
./gradlew build -x generateAot -x generateTestAot
docker-compose build
Note that we have disabled the new Spring AOT tasks,
generateAotandgenerateTestAot, in the build command. We don't need them here; they were used in the previous section of this chapter. - Use the Docker Compose file for the Java VM-based microservices and Kafka:
export COMPOSE_FILE=docker-compose-kafka.yml - Start all containers, except the microservices' containers:
docker-compose up -d mysql mongodb kafka zookeeper auth-server gatewayWait for the containers to start up, until the CPU load goes down.
- Start up the microservices using the Java VM:
docker-compose up -dWait for the microservices to start up, again monitoring the CPU load.
- To find out how much time it took to start the microservices, we can look for a log output containing
: Started. Run the following command:docker-compose logs product-composite product review recommendation product-p1 review-p1 recommendation-p1 | grep ": Started"Expect output like this:
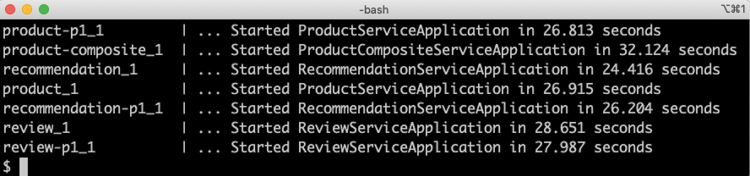
Figure 23.2: Startup times for Java VM-based microservices
In the output, we can see startup times varying from 24-32 seconds. Remember that all seven microservice instances were started simultaneously, resulting in longer startup times compared to if they were started up one by one.
- Run through the tests to verify that the system landscape works as expected:
USE_K8S=false HOST=localhost PORT=8443 HEALTH_URL=https://localhost:8443 ./test-em-all.bashSometimes, it takes a minute for the microservices and Kafka to agree on what topics and partitions to use. This will result in various error messages when running the
test-em-all.bashscript during the initialization; for example,Dispatcher has no subscribers for channel 'unknown.channel.name'. Simply rerun the test script after a minute.Note that no circuit breaker-specific tests are executed, since the use of Resilience4j in this chapter currently does not work with Spring Native. Expect the output we have seen in previous chapters from the tests:
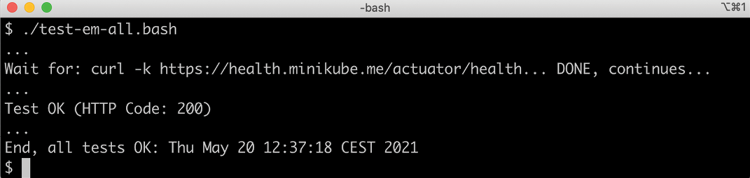
Figure 23.3: Output from the test script
- Finally, to find out how much memory is used after starting up and running the tests, run the following command:
docker stats --no-streamExpect a response like this:
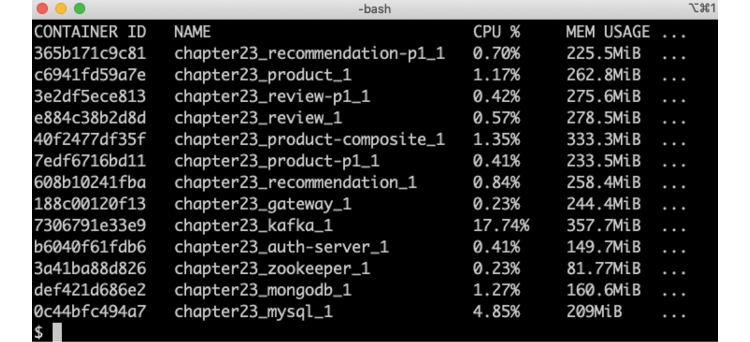
Figure 23.4: Memory usage for Java VM-based microservices
From the preceding output, we can see that the microservices consume around 220-330 MB.
- Bring down the system landscape:
docker compose down
Now, we are ready to repeat the same procedure, but this time using the Docker images with the native compiled microservices:
- Change to the new Docker Compose file:
export COMPOSE_FILE=docker-compose-kafka-native.yml - Start all containers, except for the microservices' containers:
docker-compose up -d mysql mongodb kafka zookeeper auth-server gatewayWait for the containers to start up, until the CPU load goes down.
- Start up the microservices using the Java VM:
docker-compose up -dWait for the microservices to start up, again monitoring the CPU load.
- To find out how much time it took to start the native compiled microservices, run the same command we ran previously:
docker-compose logs product-composite product review recommendation product-p1 review-p1 recommendation-p1 | grep ": Started"Expect output like this:
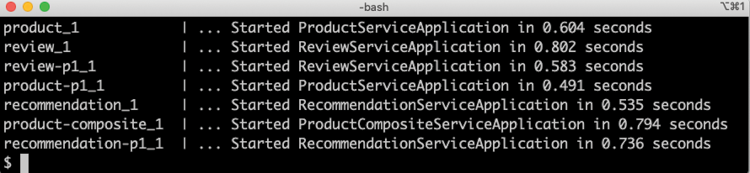
Figure 23.5: Startup times for native compiled microservices
In the above output, we can see startup times varying from 0.4-0.8 seconds. Considering that all seven microservices instances were started up at the same time, these are rather impressive figures compared to the 24-32 seconds it took for the Java VM-based tests!
- Run through the tests to verify that the system landscape works as expected:
USE_K8S=false HOST=localhost PORT=8443 HEALTH_URL=https://localhost:8443 ./test-em-all.bashExpect the same output as from the test above using the Java VM-based Docker images.
- Finally, to find out how much memory is used after starting up and running the tests, run the following command:
docker stats --no-streamExpect a response like this:

Figure 23.6: Memory usage for native compiled microservices
From the preceding output, we can see that the microservices consume around 80-100 MB. Again, this is a noticeable reduction compared to the 220-330 MB that the Java VM containers used!
- Bring down the system landscape:
docker compose down
To get a better understanding of both the memory and CPU consumption of the native compiled microservices, a more realistic load test needs to be performed, but that is beyond the scope of this book.
After seeing how much faster and less memory-consuming the native compiled microservices are when starting up compared to Java VM-based alternatives, let's see how we can run them using Kubernetes.
Testing with Kubernetes
Before we can deploy the native compiled microservices in Kubernetes, we need to replace RabbitMQ, which we have been using so far in Kubernetes, with Kafka and Zookeeper. Helm charts have been added for Kafka and Zookeeper in this chapter. Also, a new environment chart has been added, which has been configured to use the Docker images that contain the native compiled microservices. The Helm charts can be found in the following folders:
kubernetes/helm/
├── components
│   ├── kafka
│   └── zookeeper
└── environments
    └── dev-env-native
The Zookeeper chart is based on a Deployment and a Service object, as we have been using before. But for the Kafka chart, a StatefulSet has been used instead of a Deployment object. Deploying Kafka on Minikube using a Deployment object results in insufficient solutions using services of type NodePort and other workarounds.
A StatefulSet is similar to a Deployment object, since it is used to manage Pods. But it differs in terms of support for distributed stateful workloads, where the identity of the Pods is typically of importance. Typical examples of distributed stateful workloads include MongoDB as a distributed database and Kafka as a distributed streaming platform. When using a StatefulSet, each Pod gets its own DNS name, and a Service object also needs to be created as a headless service, meaning that the service itself does not have an IP address. The service's DNS name, instead, translates into the DNS names of the Pods managed by the StatefulSet.
We will try out the DNS names generated for the Pods of the StatefulSet later in this section.
A Service object can be marked as headless by setting its clusterIP to None, like so:
apiVersion: v1
kind: Service
metadata:
  name: kafka
spec:
  clusterIP: None
...
We will use a StatefulSet to create a three-node Kafka cluster.
There is also a difference, compared to using a Deployment, when a disk is attached to the Pods using a PersistentVolumeClaim (not covered in this book). When using a StatefulSet, a PersistentVolume is created for each Pod. This results in each Pod getting its own disk where it can store its own data in a persistent way. This differs from a Deployment, where all Pods share the same PersistentVolume.
Another thing we need to consider before deploying the native compiled microservices to Kubernetes is how to provision the Docker images. We don't want to run the lengthy native compile commands again to get new Docker images created in the Minikube instance. If we had used a Docker registry in this book, we could have pushed the images to the registry, but we didn't. Instead, we will extract the Docker images from Docker Desktop and import them into the Minikube instance, as a workaround for not using a Docker registry.
Move the Docker images from Docker Desktop to the Minikube instance with the following commands:
- Export the Docker images from Docker Desktop:
docker save hands-on/native-product-composite-service:latest -o native-product-composite.tar docker save hands-on/native-product-service:latest -o native-product.tar docker save hands-on/native-recommendation-service:latest -o native-recommendation.tar docker save hands-on/native-review-service:latest -o native-review.tar - If you stopped your Minikube instance before building the native images, you need to start it now:
minikube startIt could also be a good idea to stop Docker Desktop, to preserve memory.
- Import the Docker images into the Minikube instance:
eval $(minikube docker-env) docker load -i native-product-composite.tar docker load -i native-product.tar docker load -i native-recommendation.tar docker load -i native-review.tar - Finally, delete the exported
.tarfiles:rm native-product-composite.tar native-product.tar native-recommendation.tar native-review.tar
Building, deploying, and verifying the deployment on Kubernetes is done in the same way as in the previous chapters. Run the following commands:
- Build the Docker image for the auth server with the following command:
docker-compose build auth-server - To make the deploy steps run faster, prefetch the Docker images for Kafka and Zookeeper with the following commands:
docker pull zookeeper:3.4.14 docker pull wurstmeister/kafka:2.12-2.5.0 - Recreate the Namespace,
hands-on, and set it as the default Namespace:kubectl delete namespace hands-on kubectl apply -f kubernetes/hands-on-namespace.yml kubectl config set-context $(kubectl config current-context) --namespace=hands-on - Resolve the Helm chart dependencies with the following commands.
First, we update the dependencies in the
componentsfolder:for f in kubernetes/helm/components/*; do helm dep up $f; doneNext, we update the dependencies in the
environmentsfolder:for f in kubernetes/helm/environments/*; do helm dep up $f; done - We are now ready to deploy the system landscape using Helm. Run the following command and wait for all the deployments to complete:
helm upgrade -install hands-on-dev-env-native
  kubernetes/helm/environments/dev-env-native
  -n hands-on --wait
In the previous chapters, we used the
helm installcommand. Thehelm upgrade -installcommand used here is a better alternative for scripting, since it performs aninsertif the chart is not installed, but anupgradeif the chart is already installed. It's a bit like an upsert command in the relational database world. - Start the Minikube tunnel, if it's not already running (see Chapter 18, Using a Service Mesh to Improve Observability and Management, the Setting up access to Istio services section, for a recap if required):
minikube tunnelRemember that this command requires that your user has
sudoprivileges and that you enter your password during startup and shutdown. It takes a couple of seconds before the command asks for the password, so it is easy to miss! - Since it takes some time (maximum 2 minutes on my Mac) for the Kafka cluster to elect leaders for the various partitions used, it can be worth following its progress with the following command:
kubectl logs -f -l app=kafkaWhen you have seen output like the following, you can stop the
kubectl logscommand with Ctrl + C: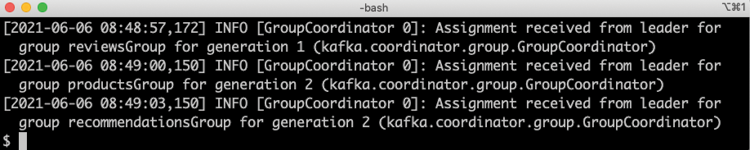
Figure 23.7: Log output from a Kafka cluster during startup
- Run the normal tests to verify the deployment with the following command:
./test-em-all.bashExpect the output to be like what we've already seen in the previous tests.
- Check the startup time for one of the Pods:
kubectl logs -l app=product-composite --tail=-1 | grep ": Started"Expect a response like this:

Figure 23.8: Startup time when running as a Pod in Kubernetes
Expect a startup time of around what we noticed when using Docker Compose, 0.8 seconds in the example above. Since we also start an Istio proxy as a sidecar, there might be some slight extra delay.
- Check the Docker images used with the following command:
kubectl get pods -o jsonpath="{.items[*].spec.containers[*].image}" | xargs -n1 | grep hands-onExpect the following response:
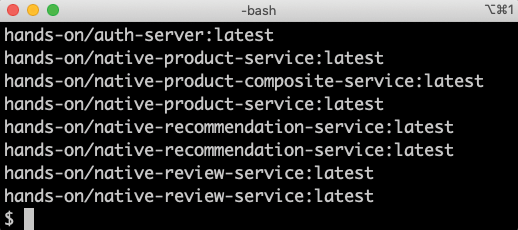
Figure 23.9: Docker images with native compiled code
From the output, we can see that all containers, except the
auth-server, use Docker images with the name prefixnative, meaning that we are running native compiled executables inside the Docker containers. - To learn a bit more about the difference between a
Deploymentand aStatefulSetobject, ask one of the Kafka brokers for the address translation of the headless service's DNS name,kafka.hands-on.svc.cluster.local. Use the following command:kubectl exec kafka-0 -it -- nslookup kafka.hands-on.svc.cluster.localExpect it to answer with:
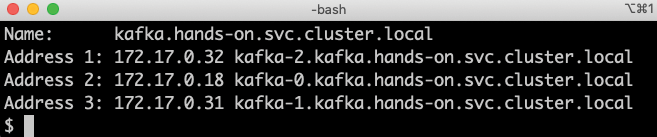
Figure 23.10: Resolving the DNS name for a headless service
From the output, we can see that the DNS name is translated into the DNS names of each broker's
Podin the cluster, as expected for a headless service. - We can also ask for an address translation of the DNS name of one of the broker's
Pods. We will used the DNS name of the third broker,kafka-2.kafka.hands-on.svc.cluster.local:kubectl exec kafka-0 -it -- nslookup kafka-2.kafka.hands-on.svc.cluster.localExpect it to answer with the IP address of the third broker's
Pod, like so:
Figure 23.11: Resolving the DNS name of one of the broker's Pods
This completes this chapter on how to use the Spring Native and GraalVM projects to create native compiled executables for our microservices.
Summary
In this chapter, we were introduced to the Spring Native project and underlying GraalVM project, along with its native image compiler. After declaring Spring Native's plugin in the build file and providing the native image compiler with some hints, it can be used to create native images. These standalone executables files are packaged by the Spring Native plugin into ready-to-use Docker images.
The main benefit of compiling Java-based source code to native images is significantly faster startup time and less memory usage. In a test where we started up seven microservice instances at the same time, we observed sub-second startup times for the native compiled microservices, compared with at least 25 seconds required for the Java VM-based microservices for the same test. Also, the native compiled microservices required half of the memory compared to the Java VM-based microservices after running through the tests in the script, test-em-all.bash.
Many of the libraries and frameworks we use in this book are already supported by Spring Native, while some of them are not yet supported. In some cases, the GraalVM native image tracing agent can be used to create configuration to help the native compiler. The tracing agent was configured to run together with our JUnit tests, and it created configuration based on the execution of the tests.
Remember that the Spring Native project has only provided a beta release at the time of writing. A lot of improvements can be expected as the project evolves toward a GA release.
We have also seen how easy it is to replace the Docker images running a Java VM with Docker images containing the native compiled images. We tested the native compiled images, both using Docker Compose and Kubernetes. When used with Kubernetes, we were also introduced to StatefulSets as an alternative to Deployment objects. StatefulSets are specifically useful for stateful workloads, such as a Kafka cluster.
With this, we have reached the end of the book. I hope it has helped you learn how to develop microservices using all the amazing features of Spring Boot, Spring Cloud, Kubernetes, and Istio and that you feel encouraged to try them out!
Questions
- How are the Spring Native and GraalVM projects related to each other?
- How is the tracing agent used?
- What is the difference between JIT and AOT compilation?
- What is a native hint?
- How are memory and startup times affected by native compiling Java code?
- How does a Kubernetes
Deploymentobject differ from aStatefulSetobject?