17
Implementing Kubernetes Features to Simplify the System Landscape
The current microservice landscape contains several supporting services that implement important design patterns required in a large-scale microservice landscape, for example, an edge server, config server, authorization server, and a service for distributed tracing. For a recap, refer to Chapter 1, Introduction to Microservices. In the previous chapter, we replaced the implementation of the design pattern for service discovery, based on Netflix Eureka, with the built-in discovery service in Kubernetes. In this chapter, we will further simplify the microservice landscape by reducing the number of supporting services required to be deployed. Instead, the corresponding design patterns will be handled by built-in capabilities in Kubernetes. The Spring Cloud Config Server will be replaced with Kubernetes ConfigMaps and Secrets. The Spring Cloud Gateway will be replaced by a Kubernetes Ingress object, which can act as an edge server in the same way as the Spring Cloud Gateway.
In Chapter 11, Securing Access to APIs, we introduced the use of certificates to protect the external API. The certificates were provisioned manually, which is both time-consuming and error-prone, specifically when it comes to remembering to rotate the certificates before they expire. In this chapter, we will learn about the cert-manager and how it can be used to automate the process of creating, provisioning, and rotating certificates.
When more and more features in a platform such as Kubernetes are being used, it is important to ensure that the source code for the microservices doesn't become dependent on the platform. To ensure that we can still use the microservices without deploying them to Kubernetes, we will conclude the chapter by deploying the microservice landscape using Docker Compose and executing the test-em-all.bash test script to verify that the microservices still work from a functional perspective without using Kubernetes.
The following topics will be covered in this chapter:
- Replacing the Spring Cloud Config Server with Kubernetes ConfigMaps and Secrets
- Replacing the Spring Cloud Gateway with a Kubernetes Ingress object
- Using the cert-manager to automatically provision certificates
- Deploying and testing the microservice landscape on Kubernetes
- Deploying and testing the microservice landscape using Docker Compose to ensure that the source code in the microservices isn't locked into Kubernetes
Technical requirements
For instructions on how to install tools used in this book and how to access the source code for this book, see:
- Chapter 21 for macOS
- Chapter 22 for Windows
The code examples in this chapter all come from the source code in $BOOK_HOME/Chapter17.
If you want to view the changes applied to the source code in this chapter, that is, see what it took to replace the Spring Cloud Config Server and Spring Cloud Gateway with corresponding features in Kubernetes, and use the cert-manager to provision certificates, you can compare it with the source code for Chapter 16, Deploying Our Microservices to Kubernetes. You can use your favorite diff tool and compare the two folders $BOOK_HOME/Chapter16 and $BOOK_HOME/Chapter17.
Replacing the Spring Cloud Config Server
As we have seen in the previous chapter, ConfigMaps and Secrets can be used to hold configuration information for our microservices. The Spring Cloud Config Server adds features such as keeping all configuration in one place, optional version control using Git, and the ability to encrypt sensitive information on the disk. But it also consumes a non-negligible amount of memory (as with any Java and Spring-based application) and adds significant overhead during startup.
For example, when running automated integration tests such as the test script we are using in this book, test-em-all.bash, all microservices are started up at the same time, including the configuration server. Since the other microservices must get their configuration from the configuration server, they all have to wait for the configuration server to be up and running before they can start up themselves. This leads to a significant delay when running integration tests. If we use Kubernetes ConfigMaps and Secrets instead, this delay is eliminated, making automated integration tests run faster. Therefore, it makes sense to use the Spring Cloud Config Server when the underlying platform doesn't provide a similar capability, but when deploying to Kubernetes, it is better to use ConfigMaps and Secrets.
Using Kubernetes ConfigMaps and Secrets instead of the Spring Cloud Config Server will make the microservice landscape start up faster and means it will require less memory. It will also simplify the microservice landscape by eliminating one supporting service, the configuration server. When we perform the replacement, it is important to do it in a way where the source code in the microservices isn't affected, thereby avoiding unnecessary lock-in to Kubernetes.
This change is illustrated by the following diagram:
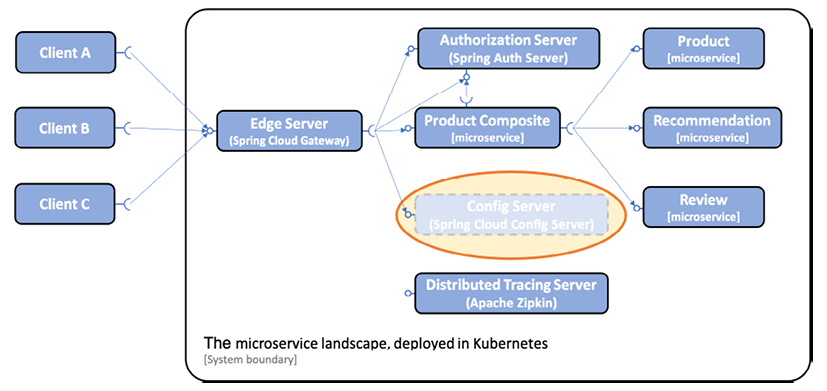
Figure 17.1: Replacing the Spring Cloud Config Server with Kubernetes built-in ConfigMaps and Secrets
Let's see what is required to replace the Spring Cloud Config Server with Kubernetes ConfigMaps and Secrets!
Note especially that we only change the configuration; no changes are required in the Java source code!
Changes required to replace the Spring Cloud Config Server
The following changes have been applied in the configuration of the source code to replace the Spring Cloud Config Server with Kubernetes ConfigMaps and Secrets:
- We have removed the
spring-cloud/config-serverproject and also removed the project in thesettings.gradlebuild file. - We have removed the Helm chart for the configuration server.
- We have removed config server-specific tests from the
test-em-all.bashtest script. - We have removed the following configuration from all microservices:
- The
spring-cloud-starter-configdependency in thebuild.gradlebuild files - The
application.ymlfiles in thesrc/main/resourcefolders in each project, which were used to connect to the config server - The
spring.cloud.config.enabled=falseproperty setting in integration tests, since it is no longer required
- The
- Changes to the configuration files in the
config-repofolder:- We have removed properties with sensitive information, for example, credentials for MongoDB, MySQL, RabbitMQ, and the password for the TLS certificate used by the edge server. Kubernetes Secrets will be used to handle sensitive information.
- The route to the configuration server API has been removed in the configuration of the edge server.
- Changes to the microservices' Helm charts in
kubernetes/helm/components:- A
config-repofolder has been added to each chart. Soft links have been created in Helm chart'sconfig-repofolder for the required configuration files from the commonconfig-repofolder. For each microservice, a soft link has been created to the commons configuration file,application.yaml, and to the microservice-specific configuration file.For a recap on how soft links are created, refer to the The components charts section in Chapter 16, Deploying Our Microservices to Kubernetes.
- The
values.yamlfile has been updated with the following:- An environment variable for a Spring property used for pointing out what configuration files to use. For example, the property looks like the following for the
productmicroservice:SPRING_CONFIG_LOCATION: file:/config-repo/application.yml,file:/config-repo/product.yml
- A ConfigMap that the microservices will use to find their configuration files. The ConfigMap will be made available inside the container on the
/config-repopath. The declaration looks like this:configmap: enabled: true volumeMounts: mountPath: /config-repo
- An environment variable for a Spring property used for pointing out what configuration files to use. For example, the property looks like the following for the
- To create the ConfigMap, a template has been added that is based on the named template,
common.configmap_from_file, from the common chart.
- A
- Changes to the environments' Helm charts in
kubernetes/helm/environments:- We have removed the dependency on the config server's chart.
- The
values.yamlfile has been updated:- The Secrets for the config server and its clients have been replaced with Secrets for the resource managers, MongoDB, MySQL, and RabbitMQ, and their clients. For example:
  rabbitmq-zipkin-credentials:
    RABBIT_USER: rabbit-user-dev
    RABBIT_PASSWORD: rabbit-pwd-dev

  mongodb-credentials:
    SPRING_DATA_MONGODB_AUTHENTICATION_DATABASE: admin
    SPRING_DATA_MONGODB_USERNAME: mongodb-user-dev
    SPRING_DATA_MONGODB_PASSWORD: mongodb-pwd-dev
Recap from the previous chapter: Note that this
values.yamlfile contains sensitive information, like the passwords from the example above. This file must therefore be stored securely. An alternative, if it is inappropriate to store this file securely, is to remove the sensitive information from this file and supply the sensitive information when thehelm installcommand is executed.- Each component is assigned the Secrets it requires.
Recap from the previous chapter: the Secrets will be mapped into each Pod as environment variables.
For example, the
productservice needs access to both MongoDB and RabbitMQ and is therefore assigned the following two Secrets:product: envFromSecretRefs: - rabbitmq-credentials - mongodb-credentials
- The Secrets for the config server and its clients have been replaced with Secrets for the resource managers, MongoDB, MySQL, and RabbitMQ, and their clients. For example:
Most of the changes in the Helm charts' values.yaml files end up in Kubernetes manifests for Deployment objects. For example, the product microservice's Deployment object will look like the following:
apiVersion: apps/v1
kind: Deployment
metadata:
name: product
spec:
template:
spec:
containers:
- name: product
env:
- name: SPRING_CONFIG_LOCATION
value: file:/config-repo/application.yml,file:/config-repo/product.yml
- name: SPRING_PROFILES_ACTIVE
value: docker
envFrom:
- secretRef:
name: rabbitmq-credentials
- secretRef:
name: mongodb-credentials
volumeMounts:
- name: product
mountPath: /config-repo
volumes:
- name: product
configMap:
name: product
Note that parts of the manifest that have not been affected by the changes above have been omitted for improved readability.
If you want to render a component's Kubernetes manifest yourself, you can do that by applying Helm's template command on the chart of interest. You must also add values from the environment's values.yaml file that are applicable for the component to the template command. Take the product service as an example. The dev-env chart's values.yaml file contains the following settings that apply to the product service:
product:
  envFromSecretRefs:
    - rabbitmq-credentials
    - mongodb-credentials
To add these settings to the template command, we can use the --set flag.
There is also a --values flag that can be used to add a values.yaml file when the command is executed.
When adding values from an environment chart, we must remember that they are parent charts to the component charts. This means that the name of the component chart must be removed from the settings when applied directly to the component chart. In this case, it means that we should add the following values to the template command to render the product chart correctly:
  envFromSecretRefs:
    - rabbitmq-credentials
    - mongodb-credentials
YAML arrays like the one above can be defined using the --set flag by listing the elements within curly braces, for example, "{a,b,c}". The product chart can be rendered using the following command:
helm template kubernetes/helm/components/product
  --set envFromSecretRefs=
    "{rabbitmq-credentials, mongodb-credentials}"
The result will contain manifests for the product microservice, a ConfigMap, a Service, and finally, a Deployment object.
This is what is required to replace the configuration server with Kubernetes ConfigMaps and Secrets. In the next section, we will learn about how we can replace the Spring Cloud Gateway with a Kubernetes Ingress object.
Replacing the Spring Cloud Gateway
In this section, we will further simplify the microservice landscape by replacing the Spring Cloud Gateway using the built-in Ingress object in Kubernetes, reducing the number of supporting services required to be deployed.
As introduced in Chapter 15, Introduction to Kubernetes, an Ingress object can be used in Kubernetes to act as an edge server in the same way as a Spring Cloud Gateway. The Spring Cloud Gateway comes with a richer routing functionality compared to an Ingress object. However, the Ingress is part of the Kubernetes platform, requiring no extra deployments, and can also be extended using the cert-manager to automatically provision certificates, as we will see later in this chapter.
We have also used the Spring Cloud Gateway to protect our microservices from unauthenticated requests, by requiring a valid OAuth 2.0/OIDC access token from a trusted OAuth Authorization Server or OIDC Provider. See Chapter 11, Securing Access to APIs, if a recap is required. Generally, Kubernetes Ingress objects do not have support for this. Specific implementations of the Ingress controller might, however, support it.
Finally, the composite health check we added to the gateway in Chapter 10, Using Spring Cloud Gateway to Hide Microservices behind an Edge Server, can be replaced by the Kubernetes liveness and readiness probes defined in each microservice's deployment manifest.
Therefore, in the same way as for the Spring Cloud Config server, it makes sense to use the Spring Cloud Gateway where the underlying platform doesn't provide a similar capability. When deploying to Kubernetes, it is better to use Ingress objects.
In this chapter, we will delegate the responsibility for validating that the request contains a valid access token to the product-composite microservice. The next chapter will introduce the concept of a service mesh, where we will see an alternative implementation of an Ingress that fully supports validating JWT-encoded access tokens.
In the Verifying that the microservices work without Kubernetes section, we will still use the Spring Cloud Gateway together with Docker Compose, so we will not remove the project.
The following diagram shows that the Spring Cloud Gateway is removed from the microservice landscape when deploying to Kubernetes:

Figure 17.2: Replacing the Spring Cloud Gateway with the Kubernetes built-in Ingress controller
Let's see what is required to replace the Spring Cloud Gateway with a Kubernetes Ingress object!
Note especially that we only change the configuration; that is, no changes are required in the Java source code!
Changes required to replace the Spring Cloud Gateway
The following changes have been applied to the configuration of the source code to replace the Spring Cloud Gateway with a Kubernetes Ingress object:
- We have removed the Helm chart for the Spring Cloud Gateway.
- We have added a named template for Ingress manifests and some default values for the Ingress in the
commonchart.The named template,
kubernetes/helm/common/templates/_ingress.yaml, begins with a declaration that we recognize from the previous chapter:{{- define "common.ingress" -}} {{- $common := dict "Values" .Values.common -}} {{- $noCommon := omit .Values "common" -}} {{- $overrides := dict "Values" $noCommon -}} {{- $noValues := omit . "Values" -}} {{- with merge $noValues $overrides $common -}} apiVersion: networking.k8s.io/v1 kind: Ingress metadata: name: {{ include "common.fullname" . }} labels: app.kubernetes.io/name: {{ include "common.name" . }} helm.sh/chart: {{ include "common.chart" . }} app.kubernetes.io/managed-by: {{ .Release.Service }} {{- with .Values.ingress.annotations }} annotations: {{ toYaml . | indent 4 }} {{- end }}The name of the template is
common.ingress, and theapiVersionandkindare set tonetworking.k8s.io/v1andIngressto identify it as an Ingress manifest. Most of the remainder of the template above looks the same as seen in other manifests where overriding parameters is required, such as the Deployment or Service template. The only new part is that the template allows the addition of annotations, if required, using theingress.annotationsfield in thevalues.yamlfile.The rest of the Ingress template contains the main part of the manifest, the
specpart. It looks like this:spec: tls: - hosts: - {{ .Values.ingress.host | quote }} secretName: {{ .Values.ingress.tls.secretName }} rules: - host: {{ .Values.ingress.host | quote }} http: paths: {{- range .Values.ingress.paths }} - path: {{ .path }} pathType: Prefix backend: service: name: {{ .service }} port: name: http {{- end }} {{- end }} {{- end -}}First comes a
tlssection where the manifest declares that the Ingress only accepts HTTPS traffic and that the acceptedhostnamewill be specified with the keyingress.hostin thevalues.yamlfiles. The certificate used for serving HTTPS requests will be stored in a Secret named as specified in thevalues.yamlfiles using theingress.tls.secretNamekey.Next are the routing rules declared in the
rulessection. First is the hostname used for routing. This will be the same hostname as in thetlssection above. Next comes a list of routes. They will be filled in using theingress.pathssection in thevalues.yamlfile. Each entry contains apathand a name of theservicethat requests to that path will be routed to. Each service is expected to have the name of its port set tohttp.The common chart's
values.yamlfile provides the following default values for the Ingress manifest:ingress: annotations: cert-manager.io/issuer: selfsigned tls: secretName: tls-certificateFirst is an annotation,
cert-manager.io/issuer, declared for the Ingress object, indicating that the cert-manager should manage the required certificate for this Ingress object using an issuer namedselfsigned. More about this below, in the Automating certificate provisioning section. Next is the Secret that will hold the certificate, given the default nametls-certificate. - We have added templates and additional settings in the environment charts,
dev-envandprod-env, for Ingress manifests. The templates are namedingress.ymland are based on the named template from thecommonchart described above:{{- template "common.ingress" . -}} - The remaining values required to render an Ingress manifest, a
hostnameand the actualpathsused for routing, are specified in each environment chart'svalues.yamlfiles. The declaration looks like this:ingress: host: minikube.me paths: - path: /oauth2 service: auth-server - path: /login service: auth-server - path: /error service: auth-server - path: /product-composite service: product-composite - path: /actuator/health service: product-composite - path: /openapi service: product-composite - path: /webjars service: product-compositeFrom the configuration, we can see that we will use the hostname
minikube.meand that three routes are defined for theauth-server, while the rest of the declared paths will be routed to theproduct-compositeservice.
We will register the hostname minikube.me in the local /etc/hosts file later, in the Testing with Kubernetes ConfigMaps, Secrets, Ingress, and the cert-manager section.
The changes above will result in an Ingress manifest being rendered by Helm. Since the Ingress template is only used by the environments charts, we need to render one of the environment charts to see the Ingress manifest.
Run the following command to render manifests using the dev-env chart:
helm template kubernetes/helm/environments/dev-env
Look for kind: Ingress in the output and you will find the Ingress manifest. It looks like this:
apiVersion: networking.k8s.io/v1
kind: Ingress
metadata:
name: RELEASE-NAME-dev-env
labels:
app.kubernetes.io/name: dev-env
helm.sh/chart: dev-env-1.0.0
app.kubernetes.io/managed-by: Helm
annotations:
cert-manager.io/issuer: selfsigned
spec:
tls:
- hosts:
- "minikube.me"
secretName: tls-certificate
rules:
- host: "minikube.me"
http:
paths:
- path: /oauth2
pathType: Prefix
backend:
service:
name: auth-server
port:
name: http
- path: /product-composite
pathType: Prefix
backend:
service:
name: product-composite
port:
name: http
- path: /actuator/health
pathType: Prefix
backend:
service:
name: product-composite
port:
name: http
Note that some of the routing rules have been removed for improved readability.
The final missing piece is how the Secret containing the certificate is created; let's look into that next.
Automating certificate provisioning
The cert-manager (https://cert-manager.io/docs/) is a certificate management controller for Kubernetes. It can facilitate the automated creation, provisioning, and rotation of certificates. It supports several sources for the certificates; for example:
- An RFC8555 (https://tools.ietf.org/html/rfc8555)-compliant ACME server such as Let's Encrypt (https://letsencrypt.org)
- HashiCorp Vault PKI Secrets Engine (https://www.vaultproject.io/docs/secrets/pki)
- Self-signed certificates, issued by the cert-manager itself
For a full list of available issuers, see https://cert-manager.io/docs/configuration/.
Since self-signed certificates don't require communication with any external resources, they are a good candidate for use during development. We will use them within the scope of this book.
Using the cert-manager in production typically requires the use of an issuer, such as Let's Encrypt, which can issue certificates for the external APIs that the API clients, for example, web browsers and external systems, will trust.
After installation of the cert-manager in a Kubernetes cluster, at least one issuer must be registered. An issuer can either be local to a namespace or accessible cluster-wide. We will use a local issuer that is registered in the existing namespace, hands-on.
It will be the responsibility of the environment charts, dev-env and prod-env, to register a proper issuer. Both environments will use the self-signed issuer. A named template, _issuer.yaml, has been added to the common chart. It looks like this:
{{- define "common.issuer" -}}
apiVersion: cert-manager.io/v1
kind: Issuer
metadata:
name: selfsigned
spec:
selfSigned: {}
{{- end -}}
The apiVersion and kind fields specify that this is an issuer defined by the cert-manager. Its name is set to selfsigned. In the Changes required to replace the Spring Cloud Gateway section above, we saw how this name was used to annotate the Ingress manifest:
ingress:
  annotations:
    cert-manager.io/issuer: selfsigned
  tls:
    secretName: tls-certificate
This is all that it takes to get the cert-manager to kick in and provide a certificate for the Ingress object. The cert-manager listens for the registration of Ingress objects that are annotated with cert-manager.io/issuer and starts to issue certificates using the issuer referenced in the value of the annotation, in this case, selfsigned. The cert-manager will use the issuer to create a certificate and will store it in a Secret named by the Ingress object. In our case, the name is set to tls-certificate. A Certificate object will also be created with the same name, containing administrative information like when it is time for the cert-manager to renew the certificate.
Since the named template, common.issuer, does not accept any configuration, all that is required to apply it in the dev-env and prod-env charts is to add a template in each chart that uses the named template. The template is named issuer.yaml and looks like this:
{{- template "common.issuer" . -}}
With this, we have everything that is required to replace the Spring Cloud Config Server and Gateway with native Kubernetes components and the cert-manager. Let's deploy and run some tests!
Testing with Kubernetes ConfigMaps, Secrets, Ingress, and the cert-manager
With the preceding changes described, we are ready to test the system landscape with the Spring Cloud Config Server and the Spring Cloud Gateway replaced by Kubernetes ConfigMaps, Secrets, an Ingress object, and the cert-manager. As before, when we used the Spring Cloud Gateway as the edge server, the external API will be protected by HTTPS. With this deployment, it will be the Ingress controller that uses the certificate provisioned by the cert-manager to protect the external API with HTTPS. This is illustrated by the following diagram:

Figure 17.3: Protecting external access using HTTPS
On macOS, the Ingress controller is exposed on the default HTTPS port, 443, on the Minikube instance. On Windows running WSL 2, where we run the Minikube instance as a Docker container, we communicate with the Minikube instance via localhost. When the Minikube instance was created in WSL 2, port forwarding was configured from port 8443 on localhost to the 443 port in the Minikube instance. The Ingress controller was installed when we performed the minikube addons enable ingress command.
For a recap on the setup of the Minikube instance, see the Creating a Kubernetes cluster section in Chapter 15, Introduction to Kubernetes.
An interesting question here is how can the Ingress controller use port 443 on the Minikube instance? We have seen the use of services of type NodePort that can allocate a port starting from 30000, so how can the Ingress controller use the standard port for HTTPS, 443?
The Ingress controller consists of a Deployment, ingress-nginx-controller, in the kube-system namespace. The answer to the question is that the Deployment configures its Pod using a hostPort to map port 443 in the host, that is, the Minikube instance, to port 443 in the container that runs in the Pod. The central parts in the definition of the Deployment look like the following:
apiVersion: apps/v1
kind: Deployment
metadata:
  name: ingress-nginx-controller
spec:
  template:
    spec:
      containers:
        image: us.gcr.io/k8s-artifacts-prod/ingress-nginx/controller:v0.40.2
        ports:
        - containerPort: 443
          hostPort: 443
This setup works for a single-node Kubernetes cluster used for development and testing. In a multi-node Kubernetes cluster, external load balancers are used to expose an Ingress controller for high availability and scalability.
The Deployment uses the same type of commands as we used in Chapter 16, Deploying Our Microservices to Kubernetes; refer to the Deploying to Kubernetes for development and test section. In this section, we will also install the cert-manager and add an entry to the/etc/hosts file for the hostname minikube.me.
Execute the following steps to deploy the system landscape and verify that it works as expected:
- Install the cert-manager in the
cert-managerNamespace and wait for the deployment to complete. Before the cert-manager can be installed, we need to add its Helm repository. Run the following commands:helm repo add jetstack https://charts.jetstack.io helm repo update helm install cert-manager jetstack/cert-manager --create-namespace --namespace cert-manager --version v1.3.1 --set installCRDs=true --waitThe cert-manager also comes with a set of Kubernetes Custom Resource Definitions (CRDs), like the
Issuerobject that was introduced above. CRDs are used in Kubernetes to extend its API, that is, to add new objects to its API. The--set installCRDs=trueflag in the command above ensures that these object definitions are installed when installing the cert-manager.Verify that three Pods are ready in the
cert-managerNamespace with the following command:kubectl get pods --namespace cert-managerExpect a response like this:
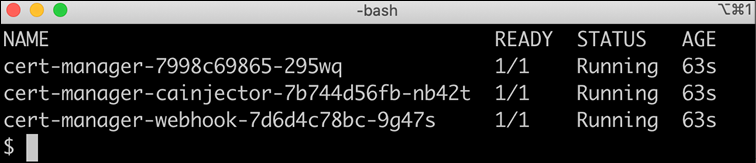
Figure 17.4: Pods in the cert-manager namespace
- Map
minikube.meto the IP address we can use to reach the Minikube instance by adding a line to the/etc/hostsfile:- On macOS, run the following command to add the line:
sudo bash -c "echo $(minikube ip) minikube.me | tee -a /etc/hosts" - On Windows using WSL 2, run the following command to add the line:
sudo bash -c "echo 127.0.0.1 minikube.me | tee -a /etc/hosts"
Note that the
sudocommand will probably ask for your password.Verify the result with the
cat /etc/hostscommand. Expect a line that contains the IP address described above followed byminikube.me; for example,192.168.64.199 minikube.me.If your
/etc/hostsfile contains multiple lines forminikube.me(for example, from earlier attempts), you need to remove the old ones manually. - On macOS, run the following command to add the line:
- You can build Docker images from source as follows:
cd $BOOK_HOME/Chapter17 eval $(minikube docker-env) ./gradlew build && docker-compose build - Pull Docker images to avoid a slow deployment process due to Kubernetes downloading Docker images:
eval $(minikube docker-env) docker pull mysql:5.7.32 docker pull mongo:4.4.2 docker pull rabbitmq:3.8.11-management docker pull openzipkin/zipkin:2.23.2 - Resolve the Helm chart dependencies:
- Set the
hands-onnamespace as the default namespace forkubectl:kubectl config set-context $(kubectl config current-context) --namespace=hands-on - In a separate terminal window, run the following command to monitor how certificate objects are created by the cert-manager:
kubectl get certificates -w --output-watch-events - Deploy the system landscape using Helm and wait for all deployments to complete:
helm install hands-on-dev-env kubernetes/helm/environments/dev-env -n hands-on --create-namespace --wait - Note how the certificate is created by the cert-manager during the deployment. Expect the following output from the
kubectl get certificatescommand: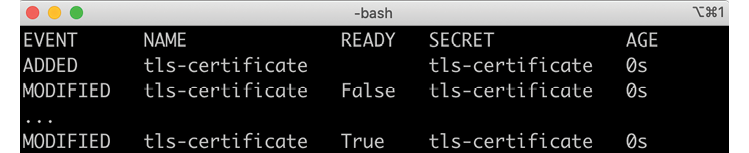
Figure 17.5: Events from the cert-manager provisioning a certificate
- Stop the
kubectl get certificatescommand with Ctrl+C. - Run the test to verify that the system landscape works as expected:
- On macOS, run the following command:
HOST=minikube.me PORT=443 USE_K8S=true ./test-em-all.bash - On Windows using WSL 2, run the following command:
HOST=minikube.me PORT=8443 USE_K8S=true ./test-em-all.bash
Expect output from the tests similar to what we obtained in the previous chapter (in condensed format):

Figure 17.6: Verifying the system landscape created by the dev-env Helm chart
- On macOS, run the following command:
Before wrapping up the dev-env, let's try out the certificate object that the cert-manager created and see how it can be used to affect the retention time for the certificate.
Rotating certificates
Let's start getting acquainted with the certificate object by issuing the following command:
kubectl describe cert tls-certificate
At the end of the output from the command, we will find the following information regarding the time that the certificate will be valid for:

Figure 17.7: Certificate validation period and renewal time
We can see that the certificate is valid for 90 days (Not After – Not Before) and that the cert-manager will try to renew it after 60 days (Renewal Time – Not Before). Since the selfsigned issuer we are using doesn't allow any configuration, these are the default values that the cert-manager uses: 90 days lifetime and a renewal process that is initiated after 2/3 of the lifetime.
But we don't want to wait 60 days before we can observe a renewal of the certificate. If we study the API specification for the certificate object at https://cert-manager.io/docs/reference/api-docs/#cert-manager.io/v1.Certificate, we will find a field in the spec section that is of interest. It is named renewBefore and can be used to specify how early the cert-manager should start the renew process. If we want the certificate to be renewed once per minute, we can specify the renewBefore to be 90 days – 1 minute = 90*24 hours – 1 minute = 2160 hours – 1 minute = 2159 hours and 59 minutes.
Start the kubectl get events -w command in a separate terminal window and run the following patch command to add the renewBefore field to the certificate:
kubectl patch certificate tls-certificate --type=json
-p='[{"op": "add", "path": "/spec/renewBefore", "value": "2159h59m"}]'
Within 1 minute, the get events command should start to report on certificate renewals. For each renewal, the following should be printed by the get events command:

Figure 17.8: Events from the cert-manager rotating a certificate
Wait a couple of minutes to verify that the certificate is renewed once per minute. If you are curious about when the next renewal will happen, you can issue the following command:
kubectl get cert tls-certificate -o json | jq .status.renewalTime
It should respond with a date like 2021-05-02T19:39:06Z.
If you no longer want to have a custom retention time, you can remove the renewBefore field with the following command:
kubectl patch certificate tls-certificate --type=json
  -p='[{"op": "remove", "path": "/spec/renewBefore"}]'
This concludes the tests we will do in the system landscape deployed using the dev-env chart. We can remove the system landscape with the following command:
kubectl delete namespace hands-on
Let us also recap how to deploy the system landscape using the prod-env chart!
Deploying to Kubernetes for staging and production
Deploying to a staging and production environment using the prod-env chart follows the same steps as we used in the Deploying to Kubernetes for staging and production section in Chapter 16, Deploying Our Microservices to Kubernetes. The steps are recapitulated here in a compact form:
- Start MySQL, MongoDB, and RabbitMQ outside of Kubernetes:
eval $(minikube docker-env) docker-compose up -d mongodb mysql rabbitmq - Tag Docker images with
v1versions:docker tag hands-on/auth-server hands-on/auth-server:v1 docker tag hands-on/product-composite-service hands-on/product-composite-service:v1 docker tag hands-on/product-service hands-on/product-service:v1 docker tag hands-on/recommendation-service hands-on/recommendation-service:v1 docker tag hands-on/review-service hands-on/review-service:v1 - Deploy the microservices using the
prod-envHelm chart:helm install hands-on-prod-env kubernetes/helm/environments/prod-env -n hands-on --create-namespace --wait - Run the test to verify that the system landscape works as expected:
- On macOS, run the following command:
HOST=minikube.me PORT=443 USE_K8S=true ./test-em-all.bash - On Windows using WSL 2, run the following command:
HOST=minikube.me PORT=8443 USE_K8S=true ./test-em-all.bash
- On macOS, run the following command:
When you are done, clean up the resources created in both Kubernetes and Docker using the following commands:
- Stop the
kubectl get cert -wandkubectl get events -wcommands if they still are running by using Ctrl + C. - Delete the namespace in Kubernetes with the following command:
kubectl delete namespace hands-on - Stop MySQL, MongoDB, and RabbitMQ with the following command:
eval $(minikube docker-env)
docker-compose down
With this, we are done with all tests running on Kubernetes. Let's see how to verify that the microservices still work without Kubernetes.
Verifying that the microservices work without Kubernetes
In this chapter and the previous one, we have seen how features in the Kubernetes platform, such as ConfigMaps, Secrets, Services, and Ingress objects, can simplify the effort of developing a landscape of cooperating microservices. But it is important to ensure that the source code of the microservices doesn't become dependent on the platform from a functional perspective. Avoiding such a lock-in makes it possible to change to another platform in the future, if required, with minimal effort. Changing the platform should not require changes in the source code, but only in the configuration of the microservices.
Testing the microservices using Docker Compose and running the test-em-all.bash verification script will ensure that they work from a functional perspective without Kubernetes. When running microservices without Kubernetes, we will lack the non-functional features that Kubernetes provides us with, for example, monitoring, scaling, and restarting containers.
When using Docker Compose, we will replace the following Kubernetes features:
- Instead of ConfigMaps, we use volumes that map the configuration files directly from the host filesystem
- Instead of using Secrets, we keep sensitive information such as credentials in the Docker Compose
.envfile - Instead of an Ingress, we will use the Spring Cloud Gateway
- Instead of Services, we will map hostnames used by the clients directly to the hostnames of the containers, meaning that we will not have any service discovery in place and will not be able to scale containers
Using Docker Compose this way will result in significant disadvantages from a non-functional perspective compared to using Kubernetes. But this is acceptable, given that Docker Compose will only be used to run functional tests.
Let's go through the changes in the docker-compose*.yml files before we run the tests using Docker Compose.
Changes in the Docker Compose files
To run microservices outside Kubernetes, using Docker Compose, the following changes have been applied to the docker-compose*.yml files:
- We have removed the configuration server definition
- We have removed the use of the following configuration server environment variables:
CONFIG_SERVER_USRandCONFIG_SERVER_PWD - We have mapped the
config-repofolder as a volume in each container that needs to read configuration files from the configuration repository - We have defined the
SPRING_CONFIG_LOCATIONenvironment variable to point to the configuration files in the configuration repository - We have stored sensitive information such as credentials and passwords in TLS certificates in the Docker Compose
.envfile - We have defined environment variables with credentials for access to resource managers using the variables defined in the
.envfile
For example, the configuration of the product microservice looks like the following in docker-compose.yml:
product:
  build: microservices/product-service
  image: hands-on/product-service
  environment:
    - SPRING_PROFILES_ACTIVE=docker
    - SPRING_CONFIG_LOCATION=file:/config-repo/application.yml,file:/config-repo/product.yml
    - SPRING_RABBITMQ_USERNAME=${RABBITMQ_USR}
    - SPRING_RABBITMQ_PASSWORD=${RABBITMQ_PWD}
    - SPRING_DATA_MONGODB_AUTHENTICATION_DATABASE=admin
    - SPRING_DATA_MONGODB_USERNAME=${MONGODB_USR}
    - SPRING_DATA_MONGODB_PASSWORD=${MONGODB_PWD}
  volumes:
    - $PWD/config-repo:/config-repo
Here is an explanation of the source code:
- The
config-repofolder is mapped as a volume into the container at/config-repo - The
SPRING_CONFIG_LOCATIONenvironment variable tells Spring where to find the property files, in this case, the/config-repo/application.ymland/config-repo/product.ymlfiles - Credentials for accessing RabbitMQ and MongoDB are set up as environment variables based on the content in the
.envfile
The credentials referred to in the preceding source code are defined in the .env file as:
RABBITMQ_USR=rabbit-user-prod
RABBITMQ_PWD=rabbit-pwd-prod
MONGODB_USR=mongodb-user-prod
MONGODB_PWD=mongodb-pwd-prod
Testing with Docker Compose
To test with Docker Compose, we will use Docker Desktop instead of Minikube. Perform the following steps:
- To direct the Docker client to use Docker Desktop instead of Minikube, run the following command:
eval $(minikube docker-env --unset) - To save memory, you might want to stop the Minikube instance:
minikube stop - Start Docker Desktop (if it is not already running).
- Build the Docker images in Docker Desktop with the following command:
docker-compose build - Run the tests using RabbitMQ (with one partition per topic):
COMPOSE_FILE=docker-compose.yml ./test-em-all.bash start stop - The tests should begin by starting all the containers, running the tests, and finally stopping all the containers. Expect output similar to what we have seen in the previous chapters (output reduced to improve readability):
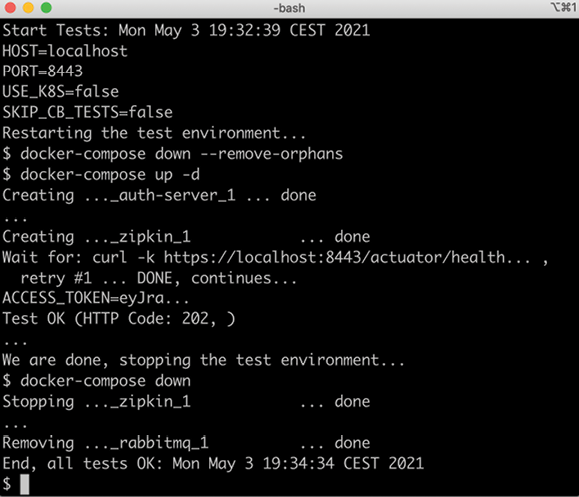
Figure 10.9: Verifying the functionality of the system landscape without using Kubernetes
- Optionally, run the tests using RabbitMQ with multiple partitions per topic:
COMPOSE_FILE=docker-compose-partitions.yml ./test-em-all.bash start stopExpect output that's similar to the preceding test.
- Alternatively, run the test using Kafka with multiple partitions per topic:
COMPOSE_FILE=docker-compose-kafka.yml ./test-em-all.bash start stopExpect output that's similar to the preceding test.
- Stop Docker Desktop to save memory, if required.
- Start the Minikube instance, if it was stopped previously, and set the default namespace to
hands-on:minikube start kubectl config set-context $(kubectl config current-context) --namespace=hands-on - Point the Docker client back to the Kubernetes cluster in the Minikube instance:
eval $(minikube docker-env)
With the successful execution of these tests, we have verified that the microservices also work without Kubernetes.
Summary
In this chapter, we have seen how capabilities in Kubernetes can be used to simplify a microservice landscape, meaning that we reduce the number of supporting services to be developed and deployed together with the microservices. We have seen how Kubernetes ConfigMaps and Secrets can be used to replace the Spring Cloud Config Server and how a Kubernetes Ingress object can replace the Spring Cloud Gateway.
Using the cert-manager allowed us to automatically provision certificates for HTTPS endpoints exposed by the Ingress controller, eliminating the need for manual and cumbersome work.
To verify that the source code of the microservices can run on other platforms, that is, isn't locked into Kubernetes, we deployed the microservices using Docker Compose and ran the test-em-all.bash test script.
In the next chapter, we will be introduced to the concept of a service mesh and learn how a service mesh product, Istio, can be used to improve observability, security, resilience, and routing in a landscape of cooperating microservices that are deployed on Kubernetes.
Head over to the next chapter!
Questions
- How was the Spring Cloud Config Server replaced by Kubernetes resources?
- How was the Spring Cloud Gateway replaced by Kubernetes resources?
- What is required to make the cert-manager automatically provision certificates for an Ingress object?
- How can the retention time of a certificate be checked and updated?
- Where is the actual certificate stored?
- Why did we run the tests using Docker Compose?