
13
Improving Resilience Using Resilience4j
In this chapter, we will learn how to use Resilience4j to make our microservices more resilient, that is, how to mitigate and recover from errors. As we already discussed in Chapter 1, Introduction to Microservices, in the Circuit breaker section, and Chapter 8, Introduction to Spring Cloud, in the Using Resilience4j for improved resilience section, a circuit breaker can be used to minimize the damage that a slow or unresponsive downstream microservice can cause in a large-scale system landscape of synchronously communicating microservices. We will see how the circuit breaker in Resilience4j can be used together with a time limiter and retry mechanism to prevent two of the most common error situations:
- Microservices that start to respond slowly or not at all
- Requests that randomly fail from time to time, for example, due to temporary network problems
The following topics will be covered in this chapter:
- Introducing the three Resilience4j mechanisms: circuit breaker, time limiter, and retry
- Adding the mechanisms to the source code
- Trying out the mechanisms when deployed in the system landscape
Technical requirements
For instructions on how to install the tools used in this book and how to access the source code for this book, see:
- Chapter 21 for macOS
- Chapter 22 for Windows
The code examples in this chapter all come from the source code in $BOOK_HOME/Chapter13.
If you want to view the changes applied to the source code in this chapter, that is, see what it took to add resilience using Resilience4j, you can compare it with the source code for Chapter 12, Centralized Configuration. You can use your favorite diff tool and compare the two folders, $BOOK_HOME/Chapter12 and $BOOK_HOME/Chapter13.
Introducing the Resilience4j resilience mechanisms
The circuit breaker, time limiter, and retry mechanisms are potentially useful in any synchronous communication between two software components, for example, microservices. In this chapter, we will apply these mechanisms in one place, in calls from the product-composite service to the product service. This is illustrated in the following figure:
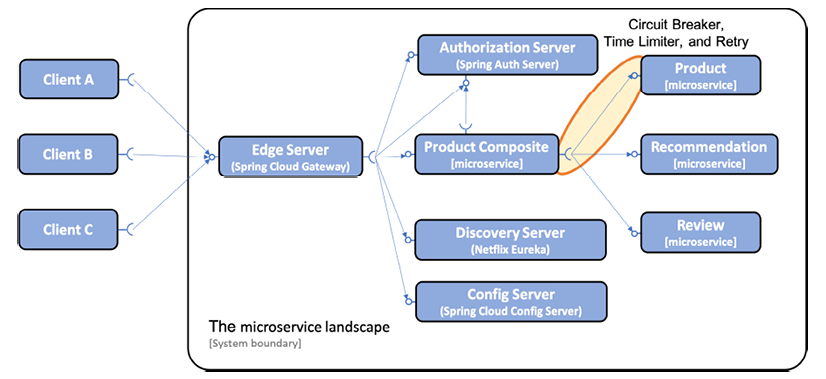
Figure 13.1: Adding resilience capabilities to the system landscape
Note that the synchronous calls to the discovery and config servers from the other microservices are not shown in the preceding diagram (to make it easier to read).
Recently, Spring Cloud added a project, Spring Cloud Circuit Breaker, that provides an abstraction layer for circuit breakers. Resilience4j can be configured to be used under the hood. This project does not provide other resilience mechanisms such as retries, time limiters, bulkheads, or rate limiters in an integrated way as the Resilience4j project does. For more information on the project, see https://spring.io/projects/spring-cloud-circuitbreaker.
A number of other alternatives exist as well. For example, the Reactor project comes with built-in support for retries and timeouts; see Mono.retryWhen() and Mono.timeout(). Spring also has a retry mechanism (see https://github.com/spring-projects/spring-retry), but it does not support a reactive programming model.
However, none of the alternatives provide such a cohesive and well-integrated approach to providing a set of resilience mechanisms as Resilience4j does, specifically, in a Spring Boot environment, where dependencies, annotations, and configuration are used in an elegant and consistent way. Finally, it is worth noting that the Resilience4j annotations work independently of the programming style used, be it reactive or imperative.
Introducing the circuit breaker
Let's quickly revisit the state diagram for a circuit breaker from Chapter 8, Introduction to Spring Cloud, in the Using Resilience4j for improved resilience section:
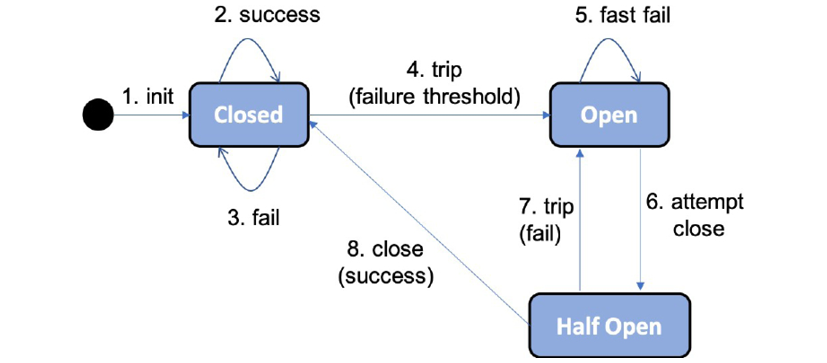
Figure 13.2: Circuit breaker state diagram
The key features of a circuit breaker are as follows:
- If a circuit breaker detects too many faults, it will open its circuit, that is, not allow new calls.
- When the circuit is open, a circuit breaker will perform fail-fast logic. This means that it doesn't wait for a new fault, for example, a timeout, to happen on subsequent calls. Instead, it directly redirects the call to a fallback method. The fallback method can apply various business logic to produce a best-effort response. For example, a fallback method can return data from a local cache or simply return an immediate error message. This will prevent a microservice from becoming unresponsive if the services it depends on stop responding normally. This is specifically useful under high load.
- After a while, the circuit breaker will be half-open, allowing new calls to see whether the issue that caused the failures is gone. If new failures are detected by the circuit breaker, it will open the circuit again and go back to the fail-fast logic. Otherwise, it will close the circuit and go back to normal operation. This makes a microservice resilient to faults, or self-healing, a capability that is indispensable in a system landscape of microservices that communicate synchronously with each other.
Resilience4j exposes information about circuit breakers at runtime in a number of ways:
- The current state of a circuit breaker can be monitored using the microservice's
actuatorhealthendpoint,/actuator/health. - The circuit breaker also publishes events on an
actuatorendpoint, for example, state transitions,/actuator/circuitbreakerevents. - Finally, circuit breakers are integrated with Spring Boot's metrics system and can use it to publish metrics to monitoring tools such as Prometheus.
We will try out the health and event endpoints in this chapter. In Chapter 20, Monitoring Microservices, we will see Prometheus in action and how it can collect metrics that are exposed by Spring Boot, for example, metrics from our circuit breaker.
To control the logic in a circuit breaker, Resilience4j can be configured using standard Spring Boot configuration files. We will use the following configuration parameters:
slidingWindowType: To determine if a circuit breaker needs to be opened, Resilience4j uses a sliding window, counting the most recent events to make the decision. The sliding windows can either be based on a fixed number of calls or a fixed elapsed time. This parameter is used to configure what type of sliding window is used.We will use a count-based sliding window, setting this parameter to
COUNT_BASED.slidingWindowSize: The number of calls in a closed state that are used to determine whether the circuit should be opened.We will set this parameter to
5.failureRateThreshold: The threshold, in percent, for failed calls that will cause the circuit to be opened.We will set this parameter to
50%. This setting, together withslidingWindowSizeset to5, means that if three or more of the last five calls are faults, then the circuit will open.automaticTransitionFromOpenToHalfOpenEnabled: Determines whether the circuit breaker will automatically transition to the half-open state once the waiting period is over. Otherwise, it will wait for the first call after the waiting period is over until it transitions to the half-open state.We will set this parameter to
true.waitDurationInOpenState: Specifies how long the circuit stays in an open state, that is, before it transitions to the half-open state.We will set this parameter to
10000 ms. This setting, together with enabling automatic transition to the half-open state, set by the previous parameter, means that the circuit breaker will keep the circuit open for 10 seconds and then transition to the half-open state.permittedNumberOfCallsInHalfOpenState: The number of calls in the half-open state that are used to determine whether the circuit will be opened again or go back to the normal, closed state.We will set this parameter to
3, meaning that the circuit breaker will decide whether the circuit will be opened or closed based on the first three calls after the circuit has transitioned to the half-open state. Since thefailureRateThresholdparameters are set to 50%, the circuit will be open again if two or all three calls fail. Otherwise, the circuit will be closed.ignoreExceptions: This can be used to specify exceptions that should not be counted as faults. Expected business exceptions such asnot foundorinvalid inputare typical exceptions that the circuit breaker should ignore; users who search for non-existing data or enter invalid input should not cause the circuit to open.We will set this parameter to a list containing the exceptions
NotFoundExceptionandInvalidInputException.
Finally, to configure Resilience4j to report the state of the circuit breaker in the actuator health endpoint in a correct way, the following parameters are set:
registerHealthIndicator = trueenables Resilience4j to fill in the health endpoint with information regarding the state of its circuit breakers.allowHealthIndicatorToFail = falsetells Resilience4j not to affect the status of the health endpoint. This means that the health endpoint will still report"UP"even if one of the component's circuit breakers is in an open or half-open state. It is very important that the health state of the component is not reported as"DOWN"just because one of its circuit breakers is not in a closed state. This means that the component is still considered to be OK, even though one of the components it depends on is not.This is actually the core value of a circuit breaker, so setting this value to
truewould more or less spoil the value of bringing in a circuit breaker. In earlier versions of Resilience4j, this was actually the behavior. In more recent versions, this has been corrected andfalseis actually the default value for this parameter. But since I consider it very important to understand the relation between the health state of the component and the state of its circuit breakers, I have added it to the configuration.
- Finally, we must also configure Spring Boot Actuator to add the circuit breaker health information that Resilience4j produces in the response to a request to its health endpoint:
management.health.circuitbreakers.enabled: true
For a full list of available configuration parameters, see https://resilience4j.readme.io/docs/circuitbreaker#create-and-configure-a-circuitbreaker.
Introducing the time limiter
To help a circuit breaker handle slow or unresponsive services, a timeout mechanism can be helpful. Resilience4j's timeout mechanism, called a TimeLimiter, can be configured using standard Spring Boot configuration files. We will use the following configuration parameter:
timeoutDuration: Specifies how long aTimeLimiterinstance waits for a call to complete before it throws a timeout exception. We will set it to2s.
Introducing the retry mechanism
The retry mechanism is very useful for random and infrequent faults, such as temporary network glitches. The retry mechanism can simply retry a failed request a number of times with a configurable delay between the attempts. One very important restriction on the use of the retry mechanism is that the services that it retries must be idempotent, that is, calling the service one or many times with the same request parameters gives the same result. For example, reading information is idempotent, but creating information is typically not. You don't want a retry mechanism to accidentally create two orders just because the response from the first order's creation got lost in the network.
Resilience4j exposes retry information in the same way as it does for circuit breakers when it comes to events and metrics, but does not provide any health information. Retry events are accessible on the actuator endpoint, /actuator/retryevents. To control the retry logic, Resilience4j can be configured using standard Spring Boot configuration files. We will use the following configuration parameters:
maxAttempts: The number of attempts before giving up, including the first call. We will set this parameter to3, allowing a maximum of two retry attempts after an initial failed call.waitDuration: The wait time before the next retry attempt. We will set this value to1000ms, meaning that we will wait 1 second between retries.retryExceptions: A list of exceptions that will trigger a retry. We will only trigger retries onInternalServerErrorexceptions, that is, when HTTP requests respond with a500status code.
Be careful when configuring retry and circuit breaker settings so that, for example, the circuit breaker doesn't open the circuit before the intended number of retries have been completed!
For a full list of available configuration parameters, see https://resilience4j.readme.io/docs/retry#create-and-configure-retry.
With this introduction, we are ready to see how to add these resilience mechanisms to the source code in the product-composite service.
Adding the resilience mechanisms to the source code
Before we add the resilience mechanisms to the source code, we will add code that makes it possible to force an error to occur, either as a delay and/or as a random fault. Next, we will add a circuit breaker together with a time limiter to handle slow or unresponsive APIs, as well as a retry mechanism that can handle faults that happen randomly. Adding these features from Resilience4j follows the Spring Boot way, which we have been using in the previous chapters:
- Add a starter dependency on Resilience4j in the build file
- Add annotations in the source code where the resilience mechanisms will be applied
- Add configuration that controls the behavior of the resilience mechanisms
Handling resilience challenges is a responsibility for the integration layer; therefore, the resilience mechanisms will be placed in the ProductCompositeIntegration class. The source code in the business logic, implemented in the ProductCompositeServiceImpl class, will not be aware of the presence of the resilience mechanisms.
Once we have the mechanisms in place, we will finally extend our test script, test-em-all.bash, with tests that automatically verify that the circuit breaker works as expected when deployed in the system landscape.
Adding programmable delays and random errors
To be able to test our resilience mechanisms, we need a way to control when errors happen. A simple way to achieve this is by adding optional query parameters in the API used to retrieve a product and a composite product.
The code and API parameters added in this section to force delays and errors to occur should only be used during development and tests, not in production. When we learn about the concept of a service mesh in Chapter 18, Using a Service Mesh to Improve Observability and Management, we will learn about better methods that can be used in production to introduce delays and errors in a controlled way. Using a service mesh, we can introduce delays and errors, typically used for verifying resilience capabilities, without affecting the source code of the microservices.
The composite product API will simply pass on the parameters to the product API. The following query parameters have been added to the two APIs:
delay: Causes thegetProductAPI on theproductmicroservice to delay its response. The parameter is specified in seconds. For example, if the parameter is set to3, it will cause a delay of three seconds before the response is returned.faultPercentage: Causes thegetProductAPI on theproductmicroservice to throw an exception randomly with the probability specified by the query parameter, from 0 to 100%. For example, if the parameter is set to25, it will cause every fourth call to the API, on average, to fail with an exception. It will return an HTTP error 500 (Internal Server Error) in these cases.
Changes in the API definitions
The two query parameters that we introduced above, delay and faultPercentage, have been defined in the api project in the following two Java interfaces:
ProductCompositeService:Mono<ProductAggregate> getProduct( @PathVariable int productId, @RequestParam(value = "delay", required = false, defaultValue = "0") int delay, @RequestParam(value = "faultPercent", required = false, defaultValue = "0") int faultPercent );ProductService:Mono<Product> getProduct( @PathVariable int productId, @RequestParam(value = "delay", required = false, defaultValue = "0") int delay, @RequestParam(value = "faultPercent", required = false, defaultValue = "0") int faultPercent );
The query parameters are declared optional with default values that disable the use of the error mechanisms. This means that if none of the query parameters are used in a request, neither a delay will be applied nor an error thrown.
Changes in the product-composite microservice
The product-composite microservice simply passes the parameters to the product API. The service implementation receives the API request and passes on the parameters to the integration component that makes the call to the product API:
- The call from the
ProductCompositeServiceImplclass to the integration component looks like this:public Mono<ProductAggregate> getProduct(int productId, int delay, int faultPercent) { return Mono.zip( ... integration.getProduct(productId, delay, faultPercent), .... - The call from the
ProductCompositeIntegrationclass to the product API looks like this:public Mono<Product> getProduct(int productId, int delay, int faultPercent) { URI url = UriComponentsBuilder.fromUriString( PRODUCT_SERVICE_URL + "/product/{productId}?delay={delay}" + "&faultPercent={faultPercent}") .build(productId, delay, faultPercent); return webClient.get().uri(url).retrieve()...
Changes in the product microservice
The product microservice implements the actual delay and random error generator in the ProductServiceImpl class by extending the existing stream used to read product information from the MongoDB database. It looks like this:
public Mono<Product> getProduct(int productId, int delay,
  int faultPercent) {

  ...
  return repository.findByProductId(productId)
    .map(e -> throwErrorIfBadLuck(e, faultPercent))
    .delayElement(Duration.ofSeconds(delay))
    ...
}
When the stream returns a response from the Spring Data repository, it first applies the throwErrorIfBadLuck method to see whether an exception needs to be thrown. Next, it applies a delay using the delayElement function in the Mono class.
The random error generator, throwErrorIfBadLuck(), creates a random number between 1 and 100 and throws an exception if it is higher than, or equal to, the specified fault percentage. If no exception is thrown, the product entity is passed on in the stream. The source code looks like this:
private ProductEntity throwErrorIfBadLuck(
  ProductEntity entity, int faultPercent) {

  if (faultPercent == 0) {
    return entity;
  }

  int randomThreshold = getRandomNumber(1, 100);

  if (faultPercent < randomThreshold) {
    LOG.debug("We got lucky, no error occurred, {} < {}",
      faultPercent, randomThreshold);

  } else {
    LOG.debug("Bad luck, an error occurred, {} >= {}",
      faultPercent, randomThreshold);

    throw new RuntimeException("Something went wrong...");
  }

  return entity;
}

private final Random randomNumberGenerator = new Random();

private int getRandomNumber(int min, int max) {

  if (max < min) {
    throw new IllegalArgumentException("Max must be greater than min");
  }

  return randomNumberGenerator.nextInt((max - min) + 1) + min;
}
With the programmable delays and random error functions in place, we are ready to start adding the resilience mechanisms to the code. We will start with the circuit breaker and the time limiter.
Adding a circuit breaker and a time limiter
As we mentioned previously, we need to add dependencies, annotations, and configuration. We also need to add some code for implementing fallback logic for fail-fast scenarios. We will see how to do this in the following sections.
Adding dependencies to the build file
To add a circuit breaker and a time limiter, we have to add dependencies to the appropriate Resilience4j libraries in the build file, build.gradle. From the product documentation (https://resilience4j.readme.io/docs/getting-started-3#setup), we can learn that the following three dependencies need to be added. We will use the latest available version, v1.7.0, when this chapter was written:
ext {
   resilience4jVersion = "1.7.0"
}
dependencies {
    implementation "io.github.resilience4j:resilience4j-spring-
boot2:${resilience4jVersion}"
    implementation "io.github.resilience4j:resilience4j-reactor:${resilience4jVersion}"
    implementation 'org.springframework.boot:spring-boot-starter-aop'
    ...
To avoid Spring Cloud overriding the version used with the older version of Resilience4j that it bundles, we have to list all the sub-projects we also want to use and specify which version to use. We add this extra dependency in the dependencyManagement section to highlight that this is a workaround caused by the Spring Cloud dependency management:
dependencyManagement {
    imports {
        mavenBom "org.springframework.cloud:spring-cloud-dependencies:${springCloudVersion}"
    }
    dependencies {
        dependency "io.github.resilience4j:resilience4j-spring:${resilience4jVersion}"
        ...
    }
}
Adding annotations in the source code
The circuit breaker can be applied by annotating the method it is expected to protect with @CircuitBreaker(...), which in this case is the getProduct() method in the ProductCompositeIntegration class. The circuit breaker is triggered by an exception, not by a timeout itself. To be able to trigger the circuit breaker after a timeout, we will add a time limiter that can be applied with the annotation @TimeLimiter(...). The source code looks as follows:
@TimeLimiter(name = "product")
@CircuitBreaker(
     name = "product", fallbackMethod = "getProductFallbackValue")

public Mono<Product> getProduct(
  int productId, int delay, int faultPercent) {
  ...
}
The name of the circuit breaker and the time limiter annotation, "product", is used to identify the configuration that will be applied. The fallbackMethod parameter in the circuit breaker annotation is used to specify what fallback method to call, getProductFallbackValue in this case, when the circuit breaker is open; see below for information on how it is used.
To activate the circuit breaker, the annotated method must be invoked as a Spring bean. In our case, it's the integration class that's injected by Spring into the service implementation class, ProductCompositeServiceImpl, and therefore used as a Spring bean:
private final ProductCompositeIntegration integration;

@Autowired
public ProductCompositeServiceImpl(... ProductCompositeIntegration integration) {
  this.integration = integration;
}

public Mono<ProductAggregate> getProduct(int productId, int delay, int faultPercent) {
  return Mono.zip(
    ...,
    integration.getProduct(productId, delay, faultPercent),
    ...
Adding fail-fast fallback logic
To be able to apply fallback logic when the circuit breaker is open, that is, when a request fails fast, we can specify a fallback method on the CircuitBreaker annotation as seen in the previous source code. The method must follow the signature of the method the circuit breaker is applied for and also have an extra last argument used for passing the exception that triggered the circuit breaker. In our case, the method signature for the fallback method looks like this:
private Mono<Product> getProductFallbackValue(int productId,
  int delay, int faultPercent, CallNotPermittedException ex) {
The last parameter specifies that we want to be able to handle exceptions of type CallNotPermittedException. We are only interested in exceptions that are thrown when the circuit breaker is in its open state, so that we can apply fail-fast logic. When the circuit breaker is open, it will not permit calls to the underlying method; instead, it will immediately throw a CallNotPermittedException exception. Therefore, we are only interested in catching CallNotPermittedException exceptions.
The fallback logic can look up information based on the productId from alternative sources, for example, an internal cache. In our case, we will return hardcoded values based on the productId, to simulate a hit in a cache. To simulate a miss in the cache, we will throw a not found exception in the case where the productId is 13. The implementation of the fallback method looks like this:
private Mono<Product> getProductFallbackValue(int productId,
  int delay, int faultPercent, CallNotPermittedException ex) {

  if (productId == 13) {
    String errMsg = "Product Id: " + productId
      + " not found in fallback cache!";
    throw new NotFoundException(errMsg);
  }

  return Mono.just(new Product(productId, "Fallback product"
    + productId, productId, serviceUtil.getServiceAddress()));
}
Adding configuration
Finally, the configuration of the circuit breaker and time limiter is added to the product-composite.yml file in the config repository, as follows:
resilience4j.timelimiter:
  instances:
    product:
      timeoutDuration: 2s

management.health.circuitbreakers.enabled: true

resilience4j.circuitbreaker:
  instances:
    product:
      allowHealthIndicatorToFail: false
      registerHealthIndicator: true
      slidingWindowType: COUNT_BASED
      slidingWindowSize: 5
      failureRateThreshold: 50
      waitDurationInOpenState: 10000
      permittedNumberOfCallsInHalfOpenState: 3
      automaticTransitionFromOpenToHalfOpenEnabled: true
      ignoreExceptions:
        - se.magnus.api.exceptions.InvalidInputException
        - se.magnus.api.exceptions.NotFoundException
The values in the configuration have already been described in the previous sections, Introducing the circuit breaker and Introducing the time limiter.
Adding a retry mechanism
In the same way as for the circuit breaker, a retry mechanism is set up by adding dependencies, annotations, and configuration. The dependencies were added previously in the Adding dependencies to the build file section, so we only need to add the annotation and set up the configuration.
Adding the retry annotation
The retry mechanism can be applied to a method by annotating it with @Retry(name="nnn"), where nnn is the name of the configuration entry to be used for this method. See the following Adding configuration section for details on the configuration. The method, in our case, is the same as it is for the circuit breaker and time limiter, getProduct() in the ProductCompositeIntegration class:
  @Retry(name = "product")
  @TimeLimiter(name = "product")
  @CircuitBreaker(name = "product", fallbackMethod =
    "getProductFallbackValue")
  public Mono<Product> getProduct(int productId, int delay,
    int faultPercent) {
Adding configuration
Configuration for the retry mechanism is added in the same way as for the circuit breaker and time limiter in the product-composite.yml file in the config repository, like so:
resilience4j.retry:
  instances:
    product:
      maxAttempts: 3
      waitDuration: 1000
      retryExceptions:
      - org.springframework.web.reactive.function.client.WebClientResponseException$InternalServerError
The actual values were discussed in the Introducing the retry mechanism section above.
That is all the dependencies, annotations, source code, and configuration required. Let's wrap up by extending the test script with tests that verify that the circuit breaker works as expected in a deployed system landscape.
Adding automated tests
Automated tests for the circuit breaker have been added to the test-em-all.bash test script in a separate function, testCircuitBreaker():
...
function testCircuitBreaker() {
    echo "Start Circuit Breaker tests!"
    ...
}
...
testCircuitBreaker
...
echo "End, all tests OK:" `date`
To be able to perform some of the required verifications, we need to have access to the actuator endpoints of the product-composite microservice, which are not exposed through the edge server. Therefore, we will access the actuator endpoints by running a command in the product-composite microservice using the Docker Compose exec command. The base image used by the microservices, adoptopenjdk, bundles curl, so we can simply run a curl command in the product-composite container to get the information required. The command looks like this:
docker-compose exec -T product-composite curl -s http://product-composite:8080/actuator/health
The -T argument is used to disable the use of a terminal for the exec command. This is important to make it possible to run the test-em-all.bash test script in an environment where no terminals exist, for example, in an automated build pipeline used for CI/CD.
To be able to extract the information we need for our tests, we can pipe the output to the jq tool. For example, to extract the actual state of the circuit breaker, we can run the following command:
docker-compose exec -T product-composite curl -s http://product-composite:8080/actuator/health | jq -r .components.circuitBreakers.details.product.details.state
It will return either CLOSED, OPEN, or HALF_OPEN, depending on the actual state.
The test starts by doing exactly this, that is, verifying that the circuit breaker is closed before the tests are executed:
assertEqual "CLOSED" "$(docker-compose exec -T product-composite curl -s http://product-composite:8080/actuator/health | jq -r .components.circuitBreakers.details.product.details.state)"
Next, the test will force the circuit breaker to open up by running three commands in a row, all of which will fail on a timeout caused by a slow response from the product service (the delay parameter is set to 3 seconds):
for ((n=0; n<3; n++))
do
    assertCurl 500 "curl -k https://$HOST:$PORT/product-composite/$PROD_ID_REVS_RECS?delay=3 $AUTH -s"
    message=$(echo $RESPONSE | jq -r .message)
    assertEqual "Did not observe any item or terminal signal within 2000ms" "${message:0:57}"
done
A quick reminder of the configuration: The timeout of the product service is set to two seconds so that a delay of three seconds will cause a timeout. The circuit breaker is configured to evaluate the last five calls when closed. The tests in the script that precede the circuit breaker-specific tests have already performed a couple of successful calls. The failure threshold is set to 50%; three calls with a three-second delay are enough to open the circuit.
With the circuit open, we expect a fail-fast behavior, that is, we won't need to wait for the timeout before we get a response. We also expect the fallback method to be called to return a best-effort response. This should also apply for a normal call, that is, without requesting a delay. This is verified with the following code:
assertEqual "OPEN" "$(docker-compose exec -T product-composite curl -s http://product-composite:8080/actuator/health | jq -r .components.circuitBreakers.details.product.details.state)"

assertCurl 200 "curl -k https://$HOST:$PORT/product-composite/$PROD_ID_REVS_RECS?delay=3 $AUTH -s"
assertEqual "Fallback product$PROD_ID_REVS_RECS" "$(echo "$RESPONSE" | jq -r .name)"

assertCurl 200 "curl -k https://$HOST:$PORT/product-composite/$PROD_ID_REVS_RECS $AUTH -s"
assertEqual "Fallback product$PROD_ID_REVS_RECS" "$(echo "$RESPONSE" | jq -r .name)"
The product ID 1 is stored in a variable, $PROD_ID_REVS_RECS, to make it easier to modify the script if required.
We can also verify that the simulated not found error logic works as expected in the fallback method, that is, the fallback method returns 404, NOT_FOUND for product ID 13:
assertCurl 404 "curl -k https://$HOST:$PORT/product-composite/$PROD_ID_NOT_FOUND $AUTH -s"
assertEqual "Product Id: $PROD_ID_NOT_FOUND not found in fallback cache!" "$(echo $RESPONSE | jq -r .message)"
The product ID 13 is stored in a variable, $PROD_ID_NOT_FOUND.
As configured, the circuit breaker will change its state to half-open after 10 seconds. To be able to verify that, the test waits for 10 seconds:
echo "Will sleep for 10 sec waiting for the CB to go Half Open..."
sleep 10
After verifying the expected state (half-open), the test runs three normal requests to make the circuit breaker go back to its normal state, which is also verified:
assertEqual "HALF_OPEN" "$(docker-compose exec -T product-composite curl -s http://product-composite:8080/actuator/health | jq -r .components.circuitBreakers.details.product.details.state)"

for ((n=0; n<3; n++))
do
    assertCurl 200 "curl -k https://$HOST:$PORT/product-composite/$PROD_ID_REVS_RECS $AUTH -s"
    assertEqual "product name C" "$(echo "$RESPONSE" | jq -r .name)"
done

assertEqual "CLOSED" "$(docker-compose exec -T product-composite curl -s http://product-composite:8080/actuator/health | jq -r .components.circuitBreakers.details.product.details.state)"
The test code also verifies that it got a response with data from the underlying database. It does that by comparing the returned product name with the value stored in the database. For the product with product ID 1, the name is "product name C".
A quick reminder of the configuration: The circuit breaker is configured to evaluate the first three calls when in the half-open state. Therefore, we need to run three requests where more than 50% are successful before the circuit is closed.
The test wraps up by using the /actuator/circuitbreakerevents actuator API, which is exposed by the circuit breaker to reveal internal events. It is used to find out what state transitions the circuit breaker has performed. We expect the last three state transitions to be as follows:
- First state transition: Closed to open
- Next state transition: Open to half-open
- Last state transition: Half-open to closed
This is verified by the following code:
assertEqual "CLOSED_TO_OPEN"      "$(docker-compose exec -T product-composite curl -s http://product-composite:8080/actuator/circuitbreakerevents/product/STATE_TRANSITION | jq -r
.circuitBreakerEvents[-3].stateTransition)"

assertEqual "OPEN_TO_HALF_OPEN"   "$(docker-compose exec -T product-composite curl -s http://product-composite:8080/actuator/circuitbreakerevents/product/STATE_TRANSITION | jq -r .circuitBreakerEvents[-2].stateTransition)"

assertEqual "HALF_OPEN_TO_CLOSED" "$(docker-compose exec -T product-composite curl -s http://product-composite:8080/actuator/circuitbreakerevents/product/STATE_TRANSITION | jq -r .circuitBreakerEvents[-1].stateTransition)"
The jq expression, circuitBreakerEvents[-1], means the last entry in the array of circuit breaker events, [-2] is the second to last event, while [-3] is the third to last event. Together, they are the three latest events, the ones we are interested in.
We added quite a lot of steps to the test script, but with this, we can automatically verify that the expected basic behavior of our circuit breaker is in place. In the next section, we will try it out. We will run tests both automatically by running the test script and manually by running the commands in the test script by hand.
Trying out the circuit breaker and retry mechanism
Now, it's time to try out the circuit breaker and retry mechanism. We will start, as usual, by building the Docker images and running the test script, test-em-all.bash. After that, we will manually run through the tests we described previously to ensure that we understand what's going on! We will perform the following manual tests:
- Happy days tests of the circuit breaker, to verify that the circuit is closed under normal operations
- Negative tests of the circuit breaker, to verify that the circuit opens up when things start to go wrong
- Going back to normal operation, to verify that the circuit goes back to its closed state once the problems are resolved
- Trying out the retry mechanism with random errors
Building and running the automated tests
To build and run the automated tests, we need to do the following:
- First, build the Docker images with the following commands:
cd $BOOK_HOME/Chapter13 ./gradlew build && docker-compose build - Next, start the system landscape in Docker and run the usual tests with the following command:
./test-em-all.bash start
When the test script prints out Start Circuit Breaker tests!, the tests we described previously have been executed!
Verifying that the circuit is closed under normal operations
Before we can call the API, we need an access token. Run the following commands to acquire an access token:
unset ACCESS_TOKEN
ACCESS_TOKEN=$(curl -k https://writer:secret@localhost:8443/oauth2/token -d grant_type=client_credentials -s | jq -r .access_token)
echo $ACCESS_TOKEN
An access token issued by the authorization server is valid for 1 hour. So, if you start to get 401 – Unauthorized errors after a while, it is probably time to acquire a new access token.
Try a normal request and verify that it returns the HTTP response code 200:
curl -H "Authorization: Bearer $ACCESS_TOKEN" -k https://localhost:8443/product-composite/1 -w "%{http_code}
" -o /dev/null -s
The -w "%{http_code}
" switch is used to print the HTTP return status. As long as the command returns 200, we are not interested in the response body, so we suppress it with the switch -o /dev/null.
Verify that the circuit breaker is closed using the health API:
docker-compose exec product-composite curl -s http://product-composite:8080/actuator/health | jq -r .components.circuitBreakers.details.product.details.state
We expect it to respond with CLOSED.
Forcing the circuit breaker to open when things go wrong
Now, it's time to make things go wrong! By that, I mean it's time to try out some negative tests to verify that the circuit opens up when things start to go wrong. Call the API three times and direct the product service to cause a timeout on every call, that is, delay the response by 3 seconds. This should be enough to trip the circuit breaker:
curl -H "Authorization: Bearer $ACCESS_TOKEN" -k https://localhost:8443/product-composite/1?delay=3 -s | jq .
We expect a response such as the following each time:

Figure 13.3: Response after a timeout
The circuit breaker is now open, so if you make a fourth attempt (within waitInterval, that is, 10 seconds), you will see fail-fast behavior and the fallback method in action. You will get a response back immediately, instead of an error message once the time limiter kicks in after 2 seconds:
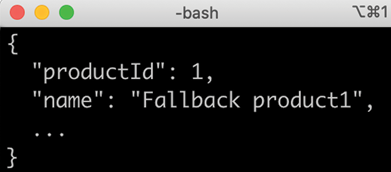
Figure 13.4: Response when the circuit breaker is open
The response will come from the fallback method. This can be recognized by looking at the value in the name field, Fallback product1.
Fail-fast and fallback methods are key capabilities of a circuit breaker. A configuration with a wait time set to only 10 seconds in the open state requires you to be rather quick to be able to see fail-fast logic and fallback methods in action! Once in a half-open state, you can always submit three new requests that cause a timeout, forcing the circuit breaker back to the open state, and then quickly try the fourth request. Then, you should get a fail-fast response from the fallback method. You can also increase the wait time to a minute or two, but it can be rather boring to wait that amount of time before the circuit switches to the half-open state.
Wait 10 seconds for the circuit breaker to transition to half-open, and then run the following command to verify that the circuit is now in a half-open state:
docker-compose exec product-composite curl -s http://product-composite:8080/actuator/health | jq -r .components.circuitBreakers.details.product.details.state
Expect it to respond with HALF_OPEN.
Closing the circuit breaker again
Once the circuit breaker is in a half-open state, it waits for three calls to see whether it should open the circuit again or go back to normal by closing it.
Let's submit three normal requests to close the circuit breaker:
curl -H "Authorization: Bearer $ACCESS_TOKEN" -k https://localhost:8443/product-composite/1 -w "%{http_code}
" -o /dev/null -s
They should all respond with 200. Verify that the circuit is closed again by using the health API:
docker-compose exec product-composite curl -s http://product-composite:8080/actuator/health | jq -r .components.circuitBreakers.details.product.details.state
We expect it to respond with CLOSED.
Wrap this up by listing the last three state transitions using the following command:
docker-compose exec product-composite curl -s http://product-composite:8080/actuator/circuitbreakerevents/product/STATE_TRANSITION | jq -r '.circuitBreakerEvents[-3].stateTransition, .circuitBreakerEvents[-2].stateTransition, .circuitBreakerEvents[-1].stateTransition'
Expect it to respond with the following:

Figure 13.5: Circuit breaker state changes
This response tells us that we have taken our circuit breaker through a full lap of its state diagram:
- From closed to open when the timeout errors start to prevent requests from succeeding
- From open to half-open to see whether the error is gone
- From half-open to closed when the error is gone, that is, when we are back to normal operation
With that, we are done with testing the circuit breaker; let's move on and see the retry mechanism in play.
Trying out retries caused by random errors
Let's simulate that there is a – hopefully temporary – random issue with our product service or the communication with it.
We can do this by using the faultPercent parameter. If we set it to 25, we expect every fourth request on average to fail. We hope that the retry mechanism will kick in to help us by automatically retrying failed requests. One way of noticing that the retry mechanism has kicked in is to measure the response time of the curl command. A normal response should take around 100 ms. Since we have configured the retry mechanism to wait 1 second (see the waitDuration parameter in the section on the configuration of the retry mechanism), we expect the response time to increase by 1 second per retry attempt. To force a random error to occur, run the following command a couple of times:
time curl -H "Authorization: Bearer $ACCESS_TOKEN" -k https://localhost:8443/product-composite/1?faultPercent=25 -w "%{http_code}
" -o /dev/null -s
The command should respond with 200, indicating that the request succeeded. A response time prefixed with real, for example, real 0m0.078s, means that the response time was 0.078 s, or 78 ms. A normal response, that is, without any retries, should report a response time of around 100 ms as follows:

Figure 13.6: Elapsed time for a request without a retry
A response after one retry should take a little over 1 second and look as follows:

Figure 13.7: Elapsed time for a request with one retry
The HTTP status code 200 indicates that the request has succeeded, even though it required one retry before succeeding!
After you have noticed a response time of 1 second, indicating that the request required one retry to succeed, run the following command to see the last two retry events:
docker-compose exec product-composite curl -s http://product-composite:8080/actuator/retryevents | jq '.retryEvents[-2], .retryEvents[-1]'
You should be able to see the failed request and the next successful attempt. The creationTime timestamps are expected to differ by 1 second. Expect a response such as the following:

Figure 13.8: Retry events captured after a request with one retry
If you are really unlucky, you will get two faults in a row, and then you will get a response time of 2 seconds instead of 1. If you repeat the preceding command, you will be able to see that the numberOfAttempts field is counted for each retry attempt, which is set to 1 in this case: "numberOfAttempts": 1. If calls continue to fail, the circuit breaker will kick in and open its circuit, that is, subsequent calls will apply fail-fast logic and the fallback method will be applied!
This concludes the chapter. Feel free to experiment with the parameters in the configuration to learn the resilience mechanisms better.
Don't forget to shut down the system landscape:
docker-compose down
Summary
In this chapter, we have seen Resilience4j and its circuit breaker, time limiter, and retry mechanism in action.
A circuit breaker can, using fail-fast logic and fallback methods when it is open, prevent a microservice from becoming unresponsive if the synchronous services it depends on stop responding normally. A circuit breaker can also make a microservice resilient by allowing requests when it is half-open to see whether the failing service is operating normally again, and close the circuit if so. To support a circuit breaker in handling unresponsive services, a time limiter can be used to maximize the time a circuit breaker waits before it kicks in.
A retry mechanism can retry requests that randomly fail from time to time, for example, due to temporary network problems. It is very important to only apply retry requests on idempotent services, that is, services that can handle the same request being sent two or more times.
Circuit breakers and retry mechanisms are implemented by following Spring Boot conventions: declaring dependencies and adding annotations and configuration. Resilience4j exposes information about its circuit breakers and retry mechanisms at runtime, using actuator endpoints. For circuit breakers, information regarding health, events, and metrics is available. For retries, information regarding events and metrics is available.
We have seen the usage of both endpoints for health and events in this chapter, but we will have to wait until Chapter 20, Monitoring Microservices, before we use any of the metrics.
In the next chapter, we will cover the last part of using Spring Cloud, where we will learn how to trace call chains through a set of cooperating microservices using Spring Cloud Sleuth and Zipkin. Head over to Chapter 14, Understanding Distributed Tracing, to get started!
Questions
- What are the states of a circuit breaker and how are they used?
- How can we handle timeout errors in the circuit breaker?
- How can we apply fallback logic when a circuit breaker fails fast?
- How can a retry mechanism and a circuit breaker interfere with each other?
- Provide an example of a service that you can't apply a retry mechanism to.