4
Deploying Our Microservices Using Docker
In this chapter, we will start using Docker and put our microservices into containers!
By the end of this chapter, we will have run fully automated tests of our microservice landscape that start all our microservices as Docker containers, requiring no infrastructure other than a Docker engine. We will have also run a number of tests to verify that the microservices work together as expected, and finally shut down all the microservices, leaving no traces of the tests we executed.
Being able to test a number of cooperating microservices in this way is very useful. As developers, we can verify that the microservices work on our local developer machines. We can also run exactly the same tests in a build server to automatically verify that changes to the source code won't break the tests at a system level. Additionally, we don't need to have a dedicated infrastructure allocated to run these types of tests. In the upcoming chapters, we will see how we can add databases and queue managers to our test landscape, all of which will run as Docker containers.
This does not, however, replace the need for automated unit and integration tests, which test individual microservices in isolation. They are as important as ever.
For production usage, as we mentioned earlier in this book, we need a container orchestrator such as Kubernetes. We will get back to container orchestrators and Kubernetes later in this book.
The following topics will be covered in this chapter:
- Introduction to Docker
- Docker and Java. Java hasn't been very friendly to containers historically, but that changed with Java 10. Let's see how Docker and Java fit together!
- Using Docker with one microservice
- Managing a landscape of microservices using Docker Compose
- Automating tests of cooperating microservices
Technical requirements
For instructions on how to install tools used in this book and how to access the source code for this book, see:
- Chapter 21 for macOS
- Chapter 22 for Windows
The code examples in this chapter all come from the source code in $BOOK_HOME/Chapter04.
If you want to see the changes that were applied to the source code in this chapter, that is, see what it took to add support for Docker, you can compare it with the source code for Chapter 3, Creating a Set of Cooperating Microservices. You can use your favorite diff tool and compare the two folders, $BOOK_HOME/Chapter03/2-basic-rest-services and $BOOK_HOME/Chapter04.
Introduction to Docker
As we already mentioned in Chapter 2, Introduction to Spring Boot, Docker made the concept of containers as a lightweight alternative to virtual machines very popular in 2013. To quickly recap: containers are actually processed in a Linux host that uses Linux namespaces to provide isolation between containers, and Linux Control Groups (cgroups) are used to limit the amount of CPU and memory that a container is allowed to consume.
Compared to a virtual machine that uses a hypervisor to run a complete copy of an operating system in each virtual machine, the overhead in a container is a fraction of the overhead in a virtual machine. This leads to much faster startup times and a significantly lower footprint. Containers are, however, not considered to be as secure as virtual machines. Take a look at the following diagram:

Figure 4.1: Virtual machines versus containers
The diagram illustrates the difference between the resource usage of virtual machines and containers, demonstrating that the same type of server can run significantly more containers than virtual machines. The main gain is that a container doesn't need to run its own instance of an operating system, as a virtual machine does.
Running our first Docker commands
Let's try to start a container by launching an Ubuntu server using Docker's run command:
docker run -it --rm ubuntu
With the preceding command, we ask Docker to create a container that runs Ubuntu, based on the latest version that's available of the official Docker image for Ubuntu. The -it option is used so that we can interact with the container using Terminal, and the --rm option tells Docker to remove the container once we exit the Terminal session; otherwise, the container will remain in the Docker engine with an Exited state.
The first time we use a Docker image that we haven't built ourselves, Docker will download it from a Docker registry, which is Docker Hub by default (https://hub.docker.com). This will take some time, but for subsequent usage of that Docker image, the container will start in just a few seconds!
Once the Docker image has been downloaded and the container has been started up, the Ubuntu server should respond with a prompt such as the following:

Figure 4.2: Ubuntu server response
We can try out the container by, for example, asking what version of Ubuntu it runs:
cat /etc/os-release | grep 'VERSION='
It should respond with something like the following:

Figure 4.3: Ubuntu version response
We can leave the container with an exit command and verify that the Ubuntu container no longer exits with the docker ps -a command. We need to use the -a option to see stopped containers; otherwise, only running containers are displayed.
If you favor CentOS over Ubuntu, feel free to try the same with the docker run --rm -it centos command. Once the CentOS server has started running in its container you can, for example, ask what version of CentOS is running with the cat /etc/redhat-release command. It should respond with something like the following:

Figure 4.4: CentOS version response
Leave the container with the exit command to remove it.
If, at some point, you find that you have a lot of unwanted containers in the Docker engine and you want to get a clean sheet, that is, get rid of them all, you can run the following command:
docker rm -f $(docker ps -aq)
The docker rm -f command stops and removes the containers whose container IDs are specified to the command. The docker ps -aq command lists the container IDs of all the running and stopped containers in the Docker engine. The -q option reduces the output from the docker ps command so that it only lists the container IDs.
Now we've understood what Docker is, we can move on to consider the problems we might face while running Java in Docker.
Challenges with running Java in Docker
Over the past few years, there have been a number of attempts to get Java working in Docker in a good way. Most importantly, Java hasn't historically been very good at respecting limits set for Docker containers when it comes to the use of memory and CPU.
Currently, the official Docker image for Java comes from the OpenJDK project: https://hub.docker.com/_/openjdk/. We will use an alternative Docker image from the AdoptOpenJDK project. It contains the same binaries from the OpenJDK project, but provides variants of the Docker images that meet our needs better than the Docker images from the OpenJDK project.
In this section, we will use a Docker image that contains the full JDK (Java Development Kit) with all its tools. When we start to package our microservices in Docker images in the Using Docker with one microservice section, we will use a more compact Docker image that is based on the JRE (Java Runtime Environment) only containing the Java tools required at runtime.
As already mentioned, earlier versions of Java have not been very good at honoring the quotas specified for a Docker container using Linux cgroups; they simply ignored these settings. So, instead of allocating memory inside the JVM in relation to the memory available in the container, Java allocated memory as if it had access to all the memory in the Docker host. When trying to allocate more memory than allowed, the Java container was killed by the host with an "out of memory" error message. In the same way, Java allocated CPU-related resources such as thread pools in relation to the total number of available CPU cores in the Docker host, instead of the number of CPU cores that were made available for the container JVM was running in.
In Java SE 9, initial support for container-based CPU and memory constraints was provided, much improved in Java SE 10.
Let's look at how Java SE 16 responds to limits we set on a container it runs in!
In the following tests, we will run the Docker engine inside a virtual machine on a MacBook Pro, acting as the Docker host. The Docker host is configured to use 12 CPU cores and 16 GB of memory.
We will start by seeing how we can limit the number of available CPUs to a container that runs Java. After that, we will do the same with limiting memory.
Limiting available CPUs
Let's start by finding out how many available processors, that is CPU cores, Java sees without applying any constraints. We can do this by sending the Java statement Runtime.getRuntime().availableprocessors() to the Java CLI tool jshell. We will run jshell in a container using the Docker image that contains the full Java 16 JDK. The Docker tag for this image is adoptopenjdk:16. The command looks like:
echo 'Runtime.getRuntime().availableProcessors()' | docker run --rm -i adoptopenjdk:16 jshell -q
This command will send the string Runtime.getRuntime().availableProcessors() to the Docker container that will process the string using jshell. We will get the following response:

Figure 4.5: Response showing number of CPU cores available
The response of 12 cores is as expected, since the Docker host was configured to use 12 CPU cores. Let's move on and restrict the Docker container to only be allowed to use three CPU cores using the --cpus 3 Docker option, then ask the JVM about how many available processors it sees:
echo 'Runtime.getRuntime().availableProcessors()' | docker run --rm -i --cpus=3 adoptopenjdk:16 jshell -q
The JVM now responds with Runtime.getRuntime().availableProcessors()$1 ==> 3, that is, Java SE 16 honors the settings in the container and will, therefore, be able to configure CPU-related resources such as thread pools correctly!
Limiting available memory
In terms of the amount of available memory, let's ask the JVM for the maximum size that it thinks it can allocate for the heap. We can achieve this by asking the JVM for extra runtime information using the -XX:+PrintFlagsFinal Java option and then using the grep command to filter out the MaxHeapSize parameter, like so:
docker run -it --rm adoptopenjdk:16 java -XX:+PrintFlagsFinal | grep "size_t MaxHeapSize"
With 16 GB of memory allocated to the Docker host, we will get the following response:

Figure 4.6: Response showing MaxHeapSize
With no JVM memory constraints, that is not using the JVM parameter -Xmx, Java will allocate one-quarter of the memory available to the container for its heap. So, we expect it to allocate up to 4 GB to its heap. From the preceding screenshot, we can see that the response was 4,198,498,304 bytes. That equals 4,198,498,304 / 10242 = 4004 MB, which is close to the expected 4 GB.
If we constrain the Docker container to only use up to 1 GB of memory using the Docker option -m=1024M, we expect to see a lower max memory allocation. Running the command:
docker run -it --rm -m=1024M adoptopenjdk:16 java -XX:+PrintFlagsFinal | grep "size_t MaxHeapSize"
Will result in the response 268,435,456 bytes, which equals 268,435,456 / 10242 = 256 MB. 256 MB is one-quarter of 1 GB, so again, this is as expected.
We can, as usual, set the max heap size on the JVM ourselves. For example, if we want to allow the JVM to use 600 MB of the total 1 GB we have for its heap, we can specify that using the JVM option -Xmx600m like:
docker run -it --rm -m=1024M adoptopenjdk:16 java -Xmx600m -XX:+PrintFlagsFinal -version | grep "size_t MaxHeapSize"
The JVM will respond with 629,145,600 bytes = 600 * 10242 = 600 MB, again as expected.
Let's conclude with an "out of memory" test to ensure that this really works!
We'll allocate some memory using jshell in a JVM that runs in a container that has been given 1 GB of memory; that is, it has a max heap size of 256 MB.
First, try to allocate a byte array of 100 MB:
echo 'new byte[100_000_000]' | docker run -i --rm -m=1024M adoptopenjdk:16 jshell -q
The command will respond with $1 ==>, meaning that it worked fine!
Normally, jshell will print out the value resulting from the command, but 100 MB of bytes all set to zero is a bit too much to print, and so we get nothing.
Now, let's try to allocate a byte array that is larger than the max heap size, for example, 500 MB:
echo 'new byte[500_000_000]' | docker run -i --rm -m=1024M adoptopenjdk:16 jshell -q
The JVM sees that it can't perform the action since it honors the container settings of max memory and responds immediately with Exception java.lang.OutOfMemoryError: Java heap space. Great!
So, to summarize, we have now seen how Java honors the settings of available CPUs and the memory of its container. Let's move on and build our first Docker images for one of the microservices!
Using Docker with one microservice
Now that we understand how Java works in a container, we can start using Docker with one of our microservices. Before we can run our microservice as a Docker container, we need to package it in a Docker image. To build a Docker image, we need a Dockerfile, so we will start with that. Next, we need a Docker-specific configuration for our microservice. Since a microservice that runs in a container is isolated from other microservices – it has its own IP address, hostname, and ports – it needs a different configuration compared to when it's running on the same host with other microservices.
For example, since the other microservices no longer run on the same host, no port conflicts will occur. When running in Docker, we can use the default port 8080 for all our microservices without any risk of port conflicts. On the other hand, if we need to talk to the other microservices, we can no longer use localhost like we could when we ran them on the same host.
The source code in the microservices will not be affected by running the microservices in containers, only their configuration!
To handle the different configurations that are required when running locally without Docker and when running the microservices as Docker containers, we will use Spring profiles. Since Chapter 3, Creating a Set of Cooperating Microservices, we have been using the default Spring profile for running locally without Docker. Now, we will create a new Spring profile named docker to be used when we run our microservices as containers in Docker.
Changes in source code
We will start with the product microservice, which can be found in the source code at $BOOK_HOME/Chapter04/microservices/product-service/. In the next section, we will apply this to the other microservices as well.
First, we add the Spring profile for Docker at the end of the property file application.yml:
---
spring.config.activate.on-profile: docker

server.port: 8080
Spring profiles can be used to specify environment-specific configuration, which in this case is a configuration that is only to be used when running the microservice in a Docker container. Other examples are configurations that are specific to dev, test, and production environments. Values in a profile override values from the default profile. Using yaml files, multiple Spring profiles can be placed in the same file, separated by ---.
The only parameter we change for now is the port that's being used; we will use the default port 8080 when running the microservice in a container.
Next, we will create the Dockerfile that we will use to build the Docker image. As mentioned in Chapter 2, Introduction to Spring Boot, a Dockerfile can be as straightforward as:
FROM openjdk:16

EXPOSE 8080

ADD ./build/libs/*.jar app.jar

ENTRYPOINT ["java","-jar","/app.jar"]
Some things to take note of are:
- The Docker images will be based on the official Docker image for OpenJDK and use version 16.
- Port
8080will be exposed to other Docker containers. - The fat-jar file will be added to the Docker image from the Gradle build library,
build/libs. - The command used by Docker to start a container based on this Docker image is
java -jar /app.jar.
This simple approach has a couple of disadvantages:
- We are using the full JDK of Java SE 16, including compilers and other development tools. That makes the Docker images unnecessarily large and from a security perspective, we don't want to bring more tools into the image than necessary. Therefore, we would prefer to use a base image for the Java SE 16 JRE, Java Runtime Environment, that only contains programs and libraries required to run a Java program. Unfortunately, the OpenJDK project does not provide a Docker image for Java SE 16 JRE.
- The fat-jar file takes time to unpackage when the Docker container starts up. A better approach is to instead unpackage the fat-jar when the Docker image is built.
- The fat-jar file is very big, as we will see below, some 20 MB. If we want to make repeatable changes to the application code in the Docker images during development, this will result in suboptimal usage of the Docker build command. Since Docker images are built in layers, we will get one very big layer that needs to be replaced each time, even in the case where only a single Java class is changed in the application code.
A better approach is to divide the content into different layers, where files that do not change so frequently are added in the first layer and files that change the most are placed in the last layer. This will result in good use of Docker's caching mechanism for layers. For the first stable layers that are not changed when some application code is changed, Docker will simply use the cache instead of rebuilding them. This will result in faster builds of the microservices' Docker images.
Regarding the lack of a Docker image for Java SE 16 JRE from the OpenJDK project, there are other open source projects that package the OpenJDK binaries into Docker images. One of the most widely used projects is AdoptOpenJDK (https://adoptopenjdk.net). In June 2020, the AdoptOpenJDK project decided to join the Eclipse Foundation. AdoptOpenJDK provides both full JDK editions and minimized JRE editions of their Docker images.
When it comes to handling the suboptimal packaging of fat-jar files in Docker images, Spring Boot addressed this issue in v2.3.0, making it possible to extract the content of a fat-jar file into a number of folders. By default, Spring Boot creates the following folders after extracting a fat-jar file:
dependencies, containing all dependencies as jar-filesspring-boot-loader, containing Spring Boot classes that know how to start a Spring Boot applicationsnapshot-dependencies, containing snapshot dependencies, if anyapplication, containing application class files and resources
The Spring Boot documentation recommends creating one Docker layer for each folder in the order listed above. After replacing the JDK-based Docker image with a JRE-based image and adding instructions for exploding the fat-jar file into proper layers in the Docker image, the Dockerfile looks like:
FROM adoptopenjdk:16_36-jre-hotspot as builder
WORKDIR extracted
ADD ./build/libs/*.jar app.jar
RUN java -Djarmode=layertools -jar app.jar extract

FROM adoptopenjdk:16_36-jre-hotspot
WORKDIR application
COPY --from=builder extracted/dependencies/ ./
COPY --from=builder extracted/spring-boot-loader/ ./
COPY --from=builder extracted/snapshot-dependencies/ ./
COPY --from=builder extracted/application/ ./
EXPOSE 8080
ENTRYPOINT ["java", "org.springframework.boot.loader.JarLauncher"]
To handle the extraction of the fat-jar file in the Dockerfile we use a multi-stage build, meaning that there is a first step, named builder, that handles the extraction. The second stage builds the actual Docker image that will be used at runtime, picking the files as required from the first stage. Using this technique, we can handle all packaging logic in the Dockerfile but at the same time keep the size of the final Docker image to a minimum:
- The first stage starts with the line:
FROM adoptopenjdk:16_36-jre-hotspot as builderFrom this line, we can see that a Docker image from the AdoptOpenJDK project is used and that it contains Java SE JRE for v16_36. We can also see that the stage is named
builder. - The
builderstage sets the working directory toextractedand adds the fat-jar file from the Gradle build library,build/libs, to that folder. - The
builderstage then runs the commandjava -Djarmode=layertools -jar app.jar extract, which will perform the extraction of the fat-jar file into its working directory, theextractedfolder. - The next and final stage starts with the line:
FROM adoptopenjdk:16_36-jre-hotspotIt uses the same base Docker image as in the first stage, and the folder
applicationas its working directory. It copies the exploded files from thebuilderstage, folder by folder, into theapplicationfolder. This creates one layer per folder as described above. The parameter--from=builderis used to instruct Docker to pick the files from the file system in thebuilderstage. - After exposing the proper ports,
8080in this case, the Dockerfile wraps up by telling Docker what Java class to run to start the microservice in the exploded format, that is,org.springframework.boot.loader.JarLauncher.
After learning about the required changes in source code, we are ready to build our first Docker image.
Building a Docker image
To build the Docker image, we first need to build our deployment artifact, that is, the fat-jar-file, for product-service:
cd $BOOK_HOME/Chapter04
./gradlew :microservices:product-service:build
Since we only want to build product-service and the projects it depends on (the api and util projects), we don't use the normal build command, which builds all the microservices. Instead, we use a variant that tells Gradle to only build the product-service project: :microservices:product-service:build.
We can find the fat-jar file in the Gradle build library, build/libs. The command ls -l microservices/product-service/build/libs will report something like the following:

Figure 4.7: Viewing the fat-jar file details
As you can see, the JAR file is close to 20 MB in size – no wonder they are called fat-jar files!
If you are curious about its actual content, you can view it by using the command unzip -l microservices/product-service/build/libs/product-service-1.0.0-SNAPSHOT.jar.
Next, we will build the Docker image and name it product-service, as follows:
cd microservices/product-service
docker build -t product-service .
Docker will use the Dockerfile in the current directory to build the Docker image. The image will be tagged with the name product-service and stored locally inside the Docker engine.
Verify that we got a Docker image, as expected, by using the following command:
docker images | grep product-service
The expected output is as follows:

Figure 4.8: Verifying we built our Docker image
So now that we have built the image, let's see how we can start the service.
Starting up the service
Let's start up the product microservice as a container by using the following command:
docker run --rm -p8080:8080 -e "SPRING_PROFILES_ACTIVE=docker" product-service
This is what we can infer from the command:
docker run: Thedocker runcommand will start the container and display log output in the Terminal. The Terminal will be locked as long as the container runs.- We have seen the
--rmoption already; it will tell Docker to clean up the container once we stop the execution from the Terminal using Ctrl + C. - The
-p8080:8080option maps port8080in the container to port8080in the Docker host, which makes it possible to call it from the outside. In the case of Docker Desktop for Mac, which runs Docker in a local Linux virtual machine, the port will also be port-forwarded to macOS, which is made available onlocalhost. Remember that we can only have one container mapping to a specific port in the Docker host! - With the
-eoption, we can specify environment variables for the container, which in this case isSPRING_PROFILES_ACTIVE=docker. TheSPRING_PROFILES_ACTIVEenvironment variable is used to tell Spring what profiles to use. In our case, we want Spring to use thedockerprofile. - Finally, we have
product-service, which is the name of the Docker image we built above and that Docker will use to start the container.
The expected output is as follows:

Figure 4.9: Output after starting up the product microservice
From the preceding screenshot we can see:
- The profile that's used by Spring is
docker. Look forThe following profiles are active: dockerin the output to verify this. - The port that's allocated by the container is
8080. Look forNetty started on port(s): 8080in the output to verify this. - The microservice is ready to accept requests once the log message
Started ProductServiceApplicationhas been written!
We can use port 8080 on localhost to communicate with the microservice, as explained previously. Try out the following command in another Terminal window:
curl localhost:8080/product/3
The following is the expected output:

Figure 4.10: Requesting information on product 3
This is similar to the output we received from the previous chapter, but with one major difference: we now have the content of "service Address":"9dc086e4a88b/172.17.0.2:8080", the port is 8080, as expected, and the IP address, 172.17.0.2, is the IP address that's been allocated to the container from an internal network in Docker – but where did the hostname, 9dc086e4a88b, come from?
Ask Docker for all the running containers:
docker ps
We will see something like the following:

Figure 4.11: All running containers
As we can see from the preceding output, the hostname is equivalent to the ID of the container, which is good to know if you want to understand which container actually responded to your request!
Wrap this up by stopping the container in Terminal with the Ctrl + C command. With this done, we can now move on to running the container detached.
Running the container detached
Okay, that was great, but what if we don't want to lock the Terminal from where we started the container? In most cases, it is inconvenient to have a Terminal session locked for each running container. It's time to learn how to start the container detached – running the container without locking the Terminal!
We can do this by adding the -d option and at the same time giving it a name using the --name option. Giving it a name is optional, and Docker will generate a name if we don't, but it makes it easier to send commands to the detached container using a name that we have decided. The --rm option is no longer required since we will stop and remove the container explicitly when we are done with it:
docker run -d -p8080:8080 -e "SPRING_PROFILES_ACTIVE=docker" --name my-prd-srv product-service
If we run the docker ps command again, we will see our new container, called my-prd-srv:

Figure 4.12: Starting the container as detached
But how do we get the log output from our container?
Meet the docker logs command:
docker logs my-prd-srv -f
The -f option tells the command to follow the log output, that is, not end the command when all the current log output has been written to the Terminal, but also wait for more output. If you expect a lot of old log messages that you don't want to see, you can also add the --tail 0 option so that you only see new log messages. Alternatively, you can use the --since option and specify either an absolute timestamp or a relative time, for example, --since 5m, to see log messages that are at most five minutes old.
Try this out with a new curl request. You should see that a new log message has been written to the log output in the Terminal.
Wrap this up by stopping and removing the container:
docker rm -f my-prd-srv
The -f option forces Docker to remove the container, even if it is running. Docker will automatically stop the container before it removes it.
Now that we know how to use Docker with a microservice, we can see how to manage a microservice landscape with the help of Docker Compose.
Managing a landscape of microservices using Docker Compose
We've already seen how we can run a single microservice as a Docker container, but what about managing a whole system landscape of microservices?
As we mentioned earlier, this is the purpose of docker-compose. By using single commands, we can build, start, log, and stop a group of cooperating microservices running as Docker containers.
Changes in the source code
To be able to use Docker Compose, we need to create a configuration file, docker-compose.yml, that describes the microservices Docker Compose will manage for us. We also need to set up Dockerfiles for the remaining microservices and add a Docker-specific Spring profile to each of them. All four microservices have their own Dockerfile, but they all look the same as the preceding one.
When it comes to the Spring profiles, the three core services, product-, recommendation-, and review-service, have the same docker profile, which only specifies that the default port 8080 should be used when running as a container.
For the product-composite-service, things are a bit more complicated since it needs to know where to find the core services. When we ran all the services on localhost, it was configured to use localhost and individual port numbers, 7001-7003, for each core service. When running in Docker, each service will have its own hostname but will be accessible on the same port number, 8080. Here, the docker profile for product-composite-service looks as follows:
---
spring.config.activate.on-profile: docker

server.port: 8080

app:
  product-service:
    host: product
    port: 8080
  recommendation-service:
    host: recommendation
    port: 8080
  review-service:
    host: review
    port: 8080
This configuration is stored in the property file, application.yml.
Where did the hostnames, product, recommendation, and review come from?
These are specified in the docker-compose.yml file, which is located in the $BOOK_HOME/Chapter04 folder. It looks like this:
version: '2.1'

services:
  product:
    build: microservices/product-service
    mem_limit: 512m
    environment:
      - SPRING_PROFILES_ACTIVE=docker

  recommendation:
    build: microservices/recommendation-service
    mem_limit: 512m
    environment:
      - SPRING_PROFILES_ACTIVE=docker

  review:
    build: microservices/review-service
    mem_limit: 512m
    environment:
      - SPRING_PROFILES_ACTIVE=docker

  product-composite:
    build: microservices/product-composite-service
    mem_limit: 512m
    ports:
      - "8080:8080"
    environment:
      - SPRING_PROFILES_ACTIVE=docker
For each microservice, we specify the following:
- The name of the microservice. This will also be the hostname of the container in the internal Docker network.
- A build directive that specifies where to find the Dockerfile that was used to build the Docker image.
- A memory limit of 512 MB. 512 MB should be sufficient for all our microservices for the scope of this book. For this chapter, it could be set to a lower value, but as we add more capabilities in the microservices in the coming chapters, their memory requirements will increase.
- The environment variables that will be set up for the container. In our case, we used these to specify which Spring profile to use.
For the product-composite service, we will also specify port mappings – we will expose its port so it can be reached from outside Docker. The other microservices will not be accessible from the outside. Next, we will see how to start up a microservice landscape.
In Chapter 10, Using Spring Cloud Gateway to Hide Microservices behind an Edge Server, and Chapter 11, Securing Access to APIs, we will learn more about how to lock down and secure external access to a system landscape of microservices.
Starting up the microservice landscape
With all the necessary code changes in place, we can build our Docker images, start up the microservice landscape, and run some tests to verify that it works as expected. For this, we need to do the following:
- First, we build our deployment artifacts with Gradle and then the Docker images with Docker Compose:
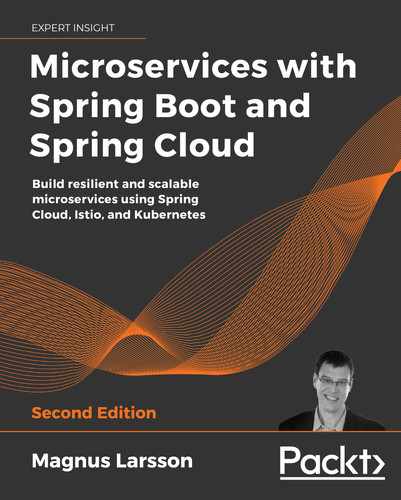
cd $BOOK_HOME/Chapter04 ./gradlew build docker-compose build - Then, we need to verify that we can see our Docker images, as follows:
docker images | grep chapter04We should see the following output:
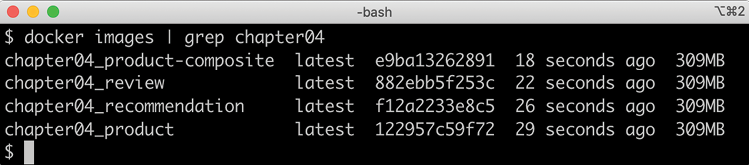
Figure 4.13: Verifying our Docker images
- Start up the microservices landscape with the following command:
docker-compose up -dThe
-doption will make Docker Compose run the containers in detached mode, the same as for Docker.We can follow the startup by monitoring the output that's written to each container log with the following command:
docker-compose logs -f
The docker compose logs command supports the same -f and --tail options as docker logs, as described earlier.
The Docker Compose logs command also supports restricting the log output to a group of containers. Simply add the names of the containers you want to see the log output of after the logs command. For example, to only see log output from the product and review services, use docker-compose logs -f product review.
When all four microservices have reported that they have started up, we are ready to try out the microservices landscape. Look for the following:

Figure 4.14: Starting up all four microservices
Note that each log message is prefixed with the name of the container that produced the output!
Now, we are ready to run some tests to verify that this works as expected. The port number is the only change we need to make when calling the composite service in Docker compared to when we ran it directly on the localhost, as we did in the previous chapter. We now use port 8080:
curl localhost:8080/product-composite/123 -s | jq .
We will get the same type of response:

Figure 4.15: Calling the composite service
However, there's one big difference – the hostnames and ports reported by serviceAddresses in the response:

Figure 4.16: Viewing the serviceAddresses
Here, we can see the hostnames and IP addresses that have been allocated to each of the Docker containers.
We're done; now only one step is left:
docker-compose down
The preceding command will shut down the microservices landscape. So far, we have seen how we can test the cooperating microservices running bash commands by hand. In the next section, we will see how we can enhance our test script to automate these manual steps.
Automating tests of cooperating microservices
Docker Compose is really helpful when it comes to manually managing a group of microservices. In this section, we will take this one step further and integrate Docker Compose into our test script, test-em-all.bash. The test script will automatically start up the microservice landscape, run all the required tests to verify that the microservice landscape works as expected, and finally tear it down, leaving no traces behind.
The test script can be found at $BOOK_HOME/Chapter04/test-em-all.bash.
Before the test script runs the test suite, it will check for the presence of a start argument in the invocation of the test script. If found, it will restart the containers with the following code:
if [[ $@ == *"start"* ]]
then
    echo "Restarting the test environment..."
    echo "$ docker-compose down --remove-orphans"
    docker-compose down --remove-orphans
    echo "$ docker-compose up -d"
    docker-compose up -d
fi
After that, the test script will wait for the product-composite service to respond with OK:
waitForService http://$HOST:${PORT}/product-composite/1
The waitForService bash function is implemented as:
function testUrl() {
    url=$@
    if curl $url -ks -f -o /dev/null
    then
          return 0
    else
          return 1
    fi;
}
function waitForService() {
    url=$@
    echo -n "Wait for: $url... "
    n=0
    until testUrl $url
    do
        n=$((n + 1))
        if [[ $n == 100 ]]
        then
            echo " Give up"
            exit 1
        else
            sleep 3
            echo -n ", retry #$n "
        fi
    done
    echo "DONE, continues..."
}
The waitForService function sends HTTP requests to the supplied URL using curl. Requests are sent repeatedly until curl responds that it got a successful response back from the request. The function waits 3 seconds between each attempt and gives up after 100 attempts, stopping the script with a failure.
Next, all the tests are executed like they were previously. Afterward, the script will tear down the landscape if it finds the stop argument in the invocation parameters:
if [[ $@ == *"stop"* ]]
then
    echo "We are done, stopping the test environment..."
    echo "$ docker-compose down"
    docker-compose down
fi
Note that the test script will not tear down the landscape if some tests fail; it will simply stop, leaving the landscape up for error analysis!
The test script has also changed the default port from 7000, which we used when we ran the microservices without Docker, to 8080, which is used by our Docker containers.
Let's try it out! To start the landscape, run the tests, and tear it down afterward, run the command:
./test-em-all.bash start stop
The following is some sample output from a test run focusing on the startup and shutdown phases. Output from the actual tests have been removed (they are the same as in the previous chapter):
Figure 4.17: Sample output from a test run
After running these tests, we can move on to see how to troubleshoot tests that fail.
Troubleshooting a test run
If the tests that were running ./test-em-all.bash start stop fail, following these steps can help you identify the problem and resume the tests once the problem has been fixed:
- First, check the status of the running microservices with the following command:
docker-compose psIf all the microservices are up and running and healthy, you will receive the following output:

Figure 4.18: Checking the status of running microservices
- If any of the microservices do not have a status of
Up, check their log output for any errors by using thedocker-compose logscommand. For example, you would use the following command if you wanted to check the log output for theproductservice:docker-compose logs productAt this stage, it is not easy to cause an error to be logged, since the microservices are so simple. Instead, here is a sample error log from the
productmicroservice in Chapter 6, Adding Persistence. Assume that the following is found in its log output:
Figure 4.19: Sample error information in the log output
From reading the above log output, it is quite clear that the
productmicroservice can't reach its MongoDB database. Given that the database also runs as a Docker container managed by the same Docker Compose file, thedocker-compose logscommand can be used to see what's wrong with the database.If required, you can restart a failed container with the
docker-compose restartcommand. For example, you would use the following command if you wanted to restart theproductmicroservice:docker-compose restart productIf a container is missing, for example, due to a crash, you start it up with the
docker-compose up -d --scalecommand. For example, you would use the following command for theproductmicroservice:docker-compose up -d --scale product=1If errors in the log output indicate that Docker is running out of disk space, parts of it can be reclaimed with the following command:
docker system prune -f --volumes - Once all the microservices are up and running and healthy, run the test script again, but without starting the microservices:
./test-em-all.bashThe tests should now run fine!
- When you are done with the testing, remember to tear down the system landscape:
docker-compose down
Finally, a tip about a combined command that builds runtime artifacts and Docker images from source and then executes all tests in Docker:
./gradlew clean build && docker-compose build && ./test-em-all.bash start stop
This is perfect if you want to check that everything works before you push new code to your Git repository or as part of a build pipeline in your build server!
Summary
In this chapter, we have seen how Docker can be used to simplify testing a landscape of cooperating microservices.
We learned how Java SE, since v10, honors constraints that we put on containers regarding how much CPU and memory they are allowed to use. We have also seen how little it takes to make it possible to run a Java-based microservice as a Docker container. Thanks to Spring profiles, we can run the microservice in Docker without having to make any code changes.
Finally, we have seen how Docker Compose can help us manage a landscape of cooperating microservices with single commands, either manually or, even better, automatically, when integrated with a test script such as test-em-all.bash.
In the next chapter, we will study how we can add some documentation of the API using OpenAPI/Swagger descriptions.
Questions
- What are the major differences between a virtual machine and a Docker container?
- What is the purpose of namespaces and cgroups in Docker?
- What happens with a Java application that doesn't honor the max memory settings in a container and allocates more memory than it is allowed to?
- How can we make a Spring-based application run as a Docker container without requiring modifications of its source code?
- Why will the following Docker Compose code snippet not work?
  review:
    build: microservices/review-service
    ports:
      - "8080:8080"
    environment:
      - SPRING_PROFILES_ACTIVE=docker

  product-composite:
    build: microservices/product-composite-service
    ports:
      - "8080:8080"
    environment:
      - SPRING_PROFILES_ACTIVE=docker