
Chapter 12: AI and NLP in Healthcare
In the previous chapter, we covered how AWS AI services can be used to set up a chatbot with your document workflows using Amazon Lex and Amazon Kendra. In this chapter, we will talk about how Amazon Textract and Amazon Comprehend Medical can help digitize medical claims in healthcare. We will talk about the healthcare industry's claims processing system and why it's important to automate medical claims. Then, we will walk you through how you can use Amazon Textract to digitize these claims in paper form and use postprocessing to validate them. Then, we will show you how you can extract NLP insights from these claims, such as whether the person was diabetic or not, using Amazon Comprehend Medical APIs.
For invalid claims, we will show you how to easily set up notifications to notify the person submitting the claims to resubmit it with the right data, such as ZIP code or claim ID. Lastly, we will show you some architecture patterns that help automate everything using AWS Lambda functions. By doing so, you will spin up an end-to-end serverless solution that will reduce time to market for the claims processing workflow. This happens because you do not have to set up and manage servers or scale to process millions of such claims.
We will cover the following topics in this chapter:
- Introducing the automated claims processing use case
- Understanding how to extract and validate data from medical intake forms
- Understanding clinical data with Amazon Comprehend Medical
- Understanding invalid medical form processing with notifications
- Understanding how to create a serverless pipeline for medical claims
Technical requirements
For this chapter, you will need access to an AWS account:
- Please make sure that you follow the instructions specified in the Technical requirements section of Chapter 2, Introducing Amazon Textract, to create your AWS account.
- Log into the AWS Management Console before trying the steps in the Improving the accuracy of document processing workflows section.
The Python code and sample datasets for our solution can be found at https://github.com/PacktPublishing/Natural-Language-Processing-with-AWS-AI-Services/tree/main/Chapter%2012. Please use the instructions in the following sections, along with the code in the preceding repository, to build the solution.
Check out the following video to see the Code in Action at https://bit.ly/3GrClSK.
Introducing the automated claims processing use case
In the healthcare industry, there were approximately 6.1 billion medical claims submitted in 2018 according to the 2018 CAHQ index report (https://www.caqh.org/sites/default/files/explorations/index/report/2018-index-report.pdf), and this number is expected to continue rising in the upcoming years.
Healthcare payer companies are constantly looking for efficient and cost-effective ways to process such volumes of claims in a scalable manner. With the current manual process of claim processing, it takes too much time to process these claims. So, healthcare companies are looking at AI and ML approaches to automating and digitizing these claims. Once they can digitize these, it becomes really easy to drive insights such as improving the population's overall health. Moreover, analyzing these claim documents might help you identify behaviors that can help prevent a medical condition from being developed. Also, healthcare payers are looking for a solution that is also compliant, such as HIPAA-compliant. For those of you outside the US, HIPAA is a healthcare-specific compliance law for the healthcare industry in the US.
So, we now understand why automating claims is so important. Now, we will talk about how we can help you automate this pipeline using AWS AI services such as Amazon Textract to digitize the claim process. You can do this by extracting text from these scanned claim documents and verifying them using NLP, along with Amazon Comprehend Medical, to get some patient health insights from these claims.
In this use case, our fictitious company, LiveRight Holdings Private Limited, is working with a healthcare insurance provider known as AwakenLife to process the claims that have been submitted by their insurance holders. These claims are mostly scanned images and most of their time and effort is spent on processing these claims since some of them are invalid. This leads to a loss to the organization. Since LiveRight has already been using Amazon Textract to automate, digitize, and further innovate their document processing workflows in the preceding chapters, they have recommended using AwakenLife so that they can use some of these AWS AI services to improve and automate their overall claims process. In this chapter, we will set up a simple AI-based workflow to validate the claims for AwakenLife, which can further reduce their overall processing time.
This solution is highly cost-effective and scalable as these services are serverless and scale to process documents based on your need. In this chapter, we will walk you through the following architecture:
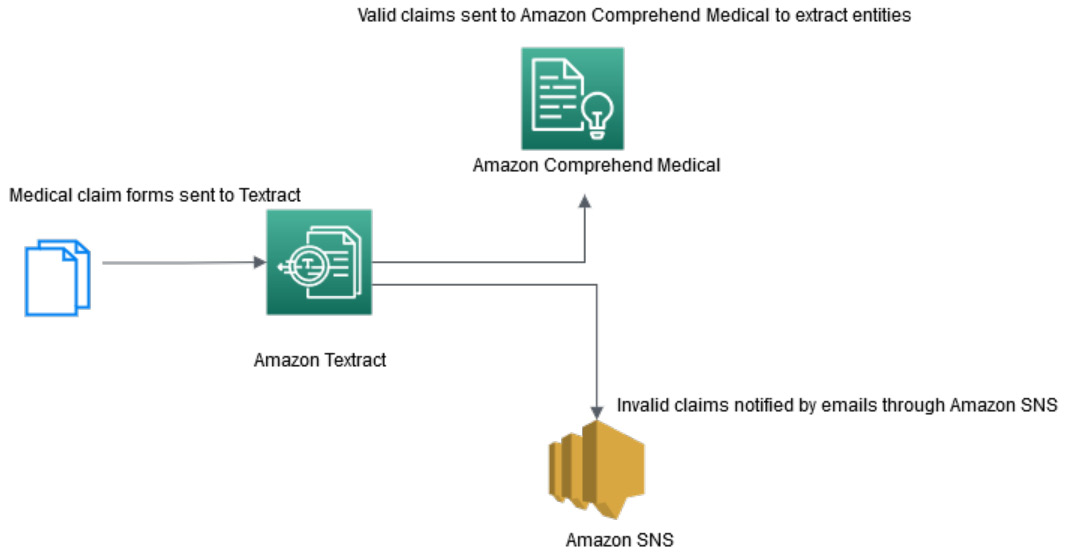
Figure 12.1 – Medical claim processing architecture for the notebook
In the preceding diagram, we can see the following:
- You have your medical intake forms, which can be in image or PDF format, that are sent to Amazon Textract for digitization or text extraction.
- Amazon Textract extracts text from these highly unstructured medical intake documents.
- You must postprocess Amazon Textract's response to validate the claims. For this blog, we are using a ZIP code and claim ID to make sure the claims are valid. You can customize these validation rules based on your business case.
- Once the ZIP code and claim ID have been validated, valid data is sent to Amazon Comprehend Medical to gain insights and entities such as patient procedure.
- If the ZIP code and claim ID are not valid, an email is sent to the stakeholder, notifying them that it's an invalid claim.
We will walk through the previous architecture using a Jupyter notebook. Once we've done this, we will cover an architecture on how to make this implementation automated using event-based lambda functions.
In the next section, we will talk about how you can use Amazon Textract to extract data from medical intake forms.
Understanding how to extract and validate data from medical intake forms
In this section, we will show you how to use Amazon Textract to extract key-value pairs or form data from a medical intake form. Then, using simple logic, you will verify whether the extracted values are valid or invalid.
If you have not done so in the previous chapters, you will have to create an Amazon SageMaker Jupyter notebook and set up Identity and Access Management (IAM) permissions for that notebook role. By doing so, you will be able to access the AWS services we will use in this notebook. After that, you will need to clone this book's GitHub repository (https://github.com/PacktPublishing/Natural-Language-Processing-with-AWS-AI-Services), go to the Chapter 12 folder, and open the ch 12 automating claims processing.ipynb notebook.
Note:
Make sure that the IAM role in the notebook has AmazonSNSFullAccess, AmazonComprehendMedicalFullAccess, and AmazonTextractFullAccess.
Now, using this notebook, we will learn how to extract data using Textract APIs and validate them using some postprocessing logic via a sample medical intake form:
- We will use the following sample medical intake form to get started. Run the following code block to load the sample medical form, which is a valid medical form for claims:
documentName = "validmedicalform.png"
display(Image(filename=documentName))
You will see that the following medical intake form has been loaded:
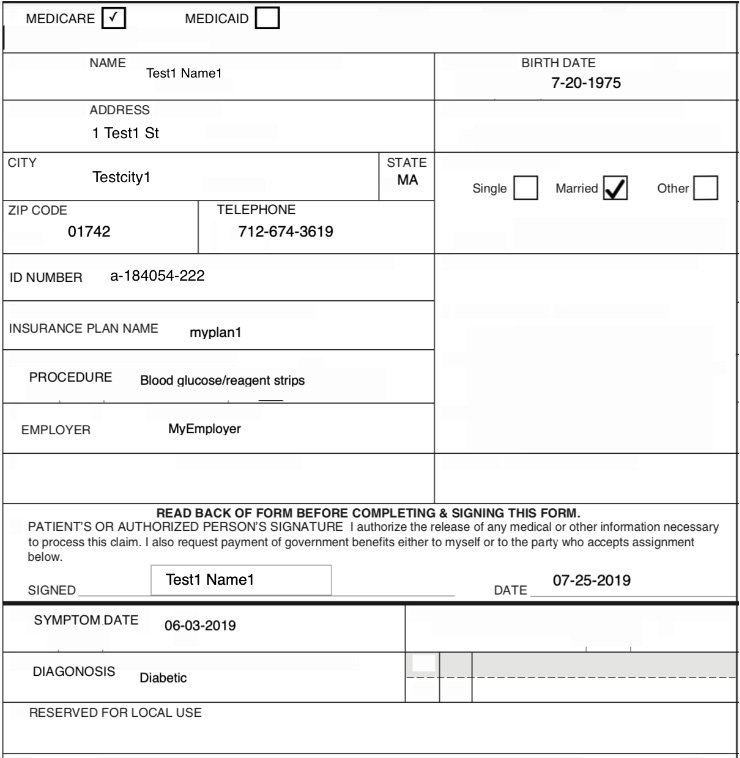
Figure 12.2 – Sample valid medical intake form
Now, we will extract the medical intake form's data by calling the Amazon Textract Analyze Document API with the Form feature enabled. This is a sync API and we covered it in detail in Chapter 2, Introducing Amazon Textract. We have created a function that takes any document image as input and returns a Textract response. We will talk about how this function can be automated using a lambda function in the last section of this chapter, Understanding how to create a serverless pipeline for medical claims. Run the following notebook cell to execute this function:
def calltextract(documentName):
client = boto3.client(service_name='textract',
region_name= 'us-east-1',
endpoint_url='https://textract.us-east-1.amazonaws.com')
with open(documentName, 'rb') as file:
img_test = file.read()
bytes_test = bytearray(img_test)
print('Image loaded', documentName)
response = client.analyze_document(Document={'Bytes': bytes_test}, FeatureTypes=['FORMS'])
return response
- With that, we've defined a Textract function. Now, we will call this function by passing the scanned medical intake form. We will get a Textract response back. Run the following cell:
response= calltextract(documentName)
print(response)
If the response from Textract is a success, you will get the following message, along with a JSON response with extracted data:
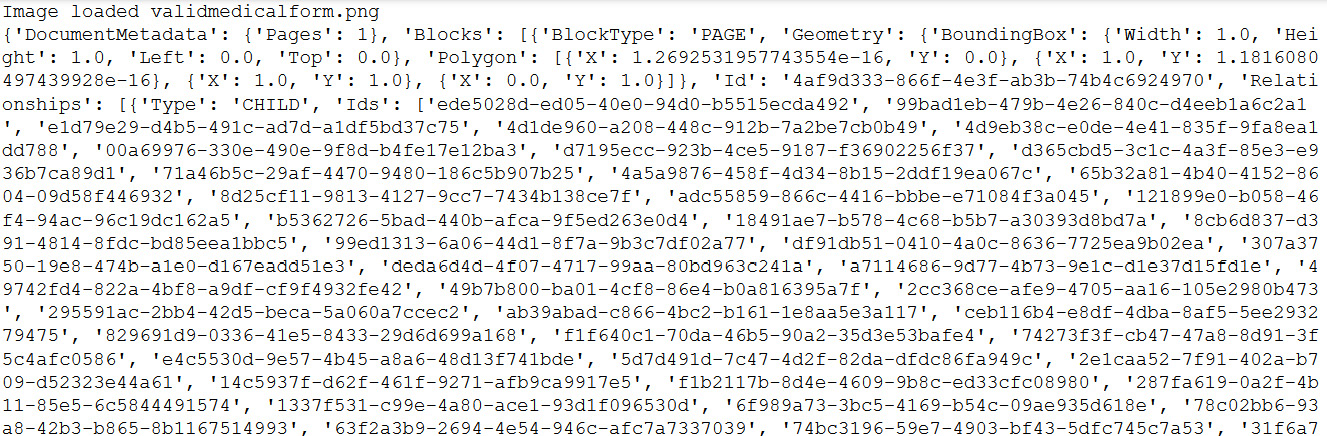
Figure 12.3 – Textract JSON response for the medical form
The preceding response contains a lot of information, such as geometry, pages, and text in document metadata.
- Now, we will create a function to parse form data or key-value text responses from this JSON response. We are using a Textract parser to parse this JSON response. Here, we have created a method that accepts a JSON response and uses a Textract parser to parse the form key values and return a key-value pair:
from trp import Document
def getformkeyvalue(response):
doc = Document(response)
key_map = {}
for page in doc.pages:
# Print fields
for field in page.form.fields:
if field is None or field.key is None or field.value is None:
continue
key_map[field.key.text] = field.value.text
return key_map
- Now, we will pass the Textract JSON response to the def getformkeyvalue(response) method to get the key-value pairs or form data from the Textract JSON response:
get_form_keys = getformkeyvalue(response)
print(get_form_keys)
You will get the following output:

Figure 12.4 – Parsed Textract form data from the JSON response
All the form entries are extracted as key-value pairs.
- Now, we will check whether these key-value or form entries are valid using some defined business rules. For this book, we are checking for form validity based on a valid ZIP Code and Claim ID. You can also modify the validation code based on your business needs. We have created a method that accepts key-value pairs and checks whether the ZIP Code or ID Number information that has been extracted from Textract is valid. If it is valid, it will return the required ID, while if it is not valid, it will return a message stating that Claim ID and ZIP Code are not valid:
def validate(body):
json_acceptable_string = body.replace("'", """)
json_data = json.loads(json_acceptable_string)
print(json_data)
zip = json_data['ZIP CODE']
id = json_data['ID NUMBER']
if(not zip.strip().isdigit()):
return False, id, "Zip code invalid"
length = len(id.strip())
if(length != 12):
return False, id, "Invalid claim Id"
return True, id, "Ok"
- Now, we will test this validation method for a valid medical form by sending the key-value pair we extracted from the getformdata(response) method:
textract_json= json.dumps(get_form_keys,indent=2)
res, formid, result = validate(textract_json)
print(result)
print(formid)
- Since it's a valid claim, both ZIP code and Claim ID are valid, and this method returns a true response (a valid response):

Figure 12.5 – Valid claim response
As you can see, we get an Ok response, along with the valid claim ID.
Now, going back to the architecture, two things can happen:
- If the form is valid or the response from this method is Ok, we will send this data to Comprehend Medical to gain insights, as we will cover in the next section.
- If the form is invalid, we will notify the customer, using Amazon Simple Notification Service (SNS), that this service is used to send email or phone notifications. We will cover this in the last section, Understanding how to create a serverless pipeline for medical claims.
In this section, we covered how you can use the Amazon Textract Analyze Document API to extract the form values from a medical intake form. We also covered how you can validate a Textract response.
Since the response is valid for the medical intake form, in the next section, we will show you how you can use Amazon Comprehend Medical to extract medical insights.
Understanding clinical data with Amazon Comprehend Medical
In this section, we will talk about how you can use Amazon Comprehend Medical to gain insights from a valid medical intake form. We covered Amazon Comprehend's features in Chapter 3, Introducing Amazon Comprehend. In this chapter, we will learn how to use the Amazon Comprehend Medical Entity API to extract entities such as patient diagnosis and PHI data types such as claim ID from the medical intake form. Let's get started:
- Go back to your notebook and run the following cell to use the Comprehend Medical boto3 API:
comprehend = boto3.client(service_name='comprehendmedical')
- Now, we will use the comprehend.detect_entities_v2 API (https://docs.aws.amazon.com/comprehend/latest/dg/API_medical_DetectEntitiesV2.html) to analyze the clinical text data from medical intake forms and return entities specific to the medical text, such as type or diagnosis. Run the following cell to see what entities we are going to get from the valid medical intake form:
cm_json_data = comprehend.detect_entities_v2(Text=textract_json)
print(" Medical Entities ========")
for entity in cm_json_data["Entities"]:
print("- {}".format(entity["Text"]))
print (" Type: {}".format(entity["Type"]))
print (" Category: {}".format(entity["Category"]))
if(entity["Traits"]):
print(" Traits:")
for trait in entity["Traits"]:
print (" - {}".format(trait["Name"]))
print(" ")
You will get the following medical insights by using this API:
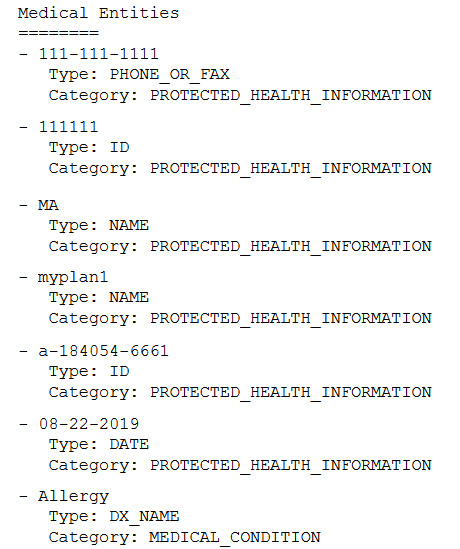
Figure 12.6 – Medical entities
It was able to determine the phone number and medical ID as PHI. If you have regulatory requirements, you can mask or redact these entity types easily as they have been correctly identified by this API.
- Now that we have extracted the entities, we will save this extracted data in Amazon S3 in a CSV file. For large-scale medical intake form processing, you would want to save all these insights in a CSV file, in an S3 bucket, and analyze them by using an analytics service such as Amazon Athena, which we covered in Chapter 8, Leveraging NLP to Monetize Your Media Content. We have created a function that takes Comprehend Medical's response and validated ID from the medical intake form and saves it in Amazon S3. Run the following code:
def printtocsv(cm_json_data,formid):
entities = cm_json_data['Entities']
with open(TEMP_FILE, 'w') as csvfile: # 'w' will truncate the file
filewriter = csv.writer(csvfile, delimiter=',',
quotechar='|', quoting=csv.QUOTE_MINIMAL)
filewriter.writerow([ 'ID','Category', 'Type', 'Text'])
for entity in entities:
filewriter.writerow([formid, entity['Category'], entity['Type'], entity['Text']])
filename = "procedureresult/" + formid + ".csv"
S3Uploader.upload(TEMP_FILE, 's3://{}/{}'.format(bucket, prefix))
- Now, we will call the printtocsv(cm_json_data,formid) method by passing the JSON response from the Comprehend Medical Entity API and formid from the validation logic:
printtocsv(cm_json_data,formid)
You will get the following response:
"successfully parsed:procedureresult/a-184054-6661.csv"
In this section, we covered how you can extract medical insights or entities using the Amazon Comprehend Medical API for valid claims from Amazon Textract. In the next section, we will take an invalid claim form and extract data using Amazon Textract and postprocess this data to check for validation. If it's not valid, we will show you how you can set up SNs to notify the stakeholder via email.
Understanding invalid medical form processing with notifications
In this section, we will walk through the architecture specified in Figure 12.1 when the claim is identified as invalid by Textract postprocessing. We will send the message to the stakeholder via Amazon SNS. Let's go back to the notebook:
- In the notebook, we will start by loading the scanned medical intake form by running the following code:
InvalidDocument = "invalidmedicalform.png"
display(Image(filename=InvalidDocument))
You will get the following sample medical form, which we will check for invalid use cases:
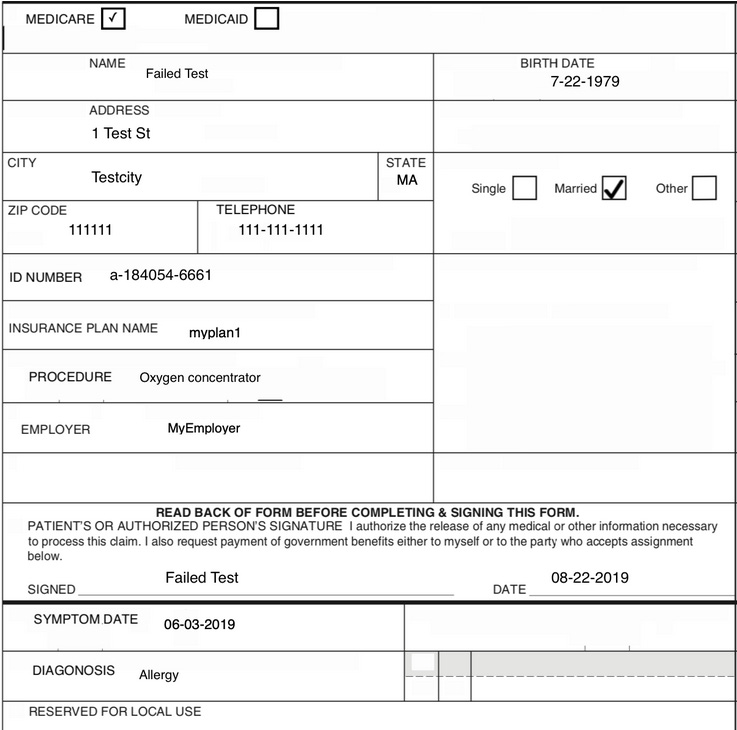
Figure 12.7 – Medical intake invalid claim form
In this form, ZIP CODE and ID NUMBER have been entered incorrectly.
- Now, we will call the calltextract(document) function that we created in the previous section and pass this document to extract the text or data using the Amazon Textract Sync API. To do so, run the following code:
response = calltextract(InvalidDocument)
- After this, we will call the getformdata(response) method that we defined in the previous sections, which takes Textract's response as input and returns the form's key-value data:
get_form_keys = getformkeyvalue(response)
print(get_form_keys)
You will get the following output:

Figure 12.8 – Extracted form data using Textract
Here, we get all the key-value pairs or form data.
- Now, we will check whether the extracted key-value pairs, such as ZIP CODE and ID NUMBER, are valid by sending this as input to the validate(body) method that we defined in the previous section. This method returns true if the content is valid but will return false if invalid claim data is submitted concerning ZIP CODE and ID NUMBER:
textract_json= json.dumps(get_form_keys,indent=2)
res, formid, result = validate(textract_json)
print(result)
print(formid)
print(res)
You will get the following response:

Figure 12.9 – Invalid claim response
The valid method returns an invalid claim and false, along with the invalid claim ID.
- Now, we want to notify the users that this claim is invalid. To do this, we will walk you through how you can set up Amazon SNS through the Amazon SNS console. Go to this link to create a topic where you will publish this invalid message: https://console.aws.amazon.com/sns/v3/home?region=us-east-1#/create-topic.
- For Name, enter invalid-claims-notify, as shown in the following screenshot:
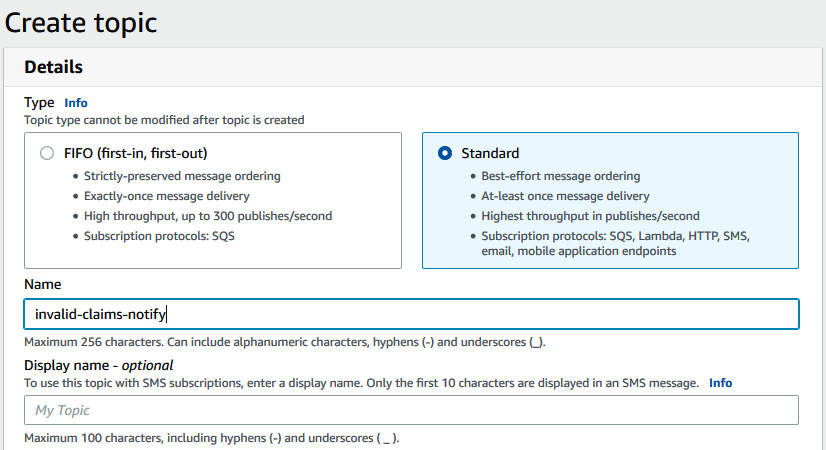
Figure 12.10 – Creating a topic in the SNS AWS console
Make sure you choose the Standard topic type.
- Scroll down and click on the Create topic button.
- After creating a topic, we must add subscribers or people who are going to subscribe to this topic for notifications by going to https://console.aws.amazon.com/sns/v3/home?region=us-east-1#/create-subscription.
- Select your topic ARN from the drop-down menu, set Email for Protocol, and enter your email ID in the Endpoint box, as shown in the following screenshot:
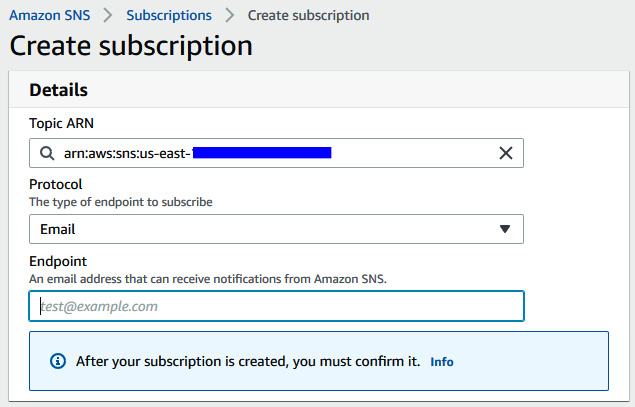
Figure 12.11 – Subscribing to the topic via email
Scroll down and click on Create Subscription.
- An email will be sent to the address you just used to subscribe. Check your email or spam for an email from SNS with a form email ID of AWS Notification - Subscription Confirmation and click on Confirm Subscription.
Note:
It's important to confirm the subscription; otherwise, you will not be notified.
- Now, go back to https://console.aws.amazon.com/sns/v3/home?region=us-east-1#/topics to copy the ARN topic we just created called invalid-claims-notify:
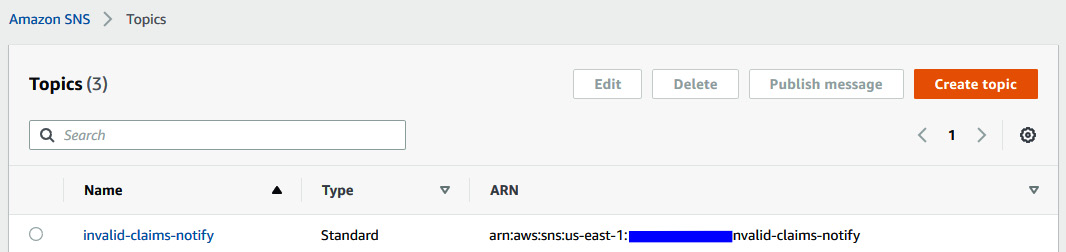
Figure 12.12 – Copying the topic's ARN from the AWS console
- After copying this ARN, go back to the notebook and paste it into the following notebook cell to load the SNS boto3 client. Here, enter a topic:
sns = boto3.client('sns')
topicARN="<Enter your topic arn>"
- Now, we will convert the invalid message into a payload that we can publish to this topic:
snsbody = "Content:" + str(textract_json) + "Reason:" + str(result)
print(snsbody)
- Next, we will use the sns.publish Python boto3 API (https://boto3.amazonaws.com/v1/documentation/api/latest/reference/services/sns.html#SNS.Client.publish) to send an invalid email message in the body to the registered email:
try:
response = sns.publish(
TargetArn = topicARN,
Message= snsbody
)
print(response)
except Exception as e:
print("Failed while doing validation")
print(e.message)
You will get the following response:

Figure 12.13 – Pushing the invalid claim message to the topic
- Check the email address you subscribed with for an email notifying you of invalid medical claims:
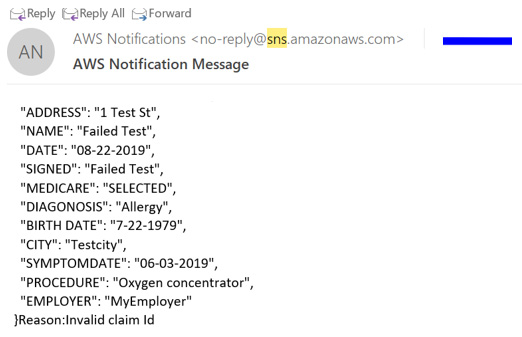
Figure 12.14 – Email notification sent
You can always opt out of the topic you have created.
In this section, we covered how to process a medical claim using Amazon Textract, check for invalid medical claims, and notify the stakeholders about this. Next, we'll learn how to create a serverless pipeline for medical claims.
Understanding how to create a serverless pipeline for medical claims
In the previous sections, we covered the building blocks of the architecture by using the Amazon Textract Sync API, the Amazon Comprehend Medical Detect Entities Sync API, and Amazon SNS to send invalid claims. We defined functions for this workflow and called the text extraction and validation functions to showcase the use case or workflow with both a valid and invalid medical claim form. These functions can be moved into lambda code and, along with S3 event notifications, can be invoked to create a scalable pipeline for medical claims processing. We can do this by using the following architecture:
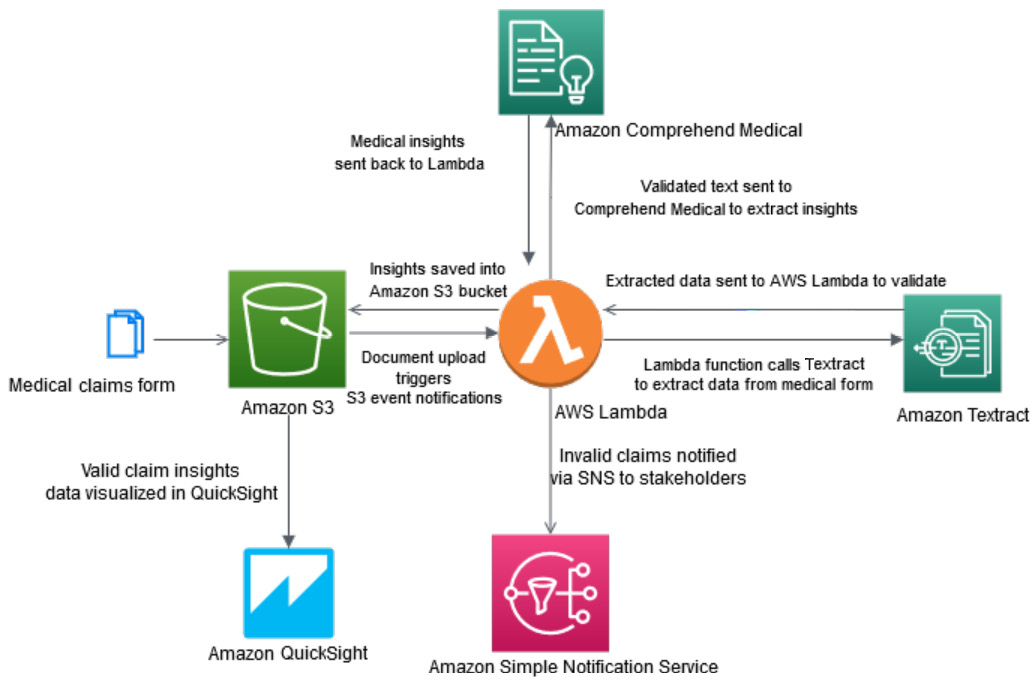
Figure 12.15 – Automating an architecture for scale with AWS Lambda
We walked through a Jupyter notebook showing individual code components for processing medical claims using a single intake form. We created Python functions to extract data, validate data, gather insights, and convert those insights into CSV files. To process millions of such documents, we will learn how to make the code functions AWS Lambda functions to create an end-to-end automated serverless architecture using the preceding diagram. The medical claims form we'll be using has been dropped into an Amazon S3 bucket by payers of AwakenLife Ltd:
- Amazon S3 claims that the upload creates an Amazon S3 event notification, which triggers the lambda function.
- In this lambda, you can call the textract function we defined in the Understanding how to extract and validate data from medical intake forms section and call Amazon Textract by passing this image as input.
- You get a text response back. This extracted text can be sent to the validation function we defined in the previous section.
- For valid claims, valid claim data is sent to Amazon Comprehend Medical to extract insights. Extracted insights are sent back to AWS Lambda.
- You can move the code for the printtocsv (cm_json_data, formid) function, which we defined in the Understanding clinical data with Amazon Comprehend Medical section, to this lambda function to convert this extracted insight into a CSV file and save it to Amazon S3.
- For invalid claims, you can use SNS to notify the stakeholders.
We can use scale and process medical claims documents at a large scale with just a few lines of code. This architecture can be quickly automated and deployed in the form of a CloudFormation template, which lets you set up Infrastructure as Code (IaC). We have provided a similar scalable implementation in the form of a blog in the Further reading section if you're interested.
In this section, we covered how to use the code we defined in the previous sections and move that to an AWS Lambda section to architect an end-to-end automated workflow using a walkthrough architecture. Now, let's summarize this chapter.
Summary
In this chapter, we introduced the medical claim processing use case. We then covered how you can use AWS AI services such as Amazon Textract to extract form data from these scanned medical forms. Then, we spoke about how you can perform some postprocessing on the extracted text based on your business rules to validate their form data. Once the form data had been validated, we showed you how to use Amazon Comprehend Medical, as covered in Chapter 3, Introducing Amazon Comprehend, to extract medical insights. Once you have medical insights, this data can be converted into a CSV file and saved in Amazon S3. Once you've done this, you can analyze this data for population health analytics by using Amazon Athena or Amazon QuickSight. We also discussed how to handle invalid claims processing by showing how to quickly configure Amazon SNS through the AWS console and add subscribers. You can notify your subscribers by email regarding the medical claims that have been submitted as invalid.
Lastly, we showed you how to architect a serverless scalable solution using AWS Lambda to call these Textract Sync and Amazon Comprehend Medical Sync APIs. This ensures that you have an end-to-end working automated architecture with the claim documents you uploaded in Amazon S3.
In the next chapter, we will cover how to improve the accuracy of your existing document processing workflows using Amazon Augmented AI with the human-in-the-loop process. We will also deep dive into aspects of why you need a human-in-the-loop process and how it helps improve the accuracy of your existing AI predictions.
Further reading
To learn more about the topics that were covered in this chapter, take a look at the following resource:
- Automating claims adjudication workflows using Amazon Textract and Amazon Comprehend Medical, by Sonali Sahu and Ujjwal Ratan (https://aws.amazon.com/blogs/industries/automating-claims-adjudication-workflows-using-amazon-textract-and-amazon-comprehend-medical/)