
Chapter 13: Diving into DNS
The Domain Name System (DNS) converts a human-readable hostname into an Internet Protocol (IP) address. It is one of the most common application layer protocols in use today and is essential to any network. In this chapter, we'll review the purpose of DNS along with a brief history so that you can better understand how it all began. We'll then cover the different types of servers, such as root, authoritative, and recursive. Additionally, we'll compare how DNS records are transported when resolving an IP address versus updating the zone file.
To get a better understanding of this protocol, we'll review some of the common types and classes of Resource Records (RRs). We'll also examine the DNS packet structure by drilling down into the header and query sections using Wireshark. You'll be able to recognize key field values such as the transaction Identification (ID) and header flags. In addition, you'll be able to break down how DNS presents the answers to a query. We'll then step through the process of resolving a hostname to an IP address. You'll learn how the Operating System (OS) stores a resolved address and how long it can remain in cache. We'll also cover how Wireshark can help you calculate DNS response times while troubleshooting, and finish with a discussion on ways to secure DNS.
This chapter will cover the following:
- Recognizing the purpose of DNS
- Comparing the different types of records
- Reviewing the DNS packet
- Evaluating queries and responses
Recognizing the purpose of DNS
Anyone who has even had a basic networking class will be familiar with DNS. This well-known protocol provides an essential service of translating a human-readable hostname into a machine-readable numeric IP address.
In this section, we'll cover the concept of how DNS works, along with a brief history of how it all began. We'll then move on to a review of the different types of servers involved in resolving an IP address and finish up with comparing the ways DNS is transported.
Let's start with a discussion of why DNS is so essential.
Mapping an IP address
DNS resolves addresses for hosts and services, along with any object that is connected to the internet. In addition, it is also required to deliver email, defend against spam, or initiate a Voice over Internet Protocol (VoIP) conversation.
Whenever a host makes a request to access a resource, the process moves through a series of servers to make the name resolution. The OS will search the local cache first, and if no answer is found, it will then extend the search to other servers, until a resolution is made.
But where did it all begin? In the next section, let's review the history of DNS.
Reflecting on the start of DNS
For most of us, it seems that DNS has been around forever. But there was a time, when the internet was young, that all that was used to locate hosts was a plain text file. From the early days of the Advanced Research Projects Agency Network (ARPANET) to 1987, there were several significant advances in the development of DNS, as shown in the graphic:
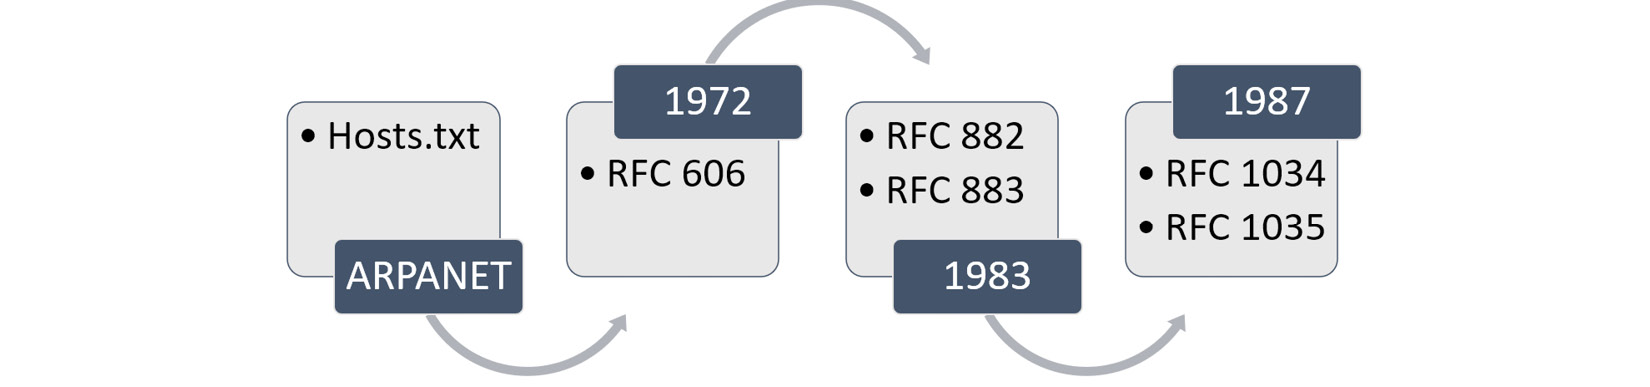
Figure 13.1 – Key moments in DNS history
The ARPANET began in 1969, and throughout the 1970s, the tiny network began to expand and add hosts daily. Similar to the way we identify hosts today, the ARPANET infrastructure used a numeric address. To locate another host, scientists devised a file called hosts.txt, which mapped hostnames to their network addresses.
The Host Status file, found at https://datatracker.ietf.org/doc/html/rfc597, included entries as follows:
101 65 UCLA-CCn IBM 360/91 Server
204 132 UTAH-TIP TIP
In the early days of ARPANET, each host kept a list of systems that were on the network. In addition to their network address, they assigned them human-readable names so that they could be more easily identified.
The file was then manually maintained and circulated to all members. Over the next two decades, significant changes occurred in the way the mappings were handled:
- 1973: As ARPANET expanded, scientists recognized the limitations of a centrally managed file and began exploring alternatives to sharing the host information.
- 1983: Request for Comment (RFC) 882 and RFC 883 outlined the beginnings of DNS acting as a distributed (instead of centralized) system.
- 1984: Berkeley Internet Name Domain (BIND) was released and provided a way to store and retrieve information about objects and resources. BIND remains the most widely used method to manage hosts in the world.
- 1987: RFC 1034 and RFC 1035 outlined the framework for DNS as we know it today.
Although DNS works in a distributed manner, there is a structured hierarchy, using zones. A zone represents an area where an administrator can provide granular control of DNS objects.
Searching for an IP address can be complex; however, one starting point for all is DNS root zone. Let's explore this concept.
Starting at the root
Root servers are name servers that respond to queries housed within the root zone. The servers are an essential component of resolving addresses so that data can move throughout the internet. The structure of a root server has the root server at the top, followed by the Top-Level Domain (TLD) servers, as shown in the graphic:
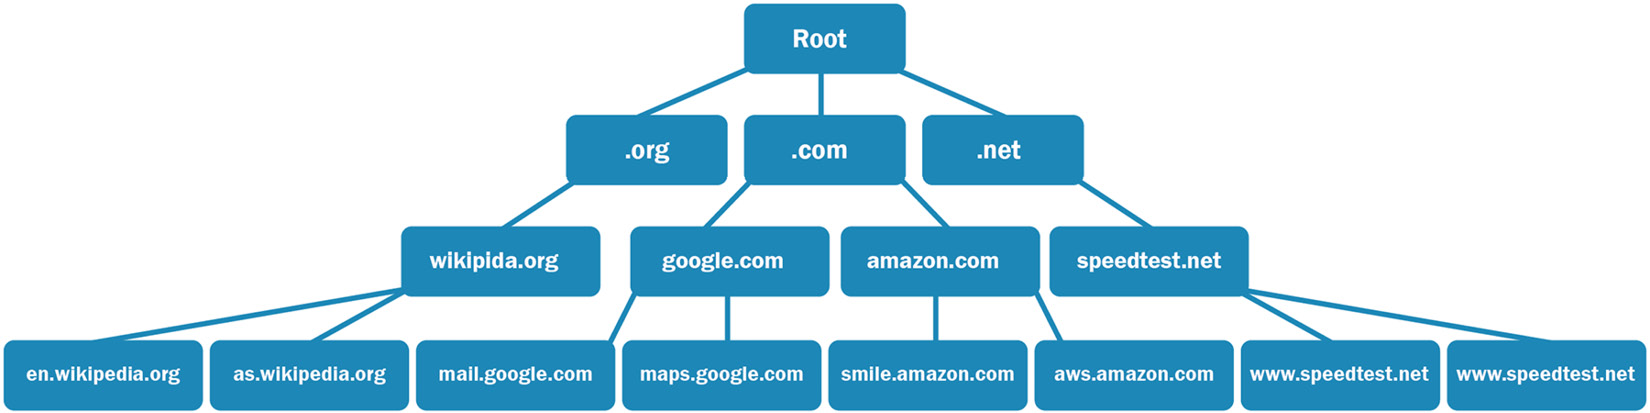
Figure 13.2 – The DNS root server hierarchy
The DNS root zone is comprised of 13 root servers along with approximately 600 redundant root servers around the globe. The TLD servers represent the extension of the domain name and provide a way to organize the data so that it's easier to resolve a query. Off of the TLD, you'll see the servers for the particular domain, followed by their respective subdomains, if any.
To give an example, if we start at the TLD.org, we see the following:
- The server, wikipedia.org, for the domain
- Followed by the respective subdomains, en.wikipedia.org and as.wikipedia.org.
Although the root server has a significant role, there are other servers involved when making a DNS request. Let's investigate this concept next.
Types of DNS servers
When requesting an IP address, there are two main types of servers that are involved in a transaction, authoritative and recursive.
First, let's see how the authoritative server plays a significant role when resolving an IP address.
Acting as an authority
Within any DNS structure, there must be an authoritative DNS server. The authoritative server holds a master set of records for the domain and is updated whenever there is a change.
Within each zone, there is an authoritative server. In most cases, there is more than one for redundancy. The different types are as follows:
- A primary server will house all reliable domain records, which includes the IP address and administrator name, along with domain-specific RRs.
- A secondary server will house a read-only copy of the zone file. Periodically, it will obtain an updated version of the file by requesting a zone transfer.
- A stub server contains only name server (NS) data, as its primary role is to send requests to a recursive server.
A primary authoritative server is required. A secondary authoritative server is optional. However, it is good practice to have a secondary server in place to provide redundancy and reduce dependency by sharing the load during a high-request volume.
Another type of DNS server is a recursive server.
Using a recursive server
A recursive server is a non-authoritative server that holds cached copies of normal back-and-forth user queries.
When a client requests an IP address, the query can be either of the following:
- Recursive is when the DNS server will do the work of obtaining the response.
- Iterative is when the client must do the work of obtaining the response.
In most cases, when a client makes a DNS request, it will be directed to a recursive server. If the server does not have the requested IP address, it will continue to search for a response, on the client's behalf. The requests from the recursive server are done in an iterative fashion until they reach the authoritative DNS name server for the requested domain, as shown in the graphic:
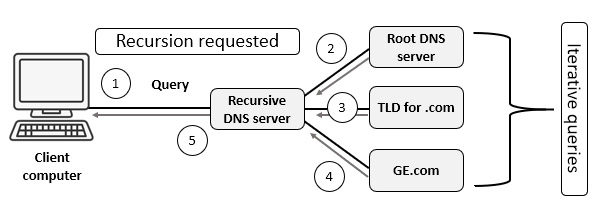
Figure 13.3 – A DNS query using a recursive server
With a recursive query, the resolution process for the IP address of GE.com is as follows:
- The client requests an IP address for GE.com.
- If the recursive server does not have the answer in the cache, it will need to query the root DNS server.
- The root server will direct the recursive server to the TLD for .com.
- The TLD server will direct the recursive server to query the authoritative nameservers for the GE.com domain.
- The recursive server then returns the result to the client.
As evidenced, the DNS process involves many components to resolve an IP address. But how does DNS communicate with other hosts? As we know, many protocols use a dedicated transport method. For example, Dynamic Host Configuration Protocol (DHCP) uses User Datagram Protocol (UDP) as its transport protocol. However, in the next section, we'll learn how DNS can use both Transmission Control Protocol (TCP) and UDP using port 53, depending on the task.
Transporting DNS
The two predominant transport layer protocols are TCP and UDP. The difference is as follows:
- UDP is a connectionless lightweight protocol used when data transport needs to be fast.
- TCP is a connection-oriented protocol that has the ability to ensure the complete delivery of data while monitoring for congestion and providing flow control.
When transporting data, DNS can use either TCP or UDP. First, let's investigate why UDP is the predominantly used protocol when making requests.
Providing a speedy resolution
In most cases, DNS uses UDP for either primary or reverse DNS requests. One key reason is that when a host sends a query, the goal is to provide a speedy resolution. UDP doesn't go through a handshake process; it simply requests the resolution and waits for a response.
In addition, UDP was designed as a lightweight protocol to transport small bits of data using packets that are under 512 bytes. Most of the time, a DNS query or response is well under that limit.
Using UDP is an optimal choice for a transport protocol, as a DNS server must respond quickly and be available to respond to incoming queries, which wouldn't be possible if the server had to maintain a TCP connection.
Although UDP is the predominant transport protocol when using DNS, there are a few reasons why DNS will use TCP.
Ensuring a complete transfer
When using DNS, there are two reasons TCP might be used as the transport protocol:
- When completing a zone transfer, as accuracy is more important than speed. Using a connection-oriented process will ensure the transfer is complete.
- Any time the payload is greater than 512 bytes, the application must use TCP.
All DNS records are not the same. In the next section, let's compare some of the DNS RRs.
Comparing types and classes of RRs
At the heart of DNS are RRs, which include information on the name, type, Time to Live (TTL), and IP address of the requested resource. In this section, we'll review some of the different types of RRs, along with examining the structure of one.
Let's start by reviewing some of the different types of RRs.
Breaking down DNS types
Whenever you send a request to a DNS server, the request will include the type of record to return. Although there are many types of DNS RR, we'll take a look at some common types, as shown in the following table:

Table 13.1 – The types of DNS RRs
As shown, these are common records; however, there are more. For a comprehensive list of DNS types, visit https://phoenixnap.com/kb/dns-record-types.
Note
An AAAA-type RR, which is an IPv6 address, is also called a Quad A. This type uses four As because an IPv6 address is four times the length of an IPv4 address.
Now that you understand some of the RR types, let's take a look at the structure of an RR.
Examining the RR structure
The structure of all RRs contains elements that describe the RR, as shown in the following table:
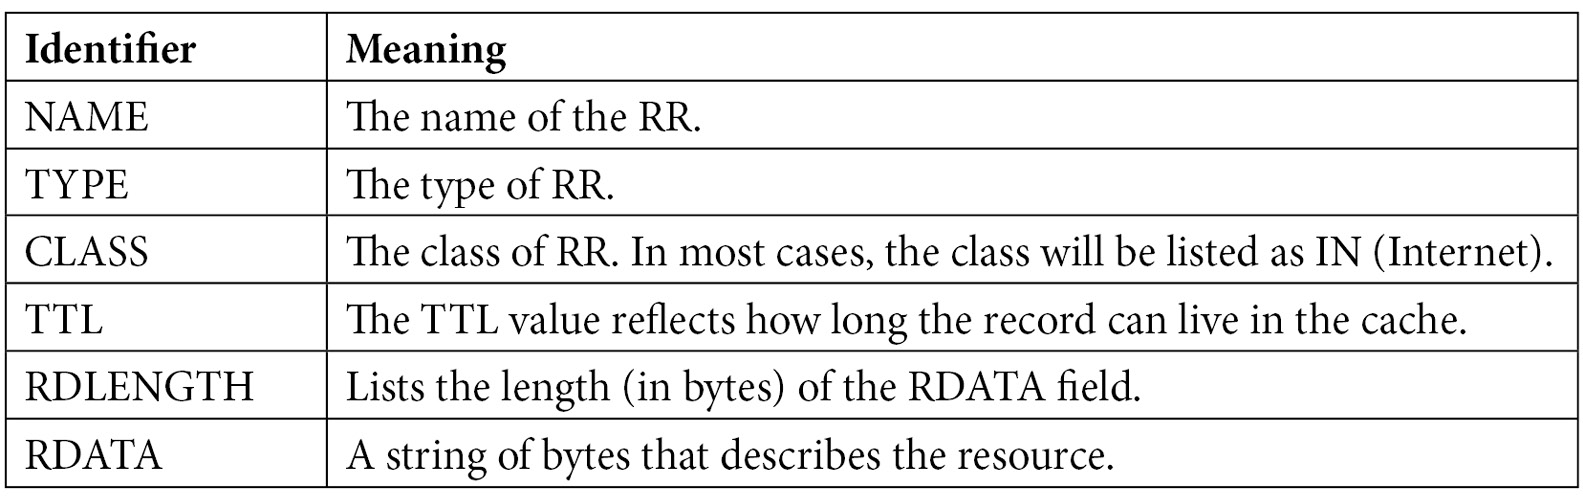
Table 13.2 – The elements in a DNS RR
Next, we'll take a look at an example of an RR answer in a DNS response packet. So that you can follow along, we will get a packet capture from CloudShark (https://www.cloudshark.org/captures/13833cdd14ba). Download the file, DNS Question & Answer.pcapng, and open it in Wireshark. Select Frame 2 and expand the DNS header. Then, expand the first RR in the Queries section, which is shown as follows:
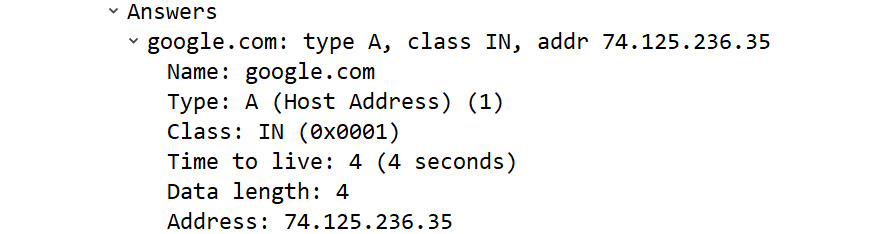
Figure 13.4 – A DNS RR answer
In any transaction, you'll find a great deal of information within the structure of a DNS packet. Let's investigate this next.
Reviewing the DNS packet
DNS is a client-server model for resolving a hostname to an IP address. To see a DNS packet in its entirety, go to DNS Question & Answer.pcapng and expand the Domain Name System (response) caret in Frame 2, which is shown as follows:
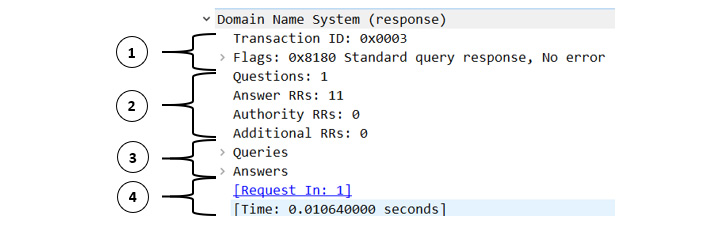
Figure 13.5 – Expanded DNS packet
As you can see, there are several parts to the DNS packet, as follows:
- The first section (1) is the DNS header.
- The second section (2) summarizes the contents.
- The third section (3) is the query section.
- The fourth section (4) are Wireshark-specific references.
In this section, we'll review the field values in a DNS header, review the structure of a DNS packet, and then compare the DNS question and answer section.
Let's start with examining the DNS header elements.
Examining the header
The header structure for either the client or the server is the same. What will be different are the field values for each header, which will identify whether the message is a query or response and include other parameters of the transaction.
Once in DNS Question & Answer.pcapng, expand the Flags caret in Frame 2, as shown in the following screenshot:
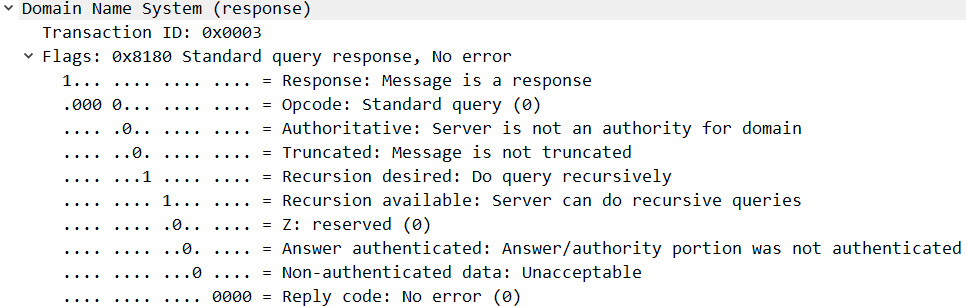
Figure 13.6 – The expanded DNS header
When examining the header fields, you will see two main sections:
- Transaction ID
- Flags
Transaction ID is an essential element of a DNS packet, as it identifies the specific DNS transaction during the exchange of the query and response packets. Wireshark keeps track of Transaction ID so that you can easily reference parts of the transaction. For example, at the bottom of Frame 2, you will see the following indicators:

Figure 13.7 – Wireshark-created indicators
Request In: 1 is a hyperlink, which will take you to the request packet for Transaction ID: 0x0003.
Note
The Time section lists the time that transpired between the query and the resultant response.
After Transaction ID, you will see the Flags section, which provides the details of the transaction. You will notice, however, that the flags for the client are different than the flags for the server. Let's explore this next.
Comparing the flags
When comparing the flags in a DNS header, you will see a distinct difference between the packet coming from the client and the packet coming from the server.
The flags from the client are as follows:
- Response: Set at 0, which indicates that the message is a query.
- OpCode: For most requests, the Operation code (OpCode) is 0, which indicates this is a standard query.
- Truncated: When set at 0, this means the message is not truncated.
- Recursion desired: When set at 1, this will indicate that the client requests recursion.
- Z: A deprecated flag that was used in outdated DNS implementations.
- Non-authenticated data: Set at 0, as this flag is used only in a response packet.
The flags from the server are as follows:
- Response: Set at 1, which indicates that the message is a response.
- OpCode: For most responses, the OpCode is 0, which indicates this is a standard query.
- Authoritative: Indicates whether the server is an authority for the domain. When set at 0, this indicates the server is not an authority for the domain.
- Truncated: When set at 0, this means the message is not truncated.
- Recursion desired: When set at 1, this will indicate that the client requests recursion.
- Recursion available: When set at 1, this will indicate that the server can do recursive queries.
- Z: A deprecated flag that was used in outdated DNS implementations.
- Answer authenticated: Will indicate whether the answer/authority portion was authenticated by the server.
- Non-authenticated data: Used in a response packet. If the value is set to 1, this will indicate that all data included has been authenticated by the DNS server.
- Reply code: 0 will indicate that there is no error.
Note
When set, the truncated flag will indicate whether the message is shortened because it exceeds the limit of 512 bytes for a UDP packet.
The OpCode flag will indicate the type of message that is being sent, as it issues a command to the DNS server to perform some action. Let's take a look.
Defining the opcode
In most cases when examining the OpCode value, the value will be set at 0, indicating that this is a standard query. However, there may be other values set, as follows:
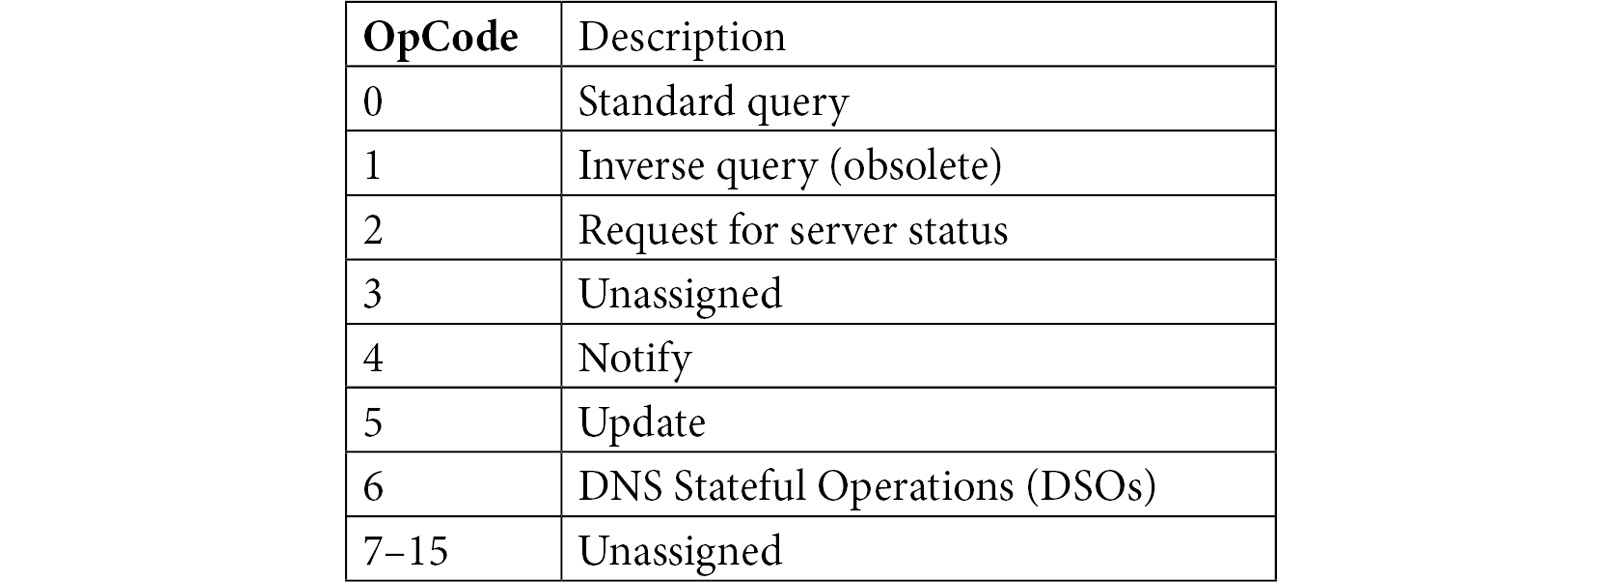
Table 13.3 – DNS OpCode
Some OpCodes, such as 3 and 7–15, are currently unassigned. However, that can change – for example, OpCode 6, DSO, is a newer opcode, used when there is an active state, such as during a TLS session.
The one flag that is most likely set at 1 in a query is the recursion flag. Let's discuss the significance of this flag.
Requesting recursion
There are two types of queries in DNS – recursive and iterative. Whenever the client submits a DNS query, it's common to see the following flag set – Recursion desired: Do query recursively.
A recursive query is the preferred option, as when available, the DNS server will do the work of obtaining the response. In contrast, an iterative query is for when the client must do the work of obtaining the response.
When the server responds, it will reply with either of the following:
- Recursion Available where the flag is set at 1, which means the server will complete a recursive query
- Recursion Not Available where the flag is set at 0, which means the server will not complete a recursive query, as this type of query is not supported
When looking at a DNS header for either a request or reply, there are four sections that follow the message header. Let's explore these next.
Dissecting the packet structure
The four sections that follow the DNS header, for either a query or response, are as follows:
- Questions: The requested resolution
- Answers RRs: The number of RRs that provide the answer(s)
- Authority RRs: The number of RRs that provide the IP address of an authoritative NS
- Additional RRs: The number of RRs that contain additional information
To give an example, as shown in the following graphic in the content summary (as shown in the section 2), we can see that there was 1 question and that it returned 11 RRs:
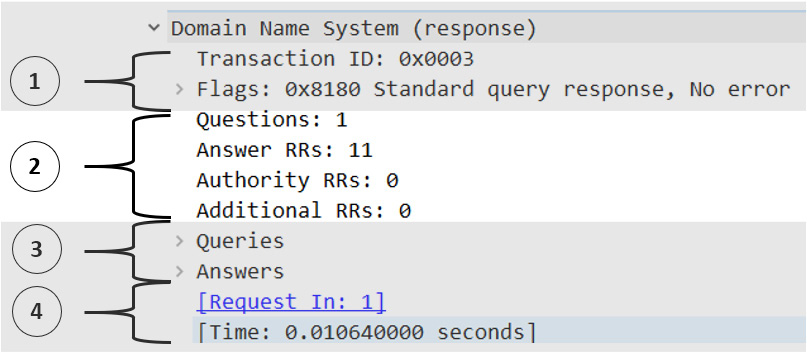
Figure 13.8 – The DNS summary section
Following the packet structure, you'll find the query section, which is used to send the question or provide the response.
Outlining the query section
When looking at DNS header details, the format for the DNS question is different than the DNS answer, as shown here:
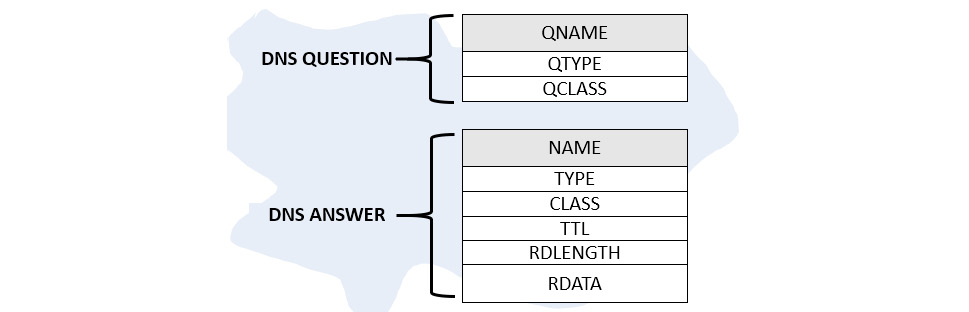
Figure 13.9 – DNS questions and answers
When a client makes a request to a DNS server, it is asking for a resolution. If we go to DNS Question & Answer.pcapng and expand the Queries caret in the request in Frame 1, from the client, we will see the following information:
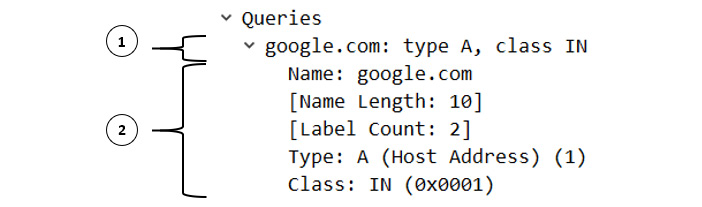
Figure 13.10 – The DNS client query
The first section (1) is Wireshark's summary of the query section. The second section (2) is the DNS question section, which contains the following:
- Name: The requested resolution. In this case, the client would like a resolution of Google.com.
- Type: The type of RR. In this case, the client is requesting an A type or a Type A (IPv4) address.
- Class: The class of RR requested. In this case, the class is listed as IN, which is the most common QClass request.
When a server replies to a DNS request, it will return the client's query and (in most cases) return answers. If we go to DNS Question & Answer.pcapng and select the Answers caret in the response in Frame 2, from the server, we will see the following information:
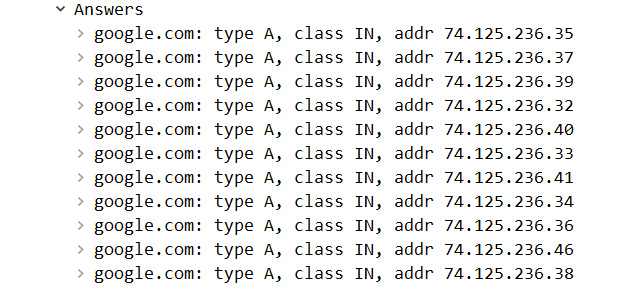
Figure 13.11 – The DNS server answers
Of course, answers from the server can vary. However, in this case, the server has returned 11 RRs.
Now that you understand the elements of a DNS packet, let's take a look at some other considerations when DNS makes a resolution.
Evaluating queries and responses
DNS queries and responses are pretty straightforward. A client sends a query to a DNS server for an IP address and the server responds with the information. In this section, we'll take a look at some of the behavior during a transaction, such as caching responses, along with monitoring average response times during a transaction using Wireshark.
We'll then evaluate what happens when we need to troubleshoot DNS, and how nslookup helps to check and verify the response. Finally, we'll take a look at spoofing DNS, and how we can secure the process.
Let's start with learning how caching plays a part in the DNS process.
Caching a response
Anything on the network has a time limit. DNS is no exception. When a server returns a response, there are several elements within the answer. Within that response is the TTL value, which reflects how long the record can live in the cache before disappearing.
The TTL value can vary by system, however, often the value is set by the domain name owner.
In Figure 13.4, we can see Time to live: 4 (4 seconds), which means the response can live in the cache for 4 seconds.
Note
Keep in mind that a TTL in a DNS RR is different than the TTL value in an IPv4 header. The TTL in a DNS RR is how long the response can live in the cache. A TTL in an IP header represents how many hops a packet can take before being dropped by a router.
It's common to see a wide range of TTL values for DNS RRs. To check your own cache on a Windows machine, open a Command Prompt and type ipconfig /displaydns. This will display a list of your own DNS RRs held in the cache – for example, after running the command, I selected one of the records, as shown here:
api.wildtangent.com
----------------------------------------
Record Name . . . . . : api.wildtangent.com
Record Type . . . . . : 1
Time To Live . . . . : 17
Data Length . . . . . : 4
Section . . . . . . . : Answer
A (Host) Record . . . : 34.210.94.123
Within the response, we can see that the RR answer for api.wildtangent.com has a Time To Live value of 17 (seconds).
If, after 17 seconds, the OS needs the IP address for api.wildtangent.com and the DNS information is not in the cache, it must issue another DNS query.
Most DNS queries and responses are under 120 milliseconds (ms or msec) or 0.12 seconds; however, some responses can take longer. Next, let's see how we can use Wireshark to calculate response times.
Calculating response times
DNS response times can vary; however, there are times when a response seems longer than usual. To test response times, the network administrator has a variety of tools. For example, to test the speed of your DNS provider, go to https://www.dnsperf.com/dns-speed-benchmark. Once there, enter example.com in the domain name field and then select RUN TEST. The site will display response times for servers around the world. Scroll down, where you will see results such as the following:
- 36 ms [United States] United States, Dallas (DC139)
- 14 ms [United States] United States, Asheville (DC82)
- 126 ms [Egypt] Egypt, Cairo (DC225)
You can also view response times using Wireshark-generated statistics. Let's take a look.
Viewing DNS response times
To show you an example of visualizing longer DNS response times, we will use bigFlows.pcap. You can find Bigflows at http://tcpreplay.appneta.com/wiki/captures.html#bigflows-pcap.
Once you open bigFlows.pcap, apply the following filter:
(((((dns) && (dns.flags.response == 1)) && !(sflow)) && !(icmp)) && !(dns.flags.rcode == 2)) && (dns.time > 0.2)
The filter will do the following:
- Display all DNS traffic using the dns filter
- Show only DNS responses using the dns.flags.response == 1 filter
- Omit any DNS server errors using: !(dns.flags.rcode == 2)
- Remove all management traffic such as Internet Control Message Protocol (ICMP) and Sampled Flow (sFlow) traffic using the !(sflow)) && !(icmp) filter
- Narrow the search to show only packets with a response time greater than 0.2 seconds by using the dns.time > 0.2 filter
Once you run the filter, you can add a column header to show response times.
To add a column header, first expand the DNS header to view the details. Next, locate the Wireshark-generated value, Time, as shown here:

Figure 13.10 – The DNS server answers
Right-click on the value and select Apply as Column. To adjust and edit the columns so that you can better visualize the data, right-click on any column header and select Column Preferences….
Once there, you can move the columns by clicking and dragging the column title to the desired location. To display the response times, I have renamed the shortcut DNS Response time and disabled some of the column headers, as shown here:
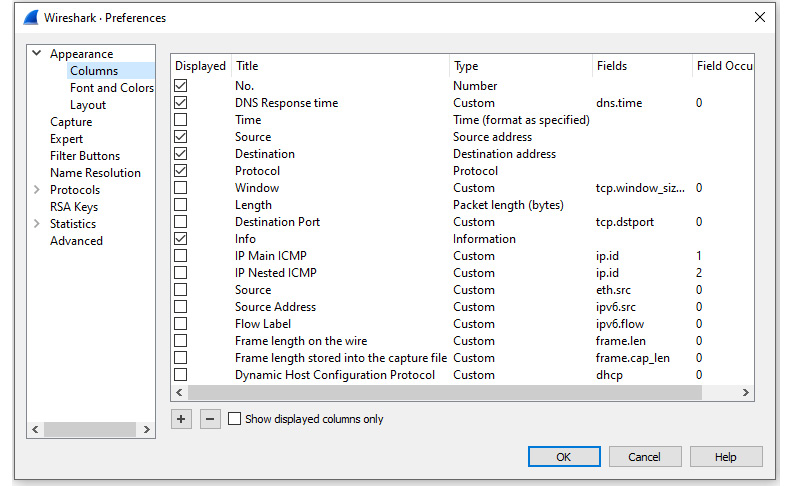
Figure 13.11 – Column preferences
After you have adjusted the columns' headers, you can sort the DNS response time to show the longest time value by clicking once on the DNS Response time header. The results are shown here:
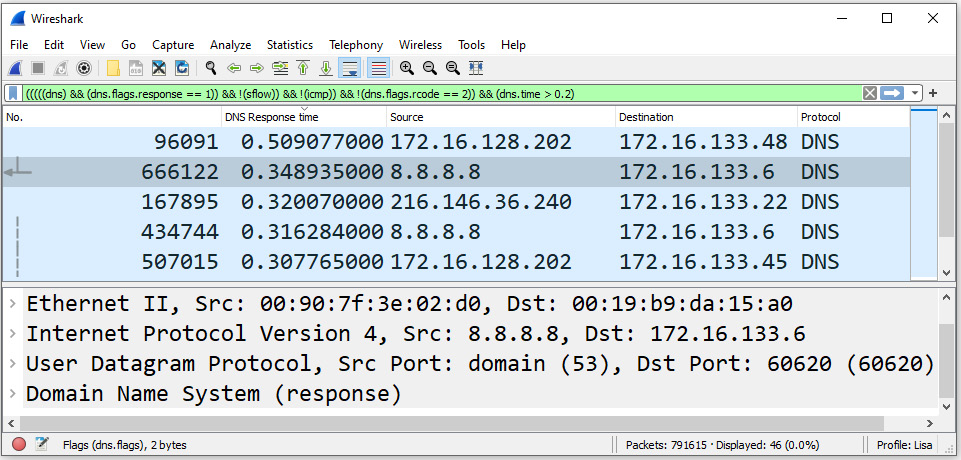
Figure 13.12 – BigFlows showing DNS response times
As shown, DNS response times can vary. While this is expected, another way to view the health of a DNS service is to check the statistics. To achieve this, go to Statistics | DNS, which will open the DNS statistics window. I applied the !(dns.flags.rcode == 2) filter, which then removed the server failure errors, as shown here:
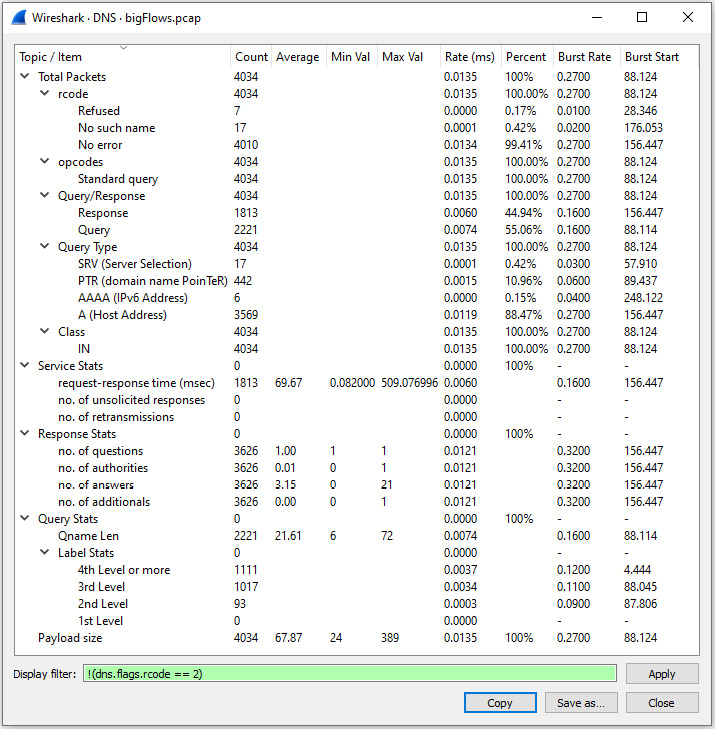
Figure 13.13 – BigFlows DNS statistics
Within the statistics window, you can see a variety of calculated values. In the center of the window are the service stats. We can see for this (filtered) capture that the request-response time in millisecond stats are as follows:
- Average request-response time – 69.67 milliseconds
- Minimum request-response time – 0.082000 milliseconds
- Maximum request-response time – 509.076996 milliseconds
Note
In most cases, you will want to see the server failure errors. However, in this capture, there were so many errors it skewed the response time stats.
DNS statistics can be a valuable tool to use during troubleshooting. For example, it will be worth investigating the following issues:
- Queries with a lengthy request-response time or failed responses might indicate that the DNS server is having issues, such as a bottleneck or a failing Network Interface Card (NIC).
- If you see an unusually large number of requests and responses, this may indicate DNS tunneling.
- Numerous requests and responses can also be indicative of a host communicating with a Command and Control (C&C) server, which is used to remotely control an infected host.
- Experiencing a disproportionately large amount of DNS responses can indicate a DNS Denial of Service (DoS) may be at play.
Next, let's take a look at nslookup, a command-line tool you can use while troubleshooting DNS.
Testing using nslookup
Setting up and maintaining a DNS server can be challenging. The DNS service is essential, and if improperly configured, this can cause serious issues in the ability of hosts to communicate with one another. In addition, if the DNS cache has been poisoned, this also will prevent hosts from communicating and can misdirect clients to malicious sites.
One way to do a quick test on a Windows machine is to use nslookup, a command-line tool primarily used to troubleshoot DNS issues.
To use nslookup, go to Start and then type Run. Once in the app, type cmd, as shown in the following screenshot:
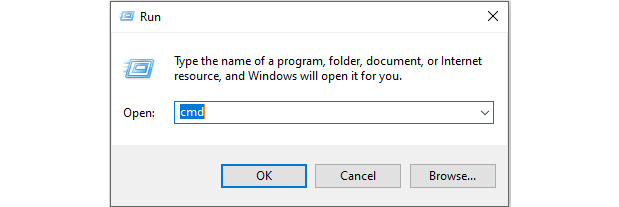
Figure 13.14 – Using Run
Once in the command-line interface, type nslookup example.com, and then press Enter. Once run, my output was as follows:
C:>nslookup example.com
Server: cdns01.comcast.net
Address: 2001:558:feed::1
Non-authoritative answer:
Name: example.com
Addresses: 2606:2800:220:1:248:1893:25c8:1946
93.184.216.34
The request first went to my Internet Service Provider (ISP), and then cdns01.comcast.net resolved the IP address.
Note
When on a macOS and/or Linux, using the dig command will provide similar results.
DNS can suffer from malicious activity. In the next section, let's discuss some of the security issues related to DNS.
Securing DNS
DNS has been used to resolve addresses for many years. In the early days of the internet, there wasn't any consideration of securing the protocol. As a result, it can suffer from attacks such as cache poisoning and spoofing.
First, let's outline what can happen if a malicious actor poisons the cache.
Poisoning the cache
DNS is essential to any network. When clients request an IP address, they are trusting the server to provide an accurate address. If the address is incorrect, the client might be redirected to a bogus site.
DNS RRs have a TTL value that represents how long they can live in the cache, which is a temporary holding area for DNS records. The cache is an important concept, as it provides a way to send a quicker response to a query.
Cache poisoning injects spoofed information into a DNS server's cache. This attack is used by malicious actors to misdirect clients requesting a DNS resolution. The results of the attack will depend on what server was poisoned. On a Local Area Network (LAN), all local users will be affected. However, poisoning the cache of an ISP server will have widespread effects.
It's essential to protect against attacks that disrupt DNS. Let's examine ways to achieve this.
Defending DNS
DNS servers can represent a vulnerable target. To protect the server, the network administrator can employ a few techniques:
- Use cache locking, which controls how and when the cache can be overwritten.
- Restrict zone transfers to only respond to trusted servers.
- Use DNS Security Extensions (DNSSEC), which provides data authentication and integrity.
Additionally, all other standard good practice techniques to secure DNS servers should be used. Techniques include keeping the servers updated and patched and using firewalls that restrict access to only authorized entities.
Summary
In this chapter, we outlined the purpose of DNS, reviewed the types of servers, and then compared the way DNS is transported. We then evaluated the types and classes of RRs and then analyzed the structure and information contained within an RR. Next, we examined a DNS packet and drilled down into the header fields and flags, analyzed the packet structure, and reviewed the query section.
By now, you should have a solid understanding of the DNS query and response process and can recognize the TTL value, which indicates how long the value can remain in the cache. In addition, we saw how to examine DNS statistics in Wireshark and how we can test DNS by using tools such as nslookup and dig. We then summarized by discussing potential threats along with general advice on how to secure DNS.
In the next chapter, we will begin by explaining the need for Dynamic Host Configuration Protocol (DHCP) and review the purpose of this essential protocol. So that you understand how an IP address is obtained from the DHCP server, I'll outline the Discover Offer Request Acknowledge (DORA) process. I'll then dissect a DHCP header and review all the field value flags and port numbers, and then finish with a DHCP example.
Questions
Now, it's time to check your knowledge. Select the best response, and then check your answers, which can be found in the Assessment appendix:
- _____ servers are name servers that respond to queries housed within the root zone and are an essential component of resolving addresses.
- Recursive
- Root
- Redundant
- Caching
- Within any DNS structure, there must be a(n) _____ DNS server that holds a master set of records for the domain and is updated whenever there is a change.
- recursive
- redundant
- authoritative
- caching
- There are many types of DNS RR. A type 12 _____ converts an IP address to a domain name.
- AXFR
- MX
- AAAA
- PTR
- When set, the _____ flag will indicate whether the message is shortened because it exceeds the limit of 512 bytes for a UDP packet.
- recursive
- caching
- blunted
- truncated
- Experiencing a disproportionately large amount of DNS responses can indicate that a DNS _____ attack may be at play.
- spoofing
- DoS
- truncating
- cache poison
- Within the DNS question section, the _____ is the requested resolution.
- name
- type
- class
- cache
- One way to troubleshoot DNS issues on a Windows machine is to use the _____ command-line tool.
- baseline
- boost
- nslookup
- dig
Further reading
Please refer to the following links for more information:
- Visit https://www.cloudflare.com/learning/dns/glossary/dns-root-server/ to learn more on DNS root servers.
- Verisign has an insightful discussion on how DNS works. Learn more by visiting https://www.verisign.com/en_US/website-presence/online/how-dns-works/index.xhtml.
- Visit https://www.cloudns.net/blog/dns-history-creation-first/ for a brief history of DNS.
- To view a detailed infographic on all the RFCs involved in creating and refining the DNS protocols we use today, visit: https://emaillab.jp/dns/dns-rfc/.
- To see an example of a simple zone file, visit https://docs.fedoraproject.org/en-US/Fedora/12/html/Deployment_Guide/s2-bind-zone-examples.html.
- For more information on DNS statistics in Wireshark, visit https://www.wireshark.org/docs/wsug_html_chunked/ChStatDNS.html.
- Visit https://datatracker.ietf.org/doc/html/rfc1035 for details on domain names and how to properly implement and configure a DNS ecosystem.
- For an insightful primer on DNS, visit https://www2.cs.duke.edu/courses/fall16/compsci356/DNS/DNS-primer.pdf.
- For a comprehensive review of the field values in a DNS header, visit https://isc.sans.edu/forums/diary/When+attackers+use+your+DNS+to+check+for+the+sites+you+are+visiting/16955/.
- To learn more about how the DNS truncated flag is used, visit https://support.f5.com/csp/article/K91537308.
- To learn more about DNS response time, visit https://www.keycdn.com/support/reduce-dns-lookups.
- Discover ways to keep your DNS server safe by visiting: https://securitytrails.com/blog/8-tips-to-prevent-dns-attacks.
- To see a list of DNS parameters, visit https://www.iana.org/assignments/dns-parameters/dns-parameters.xhtml#dns-parameters-5.
- Visit https://www.dnsfilter.com/blog/c2-server-command-and-control-attack to learn how a C&C server is used to communicate with an infected host.