Chapter 10: Managing TCP Connections
One of the most important, yet least understood, Transmission Control Protocol (TCP) concepts is the three-way handshake. A TCP handshake initiates the connection and sets up the parameters. No data is exchanged until this process is complete. Similar to the handshake is the teardown when the two endpoints exchange a series of finis (FIN) packets, which indicates the session is complete.
In this chapter, we'll take a more detailed look at the handshake and resultant socket creation. So that you can home in on a single TCP stream, we'll take a large capture, and subset, mark, and filter the packets, so we can examine the TCP handshake. As we move through the chapter, we'll have a greater understanding of the TCP options exchanged during the handshake. We'll learn what they mean and why they are required to have a conversation on today's networks. In addition, we'll see how we can easily modify protocol preferences, such as analyzing TCP sequence numbers with a simple right-click. Finally, we will examine the TCP teardown process and see how the FIN flag indicates the end of data transmission.
This chapter will address all of this by covering the following:
- Dissecting the three-way handshake
- Discovering TCP options
- Understanding TCP protocol preferences
- Identifying a TCP teardown
Dissecting the three-way handshake
In computing, a handshake is an exchange of information between devices that sets up the parameters of the conversation. Each side sends what is available, and the two endpoints agree on the terms before any data is exchanged.
In most cases, the client will initiate the conversation with a server by sending a synchronization (SYN) packet; the server responds with a synchronization acknowledgment (SYN-ACK), and the client then completes the handshake with an acknowledgment (ACK). The TCP handshake is as follows:

Figure 10.1 – The TCP three-way handshake
After the handshake is complete, the data exchange will follow.
For a closer look at the three-way handshake, go to http://tcpreplay.appneta.com/wiki/captures.html#bigflows-pcap. Once there, download bigFlows.pcap so that you can follow along. BigFlows is a large capture that has many protocols and conversations, as shown in the following screenshot:

Figure 10.2 – bigFlows.pcap
BigFlows has 791,615 packets, as shown in the lower right-hand side of the status bar in Figure 10.2. Although you could technically work with the entire capture, in the next section, we will isolate a single stream and then create a smaller, more manageable file.
Isolating a single stream
When capturing traffic, Wireshark keeps track of all the streams. In a file the size of bigFlows.pcap, there will be many TCP and User Datagram Protocol (UDP) streams. Although we can filter on any of the streams, for now, let's use the TCP stream 312, as this includes the handshake, options, data, and then the FIN exchange to end the session.
To show only stream 312, go to the display filter and enter tcp.stream eq 312, and then press Enter. Because this is such a large file, it will take Wireshark several seconds to run the filter. Once you are done, you will see an example of a complete TCP stream, as shown here:
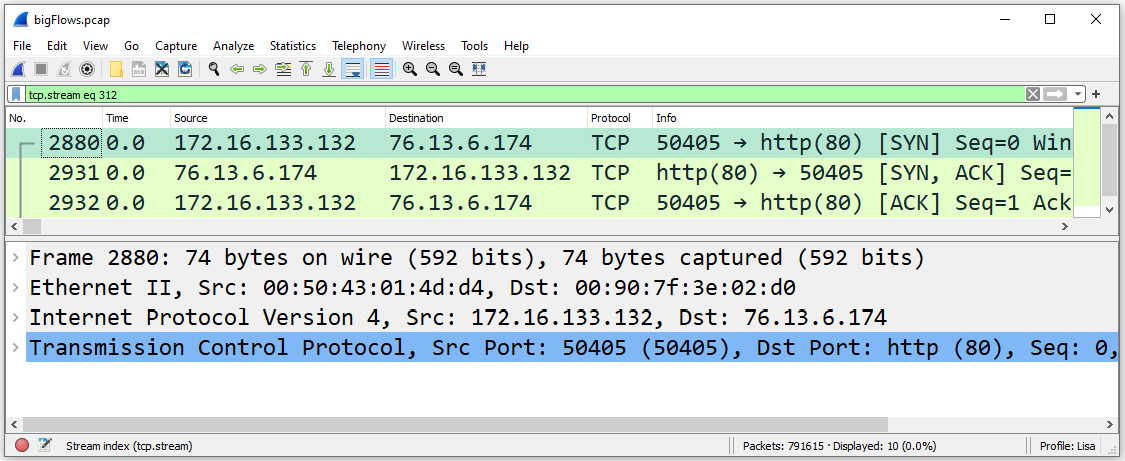
Figure 10.3 – tcp.stream eq 312
Now that we have a single isolated stream, we'll want to subset the capture and save it as a smaller file. To subset only the TCP stream 312, go to File | Export Specified Packets.
This will open a dialog box that offers various ways to export specified packets, as shown in the following screenshot:

Figure 10.4 – Select the All packets and Displayed options
Near the bottom of the dialog box, you will see a header, Packet Range, where you will make your selections. If you have filtered the capture, Wireshark will assume that you would like to export only the displayed packets, and the radio button for Displayed will be active.
Select All packets and Displayed, as shown in the screenshot, and then save as Flow312.pcapng.
Close bigFlows.pcap and clear the display filter, and then open the newly created file. In the next section, let's zero in on the handshake and examine each of the packets exchanged.
Marking the TCP handshake
One of the ways you can isolate a series of packets within Wireshark is by marking them, which will modify the packet to have a black background with white text. Once we mark them, we can filter according to the marked packets to focus on the handshake.
In the file, we'll identify the handshake by marking the packets. We know that to begin a session, TCP starts with a handshake that uses three packets as follows:
- The client sends a SYN packet to the server.
- The server responds by sending a SYN ACK packet.
- The client sends a final ACK packet.
Once the handshake is complete, the data flow begins.
Wireshark will identify the three-way handshake and the exchange of packets by showing the transaction details in the info column (if you have this column header active). In the Flow312.pcapng capture, packets 1, 2, and 3 represent the handshake.
Once the handshake is identified, we'll mark each of the three packets. To mark the packets, select each of the packets and right-click the Mark/Unmark Packet submenu choice, as shown in the following screenshot:
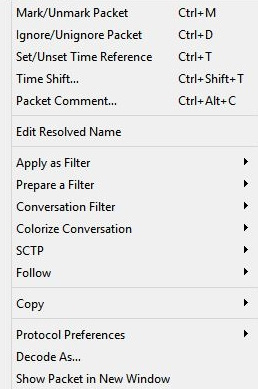
Figure 10.5 – Mark/Unmark Packet
Once you have marked the packet, the background will turn black and the text will be white, as shown here:

Figure 10.6 – Results of marking a packet
After that, we'll want to view only the marked packets by entering frame.marked==1 in the display filter and pressing Enter. Clear the marks by going to Edit | Unmark all Displayed so that we can begin to dissect the handshake.
Now that we have singled out the three-way handshake, let's take a look at each of the three packets.
Identifying the handshake packets
In this section, we'll take a look at each of the packets and examine the flags, along with the sequence and acknowledgment numbers. Let's start with the SYN packet.
Sending the SYN packet
In the first packet, the client will initiate the connection by sending a SYN packet to the server and then wait for a response.
To see all the field values, go to Frame 1, and expand the TCP header as shown in the following screenshot:

Figure 10.7 – The Flow312.pcapng TCP header in Frame 1
In Frame 1, you'll see the source and destination ports along with other field values in the header. This includes the sequence and ACK numbers, as follows:
- Sequence number: 0 (relative sequence number)
- Acknowledgment Number: 0
If we expand the flags, we see that the Syn flag is set, as shown in the following screenshot. Keep in mind that the Syn flag will only be used to synchronize the sequence numbers during the first two packets of the handshake:

Figure 10.8 – The TCP Syn flag set
Although all three packets of a handshake are important, the first two packets set up the parameters of the conversation. Select Frame 1 and view the TCP header in the Packet Details pane. Then, select the TCP header, and we see Transmission Control Protocol (tcp), 40 bytes in the status bar along the bottom, as shown in the following screenshot:

Figure 10.9 – TCP header 40 bytes
While a normal TCP header is 20 bytes, this header is 40 bytes. The TCP header size is larger because it contains options that are added to the header.
Note
In most cases, you will see a larger header size in the first two packets of the three-way handshake. You may also see a larger header size in subsequent frames when the TCP header contains options.
In addition, within the field values, we see that Wireshark has identified this conversation as [Stream: 0]. On the client side, the operating system will create a local socket with an IP address and a port number combination of 172.16.133.132: 50405 to receive data.
Now that we have seen the first packet of the three-way handshake, let's examine the second packet, the SYN-ACK packet.
Returning the SYN-ACK packet
Once the server agrees to take part in the connection, the server will return a SYN-ACK and wait for a final ACK to start the connection.
In Frame 2, you will see the field values. In this case, the ACK number has changed. The sequence and ACK numbers in Frame 2 are as follows:
- Sequence number: 0 (relative sequence number)
- Acknowledgment Number: 1
In addition, the TCP flags are now set to SYN-ACK, as shown in the following screenshot:

Figure 10.10 – Viewing the TCP SYN-ACK flags set
Before any data is exchanged, the handshake must be complete with the ACK packet, as discussed next.
Finalizing with an ACK packet
Frame 3 is the final packet in the three-way handshake. At this point, the sequence and ACK numbers are as follows:
- Sequence number: 1 (relative sequence number)
- Acknowledgment Number: 1
To see the details, go to Frame 3 and then to the TCP header, and then expand the TCP flags, which are now set at ACK, as shown in the following screenshot:

Figure 10.11 – The TCP ACK flag set
In addition, we also see Transmission Control Protocol (tcp), 32 Bytes in the status bar along the bottom, as shown in the preceding screenshot. Again, this is because this connection has TCP options, which adds to the length of the TCP header.
In many cases, there are TCP header options that outline and further define the parameters of the conversation. In the next segment, we'll look at TCP options in general, and then focus on the options of the TCP conversation in Flow312.pcapng.
Learning TCP options
While TCP is already an amazing protocol, it also permits various options that can be added to the TCP header to extend the functionality. The complete list, last updated in February 2021, can be found at https://www.iana.org/assignments/tcp-parameters/tcp-parameters.txt.
Keep in mind the following about TCP options:
- Not all options are used.
- Some of the options are experimental.
- Some are used for specific reasons and do not have an associated Request for Comment (RFC).
- Some have been developed and used without the proper Internet Assigned Numbers Authority (IANA) assignment.
The seven most common options are listed in the following table:

Table 10.1 – TCP options
The first three, EOL, NOP, and MSS, are from the original TCP RFC 793. The others were developed over time. Any options will follow the TCP header and are in multiples of 8 bits (or 1 byte). The entire header must be a multiple of 32 bits, or 4 bytes, for memory alignment. Therefore, in some cases, padding is required to ensure that the header is a multiple of 4 bytes. The entire header must be a multiple of 32- bits, (or four 4 bytes), for memory alignment.
To see the TCP options for Flow312.pcap, select the options header in Frame 1, where additional conversation parameters are listed, as shown here:

Figure 10.12 – Flow312 Frame 1 options
So that you have a better understanding of each of the seven common options, let's take a look at each of them, starting with the EOL option.
Grasping the EOL option
EOL is a single byte used at the end of the options list. To see an example, open the Flow312.pcap packet capture, put tcp.option_kind == 0 in the display filter, and press Enter. Wireshark will display Frame 2. Expand the TCP header options, which will show the EOL at the end of the list:

Figure 10.13 – Flows312 Frame 2 options list
Another TCP option is NOP, which isn't an option at all, but a way to occupy space, as we'll see next.
Using NOP
NOP is essentially a placeholder to separate different options. How and where NOP is used is dependent on the operating system. For example, as shown in the preceding screenshot, we can see that two NOPs are placed between the Window Scale and Timestamps options.
In addition to using NOP to separate the various options, NOP is used to ensure that the options header is a multiple of 32- bits, (or four 4 bytes), for memory alignment.
For example, if there is an option with 3 bytes, such as a window scale, a single 1-byte NOP will be added so that the option's length totals 4 bytes.
Next, we'll look at an option that helps outline the acceptable receive segment size, which is significant in many ways.
Defining the MSS
The MSS is an option that defines the maximum (receive) segment size. This value is important for several reasons.
During a conversation between endpoints, TCP monitors the connection to ensure that the optimal data is sent, so as not to waste bandwidth. When looking at a typical frame, we can see the differences between the TCP MSS and the Internet Protocol (IP) Maximum Transmission Unit (MTU) as shown in the following figure:

Figure 10.14 – Comparing the MSS with the MTU
During a data transaction, TCP keeps track of the following values:
- Window size (WS), for flow control, so as not to overwhelm the receiving host.
- Network, for evidence of congestion by using the congestion window (CWND). When necessary, the server will throttle the data transfer.
- MTU so the host sends only the amount of data that the network can handle so as to prevent the need to fragment the datagram.
On the network, the sending host monitors these values, as it can only send the smallest of the three values.
For example, a host needs to send 1,800 bytes of data. The network limits are as follows:
- CWND: 900 bytes
- MTU: 1,500 bytes
- WS: 1,800 bytes
According to the values listed, TCP must send the smallest value, which is CWND: 900 bytes.
The MSS is not always included in the options header. If this option is not used, the server can send a segment of any size, while keeping in line with the network limits.
As we can see, the MSS provides essential information to ensure optimal data flow. Let's now review another common option, the WS.
Scaling the WS
TCP is a full-duplex communication protocol, in which the sender and receiver constantly communicate with each other. Flow control is an end-to-end control method where a host transmits a WS with every ACK, indicating how many bytes it can accept, so the sender does not transmit too much data and overwhelm the host.
Window Scale is an option that allows the WS to be expanded according to a scaling factor obtained from the TCP options exchanged during the three-way handshake. The WS value is used to increase the maximum WS that is allowed. Although optional, this provides information to the server of a more accurate WS value.
Let's outline why this is an important option. In the TCP header, the window field value is 16 bits, which permits a maximum size of 2^16 (or 65,535) bytes. The original RFC for TCP was written in the early 1980s when buffer sizes were small, so this value made sense. However, as time passed, it became evident that a larger value would be required, and the Window Scale option provided a way to truly represent that value.
When using the Window Scale option, the total value can be up to 2^30. This value as a metric is beneficial when data travels, especially on high-bandwidth WAN links; a larger WS will improve performance. Intermediary devices can be tuned to accept larger WS; for example, when configuring a Cisco router that supports window scaling, you can adjust this value up to 1,073,741,823 bytes.
To illustrate this, the following diagram shows a connection where the client advertises a WS of 35,000 bytes. The server begins to send the packets to the client in line with the WS:

Figure 10.15 – Server sending data in line with a smaller WS
While in the connection, if the WS starts to drop, the server will need to throttle back the data so as not to overwhelm the client. However, if the client uses scaling and now advertises a WS of 70,000 bytes, the server can send twice as many packets, as shown in the following diagram:

Figure 10.16 – A larger WS allows the server to send more data
Increasing the WS will utilize all available bandwidth and provide a more efficient data transfer.
Networks can be unstable, and data transfer does not always go in an orderly fashion. This next option provides an overview of how a client can selectively acknowledge the data it has received, so the server only has to retransmit the missing bytes.
Permitting SACK
Over time, there have been improvements to the TCP/IP suite of protocols. One such improvement is SACK. In the case of SACK, the client will notify the server only if there are any missing packets, with the goal of keeping the data flowing. Let's discuss how this option improves data flow.
TCP is a connection-oriented protocol. During transmission, all data is sequenced and acknowledged to ensure the complete transfer of all data required for that session. This is achieved in the following manner.
After the server sends data to the client, the client will acknowledge that the data was received and is ready to accept more. This is communicated to the server by sending an ACK that indicates the next expected byte. To ensure complete data transfer, the server monitors the acknowledgments. However, sometimes there is a gap in transmission.
For example, the server has received ACK 1-100 and then ACK 151-200. In this case, there is a perceived gap of ACK 101-150, and the server believes the client is missing bytes 101-150.
The server has no idea why there is a gap in transmission and will resend all the data that it believes is missing. The gap may be due to one of the following reasons:
- The client did not receive the data.
- The client did receive the data, but the server did not receive the ACK.
This can lead to unnecessary retransmission of data.
By using SACK, the server only has to resend any missing data. While using SACK, there are two options that are sent in the first two packets of the three-way handshake, as shown here:
- The SACK-permitted option indicates that SACK can be used after establishing a connection.
- The SACK option permits selective acknowledgment of data.
The TCP SACK option uses two 16-bit fields, so the client can indicate the bytes it has received.
For example, open the bigFlows.pcap capture, and use the tcp.stream eq 198 filter. Within tcp.stream 198, we see some indication of problems, such as a Duplicate Acknowledgement (Dup ACK) along with a couple of Out-Of-Order packets, as shown in the following screenshot:

Figure 10.17 – Stream 198
In Frame 4006, the client used TCP option – SACK 10852-11096, as shown in the following figure:

Figure 10.18 – TCP SACK option evident in bigFlows.pcap
Within the SACK option, we see the following values, which indicate the gap in transmission:
- left edge = 10852 (relative)
- right edge = 11096 (relative)
By using SACK, the server only needs to send the data from sequence number 10852 to 11096, which can prevent unnecessary retransmissions and keep the data flowing.
Another TCP option is timestamps, which monitors the transmission and keeps track of the round-trip time during the data exchange.
Using timestamps
TCP relies on time as part of the functions of flow control and reliable data transfer. Data travels through LANs and over WANs. Every network is different, and TCP needs to understand the degree of latency on each network in order to set appropriate ACK timeout values.
Using the Timestamps option, TCP can monitor the round-trip times. This is so the sending host can retransmit a packet if it does not receive an ACK in a timely manner.
In the Flow312.pcap capture in Frame 2, open the options to view the Timestamps option, as shown in the following screenshot:

Figure 10.19 – Viewing the TCP Timestamps option
Within this option, there are the following values:
- Kind: (1 byte) This field indicates the type of option, in this case, the value is (8), which is the Timestamps option.
- Length: (1 byte) This indicates the length of this option's header in bytes; in this case, it is 10 bytes.
- Timestamp value (TSval): (4 bytes) This is the timestamp clock on the sender's side. The value is 1707407197.
- Timestamp echo reply (TSecr): (4 bytes) This is the echo reply sent by the remote host. The value is in Frame 2, and is 131517608.
TCP uses the Timestamps value to monitor the round-trip time in various segments in the path. The Timestamps option must be set during the handshake. After that, you will see the option reporting back during the conversation.
As we can see, TCP can set various options during the handshake that further define the parameters of the conversation.
While working with Wireshark, there may be a preference in the way the protocol responds or is configured. We can modify many of the protocol preferences, as we'll see next.
Understanding TCP protocol preferences
In Wireshark, there are several protocols that we can modify to display the data, according to our preferences. To modify the way a protocol is displayed, select a header and right-click to view Protocol Preferences, as shown in the following screenshot:

Figure 10.20 – Viewing TCP protocol preferences
At the top of the list of preferences, there is another option, Open Transmission Control Protocol preferences..., which will open the Wireshark preferences, as shown in the following screenshot:

Figure 10.21 – TCP preferences
Once the Preferences dialog box is open, you can select and modify some of the TCP options.
Modifying TCP preferences
When in the preferences dialog box for TCP, you will see a list that outlines your choices, as follows:
- Show TCP summary in protocol tree: When selected, this option will show a summary of what has transpired in that packet.
- Validate the TCP checksum if possible: TCP has a checksum that is used for error detection. In most cases, this option is not selected, as the checksum will offload to the NIC and the value will be invalid and indicate an error.
- Allow subdissector to reassemble TCP streams: When selected, this will allow an upper-layer protocol to reassemble the TCP stream.
- Reassemble out-of-order segments: When selected, this will put the segments in the correct order to display in their ordered form. This option is disabled by default as, when used, it can consume excessive memory.
- Analyze TCP sequence numbers: This option is helpful with analysis, as Wireshark will monitor the sequence numbers that help identify trouble, such as TCP retransmission, duplicate ACKs, and zero windows.
- Relative sequence numbers (Requires "Analyze TCP sequence numbers"): When used, this feature helps make the sequence numbers easier to read and compare. The relative sequence numbers start with zero for the first packet in each stream, and then increment from that point.
- Scaling factor to use when not available from capture: Window Scale is used to increase the maximum WS that is allowed. This option was covered in detail in Chapter 9, Decoding TCP and UDP.
- Track number of bytes in flight: To see the bytes in flight, in Flow312.pcapng, use the tcp.analysis.bytes_in_flight display filter, which will result in two frames. Select Frame 5 and expand the SEQ/ACK analysis to see the bytes in flight, as shown here:

Figure 10.22 – Calculating TCP bytes in flight
- Calculate conversation timestamps: This option will monitor time values and can help to find delays during TCP conversations.
- Try heuristic sub-dissectors first: This option helps Wireshark attempt to identify what type of application is used by using the port number to properly dissect the packet. This is done according to the behavior exhibited, and what Wireshark believes is the appropriate protocol.
- Ignore TCP timestamps in summary: Wireshark obtains the timestamp from the operating system kernel. Use this option if you feel the timestamp may not be accurate.
- Fast Retransmission supersedes Out-Of-Order interpretation: On a busy network, packets get lost and delays occur. With this option, you can modify the way Wireshark prioritizes during analysis, and characterize a Fast Retransmission to be interpreted before any Out-Of-Order packets.
- Do not call subdissectors for error packets: Wireshark does its best to properly dissect each protocol according to the RFC. In some cases, the dissector may have incorrectly identified an error. Therefore, it's best to check this option so that Wireshark does not continue to incorrectly dissect the packet and throw more errors.
- TCP experimental options with a Magic Number: In some cases, the capture may include a conversation where the TCP option is experimental, possibly used for testing. Because the option is experimental and not a standard, Wireshark needs to use a magic number to identify the option, so it can be properly dissected.
- Display process information via IPFIX: Internet Protocol Flow Information Export (IPFIX) is a format used to analyze network traffic. When selected, Wireshark will display the process information that can be used to analyze and troubleshoot IPFIX flows.
Note
For any of the options that change the default values, use caution! What you enter may stick and may not allow you to undo the option without a reinstall.
During an analysis, Wireshark will attempt to investigate all aspects of a protocol's behavior. As you can see, it's possible to personalize your preferences and tailor the way TCP is interpreted.
This final section provides an overview of the TCP teardown, which properly closes the connection between two endpoints.
Tearing down a connection
When a TCP connection is complete, TCP tears down the connection by exchanging a series of FIN packets, closing the port, and refusing any more requests to communicate. Let's walk through the entire process.
When two hosts are communicating, a TCP conversation goes through several stages:
- TCP starts with a (three-way) handshake to set up the session. In many cases, there are additional header options that further define the parameters.
- During the conversation, TCP monitors the communication and acknowledges all bytes received to ensure the complete delivery of the data.
- Once the conversation is over, TCP ends the session with an exchange of FIN packets between the two endpoints, which indicates that the session is complete.
Let's now take a look at how session teardown is represented in Wireshark.
In the Flows312.pcapng capture, packets 6, 7, 8, and 9 represent the session teardown, as shown here:
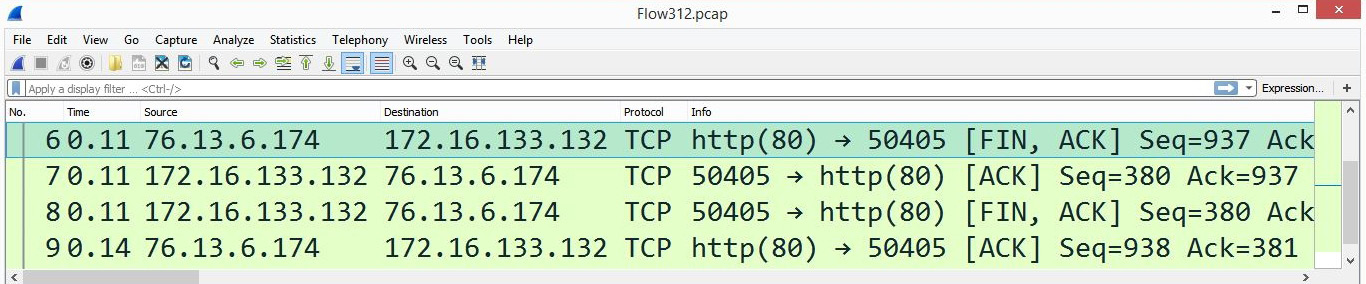
Figure 10.23 – The four-packet FIN exchange
To close the session, TCP uses a FIN flag, as shown in the following screenshot, which indicates that there is no more data to be sent:
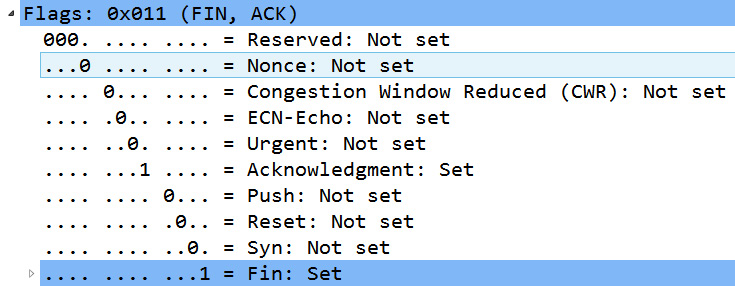
Figure 10.24 – The TCP FIN flag set
To completely close a connection, TCP progresses from an established state to FIN-WAIT-1, FIN-WAIT-2, CLOSE-WAIT, CLOSING, LAST-ACK, TIME-WAIT, and then CLOSED, as stated in RFC 793.
Note
Some applications (such as Outlook and Exchange) will close a TCP connection with Reset (RST) and FIN to try and prevent port exhaustion.
TCP will wait until both sides have said their final goodbyes and have sent a FIN packet, and then the operating system will close the socket. Any future attempts at communicating will be refused.
Summary
An important concept in establishing a connection-oriented session is to outline the parameters of the conversation before any data is exchanged. In this chapter, we studied how TCP begins a conversation by using a three-way handshake and then took a closer look at each step of the handshake. We saw how, once the handshake is complete, the operating system creates a socket so that data exchange can take place.
In addition, we reviewed the TCP options that are exchanged during the three-way handshake, such as SACK, MSS, and timestamps. This chapter also explained the TCP protocol preferences and outlined how you can modify the TCP preferences in Wireshark. We then finished by seeing how TCP ends a session by exchanging FIN packets that signal each host to close the session.
IP is the other dominant protocol in the TCP/IP suite. In the next chapter, we will take a closer look at IPv4 and IPv6. So that you have a better understanding of this network layer protocol, we'll begin with a thorough overview of IPv4 and examine the header format along with each of the field values. We will then take a look at IPv6 along with the corresponding header format and the field values. In addition, because IPv4 is a completely different format from IPv6, we will address how the two can coexist by using various tunneling protocols when in a dual-stack environment.
Questions
Now it's time to check your knowledge. Select the best response, and then check your answers, which can be found in the Assessments appendix:
- To filter only in packets that you have marked in Wireshark, use _____ in the display filter.
- marked:all
- frame = black
- frame.marked==1
- marked: on
- ____ is used to increase the maximum WS that is allowed.
- NOP
- Window scale
- Timestamp
- SACK
- When using _____, the receiver will notify the sender if there are any missing packets.
- NOP
- Window scale
- Timestamp
- SACK
- TCP ends the session by exchanging packets indicating that each side should close their respective socket. TCP uses the _____ flag to indicate the end of a conversation.
- END
- SYN
- FIN
- URG
- If, in the TCP header, the sequence number is 1 and the next sequence number is 937, the packet has _____ bytes of data.
- 32
- 380
- 936
- 33,304
- When using TCP options, _____ is a single byte used at the end of the options.
- EOL
- SACK
- NOP
- WS
- Using the _____ option, TCP can monitor the round-trip times. This is so the sending host can retransmit a packet if it does not receive an ACK in a timely manner.
- EOL
- SACL
- NOP
- Timestamps
Further reading
Please refer to the following links for more information:
- The TCP three-way handshake is outlined in detail in the original RFC 793 found at https://tools.ietf.org/html/rfc793.
- Read more on SACK by visiting https://packetlife.net/blog/2010/jun/17/tcp-selective-acknowledgments-sack/.
- Read more about how Wireshark helps troubleshoot by providing advanced analysis of the data transfer by visiting https://www.wireshark.org/docs/wsug_html_chunked/ChAdvTCPAnalysis.html.