
Entire books have been written explaining how best to create a 3D animated character; so, unsurprisingly, we won't be looking at how to actually produce an animated 3D model here. Indeed, my warning in the previous chapter about "programmer art" probably goes double for "programmer animation". For evidence to back this statement up, look no further than the graphics accompanying the example programs of this book, which are all examples of "programmer art" made by yours truly. I really should heed my own advice.
Anyway, with that tip hopefully now rammed home, let's see how we can export animation data from a 3D modeling package.
Exporting an animation requires a number of new file types to be exported. These will be discussed in detail later, but in short they are files that represent the skeleton, the skin, and the actual animations themselves. The following sections will show how to export this data.
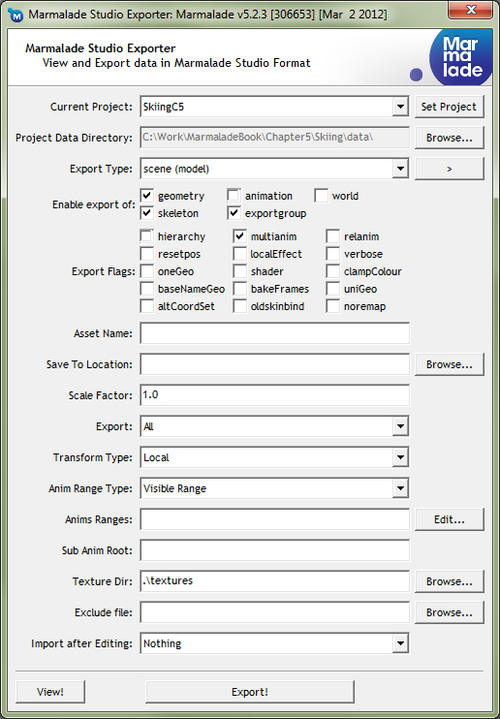
If you are using 3DS Max or Maya to create your animations, the required animation files are exported using the Marmalade exporter plugin. To refresh your memory, the exporter plugin window is shown in the following screenshot:
To export an animation, just load it into your modeling package and follow these steps:
- Set up the export options in the same way as we did for exporting a static model. Please look at the steps listed in Chapter 4, 3D Graphics Rendering, if you've forgotten what the various options are for. We'll now take a look at the additional animation-specific options.
- Ensure that just the geometry, skeleton, and exportgroup checkboxes are ticked in the group labeled Enable export of.
- You can now click on the Export! button to write out the GEO, MTL, and GROUP files for the model. Two new file types will also be exported, the SKEL and SKIN files, which as you can probably guess represent the skeleton and skin information for the model.
The files exported in these steps are necessary in order to animate the model, but they don't actually contain any animation data as such. Here's how we get hold of the data that will describe how the model is actually animated:
- Go back to the exporter plugin window and click on the button to the right of the Export Type combobox. A pop-up menu should appear from which you should select the anim option.
- The checkboxes in the Enable export of section should change so that only the animation checkbox is ticked.
- In the Export Flags section, the multianim checkbox can be selected if you have several animations in the scene to export. Note that each animation should be for the same 3D model.
- The Anim Range Type option can take one of three possible values. The default is Visible Range, which will export only the range of frames that are currently visible on the animation track bar in the modeling package. The next option is Individual Anim Range, which will only export animation data between the first and last key frame of each animation. The final option, Full Range, is only available in Maya. It will export the entire animation regardless of whether a range of frames has been set on the animation track bar or not.
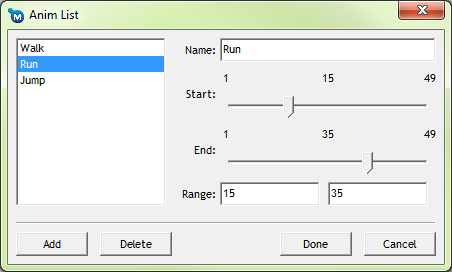
- The Anims Ranges option allows you to split one big animation sequence up into several smaller animations. If you click on the Edit… button, the dialog box just seen will be displayed. Use the Add button to create a new animation range, use the Name textbox to name the animation, and then drag the sliders to set the Start and End frames for the animation. Use the Delete button to delete an animation range from the list. The Done button will close the dialog and accept any changes made, while the Cancel button will discard any changes made before closing the dialog.
- The final option that affects animation export is the Sub Anim Root textbox. You can enter the name of one of the bones in the skeleton and the animation data will only be exported for that bone and its children. We'll learn more about sub-animations later in this chapter.
- With all the animation-related options in the exporter now set up, just click on the Export! button to output one or more ANIM files. The number of files exported depends on how many animations were in the scene, the status of the multianim checkbox, and whether the Anims Ranges option was used.
You can also export animations using the Blender plugin. The terminology used in Blender for animations is a little unusual, as Blender calls the skeleton an armature, but aside from that the approach to animation is the same.

Here are the steps you should follow to export an animated model from Blender:
- Load the animation you wish to export into Blender and then go to File | Export | Marmalade Cross-platform Apps (.group) to display the export options screen. As a reminder, the export options are shown in the previous screenshot, but please refer to the steps listed in Chapter 4, 3D Graphics Rendering, for more information about the standard model export settings.
- To tell the exporter to write out all the different animation file types, ensure that the Export Armatures checkbox is selected.
- The Animations Frames combobox contains three options. None will export no animation data, Keyframes Only will export just the data for the key frames of the animation (this is the option you would normally want to select), and Full Animation will export data for every frame regardless of whether it is a key frame or not (this is often referred to as "baking" the animation and means you get the exact animation seen in the modeling package at the expense of an increase in animation memory footprint).
- The Animations Actions combobox contains two settings. Default Animation will export only the animation that has been selected as the default for the armature. The other option is All Animations, which will export all the animations currently defined for the armature.
- The final setting is the Animation FPS value. This dictates the playback speed in frames per second for the animation, so it is possible to speed up or slow down an animation by changing this value without the need to alter all the key frame timings.
- To export the data, ensure that you have a file location and name entered in the boxes at the top of the screen and then click on the Export Marmalade button.