
People like motion in games and a movie is nothing but a quick succession of image frames. So, we need to be able to redraw our screen periodically to get that effect; with Dart screen frame rates of 60 fps or higher, this becomes possible. A certain time interval is represented in Dart as an object of the type Duration. To do something periodically in Dart, we use the Timer class from the dart:async library and its periodic method. To execute a function moveBall() at every INTERVAL ms (you could call it a periodic event), use the following method:
new Timer.periodic( const Duration(milliseconds: INTERVAL),(t) => moveBall() );
The first parameter is the time period, the second is the callback function that has to be periodically executed, and t is the Timer object. If the callback function has to be executed only once, just write a new Timer(.,.) method, omitting the periodic function. When drawing on canvas, the first thing that the periodically called function will have to do is erase the previous drawing. To stop a Timer object (usually in a game-over situation), use the cancel() method.
Another way of doing this is by using the animationFrame method from the window class, as we will demonstrate in the memory game in Chapter 7, Building Games with HTML5 and Dart.With this technique, we start gameLoop in the main() function and let it call itself recursively, as in the following code:
main() {
 // code left out
 // redraw

window.animationFrame.then(gameLoop);
}

gameLoop(num delta) {
 moveBall();

window.animationFrame.then(gameLoop);
}To show these DOM possibilities, here is a Ping Pong game using styles, based on a similar JavaScript project described in the book at http://www.packtpub.com/html5-games-development-using-css-javascript-beginners-guide/book. Normally, you would write an HTML Dart game using canvas as we do in the next section, but it is interesting to see what is possible just by manipulating the styles. Download the project from GitHub with: git clone git://github.com/dzenanr/ping_pong_dom.git.
This project was developed in spirals; if you want to see how the code was developed, explore the seven stages in the subfolder spirals (spiral s07, especially, contains a function examineCSS() that show you how to read the rules in the stylesheet of Dart code; also, the game screen contains some useful links to learn more about reading and changing CSS rules).
The following is the Dart code of the master version; we have commented on it using line numbers:
import 'dart:html';
import 'dart:async';
const int INTERVAL = 10;  // time interval in ms to redraw the screen
const int INCREMENT = 20; // move increment in pixels
CssStyleSheet styleSheet;              (1)
var pingPong = {            (2)
  'ball': {
    'speed': 3,
    'x'    : 195,
    'y'    : 100,
    'dx'   : 1,
    'dy'   : 1
  },
  'key': {
    'w'    : 87,
    's'    : 83,
    'up'   : 38,
    'down' : 40
  },
  'paddleA' : {
    'width'  : 20,
    'height' : 80,
    'left'   : 20,
    'top'    : 60,
    'score'  : 0
  },
  'paddleB' : {
    'width'  : 20,
    'height' : 80,
    'left'   : 360,
    'top'    : 80,
    'score'  : 0
  },
  'table' : {
    'width'      : 400,
    'height'     : 200
  }
};

main() {
  styleSheet = document.styleSheets[0];        (3)
  document.onKeyDown.listen(onKeyDown);        (4)
  // Redraw every INTERVAL ms.
  new Timer.periodic(const Duration(milliseconds: INTERVAL),   (t) => moveBall());                  (5)
}
String ballRule(int x, int y) {
  String rule = '''
    #ball {
      background: #fbbfbb;
      position: absolute;
      width: 20px;
      height: 20px;
      left: ${x.toString()}px;
      top: ${y.toString()}px;
      border-radius: 10px;
    }
  ''';
  return rule;
}
String paddleARule(int top) {
  String rule = '''
    #paddleA {
      background: #bbbbff;
      position: absolute;
      width: 20px;
      height: 80px;
      left: 20px;
      top: ${top.toString()}px;
    }
  ''';
  return rule;
}
String paddleBRule(int top) {
  String rule = '''
    #paddleB {
      background: #bbbbff;
      position: absolute;
      width: 20px;
      height: 80px;
      left: 360px;
      top: ${top.toString()}px;
    }
  ''';
  return rule;
}
updateBallRule(int left, int top) {
  styleSheet.removeRule(1);
  styleSheet.insertRule(ballRule(left, top), 1);
}
updatePaddleARule(int top) {
  styleSheet.removeRule(2);
  styleSheet.insertRule(paddleARule(pingPong['paddleA']['top']), 2);
}
updatePaddleBRule(int top) {
  styleSheet.removeRule(3);
  styleSheet.insertRule(paddleBRule(pingPong['paddleB']['top']), 3);
}
onKeyDown(e) {
  var paddleA = pingPong['paddleA'];
  var paddleB = pingPong['paddleB'];
  var key = pingPong['key'];
  if (e.keyCode == key['w']) {               (6)
    paddleA['top'] = paddleA['top'] - INCREMENT;
    updatePaddleARule(paddleA['top']);
  } else if (e.keyCode == key['s']) {
    paddleA['top'] = paddleA['top'] + INCREMENT;
    updatePaddleARule(paddleA['top']);
  } else if (e.keyCode == key['up']) {
    paddleB['top'] = paddleB['top'] - INCREMENT;
    updatePaddleBRule(paddleB['top']);
  } else if (e.keyCode == key['down']) {
    paddleB['top'] = paddleB['top'] + INCREMENT;
    updatePaddleBRule(paddleB['top']);
  }
}
moveBall() {
  var ball = pingPong['ball'];
  var table = pingPong['table'];
  var paddleA = pingPong['paddleA'];
  var paddleB = pingPong['paddleB'];
  // check the table boundary
  // check the bottom edge
  if (ball['y'] + ball['speed'] * ball['dy'] > table['height']) {
    ball['dy'] = -1;              (7)
  }
  // check the top edge
  if (ball['y'] + ball['speed'] * ball['dy'] < 0) {
    ball['dy'] = 1;
  }
  // check the right edge
  if (ball['x'] + ball['speed'] * ball['dx'] > table['width']) {
    // player B lost            (8)
    paddleA['score']++;
    document.querySelector('#scoreA').innerHtml  paddleA['score'].toString();
    // reset the ball;
    ball['x'] = 250;
    ball['y'] = 100;
    ball['dx'] = -1;
  }
  // check the left edge
  if (ball['x'] + ball['speed'] * ball['dx'] < 0) {
    // player A lost              (9)
    paddleB['score']++;
    document.querySelector('#scoreB').innerHtml = 	paddleB['score'].toString();
    // reset the ball;
    ball['x'] = 150;
    ball['y'] = 100;
    ball['dx'] = 1;
  }
  ball['x'] += ball['speed'] * ball['dx'];
  ball['y'] += ball['speed'] * ball['dy'];
  // check the moving paddles
  // check the left paddle
  if (ball['x'] + ball['speed'] * ball['dx'] <      (10)
      paddleA['left'] + paddleA['width']) {
    if (ball['y'] + ball['speed'] * ball['dy'] <=
        paddleA['top'] + paddleA['height'] &&
        ball['y'] + ball['speed'] * ball['dy'] >= paddleA['top']) {
      ball['dx'] = 1;
    }
  }
  // check the right paddle
  if (ball['x'] + ball['speed'] * ball['dx'] >= paddleB['left']) {
    if (ball['y'] + ball['speed'] * ball['dy'] <=
        paddleB['top'] + paddleB['height'] &&
        ball['y'] + ball['speed'] * ball['dy'] >= paddleB['top']) {
      ball['dx'] = -1;	            (11)
    }
  }
  // update the ball rule
  updateBallRule(ball['x'], ball['y']);
}
The screen looks like as shown in the following screenshot:
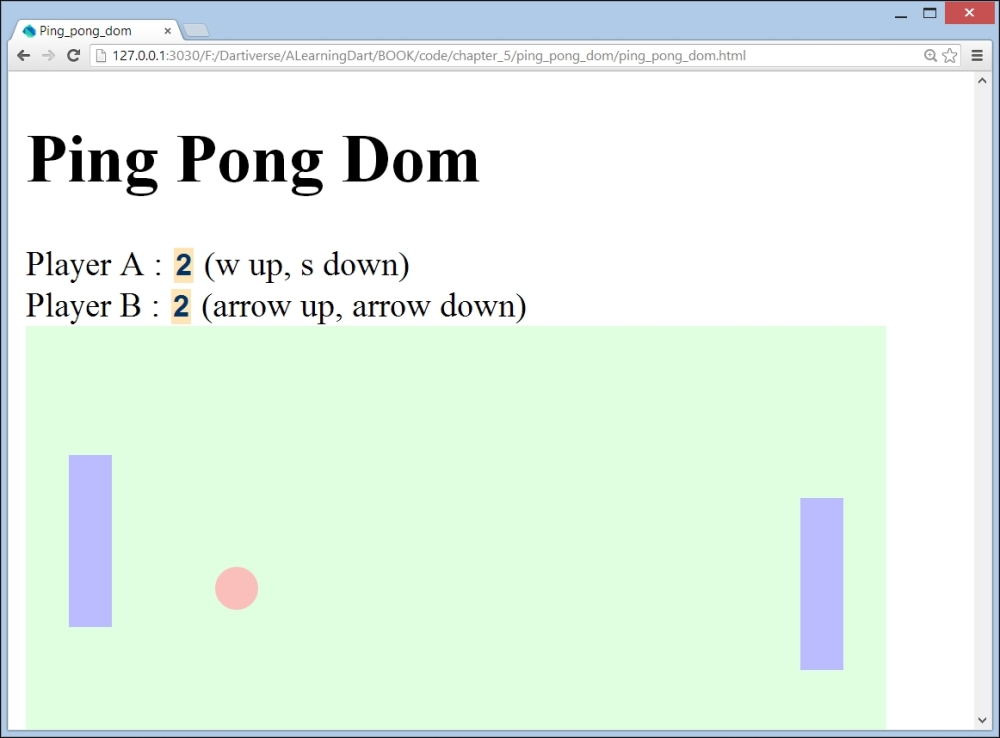
The screen of Ping Pong DOM
Basically, the mechanism is that we change the left and top property values in the style rules for the ball, paddleA and paddleB in the function ballRule, paddlARule, and so on. When this new style rule is attached to our document, the HTML element moves on the screen. In line (1), we declare a stylesheet that we append to our document in line (3). The variable pingPong in line (2) is a Map with the keys ball, key, paddleA, paddleB, and table (these correspond with HTML element IDs), and their values are, themselves, maps containing variables and their values (for example, top has the value 60). These maps are further referenced using variables, as follows:
var paddleA = pingPong['paddleA'];
In line (4), an onKeyDown event handler is defined. This tests the key that was pressed along with if (e.keyCode == key['w']) (line (6)), and so on, and, when the key is recognized, the value of the top variable in the corresponding paddle Map is incremented or decremented (the value of Top is 0 at the top of the screen and increases towards the bottom of the screen. w means that the value is going up; this means the value of top is decreasing, so we have to subtract INCREMENT from the current top value, and likewise for the other directions). An updatePaddle(A-B)Rule function is called; in it, a new style rule is inserted into the stylesheet, updating the top value for the style rule of the corresponding paddle HTML element (the style rules are multiline strings).
Let's then see what happens in the periodic function moveBall(). Basically, this method changes the x and y coordinates of the ball:
  ball['x'] += ball['speed'] * ball['dx'];
  ball['y'] += ball['speed'] * ball['dy'];
However, we have to check a number of boundary conditions (such as the ball crossing the edges of the table); if the ball is going down toward the bottom edge of the table (line (7)), dy becomes -1, so the new ball['y'] value will be smaller and the inverse will occur for when the ball goes along the top edge. If the ball goes over the right edge (line (8)), Player A wins a point, so their score is updated on the screen and the ball is reset. In line (9), the inverse is true and Player B wins a point. In lines (10) and (11), we test for the collision of the ball and paddleA or paddleB respectively; using paddleA, we want to send the ball to the right, so we set dx = 1; with paddleB, we want to send it to the left, so dx = -1. Then, in the same way as for the paddles, we update the style rule for the ball.
Canvas is a way to draw graphics on a web page in a straightforward manner. It is an important part of HTML5 and provides apps with a resolution-dependent bitmap canvas, which can be used for rendering graphs, game graphics, art, or other visual images on-the-fly. We will rewrite our Ping Pong game using the canvas drawing technique (this project is based on the Dart port of the canvas tutorial at http://billmill.org/static/canvastutorial/ by Chris Buckett (https://github.com/chrisbu/Bounce)). Download the project from GitHub using git clone git://github.com/dzenanr/ping_pong.
When you open the project in Dart Editor, you see the latest master version and you can run and play it immediately. In the spirals subfolder, you see how the project has grown in 11 stages and we will learn about canvas drawing by exploring this evolution. The spiral approach to learning is used to advance step-by-step from simple spirals at the beginning to more complex ones close to the last version of the project. This is also an excellent development approach that encourages refactoring and, thus, produces clear, understandable code.
Open the project spirals/ping_pong_01. The goal of this spiral is to display a small, black circle and a small, white rectangle with a black border; in other words, to learn how to draw. Take a look at the HTML file—all drawing is done within the <canvas> tag:
<canvas id="canvas" width="300" height="300">
  Canvas is not supported in your browser.
</canvas>
Adjusting the width and height values to the app's needs, you can also include text that which will be displayed in older browsers that do not support canvas (it is widely supported, but only in Internet Explorer from 9.0 onwards). Now we look at the code of ping_pong.dart in the following spiral:
library ping_pong;               (1)

import 'dart:html';
import 'dart:math';

part 'board.dart';               (2)

void main() {
  //get a reference to the canvas
  CanvasElement canvas = querySelector('#canvas');           (3)
  Board board = new Board(canvas);         (4)
  board.circle(75, 75, 10);           (5)
  board.rectangle(95, 95, 20, 20);         (6)
}
Following good practice, we make our app a library in line (1). The file containing the library declaration contains the starting point main(); all other code resides in other parts (see line (2)). In line (3), we make a reference to <canvas> using an object of the type CanvasElement (in dart:html). Then, we have to make a context object (which can be either 2d or webgl (3d)) to draw on:
CanvasRenderingContext2D context = canvas.getContext('2d'),In this app, we will draw on a Board object made in line (4); this object has the methods circle and rectangle that contain the details for drawing these shapes and they are called in lines (5) and (6). Line (4) passes the canvas object to the Board constructor (line (7)) in the part file board.dart, where the context object is created:
part of ping_pong;
class Board {
  CanvasRenderingContext2D context;
  Board(CanvasElement canvas) {          (7)
    context = canvas.getContext('2d'),
  }
  //draw a circle
  void circle(x, y, r) {
    context.beginPath();            (8)
    context.arc(x, y, r, 0, PI*2, true);      (9)
    context.closePath();            (10)
    context.fill();            (11)
  }
  //draw a rectangle
  void rectangle(x, y, w, h) {
    context.beginPath();
    context.rect(x,y,w,h);          (12)
    context.closePath();
    context.stroke();            (13)
  }
}
When drawing an arbitrary shape, we draw, in fact, a path. This usually involves a number of steps enclosed within a call to beginPath() (line (8)) and a call to closePath() (line (10)); this also closes the shape; when drawing basic shapes, such as lines, rectangles, and circles, as in this example, they can be left out. A black line or an open figure is drawn using context.stroke(), such as in line (13); for a filled-in shape, you need to use context.fill(), such as in line (13). When we run this script, it shows:
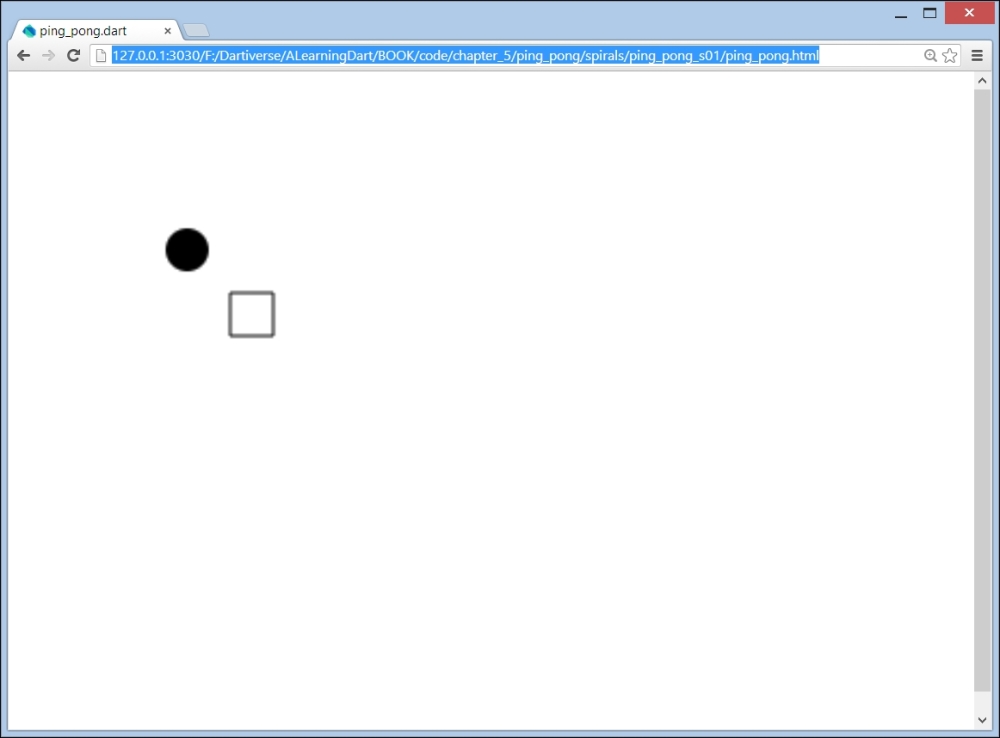
The screen of Ping Pong spiral 1
To further explore how lines and arcs are drawn, we create an additional web app canvas_1:
import 'dart:html';
import 'dart:math';
CanvasRenderingContext2D context;
var width, height;
void main() {
  //get a reference to the canvas
  CanvasElement canvas = querySelector('#canvas'),
  width = canvas.width;              (1)
  height = canvas.height;
  context = canvas.getContext('2d'),
  lines();
  arcs();
}
//drawing lines
void lines() {
  context.moveTo(100, 150);
  context.lineTo(450, 50);
  context.lineWidth = 2;
  context.lineCap = 'round'; // other values: 'square' or 'butt'
  context.stroke();
}
//drawing arcs
void arcs() {
  var x = width / 2;            (2)
  var y = height / 2;
  var radius = 75;
  var startAngle = 1.1 * PI;
  var endAngle = 1.9 * PI;
  var antiClockWise = false;
  context.arc(x, y, radius, startAngle, endAngle, antiClockWise);
  context.lineWidth = 8;
  context.stroke();
}
We obtain the width and height parameters of the canvas object (line (1)) in order to draw proportionally to the space that we have, for example, in choosing the center of a circle (for our arc), such as in line (2).
Canvas uses an (x, y) coordinate system, measured in pixels to locate points: the origin (0,0) is the upper-left corner of the drawing area, the x axis goes from left to right, and the y axis from top to bottom. moveTo(x, y) positions the drawing cursor at the point (x, y) method and the lineTo(x', y') method draws a straight line from (x, y) to (x', y') when the stroke or fill methods are called; lineWidth is an obvious property. To draw a circular arc, you use the method with the same name arc; this method takes no less than six parameters: context.arc(x, y, radius, startAngle, endAngle, antiClockWise); x and y are the coordinates of the circle's center; the third parameter is the circle's radius; parameters startAngle and endAngle are the start and end angles (in radians); the parameter antiClockWise is true or false (the default value is anticlockwise, that is from end to start) and defines the direction of the arc between its two end points: see the next figure for clarification and the example in the arcs() method (comment out the call to lines()). Now we see how a circle can be drawn by going from a 0 PI angle to a 2 PI angle, such as in the board.dart line (9), which is called using line (5).
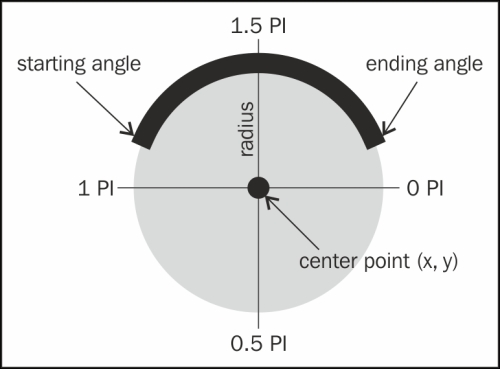
Drawing an arc
Using the lineTo method, it takes three calls to draw a triangle and four for a rectangle. The latter case was considered common enough to provide a rect(x,y,w,h) method (line (12) in board.dart), where x and y are the coordinates of the upper-left corner, w is the width, and h is the height of the rectangle; this is applied in the rectangle() method called on board (line (6)).To erase all drawing in a rectangular area, use the context.clearRect(x,y,w,h) method (first used in Spiral 3 – moving a ball).
In the project spirals/ping_pong_02, the goal is to display two circles and two rectangles in different colors; that is: how can we get some color in our drawing? For that, we need two new properties: context: strokeStyle sets the drawing color for the border and fillStyle sets the fill color; if you do not use these, black is the default color. The color itself is given as a string, containing:
- a predefined color name, such as
context.strokeStyle = 'red'; - a hexadecimal number, such as
context.strokeStyle = '#ff0000'; - an
rgbastring containing thered,green,bluevalues (between0and255) and an alpha value (the opacity of the color having a value between0and1), such ascontext.fillStyle ="rgba(55, 55, 0, .75)"
For example, a rectangle method can be given a border color and an inside color by calling:
  board.rectangle(15, 150, 120, 120,

"rgba(55, 55, 0, .75)", "rgba(155, 155, 0, .5)");
while the rectangle method is now changed to:
void rectangle(x, y, w, h, strokeStyle, fillStyle) {
    context.beginPath();
context.strokeStyle = strokeStyle;
context.fillStyle = fillStyle;
    context.rect(x,y,w,h);
    context.stroke();
    context.fill();
    context.closePath();
  }
Do experiment with the possibilities.
We now know everything we need to draw our Ping Pong game; we'll start doing this and developing the game logic in the next spiral. But, often, you need other techniques in drawing applications: you'll find more of them in canvas_2.dart To see clearly what each code section does, comment all code and uncomment only the section you want to run. In this code file, you can find the methods for drawing quadratic curves and Bezier curves, combining them in paths, custom shapes, linear and radial gradients, and drawing images and text. For more details on the different parameters, refer to http://www.html5canvastutorials.com/tutorials. You can find a lot more code examples in the GitHub repository git at http://github.com/dzenanr/ondart_examples especially the folders ondart_dom, ondart_html5, and ondart_canvas; these accompany the course presentations found at http://ondart.me/web_programming.md.
In the project spirals/ping_pong_03, the goal is to change the position of a small, black circle (a ball) in a straight line using subsequent calls of the move method.
Run the app: we see a ball moving down diagonally from the upper-left corner to the right and then disappearing out of sight. In the main file ping_pong.dart, nothing much has changed; a new part file ball.dart has appeared (line (1)). To describe the ball and its behavior in the Ball class; and; in line (2), the ball object is created, giving it a reference to the board object.
library ping_pong;
import 'dart:html';
import 'dart:async';
import 'dart:math';
part 'board.dart';
part 'ball.dart';            (1)
void main() {
  CanvasElement canvas = querySelector('#canvas'),
  Board board = new Board(canvas);
  Ball ball = new Ball(board, 0, 0, 10);        (2)
  new Timer.periodic(const Duration(milliseconds: 10), (t) => ball.move());              (3)
}
In ball.dart, we see that in the constructor (line (4)), our ball is drawn by calling context.arc on the board object.
part of ping_pong;
class Ball {
  Board board;
  int x, y, r;
  int dx = 2;
  int dy = 4;
  Ball(this.board, this.x, this.y, this.r) {        (4)
    draw();
  }
  void draw() {
    board.context.beginPath();
    board.context.arc(x, y, r, 0, PI*2, true);
    board.context.closePath();
    board.context.fill();
  }
  void move() {
    board.clear();            (5)
    board.context.beginPath();
    board.context.arc(x, y, r, 0, PI*2, true);
    board.context.closePath();
    board.context.fill();
    x += dx;            (6)
    y += dy;            (7)
  }
}
In (line (3)) in the main() method in the preceding code, a Timer invokes periodically the move() method on the ball. In the move() method, the board is first cleared (line (5)). Within the clear() method, this is done through a new clearRect() method on the context object:
void clear() {
    context.clearRect(0, 0, width, height);
}
In lines (6) and (7), the values of the x and y coordinates of the center of the ball are increased using dx and dy respectively. As these remain the same, the ball runs from left to right and top to bottom; it disappears when it leaves the canvas area determined by the width and height parameters. We will improve on this in Spiral 5 – a bouncing ball; for now, let's give the board object the same dimensions as the canvas element:
Board(CanvasElement canvas) {
    context = canvas.getContext("2d");
    width = canvas.width;
    height = canvas.height;
}In this spiral, we pause and reorganise (refactor) our code a bit (we wrote duplicate code in draw() and move()—horror!). In our main() method, we now only create the board object, and call a new method init() on it:
void main() {
  CanvasElement canvas = querySelector('#canvas'),
  Board board = new Board(canvas);
  board.init();
}
This method in board.dart creates the ball object, passing it as a reference to the board object using the this parameter:
  void init() {
    Ball ball = new Ball(this, 0, 0, 10);
    new Timer.periodic(const Duration(milliseconds: 10), (t) =>
  }
The common code in draw() and move() from the Spiral 3 – moving a ball section is eliminated by letting move() call draw() from ball.dart:
  void draw() {
    board.context.beginPath();
    board.context.arc(x, y, r, 0, PI*2, true);
    board.context.closePath();
    board.context.fill();
  }
  void move() {
    board.clear();
    draw();
    x += dx;
    y += dy;
  }
We have applied a fundamental principle called DRY (Don't Repeat Yourself, at least not in code).
In most games, the ball has to stay on the board, so let's try to bounce the ball on the board's edges. The code that lets the ball move is the move() method, so that is the only code that has to expand. For both coordinates, we now have to check the boundary that the ball will cross on the board's edge lines:
- For
x, this means that(x + dx)must not equal to> board.width (right border)or equal to< 0 (left border); if any of these situations do occur (that's why we use or:||), for example,if (x + dx > board.width || x + dx < 0),, the ball must change its direction (the value ofxmust decrease instead of increase and vice versa); this we can obtain by reversing the sign ofdx:dx = -dx; - For
y, this means that(y + dy)must not equal to> board.height (bottom border)and must not equal to< 0 (top border); if it does, for example,if (y + dy > board.height || y + dy < 0), the ball must change its direction (ymust decrease instead of increase and vice versa); this we can obtain by reversing the sign ofdy:dy = -dy;
Verify that this procedure works (although the movement is rather boring at this stage).
In this spiral, we add a racket that is displayed as a small, black rectangle. From the beginning of the code, we represent it through its own class in racket.dart. In it, we provide a constructor and the draw method that uses context.rect; the racket also has a reference to the board object.
part of ping_pong;
class Racket {
  Board board;
  num x, y, w, h;
  Racket(this.board, this.x, this.y, this.w, this.h) {
    draw();
  }
  void draw() {
    board.context.beginPath();
    board.context.rect(x, y, w, h);
    board.context.closePath();
    board.context.fill();
  }
}
To enhance the adaptability of the game, we start by defining a number of constant values upfront in the Board class:
 const num START_X = 0;
 const num START_Y = 0;
 const num BALL_R = 10;
 const num RACKET_W = 75;
 const num RACKET_H = 10;
These are used in the init() method to construct the ball and racket objects:
void init() {
    ball = new Ball(this, START_X, START_Y, BALL_R);
    racket = new Racket(this, width/2, height-RACKET_H, RACKET_W,RACKET_H);
       timer = new Timer.periodic(const Duration(milliseconds: 10),
             (t) => redraw());
   }
Since we now have to draw two objects, we rename the periodic function to redraw() and give the responsibility to the board object, which calls the draw methods on the ball and racket objects (lines (1) and (2)).
void redraw() {
    clear();
    ball.draw();              (1)
    racket.draw();            (2)
    if (ball.x + dx > width || ball.x + dx < 0) {
      dx = -dx;
    }
    if (ball.y + dy > height || ball.y + dy < 0) {
      dy = -dy;
    } else if (ball.y + dy > height) {        (3)
      if (ball.x > racket.x && ball.x < racket.x + racket.w) {
        dy = -dy;
      } else {
        timer.cancel();
      }
    }
    ball.x += dx;
    ball.y += dy;
  }
It also does all the checks for the boundary conditions and we add in line (3) that the ball is bounced (dy = -dy) only when it touches the racket (ball.x > racket.x && ball.x < racket.x + racket.w); if it falls outside the racket, the game is over and we cancel the timer, stopping the animation (line (4)). Due to the start location of the ball, the game-over condition does not occur in this spiral.
Here, the goal is to move the racket using the left and right keys of the keyboard. To this end, the racket will have to listen to key events; the following is the code of racket.dart:
part of ping_pong;
class Racket {
  Board board;
  num x, y, w, h;
  bool rightDown = false;            (1)
  bool leftDown = false;
  Racket(this.board, this.x, this.y, this.w, this.h) {
    draw();
    document.onKeyDown.listen(_onKeyDown);        (2)
    document.onKeyUp.listen(_onKeyUp);
  }
  void draw() { ... } // see Spiral 6
  _onKeyDown(event) {            (3)
    if (event.keyCode == 39) rightDown = true;
    else if (event.keyCode == 37) leftDown = true;
  }
  _onKeyUp(event) {              (4)
    if (event.keyCode == 39) rightDown = false;
    else if (event.keyCode == 37) leftDown = false;
  }
}
In line (2), we register for the KeyDown event and attach the handler _onKeyDown, which is also done in the following line for the KeyUp event. _onKeyDown and _onKeyUp are private methods that could have been used anonymously in the event definition. In these handlers, we test for the keyCode of the pressed key: the left arrow has keyCode 37 and the right arrow 39. We catch their state in two Boolean variables leftDown and rightDown: if the left arrow is pressed, we set leftDown to true and, when the right arrow is pressed, we set rightDown to
true (line (3)). In the KeyUp event handler in line (4) that fires when the key is released, the boolean is reset to false. As long as the arrow key is pressed, its corresponding boolean is true. This is tested in the redraw() method of the Board class, where the following lines are added before racket.draw():
    if (racket.rightDown)     racket.x += 5;
    else if (racket.leftDown) racket.x -= 5;
When the right arrow is pressed, the racket moves to the right and vice versa.
This is the first playable version of our game; but, we see that our racket can disappear and, perhaps, we want to be able to move the racket using the mouse as well.
To accomplish moving the racket using the mouse, we listen for a MouseMove event and attach the event handler to the racket constructor: document.onMouseMove.listen(_onMouseMove).
We also define two variables that define the canvas width:
      canvasMinX = 0;
      canvasMaxX = canvasMinX + board.width;
We use the preceding code statements to perform a test in the mouse event handler: if the x coordinate of the mouse pointer (given by event.pageX) is situated in our canvas, set the x coordinate of our racket object to the same value:
  _onMouseMove(event) {
     if (event.pageX > canvasMinX && event.pageX < canvasMaxX)  x = event.pageX;
}The goals for this spiral are as follows:
- The board should have a border.
- We want two rackets.
- The rackets cannot be moved outside the border.
The border is easy; call the border() method from init() to draw a rectangle around the canvas:
   void border() {
        context.beginPath();
        context.rect(X, Y, width, height);
        context.closePath();
        context.stroke();
      }
We add a second racket to the top of the screen, which moves synchronously with the bottom racket. Our board object will now contain two racket objects racketNorth and racketSouth, both of which are created in the init() method:
racketNorth = new Racket(this, width/2, 0, RACKET_W, RACKET_H);
racketSouth = new Racket(this, width/2, height-RACKET_H, RACKET_W, RACKET_H);
The code from Spiral 7 – moving the racket using keys is applied to both the objects.
The third goal is accomplished by adding a test to the MouseMove event handler:
  _onMouseMove(event) {
        if (event.pageX > board.X && event.pageX < board.width) {
          x = event.pageX - board.X - w/2;
          if (x < board.X) x = board.X;
          if (x > board.width - w) x = board.width - w;
        }
  }
By introducing an X constant for board, we have simplified the condition we saw in Spiral 8 – moving the racket using the mouse. The racket movements are now more synchronous with the mouse movement, and the last two if tests make it impossible for the rackets to go outside the borders of the board. Now we have a minimally decent game.
In this spiral, we add a title and a button to restart the game; both are done in HTML. The button is placed in a <div> tag outside the canvas:
<button type="button" id="play">Play</button>
We now change the constructor of board to only start init() when the button with the ID play is clicked: query Selector('#play').onClick.listen( (e) => init() );
That's it!
No new Dart code is added here, but we improve the display using CSS. Additionally, some relevant web links are added along with a section for each new spiral to indicate what is new. Take a look at ping_pong.html (in both the source and the browser) to learn how to use the document features of HTML5:
- The title within the screen is displayed in a
<header>tag. - The different parts of the document are placed in their own
<section>tag with an appropriate ID, such assideormain; sections can be nested. The two columns' layout design style is applied using thefloatproperty inlayout2.css. Thesidesection is the playground and contains a<button>tag to start the game, placed within a<footer>tag. The hyperlinks beneath it are placed within a<nav>tag; the design fromlink.cssuses a background image to better display the links. - The
<footer>tags are used to separate the different spirals at the bottom of the screen.
The preceding points are shown in the following screenshot:
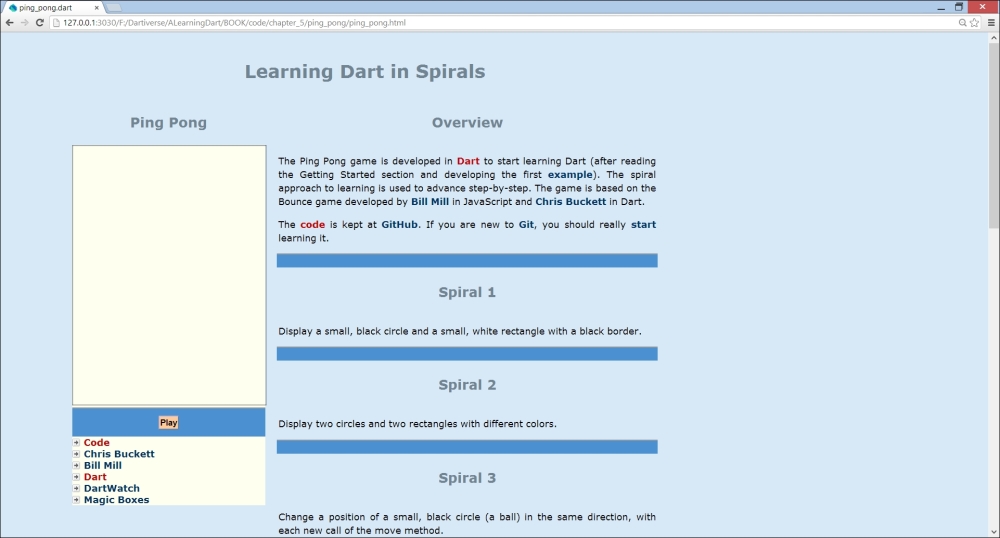
Ping Pong, the master version
As an exercise, you could decouple the rackets so that we have two independent players and then keep score of the game (see the DOM version of the game for inspiration). Also, place the timer interval in a variable if you want to change the game's difficulty level.